A drill is a device designed for creativity and handicrafts related to carving and grinding. This device is necessary for drilling holes, carving plexiglass, wood, metal, grinding various surfaces, and making engravings. Most often, all kinds of accessories for a drill are included with the device: drills, cutting wheels, polishing discs, felt, brushes, cutters. However, it is better to choose attachments for beginners yourself to make using them as comfortable as possible.
A drill is a device designed for creativity and handicrafts.
Wood carving drill or engraver: how to choose in the store?
A drill can have several other names: miniature drill, engraver. Most often, such devices are multifunctional, as they are complemented by a huge number of different attachments.
When purchasing a wood carving machine, you need to pay attention to the following characteristics:
- The shaft lock button and the trigger element should be located close to each other. This arrangement will allow the artist to quickly change his occupation without being distracted from his work.
- The average power of the device should be 180 watts.
- Torque should be averaged between 5000-35000 rpm. Many models offer the technician a choice of speed. A device with a function of working with reduced torque will be appropriate for making engravings.
- The weight of the device should not be too large, otherwise it will be difficult to use for a long time. The optimal weight is considered to be 400-600 grams.
- If you want to work in a place far from an outlet, you need to select a model with a battery.
An indication of the battery charge level brings a certain degree of convenience to the device. This function allows you to charge the device on time and not miss work deadlines. Therefore, in order to answer the question: which drill to choose, you need to evaluate the direction of your creativity and its requirements. Based on these indicators, the device that is optimal in its functionality is selected.
Homemade drill with a flexible shaft - Metals, equipment, instructions
Many home craftsmen are interested in the question of whether a drill can be made with their own hands. Solving this problem is not difficult, and the finished home-made device, despite the simplicity of its design, will be distinguished by fairly high efficiency and functionality.
Homemade drill based on a small-sized electric motor
A homemade drill will not cost much and will not cause any problems during manufacture. It will be useful in many situations, including when performing such technological operations as:
- drilling;
- drilling holes;
- processing of grooves and recesses of various configurations;
- engraving;
- polishing;
- cutting of plastic products;
- cutting non-ferrous sheet metal (aluminum, brass, bronze, etc.) up to 1.5 mm thick.
Grinding a metal part with a drill
The drill, made according to the instructions below, is distinguished by its compact dimensions, light weight and ease of use.
Such a device, made by hand at home, is equally successfully used to perform small and quite serious work with products made of various materials - metal, wood, plastic, bone, etc.
Such a drill is very useful in jewelry making, when repairing small items for various purposes, manufacturing and repairing electrical devices, and in many other situations.
Drill - characteristics, application, DIY production
For many, a drill is the embodiment of childhood horrors associated with visiting a dental office, and the sound it makes is one of the most unpleasant in the world. Meanwhile, if we consider it as a unique tool used in various fields, including the one that we have already mentioned, then, perhaps, it will not be found equal to it in a number of properties.
How to make an engraver for small jobs with your own hands?
If a master does not want to purchase an expensive device, he can make an engraver for small jobs on his own.
In Soviet times, craftsmen sometimes adapted decommissioned US-30 dental drills, which were faithful friends of the dentist and a nightmare for the patient, for engraving work or for wood carving. If a less powerful, but more compact option was needed, electric shavers from Berdsk or Kharkov were used. Nowadays, a homemade drill can also be made from an electric razor, for example, Philips.
Necessary components and their characteristics:
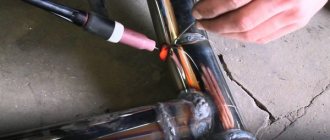
- A flexible shaft, as well as a working attachment, which will allow you to fix the device in its clamping mechanism. A cable can be used as a flexible shaft to activate the car's speedometer. The working nozzle is made of a textolite block: it is ground to the required dimensions and equipped with a stepped hole on the inside. The diameter of the hole is selected based on the dimensions of the fixed area of the cable: it must be securely fixed in it. The front nozzle area is equipped with a tube, inside of which is placed a freely rotating clamping chuck made of 2 halves, fixed to each other with a screw. A tool having a 2-5 mm shank diameter can be inserted into a balanced chuck.
- Tools for processing.
- A drive motor is any motor that operates at a voltage of 220 volts: from a tape recorder, washing machine, electric toothbrush. The best option is considered to be a motor from a sewing machine, since it is equipped with a rheostat that allows you to regulate the speed characteristics of the shaft.
During the work, you will also need an electric drill, a sharpening machine, and a set of plumbing tools. Do-it-yourself assembly of the device is carried out on the basis of the following drawings.
Assembling a drill
After preparing all the structural elements, you can begin assembling the device.
A homemade device is made according to the following instructions:
- The first step is to make a simple base frame. This base will allow you to securely fix all the elements of the device. In the manufacturing process of this element, a textolite or thick plywood sheet can be used. A piece of the required size is cut out of the material.
- According to the arrangement of elements, an electric motor and a bracket equipped with a clamp are attached to the base. The latter will serve as the basis for fixing the rear tip of the flexible shaft.
- Pulleys taken from unnecessary household appliances are fixed to the electric motor shaft, the movable core of the flexible shaft. To perform fixation, holes are made in the flange area of the pulleys, as well as on the shafts, necessary for placing the pins. You can make connections more reliable using epoxy resin.
- Then the future drill is equipped with a rubber belt. This element is installed on the pulleys of the flexible shaft and electric motor.
- The motor is connected to the electrical supply.
- The working nozzle is fixed on the front end of the flexible shaft.
After preparing all the structural elements, you can begin assembling the device
To ensure safe operation of the tool, a plywood casing is required for the electric motor and belt feed. Before starting work, it is necessary to test the serviceability of the manufactured device.
Principle, features of work
A self-made engraver resembles a drill or a grinding machine. However, its main purpose is considered to be the processing of small parts. A homemade hand engraver allows you to perform the following actions:
- drill;
- mill;
- polish;
- engrave.
Soft woods, hard steel, ceramics, glass with a high level of fragility, plastic, and bone can be selected for processing. During the processing process, it is necessary to use various attachments that are selected for each specific material.
A machine made according to the instructions described above will work according to the following principle:
- With the help of pulleys and a rubber belt, electric motor rotation is transmitted to the flexible shaft area.
- It is sent via a flexible shaft to the working attachment.
- The working nozzle processes the fixed element.
This tool can be made using a different scheme. It requires connecting a flexible shaft to an electric motor using an adapter coupling. Fixation occurs according to the following scheme: one tip of the coupling is mounted on the electric motor shaft and secured with a pin, the movable tip of the flexible shaft is fixed in a square hole located at the other end of the coupling.
Shell options
If, in order to make a clamping device, you need to go to Aliexpress or another similar portal in search of a collet chuck, everything is much easier with a casing. To create it, you can use trash that is usually thrown away.
Let's look at several variations.
- A bottle of antiperspirant deodorant . Individual plastic containers perfectly fit the dimensions of the motor from an audio recorder or CD player. In a situation where the engine is slightly larger in size, it should be inserted with slight tension. You need to cut a hole in the cap of the antiperspirant bottle to remove the collet cartridge. For greater practicality, at the very bottom you can put a socket for connecting a power source, and on the side there is an on/off button. This makes it possible to keep the drill away from the block.
Cones, attachments, cutters: which ones are suitable for a beginner?
Working accessories used to work with an engraver are characterized by their wide variety. To make the right choice when selecting nozzles, you need to consider several factors:
- features of the processed material;
- technological tasks.
Engravers who work with the device constantly recommend purchasing a set of attachments at once, which includes items of various sizes, types and purposes. At the first stage, a novice engraver will need a small set of tools, including a couple of dozen elements of various types.
Diamond and abrasive burs
Most often, engraving machines are equipped with diamond burs. The main feature of this tool is that the main part of the body is made of tool steel, and its working surface is covered with a layer of diamond powder. Another name for this tool is a cutter. Diamond burs are necessary for processing hard surfaces.
Most often, engraving machines are equipped with diamond burs
Most often they are used when working with the following materials:
- glass;
- steel;
- ceramics;
- stones.
Most often, cutters are used for finishing shaped holes. Basically, these elements are sold in sets that include 10-20 tools.
A more budget-friendly option are roller cutters with a working surface made of rubber and abrasive material. They are used for metal work. You need to use abrasive cutters for boring holes and grinding. The capabilities of these tools are optimal only for beginners.
Other attachments
Milling cutters for beginners should be selected in small sizes. With their help, the engraving will have a neater appearance. Most often, for beginners, sets of cutters are offered, consisting of 4-6 elements of various shapes: cylindrical, end, worm, conical, end. Large kits should only be purchased by experienced craftsmen.
You will also need a drill during the work process. This tool is necessary for cutting through the design. Most often it is used to make the outline of a picture and the main elements of the background.
If you need to make holes, you need to purchase a set of drills. This accessory will turn your drill into a drill. If an artist needs to regularly clean the surfaces being treated from corrosion and other dirt, he needs to purchase wire attachments.
Clamping mechanism
The next important component of the device is the chuck used to hold the drill. To make a clamping device, you must first purchase a collet chuck . It is a clamping device capable of firmly holding cylindrical objects. Having secured the drill in the collet chuck and firmly clamped it on the motor axis, you just need to connect the power supply or batteries to the motor.
This simplified version of a mini-drill is already capable of drilling holes.
If you do not want to burden yourself further, and you will not use the tool very often, you can leave it as is.
However, holding the “naked” motor in your hands is uncomfortable, and the mini-drill looks unattractive. To bring what you started to the finish line, you will need a shell and separate control components.
Manufacturing of percussion-rope drilling rig
A tripod with a bailer is a simple design, like everything ingenious. Its dimensions can be estimated “by eye”; particularly precise engineering calculations are not needed here. For example, the height of the tripod on which the bailer will be attached should be about a meter greater than this drill.
If drilling work is carried out in the basement of a house, the size of the structure will be limited by the height of the ceiling.
Impact-rope drilling is performed using a heavy projectile - a bailer. It is thrown down from a height, the soil collapses and fills the cavity inside the bailer, after which the device is removed and cleaned
In an open space, the bailer can be hung higher to increase the impact force. But don't make it too high, it's not effective. The bailer itself should be quite heavy. To effectively loosen the soil, it is better to make notches on its sole or grind off a sharp edge.
The optimal length for drilling is considered to be between 1.8 and 2.2 meters, so that the driller can freely reach the top of the drill to attach or disconnect the cable. However, in manual drilling, the best bailer length is considered to be 1.0 - 1.2 m. This size allows you to reach the bottom of the projectile with your hand if it does not empty when loam sticks, for example.
In cable percussion drilling, a bailer with a length of about 1.2 - 2.0 meters is used. The projectile must be heavy enough to break up the soil and pull it to the surface in large quantities
A bailer is most often made from a piece of metal pipe; the desired metal thickness is 4 - 6 mm.
To make such a drilling device, the following operations should be performed:
- Prepare a piece of pipe of suitable size.
- Make a valve at the bottom of the projectile.
- Weld a protective mesh on top.
- Boil the handle or “ears” to secure the rope.
- Sharpen the bottom of the projectile or weld several “teeth” from pieces of metal or pieces of thick wire.
- Make a tripod from metal pipes.
- Install a block, winch and engine to lift the projectile from the shaft.
- Tie a rope to the bailer and assemble the structure.
The bailer valve deserves special attention. Small diameter projectiles use a ball valve. A metal ball with a diameter slightly larger than half the diameter of the bailer is suitable for its role.
If a suitable ball is not found, it can be made from scrap materials. For example, for these purposes a mixture of lead shot and epoxy resin is often used; the role of the casting mold is played by some kind of children's ball made of plastic or rubber.
The reed valve of a bailer consists of a round piece of metal that closes the gap at the bottom of the glass, as well as a spring that holds it closed.
A washer with a hole whose diameter is smaller than the size of the ball is welded at the bottom so that it does not fly out. For the same purposes, a stopper is placed at the top, at some distance from the protective grille - a piece of metal that limits the upward movement of the ball. A wire grid prevents large pieces of soil from falling out of the bailer.
The valve ball must not fall below the level of the pointed edge or metal teeth, otherwise it will absorb the force of the impact. On the other hand, the “teeth” should not be made too long, otherwise they will not allow part of the soil to get inside the bailer.
A window is cut out in the upper third of the bailer body. It will be needed when a full bailer needs to be cleared of soil that has accumulated inside.
To make a ball valve for a bailer, you need a metal ball with a diameter of about 60 mm. Such an element can be removed from a large bearing
Another valve option is a petal valve. It is made from a piece of metal. The reed valve looks like a round door attached to a spring at the bottom of the bailer. When the projectile moves downwards, the valve opens under soil pressure, and then the spring closes it and holds the soil inside. Sometimes such a valve is sealed with a piece of rubber, but this is not necessary.
If, when drilling with a homemade bailer, it turns out that it captures too little soil, you may just need to slightly correct the design. Sometimes you need to open up the clearance a little at the bottom of the device. If the projectile turns out to be too light, it should be weighted down.
To do this, the upper part of the bailer is sometimes filled with concrete. But you can simply attach an additional load on top on a movable joint.
A tripod for impact-rope drilling can be made from a metal pipe, but for short-term use, durable wood, for example 150-200 mm timber, is also suitable
On viscous soils, a type of bailer without a valve may be effective. Dense soil is packed inside the projectile and held there naturally. Such a device is cleaned through a narrow vertical hole on the side.
If possible and necessary, you should make two different bailers to use them on different soils. The bailer is also used to clean the finished well from sand and dirt. But in this situation there is no need to make such a large projectile; a device about 0.8 -1.0 meters long will do.