Modern technologies require high precision in the production of various technical products. This parameter is achieved through the use of various measuring instruments.
The article provides a detailed description of the micrometer, its varieties, types, and areas of use. Instructions will also be given on how to use the micrometer and how to set it up correctly, as well as store it.
Purpose
A micrometer is used to measure quantities such as thickness, diameter, width, cross-section, depth of various objects. Depending on the type and purpose of the device, measurements are available from a few centimeters to microns.
Such devices are used for designing, creating, and repairing various technical parts, devices, and technological projects.
Device
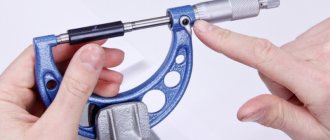
Despite the many varieties of micrometers, the device retains its basic design details. The micrometer consists of the following parts:
- Diametric bracket. This is the base of the micrometer. It is used to place the item being measured.
- Fixed sponge. Placed at the end of the bracket to hold the part motionless.
- Movable sponge. It is she who presses the object for measurement.
- Threaded clamp. Used to fix the movable jaw.
- Calculation scale with markings stamped on it. One side of the scale is divided into centimeters, the other into millimeters. Depending on the type of micrometer, the graduations may be smaller or larger.
- The cylindrical drum is also the moving part of the micrometer. This part is marked in microns.
- Ratchet. Necessary for fixing the sponge without pressure. The ratchet assembly prevents deformation of the surface of the part being measured during strong clamping.
This is a standard micrometer device. Different types of this device may have additional or modified parts. Next, the main types of micrometers and their areas of use will be described.
CONTROL AND TEST METHODS
4.1. Micrometer verification - according to MI 782-85.
4.2. The impact of environmental climatic factors during transportation is checked in climatic chambers. Tests are carried out in the following mode: at a temperature of plus (50±3) °C, minus (50±3) °C and at relative humidity (95±3)% at a temperature of 35 °C. Exposure in the climate chamber in each mode is 2 hours. After testing, the micrometer error and the parallelism of flat measuring surfaces should not exceed the values established in clauses 2.1.1.3 and 2.1.1.4.
4.3. When determining the influence of transport shaking, an impact stand is used, which creates shaking with an acceleration of 30 m/s² and a frequency of 80-120 beats per minute.
Boxes with packaged micrometers are attached to the stand and tested with a total number of impacts of 15,000. After testing, the micrometers must meet the requirements established in clauses 2.1.1.3 and 2.1.1.4.
Varieties
Every year the design of various parts becomes more and more complex. Various types of micrometers are used for precise design.
There are 4 main types of device according to the measurement method and the function of issuing the final result:
- Analog micrometer. The simplest and most common device. This micrometer is completely mechanical. The measurement result is controlled using markings on the scale and drum.
- Pointer or lever. Almost similar to its mechanical counterpart. It is distinguished by the presence of a pointer dial. The display is marked in microns and also shows the degree of pressure on the object being measured. These micrometers are highly accurate.
- Electronic. These micrometers are similar in design to mechanical models. A special feature is the presence of a display on which the final measurement result is displayed. Such devices also have a memory function; they can be configured for calculations in the smallest parameters.
- Laser device. It is the most accurate and technologically sophisticated. In addition to the main function, it can calculate the most minor curvatures, deviations, and surface abrasions.
Next, we will look at what types of micrometers there are according to their area of use. The scope of application makes some adjustments to the design of this measuring device.
- Smooth. Using these devices, the diameter and cross-section of an object are measured.
- Pipe. They are used to calculate the difference between diameter and wall thickness. Often used to control the corrosion layer.
- Micrometer "tooth gauge". It is used in gear design. Using a gear gauge, the size, thickness, and depth of gear teeth are measured.
- Sheet micrometers. Necessary for measuring the thickness of thin sheet steel.
- Wire meter. Using it you can measure thin rods, wire, and balls of small diameter. Structurally, it differs from a mechanical device only in the absence of a bracket.
- Universal. It is equipped with special movable attachments, which significantly expands the scope of its intended use.
- Prismatic. The prism-shaped bracket allows you to measure parts with an angular or triangular cross-section.
- Depth gauge. Allows you to control the internal size of the part. Used to measure the depth of holes.
- Thread gauge. Used to measure metric and inch threads on fasteners.
- Double or paired. Necessary for measuring parts with several surface levels.
- Bore gauge. Just like depth gauges, they are used to control the depth of a part. They are distinguished by higher accuracy and the ability to measure the depth of a hole with a small cross-sectional diameter.
All the described varieties are similar in the principle of working with them.
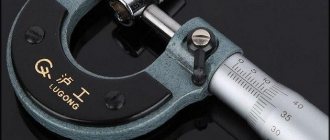
Micrometer design
Manufacturers offer a couple of designs of this type, which perform certain actions and are an improved model. The most common micrometer design looks like this.
The first thing you should pay attention to when considering this unit is the metal bracket, which is made in one size and does not change its parameters.
- This part is equipped with a metal heel at one end and a screw at the other.
- It is designed in such a way that the distance parameters between them are displayed on the digital scale of the device.
- If you secure the screw before measuring the part, you can get its exact diameter. Which will be displayed on the scale.
- The peculiarity of the unit is that it is a contact version. Those. compresses the measuring material tightly enough. Therefore, it is not suitable for soft fabrics.
To prevent the system from malfunctioning, the device is equipped with a lock. It is made in such a way that if you come into contact with it, you can avoid any damage to the micrometer, from unscrewing the screws to shifting the measurement parameters. Therefore, the unit shows the most accurate value, down to the millimeter.
Setup instructions
Before you learn how to use a micrometer correctly, we suggest that you familiarize yourself with several nuances in preparing the device for use.
Setup and calibration
Before starting to measure a part, you must ensure that the calibration is accurate. This requires:
- Clean the surface of the tool jaws. To do this, place a blank sheet of plain paper between them. The jaws are clamped under slight pressure. Next you need to remove the sheet. The operation must be repeated several times. This removes dirt, grease and moisture. It is prohibited to use hard rags or sandpaper for this purpose.
- To set up the device you need to use a standard. Each similar tool is equipped with such a part. The reference workpiece must be clamped between the jaws, fixed using a ratchet mechanism and checked for alignment of the mark with the size of the standard.
If the indicators differ, the tool will have to be adjusted. To do this you need:
- Loosen the movable jaw and remove the reference sample.
- Combine the jaws again until they stop without applying pressure.
- Check how zero risk is combined.
- If there is no alignment, you need to fix the position of the jaws.
- Loosen the ratchet mechanism.
- Scroll the drum until the zero marks align.
- Secure the ratchet mechanism with the fastening screw.
Thus, all parts of the micrometer are brought into alignment with zero. This calibration will help you measure with a micrometer as accurately as possible.
Operating instructions
Measurements with a micrometer should begin by setting the most convenient position for the instrument. It can be held in your hands, or firmly secured in a vice. Next you need:
- Place the part to be tested in the tool bracket.
- Squeeze using a movable sponge until it stops. Do not clamp under high pressure.
- Turn the ratchet mechanism as far as it will go, but without applying excessive pressure.
- Secure the position by moving the clamp to the closed position.
- Look at the combination of marks.
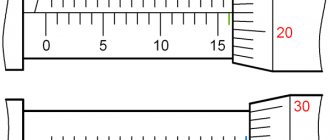
The micrometer readings are read as follows:
- The stem of the instrument has a main and an additional scale. The main one is marked in large quantities and is located below. On the additional one, risks of small value are displayed, its position is above the main scale. The main ones are the risks of the main scale with digital marks.
- The drum has a scale with marks calculated in hundredths of a millimeter.
- First, the integer numeric value of the lower scale is determined. If the line stops near the number “5”, then the whole number is equal to 5 millimeters.
- Then you need to add the number from the top scale to this value. The markings on it have values in fractions. If the risk stops before the mark, its value is not taken into account, and if after, then it must be added to the main result. For example, if the mark has passed by one division, it will be equal to 0.5 mm.
- Next you need to determine hundredths. To do this, you need to remove the values from the drum.
- The drum line is aligned with the central strip between the 2 scales on the stem. For example, the value is 50.
- The final calculation is carried out by adding all the data: 5+0.5+0.5=6 mm.
Working with a micrometer is quite simple if it is accurately calibrated and has a flat surface on both jaws.
A micrometer for internal measurements is used in a different way. Its movable jaw is placed in the hole until it stops. Next, you need to align the tool stem with the surface of the part. After alignment and stop, the stem is fixed with a ratchet, and the resulting data is read. The reading method is completely identical to the description in the instructions.
Storage
The micrometer is a very fragile instrument. It must be stored following the following rules:
- Be sure to store it in the protective case that comes with the tool.
- Storage in high humidity conditions is prohibited.
- It is necessary to monitor the condition of the jaws and moving parts.
- If necessary, carry out regular cleaning, calibration and lubrication.
- It is prohibited to throw or drop the device.
The following will describe: how to choose the right device; the best models for use in everyday life and industry.
Rating of the best micrometers (TOP 5 manufacturers)
Based on reviews from ordinary customers and specialists, a list of the best devices was compiled:
- FIT 19909;
- Bison “Expert”;
- MCC 25 GRIFF;
- Sheet micrometer ML-25;
- ASIMETO 152-01-0.
Devices
Before choosing a micrometer model, you need to know exactly for what purposes it will be used. The best choice, of course, would be a universal type model. It is suitable for measuring parts of almost any shape. It is also worth considering the type of reading. It is better to choose currently available digital devices. They provide results without the need for calculations from all instrument scales.
Calibron MKTs-50
Model from Chinese manufacturers. It is a type of smooth electronic micrometer. A special feature is a wide range of configuration and calibration functions. There is a screen backlight, a memory function, and an energy saving mode. The tool allows you to measure external diameters and sections.
Advantages:
- High accuracy.
- Measurement within 5cm.
- Memory mode.
- Build quality.
This model can be used as a household tool.
Expert MK-25
Russian model of a smooth mechanical micrometer. It is distinguished by the possibility of absolute measurements up to 2.5 centimeters in increments of 0.1 mm. Can be used to control pipe thickness. A special feature is the build quality, stainless alloy from which the device parts are made.
Advantage:
- Average price.
- Build quality.
- Ease of use.
Such a device can be used for technical work in workshops and industries.
Norgau NMD-165D
High precision smooth type digital micrometer. Available measurement threshold up to 25 mm. A special feature is the ability to independently release pressure when the jaws are tightly coupled. There is a memory function, wide calibration settings.
Advantages:
- Data accuracy.
- Pressure release.
- Clear fixation.
- Average price.
The tool is characterized by a long service life, build quality, and high functionality.
ACCEPTANCE
3.1. To check the compliance of the micrometer with the requirements of this standard, state tests, acceptance control, and periodic tests are carried out.
(Changed edition, Amendment No. 1).
3.2. State tests - according to GOST 8.001-80* and GOST 8.383-80*.
* PR 50.2.009-94** is in force in the Russian Federation.
** The document is not valid on the territory of the Russian Federation. The procedure for testing standard samples or measuring instruments for the purpose of type approval, the Procedure for approving the type of standard samples or the type of measuring instruments, the Procedure for issuing certificates of approval of the type of standard samples or the type of measuring instruments, establishing and changing the validity period of these certificates and the interval between verifications of measuring instruments are in effect. , Requirements for approval marks of the type of standard samples or the type of measuring instruments and the procedure for their application, approved by Order of the Ministry of Industry and Trade of Russia dated November 30, 2009 N 1081.
3.3. During acceptance inspection, each micrometer is checked for compliance with the requirements of clauses 2.1.1.2, 2.1.1.3 (except for checking changes in readings due to bending of the bracket), 2.1.1.4-2.1.1.6, 2.1.1.8-2.1.1.12, 2.1.1.15, 2.1 .1.17, 2.1.1.18, 2.1.2.2-2.1.2.5, 2.1.3.3, 2.1.4.1, 2.2, 2.3 and 2.4.
3.4. Periodic tests are carried out at least once every three years on at least three micrometers of each type and accuracy class from those that have passed acceptance control for compliance with all the requirements of this standard. The test results are considered satisfactory if all tested micrometers meet all tested requirements.
(Changed edition, Amendment No. 1).
3.5. (Deleted, Amendment No. 1).