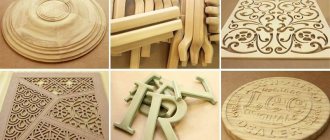
Inserting a lock into a wooden interior or entrance door is one of the most critical processes when installing this enclosing structure. The outdated technique of gouging out grooves with a chisel and hammer is a thing of the past. Today, professionals actively use special electrical appliances – milling cutters. To achieve the expected result, you need to know exactly which router to cut the lock into the door.
Mortise a lock using a hand router
Types of milling cutters
To insert locks into wooden door panels, hand-held milling cutters are used, which are fixed at the end of the structural element and the material is sampled strictly in the specified location. Milling cutters that are widely available are divided into the following basic types:
- Vertical, or submersible, is the most popular tool - the cutter is positioned strictly perpendicular to the plane being processed, the immersion depth is determined by the master by applying force to the spring mechanism on which the device is fixed.
Vertical router
- Edge, or edging - miniature cutters, as well as the high-precision movement of the device, allow you to perform filigree work on processing the edges of a wooden door leaf with an accuracy of tenths of a millimeter.
- Combined - one of the most popular devices among professionals - the design combines two types of milling cutters - vertical and edge, which allows for complex processing of the blade when inserting locks of any complexity.
- Special-purpose, dowel, lamellar - purely professional machines that are designed to perform any one technological operation.
Edge router
Residents should take into account that the purchase of milling cutters with a set of working parts does not guarantee high quality of blade processing and accuracy of inserting locks, since the master is required to comply with the technological map and have extensive experience working with the equipment.
Types of manual milling machines
On the modern market, manual milling units are represented by electrical equipment of the following categories:
- devices of a vertical or submersible type, which are mostly used for cutting grooves of various depths and widths (a common representative of a power tool in this category is a milling cutter for inserting hinges and locks);
- edge milling cutters, which are also called edging cutters (power tools of this category are used to perform decorative processing of the edges of products made from wood);
- combined type milling machines, used to a greater extent in the professional field (they are called combined because they combine the capabilities of edge and vertical type milling machines);
- power tools for special purposes, the most common types of which are lamella and dowel milling cutters (as the name of the category of such devices implies, they can only be used to solve a specific technological problem).
Classification of cutters
When purchasing a router, you also need to additionally purchase cutting tools (cutters) with the required edge and design. These removable parts are divided into several categories:
- Grooved - designed for making grooves, gutters and other extended or deep recesses, they are classified into several types:
- Structural – classic cutouts allow you to make even cuts with orthogonal edges.
- Straight - perform straight cuts.
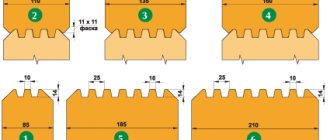
Slot cutters
- Fillet - used for making deep holes.
- Edge - ideal for cutting complex grooves for lock plates, or for forming artistic patterns on the canvas. Classification:
- Straight - allow you to process a straight edge on the canvas.
- Disc – designed for sampling and processing the rebate plane.
- Horizontal - an indispensable tool for finishing each edge before installing the lock in the resulting groove.
- Curved - a thin working body allows you to process any type of surface, regardless of its shape and dimensions.
Edge cutters
- Figurative - designed for finishing the edges or faces of a sample of the main volume of wood, suitable for any curved surface. Classification:
- Horizontal - supplied in the form of a disk, designed for finishing grooves of small depth.
- Vertical - have a small diameter and large depth, easily penetrate into the deepest grooves for finishing the edge.
- One-sided - allow you to process the plane only in the contact area.
- Double-sided - a universal tool with a cutting edge along the entire perimeter of the cutter.
Figurine cutters
Experts recommend purchasing cutters from well-known manufacturers, made of alloy steel with high-quality soldering and laser sharpening. All high-tech devices from reliable suppliers are supplied with a quality certificate indicating the warranty period for trouble-free operation.
Which router is better to buy for your home?
If you plan to work on wood without excessive loads, it is quite enough to purchase an entry-level model. In addition to saving money, the relatively low weight is useful, which simplifies handling of the equipment. But you should correctly assess the significance of larger investments when purchasing professional-grade equipment. With this choice you can count on the following advantages:
The presented rating of the best routers for professional work and at home is recommended to be used taking into account the characteristics of future operation. The distribution of positions in the list is made on the basis of a comprehensive technical analysis after studying customer reviews and evaluation by professional experts.
Source
How to choose the right tool
When purchasing a router for inserting a lock into wooden door leaves, you need to take into account a number of important nuances:
- The natural material is easy to process, which is why the master does not need a high-power machine. The average equipment performance is no more than 2.5 - 3.5 kW.
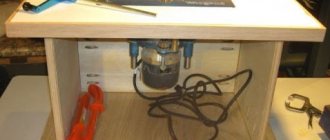
Household hand router
- To avoid complex manual reworking of the grooves after sampling the material with a milling cutter, it is necessary to purchase in advance a machine with the required stroke amplitude of the working head. Experts recommend choosing this parameter with a slight margin.
- The weight of the device should be such that the master can easily move the router with both hands.
- The standard electrical cord must be covered with elastic rubber insulation and be of sufficient length for comfortable use.
- The functionality and number of modes of the router must fully satisfy the operational requirements for it.
Operating modes of power tools
- The power tool must be equipped with a removable working head to allow quick replacement of cutters with different diameters and characteristics.
- The device must provide a complete, unobstructed view of the plane being processed.
One of the most important parameters for choosing a reliable car is the popularity of the brand, the year the company was founded, as well as the presence of positive reviews about the brand’s products on the Internet.
Briefly about the main thing
To cut a lock with a router or hang hinges on a door, you need to choose the right tool. It is best to use a simple submersible model, since the combined model is heavy. This will create certain inconveniences, especially if there is no experience in such wood processing.
Using a router to cut in fittings is easy. But the process is greatly simplified if there are special templates. Having placed the device in the desired place, all that remains is to set the required processing depth on the tool and install it on top.
When working, you need to carefully monitor the process in order to notice overload in time. It can occur if the wood structure is too hard. Then you just need to reduce the speed of the tool using a special switch on the body.
What auxiliary tools are needed to select grooves for locks?
In addition to the router, the home craftsman will need a number of additional hand tools:
- To mark the door leaf:
- Laser or standard tape measure with steel blade.
- High precision carpentry corner.
- Construction metal ruler with a blade length of 1000 mm.
- A simple pencil or marker.
Markup Tools
- To fix the door leaf:
- Place a soft layer on the workbench or floor to prevent damage to the end of the door leaf during operation.
- A slipway for fixing the product in the desired position.
- Clamps for clamping the door leaf after installation on the slipway.
Clamps for fixing the canvas
- To select material for installing a lock:
- 2 or 3 replaceable heads with collets for the router.
- A set of cutters of all categories described above.
- To refine the sample after cutting with a router:
Set of cutters
- A chisel with a narrow cutting edge.
- A hammer with a hammer weight of up to 300 - 500 g.
- A file with a coarse abrasive.
- Sandpaper for finishing grooves.
- To fix the lock in the body of the canvas:
- Set of self-tapping screws.
- Drill with a thin drill bit for marking holes for self-tapping screws.
- Screwdriver with variable rotation speed and a set of bits.
- A hand-held slotted or Phillips screwdriver for tightening self-tapping screws.
Screwdriver with a set of bits
All tools must be of high quality, well sharpened, free of dirt and oil stains, and ready for work.
Furniture hinge insertion
To select a large-diameter blind hole with a hand router, you need to make a template yourself. It has a stop bar, thanks to which the tool can be easily positioned on the furniture door. It is done very simply.
Milling for a furniture hinge Source amazon.com
A rectangle with sides 280×140 mm is cut out of plywood 4-5 mm thick. Divide the width in half and draw a line. We retreat 70 mm from the corners along one of the sides along the length and also connect these points with a line. At the intersection we drill a hole with a diameter of 51 mm.
We select a wooden plank for support. Its length is 140 mm, and its cross-section is 5×30 mm. We place the stop at the very edge of the hole, stepping back from the edge of the rectangle by 15 mm. We attach the plank with glue and small nails. The template is ready.
The depth is set on the router to 11.5 mm. The template is applied to the furniture board, and the strip rests against its end. And in several passes the groove is selected. In this way, a blind hole is made for a standard furniture hinge with a 35 mm cup.
How to properly set up a router
Before you start working with the router, you need to prepare it for work by performing the following steps:
- The router is mounted on a frame, which is fixed to the plane of the door leaf using clamping clamps.
- The main pin, which is responsible for moving the device in the frame, is loosened manually.
Setting up the router
- The required cutter is inserted into the working head of the milling cutter, which is clamped on the collet.
- The cutter with the working head is carefully lowered to the required depth, depending on the type of plane being processed.
- On the scale responsible for the position of the cutter and the depth of the excavation, the position “0” is set.
- The bed clamping screw is firmly fixed together with the router in the selected position.
Router bed position
One of the most important preparatory stages for work is choosing the number of revolutions of rotation of the cutter. This parameter is determined individually, depending on the type of wood. For pine, 2 - 3 thousand revolutions per minute may be sufficient, and for oak or teak, the rotation speed must be doubled.
Vertical power up to 1200 W
A necessary tool for the workshop, capable of immediately replacing a plane, drill, or engraver. Selecting grooves for hinges and locks will become a minute task with models of low power and light weight. The Top 3 popular options in this group included milling cutters from manufacturers in Germany, Japan and Russia.
1Bosch POF 1200 AE
A small and inexpensive router is suitable for novice craftsmen and owners involved in construction and finishing on their own. Mostly designed for soft wood and simple work without maximum processing precision. The ability to adjust the speed will make it easier to work with different types of materials. The manufacturer took care of stepwise switching from 11,000 rpm to 28,000 rpm.
Specifications:
- power: 1200 W;
- adjustable rotation speed from 11000 to 28000;
- processing depth: 55 mm;
- weight: 3.4 kg.
Pros:
- mills not too hard materials well;
- has low weight;
- affordable price;
- You can connect a vacuum cleaner.
Minuses:
- weak guides;
- high noise level.
You can purchase a device that costs about 6,000 rubles at most power tool stores.
2Makita RT0700CX2
Functional device with 3 bases, significantly expanding the range of applications. There is the possibility of edge processing, grooving and copying work with parts. In addition, the Japanese manufacturer took care of the users and offered the best option for completing the tool with a large number of attachments, the ability to connect a vacuum cleaner, as well as replaceable handles and a storage bag.
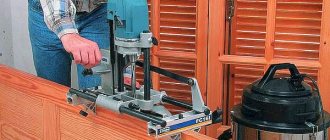
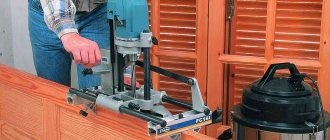
Preparing the door leaf
Before starting work, after debugging the router and installing the required working element, it is necessary to prepare the door leaf for work. To do this, you will need to perform a number of steps in accordance with the following algorithm:
- The canvas must be freed from old locks, handles and hinges.
- The best solution would be to install the product to be processed on the opposite end plane.
- Before starting milling, it is recommended to secure the door with clamps or in a vice.
Fixing the door leaf
- Considering that the router has a mass of 3 kg or more, before starting work it is recommended to install the end of the door to be processed so that the router is in a horizontal position and lowers partially under the influence of its own weight.
After fixing the door, it is recommended to apply force to it to check that the position remains unchanged. If the blade becomes skewed or falls during milling, the working element can cause irreparable damage to the wood.
Assembly and adjustment
All that remains is to finally assemble the lock, adjust its operation if necessary, and finally secure all the fasteners. It’s worth noting right away that you don’t need to be too zealous with fasteners, especially in those locks where parts of the device are fastened together from different sides of the blade. Tightening the screws too hard can deform the housing, and the locking mechanism will be difficult to work, even jamming.
Since the latch is already in the right place, it is necessary to insert the handles. The first step is to install the handle with mounting screws, which must be unscrewed before installation. After this, the handle is inserted with its square axis into the hole in the lock and into its own hole in the blade until it stops.
The other handle in modern models is often fixed on a cylindrical body and has a removable decorative strip. First, the handle and decorative strip must be removed from the body by recessing the latches, and only then the body is installed in the corresponding hole in the canvas towards the square control axis from the opposite handle, and is pushed onto this axis until it stops. Then the mounting screws are inserted into the holes, and with them the two sides of the handles are fastened to each other.
Now all that remains is to return the decorative strip and handle to the body, recessing the latches on the body. They are threaded onto the body until the latches come out of the recess into the fastening grooves of these elements.
The installation of the locking device is complete, and you need to adjust the free play of the lock mechanism and its smooth operation. This can be checked by turning the knob. It should move easily and without gaps, and after being released it should immediately return to its place. In case of heavy movement or jamming, it is necessary to loosen the fastening screws a little. On the contrary, if there are extraneous sounds and play in the mechanism, then the fastening screws need to be tightened deeper.
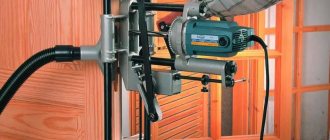
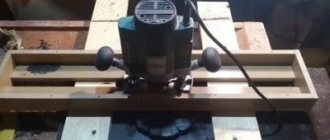
Rules for working with a router
To cut a lock into a wooden door with a router yourself, you must follow all the steps in the following step-by-step instructions:
- The door leaf is fixed in the desired position, in a vice or with clamps.
- The plane to be processed should occupy a horizontal position and be located at a height of no more than 1 - 1.2 m from the floor.
Installing a router on a door leaf
- Before milling begins, the door leaf is marked using a ruler, tape measure, carpenter's corner and a simple pencil.
- To mark places for installing radius pads, it is recommended to use these steel parts as templates.
- The router is fixed above the plane being processed using its own clamps.
- The power tool is set to the required groove depth.
- The device is connected to the network, after which the master performs a sample in strict accordance with the pre-applied markings.
Marking the door before processing
- Upon completion of the work, the router is dismantled, and the master fits the lock into the resulting groove.
- If the dimensions do not match, the edge is refined with small cutters or a well-sharpened chisel with a narrow blade.
- A lock is fixed into the prepared hole, which is subsequently secured with self-tapping screws.
After inserting and installing the lock, you must immediately hang the door on the hinges, and then check the softness of movement and locking of the door panel; if any inconsistencies are detected, it is recommended to correct the position of the lock by additionally modifying the cut in the door with a router.
How to embed hinges with your own hands
Setting up a router comes down to two steps:
- setting the cutter to the required depth according to the thickness of the loop;
- if the sample is made with fixtures, install a parallel stop or a double-sided template to the required dimensions, exactly according to the width of the sample.
The cutter can be easily adjusted in depth using the following technique:
- The clamp for fixing the platform in height is released, and the router is placed on a flat surface.
- A loop is placed on the platform strictly horizontally (without lifting due to the bushing).
- The router is lowered so that the cutter touches the loop.
- The position is fixed.
The loop can be placed not under the cutter, but on the depth limiter regulator on the platform, then everything is the same.
The loops are placed at the location. The main thing is to maintain the alignment of the loops, the axes must be on the same line. If the hinge axes are fixed crookedly relative to each other, when opening/closing the door the hinges will break off, the door will open tightly or not close completely.
To control alignment, you can use a flat corner or block, the length of which is enough for 2 loops. The dimensions to the edge of the door leaf at both ends of the marking are also verified, that is, both hinges must be strictly parallel to the door leaf and located at the same distance from the edge.
The contour is marked by cutting through the perimeter with a sharp chisel, mounting knife or chisel. A deep slot is desirable, then the laminate will not tear during sampling. The marking must remain on the canvas, since it is initially applied outside the loop.
There are loops with rounded and right corners on sale. The cutter leaves a semicircle at the corners of the sample. If the loop is rectangular, the roundings at the corners of the sample are selected using a chisel.
Ideally, the loop should not dangle in the niche, but should sit tightly under light blows of the hammer.
The fit on the door frame (post) is marked and selected in the same way. The whole process can be seen clearly and clearly in the video below; it shows the complete insertion process, and sampling on the box (stand) starts from the 15th minute.
If the canvas is several mm shorter than the rack (permissible gaps), the difference is divided in half at the top and bottom. That is, after installing the door in place, there should be equal gaps at the top and bottom of the door leaf, for example, 2-3 mm.
As a result, a manual electric router is a modern tool that is great for inserting locks and hinges into interior and other wooden doors. The master’s task is only to correctly set the milling depth, guide and hold the cutter within the markings.
Possible errors when working with a router and ways to correct them
When inserting a lock into a wooden door using a router, a home craftsman may encounter a number of difficulties that will lead to negative consequences:
- When checking the functionality of the lock, the holes on the counter plate in the area where the door frame is located do not match - before selecting a groove in the frame, it is recommended to hang the door with the lock already installed and make the markings after the fact.
Cutting the counter plate
- When installing the lock in a pre-prepared groove, a slope is observed relative to the vertical axis - when installing the router on clamps, it is necessary to check that the orthogonal position of the working body is observed in relation to the plane being processed.
- When installing the lock, its free movement and play are observed - if the groove is larger than the dimensions of the bolt of the locking mechanism, it is necessary to install expansion linings of wood or plastic into the body of the sample.
Misalignment of the lock installed in the groove
- When you try to install the lock bolt, the difficulty of inserting it becomes apparent - under no circumstances should you hammer the lock with a hammer, since additional pushing forces can cause cracks to form in the wood. For normal installation, it is recommended to widen the hole with a hand chisel.
- If the cutter does not meet the required depth of the future cutting, it is necessary to prepare the necessary cutting element in advance, or carry out the work in 2 stages, with sequential adjustment of the settings of the manual router.
A finished door with a built-in locking device.
If you follow all the recommendations listed above, a door with a lock embedded in it will serve no less than the period stated by the manufacturer. Before starting milling, the home craftsman is recommended to familiarize himself with master classes from professionals and perform all work in strict accordance with the technological map
Cutting holes
You can use a straight mortise bit to cut holes in wood pieces. If the hole has a complex shape, then it is cut with a router according to a pre-prepared template using a copy ring. The latter is attached to the base of the milling cutter and, when the unit is operating, sets the movement of the tool in the desired direction.
So, to cut a hole in a wooden piece, you need to perform the following operations:
- secure a straight slot cutter in the collet of the machine;
- attach a copy sleeve to the router sole;
- place the workpiece in which you want to make a hole on the workbench;
- place small pieces of chipboard under the workpiece to slightly raise it above the table (this is required for the tool to come out when cutting through the part);
- place the template with the already prepared hole on the workpiece and press both parts to the table with clamps;
- set the minimum value of the cutter overhang (about 3 mm) relative to the base of the device;
- turn on the router and carefully lower it onto the template so that the cutter gently enters the material;
- mill along the entire perimeter of the template;
- lower the cutter another 3 mm and repeat the above operation;
- Continue adding 3mm depth at a time until the cutter goes right through the workpiece.
In the same way, you can cut a round hole according to the appropriate template. But in order to cut a circle in a workpiece, there is a much simpler way. Most models of routers already include a compass device. It consists of a rod with an adjustable (pointed) screw on one side.
The rod is attached to the sole of the unit, and a pointed screw is inserted into a hole that serves as the center of the future circle. Next, you need to set the desired radius taking into account the diameter of the cutter. The following figure shows how to correctly calculate the radius of a hole.
Milling is carried out in the usual way in several stages, each time deepening the tool by 3 mm.
You can also use a router to drill holes, for example, for installing furniture hinges. This is done as follows.
- Clamp a Forstner drill of the required diameter into the collet of the unit.
- Set the spindle speed to minimum.
- Place the router on a flat surface.
- Lower the cutter so that the spike in its center does not reach the table surface 2-3 mm, and fix the drive on the guides.
- Next, lower the depth stop onto any step of the turret stop and secure it with the locking screw. Thanks to the depth limiter, the cutter will not be able to drop below the required level.
- Remove the drive lock so that it can move freely up and down along the guides.
- The center of the future hole should be marked on the workpiece.
- Place the router pad on the workpiece and lower the cutter so that the tenon located in its center exactly hits the intended location on the part.
- Raise the cutter slightly above the workpiece, turn on the unit and, after reaching full speed, smoothly begin to plunge the tool into the material until the depth stop reaches the stop. At this point the drilling operation can be considered complete.
Before drilling on a workpiece, you should perform the same operation on some unnecessary piece of wood or chipboard of similar thickness.
If you need to make a through hole, then it is not necessary to install a depth stop. For a “clean” cutter exit on the back side of the workpiece, drilling must be carried out in 2 stages. At the first stage, the cup drill is immersed into the workpiece until a small hole from the tenon is formed on its reverse side. Next, the workpiece is turned over, the drill spike is installed in the resulting hole, and further drilling is carried out. This way, the edges of the hole on both sides of the workpiece will be smooth and without chips.
Homemade and insertion templates for inserting loops
You can make a template for inserting loops yourself. You will need a lot of them, for all the variety of existing models of fittings. Therefore, there is a risk to seriously and for a long time engage only in manufacturing. And then get disappointed and start looking for where to buy. For this reason, it is better to look at the options for templates with inserts.
But you will have to face the fact that this will take much more money than you originally expected. You need to buy a lot of insert strips for inserting fittings, which will be installed in a special template holder.
A pair, a three, or even more sets - it definitely won’t fit all doors. And more and more varieties of accessories appear. Accordingly, the number of inserts is growing. And now the accumulated pile is difficult to lift, and Finding something in it is even more difficult.
The price of each insert is 270-290 rubles, the price of the template where the inserts will be inserted is 6000 rubles. With a minimum set of 5 models of fittings (lock, hinge, hidden hinge, strike plate, latch), the price is RUB 13,250. An average set will cost you about 60,000 rubles.
In addition, all flaws appear in the work. Any fittings are not ideal in size and are produced with a length and width tolerance of 0.5-1.5 mm. Even half a millimeter of discrepancy with the insert template - it will either install with gaps, which is very visible, or you will have to expand the recess manually using a jewelry chisel.
Disadvantages that you definitely need to know about when working with insert templates for a router:
- There is an error when inserting fittings, provided that if the fittings are expensive and made in Italy, the error may be minimal.
- Simultaneous insertion of hinges into the frame and door leaf is not provided
- It is not possible to install locks on an installed door
- The template is fixed with clamps, this is not reliable and safe
- There is no mount for the router; there is a risk of injury if a paper clip or knot gets caught in the door leaf.
TOP best edge routers
Bosch GKF 600 Professional
The cost of the device is around 12,500 rubles. The Germans continue to produce really high-quality milling cutters. This model runs on a 600 W motor. It easily picks up rotation speed up to 33,000 rpm in 1 minute. It is also convenient that the entire range of cutters is suitable for work.
The design is durable and light in weight. If necessary, the base is shifted to the required division on the router body, and then adjusted to the size using a wheel in the area of the base base.
The device is comfortable to use in your hand. The base can be removed completely. The device can be used as an engraver with high power.
Advantages
- power characteristics;
- convenience indicators;
- The adjustment is quite simple.
Flaws
- The equipment is presented with a straight base; you need to separately purchase an option with the ability to adjust the tilt.
Makita 3709
The cost of the device is around 5800 rubles. The manufacturer is a Japanese company. The device is reliable and has good performance. Operates at 30 thousand revolutions in 1 minute. The cutter plunges up to 40 mm. In fact, the device is decent, but in view of the reduced price, the manufacturer decided to save money. For this reason, the equipment was slightly damaged.
The base of the router is made of 90 percent polycarbonate with a transparent base. The clip is plastic. The ears are tightened using a screw. Users complain that the manufacturer should have added 8 mm collets to the kit. But, in fact, there are only 6 mm collets.
Advantages
- comfortable grip;
- engine with high power and speed characteristics.
Flaws
- the base is made of plastic.
Hammer FRZ710 PREMIUM
The device costs around 8,300 rubles. It is not even just an edgeband, but can also be classified as universal. The complete set is represented by a vertical type base with handles. There is also equipment for performing edge work. Just keep in mind that even though it is universal, it is not always useful. The motor operates at 700 W, while the system speed is at its limit. The immersion depth is 30 mm, these are not too large characteristics.
The inconvenient thing is that there is no smooth lowering. You have to turn the device on and off by releasing the handles. So the vertical base here can rather be attributed to a series of equipment “made from what was available.”
As for disassembling the device as an edging device, it is heavy in the hand and not very comfortable. When acting on a polished cylindrical part, pads are needed, then the vibration is transmitted to a lesser extent through the hand.
In general, users note that the device is suitable for home use, but cannot be used in large quantities.
Advantages
- versatility;
- 3 collets;
- decent power ratings for an edging device.
Flaws
- heavy weight;
- not entirely convenient if used as a vertical device.
Rating of the best manual wood routers in terms of price and quality in 2021
The most popular units remain those that combine quality with reasonable cost. They are most often used at home, but they can also be useful in small workshops.
Elitech F 1800 E
The manual unit has a significant mass and demonstrates a power of 1800 W. Equipped with a spindle lock and a turret stop, there is a built-in backlight to improve visibility.
The cost of Elitech F 1800 E starts from 5,000 rublesPros
- long cord 2.5 m;
- high power;
- There is a 12 mm collet.
Minuses
- the start button becomes clogged with dust;
- weight 4.3 kg.
I like10I don't like3
Kolner KER 1200V
Inexpensive hand router suitable for home use. The working depth of the device is 50 mm, the speed is adjustable from 15,000 to 30,000 revolutions.
You can buy Kolner KER from 3,200 rublesPros
- does not heat up during operation;
- power more than 1 kW;
- rich equipment
Minuses
- makes noise during use;
- no soft start.
I like10I don't like3
Bort BOF-1600N
The 1.5 kW vertical router supports a speed of 12,000-26,000 rotations and has a nozzle stroke of 60 mm. There is a smooth switching of revolutions, the sole of the unit is cast and fits tightly to the surface.
Bort BOF price starts from 3900 rublesPros
- reliable assembly;
- moderate cost;
- five year warranty;
- smooth speed adjustment.
Minuses
- the mechanism for replacing cutters is inconvenient;
- no storage case;
- large weight - 4.8 kg.
I like10I don't like3
TOP best keyway routers
Makita PJ7000
In terms of price, this device is affordable to many. It costs around 16,200 rubles. It runs on a 710 W motor, with rotational speeds reaching 11 thousand per minute. The maximum diameter of the cutter is 100 mm, but its selection should be approached carefully. If there is an imbalance in the high-speed tool area, the milling cutter will produce high-power vibration. The device base is optimal. The desired angle is achieved accurately and quickly.
Advantages
- high power levels;
- dust collector with efficient characteristics.
Flaws
- vibrations are felt;
- the body is not equipped with rubber insulating pads.
Bosch GFF 22 Professional
The cost of the router is about 16,150 rubles. It features an ergonomic solution. This applies to both the grip and the left-handed handle. The milling cutter is designed for right-handed craftsmen, and therefore it will be difficult for left-handed people to use it.
The model is also distinguished by the gear ratio of the gearbox. These are proven solutions that provide quality and reliability. The motor has 670 W. It is capable of spinning the cutter up to 9 thousand revolutions per minute. At its maximum, it can reach 105 mm.
Users are not happy with the vacuum cleaner catcher. It is recommended to be used as a last resort. It's better to use a vacuum cleaner.
Advantages
- the build quality is at the highest level;
- performance indicators.
Flaws
- operates at a noise level of 87 dB;
- the cost is high.
Conductor for inserting locks Gidmaster pitfalls
Attracts with its affordable price compared to Virutex. From 10 to 12 thousand rubles. However, the conductor is not universal. Used only as a template for inserting locks.
Moreover, all work will have to be done with a drill. It is extremely inconvenient, the speed is too low, you can damage the door - you often end up with chips and torn edges on the door. Especially if it is covered with enamel.
- An obvious drawback is that it is difficult to set the size correctly.
- Works only with cutters with threads on the collet.
- It is impossible to embed hinges, strikers and crossbars.