How to make a notch on metal
Applying a pattern to various objects by removing a substance from its surface has been known to mankind for many millennia.
With the advent of new materials, the need arose to develop working methods that allow engraving on objects that are much harder than wood and stone.
New technologies make it possible to fully automate the engraving process when applying a design to a metal surface, but for a home craftsman, the most suitable option is to master the manual method of applying a design.
Do-it-yourself metal engraving is possible at home, if you have the tools and a suitable room to perform this type of work.
What is needed for engraving
For manual engraving at home, you will need the following tools and materials:
- Stichel.
- Metal blank.
- A vice or similar device for holding a workpiece stationary.
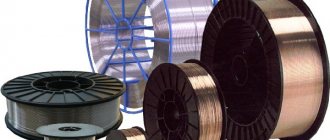
The blank for applying the pattern can be used from any metal, but for beginning craftsmen it is better to use aluminum or copper.
The graver is a rod up to 120 mm long. One end of this tool is cut at an angle and sharpened, the other is installed in a handle made of wood or plastic.
The graver can be of different shapes and also differ in the width of the working surface. If you do not have this tool, you can make it yourself if you have materials suitable for this purpose.
Making your own gravel
To make a gravel, it is necessary to use tool steel. The metal used in springs and ball bearings is excellent for this purpose. To make a cutting surface, you can use old files and needle files, as well as various cutters that need to be cut into thin strips.
The ideal material for making an engraving pen is P18 steel. From old circles for circular saws you can make a large number of blanks for the production of gravers at home. Next, the working part of the workpiece is sharpened at an angle that will make it possible to make a notch of a certain width on the metal surface.
The handle of the gravel is made of hardwood, and should be of such a width that the master can comfortably hold the tool in his hand. The recommended length of this part of the gravel is usually 50 mm.
A mushroom-shaped handle is the most suitable for making this tool, but you can experiment and make several different options, and in the process choose the most suitable option.
:
Preparation of the workpiece
First of all, you should select a blank on which the drawing will be displayed. The selected product must be free of rust and chips. To prepare the surface you will need:
- Sandpaper P400.
- GOI paste No. 1 or No. 2
First, the workpiece is polished using sandpaper. Then final polishing is carried out using GOI paste.
To avoid damage to the surface, when carrying out polishing work with GOI paste, it is recommended to use this product only No. 1 or No. 2.
You should also do the following before finishing polishing with this product:
- Prepare a flannel cloth and moisten it with white spirit
- Pour GOI paste onto a dampened cloth.
- Wipe the unwanted area of metal with a cloth to remove large pieces that could scratch the surface.
After such preparation, the workpiece is polished using uniform circular movements. After completing the polishing activities, the metal object must be rinsed in kerosene and dried at room temperature.
The process of engraving on metal
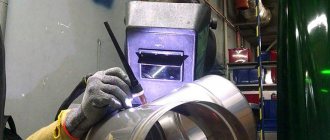
If you are engraving a metal surface for the first time, then before you start applying the main design, it is recommended to practice on an unnecessary piece of metal.
The ideal option for such training is to use a copper plate. A piece of copper should be securely fixed to a wooden board using self-tapping screws with wide heads. When the workpiece is secured, the board is laid on the table, additional lighting is turned on if necessary, the cutting tool is clamped in the right hand, and an even notch is made on the metal surface.
To prevent the hand from slipping when making a straight line, on the surface of the metal plate the thumbs of the left and right hands should be connected and touch the plate where the drawing is made.
The index finger of the right hand, at this time, rests on the tool’s cutter and completely controls the process of drawing lines. It is recommended to first make several straight parallel stripes on the workpiece.
When the smooth areas look good, you can move on to making semicircular lines.
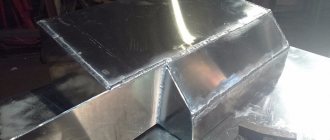
Top making process
To make a knob, you need to very accurately outline the pipe. To do this, draw a template on a sheet of paper in full size, as in the photo.
It is designed for a profile pipe 100x100 mm. Using a square, the dimensions are transferred to the pipe.
Very carefully, use a grinder to cut out the petals on the pipe without touching the excess.
Then, using a drill or a screwdriver with a cutting disc, you need to get inside the pipe and make notches on the petals along the second marks. This is necessary to bend them outward.
After bending, it becomes possible to make notches along the remaining marks using a grinder. An angle grinder leaves a wide cut, so bending metal after it is easier than after using a thin cutting disc on a drill.
Now, using a pair of clamping pliers, you need to bend the petals, as in the example. Please note that at first the bends at marks 2, 4 and 5 are made outward. This can be clearly seen from the drawing.
At the first mark, the petals are filed on the outside. Then you can begin to bend them into a knob, tapping them with a hammer. You need to bend step by step, welding each transition.
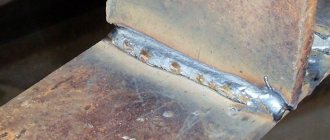
After bending and welding, the weld seams are cleaned.
In hard-to-reach places they can be corrected with a file. As a result, you get a neat top on the column, from which you cannot tell that it was made by hand.
This method can be used to make knobs not only on fence posts, but also on railing balusters and bed frames.
Do-it-yourself metal chasing
13.06.2020
Embossing relief images or inscriptions on the surface of metal is called metal embossing. Designers use this type of applied art to create exclusive decorative interior items, jewelry, dishes, etc. In former times, there were coin minting workshops in treasuries.
Process Basics
The image is created by striking a hammer with a tool applied to the surface of the metal. The configuration of the impression depends on the shape of the working part of the instrument. Then it is sequentially rearranged and the operation is repeated until the entire pattern is knocked out. Complex images are minted using several tools with working parts of different shapes.
Depending on preferences, metal minting is performed in different styles:
- historical;
- Old Russian;
- eastern;
- Georgian;
- Moroccan;
- Uzbek;
- modern.
The quality of the images depends on the degree of training of the minter.
Regardless of the style, each master has his own “handwriting” of performing the work. Despite the apparent complexity, it is not difficult to master metal embossing with your own hands.
Complex images are minted using different tools
Types of coinage
Depending on the shape of the object and the complexity of the design, embossing can be:
- Openwork, similar in appearance to metal lace. The work begins with cutting out the background, then the final cutting is carried out along the prepared lines. Since the thickness of the openwork partitions is small, during annealing it is necessary to ensure that they do not melt. Openwork embossing is often applied to three-dimensional objects as a finishing touch.
- Contour, which is minted on sheet metal without a pre-applied relief. Visually, such embossing is similar to engraving, but differs from it in convex or concave shapes. This method is used for the manufacture of decorative elements of interiors and for applying ornaments to flat surfaces.
- On bulky objects. The most difficult type of embossing to perform, since the design is embossed on a curved surface. However, experienced craftsmen cope with the work without much difficulty.
- Embossed. It is also classified as a complex species. The work begins by punching out the contours of the design, then the image is made in relief. At the final stage, the image details are aligned and polished.
Materials used
Embossed jewelry is traditionally made from silver and gold. Most craftsmen work with cheaper metals:
- Copper with a thickness of 0.3 to 1.5 mm. It is plastic, easy to process, depending on the brand with a light or dark shade of red. Copper and its alloys are more often used than other metals for decorating rooms.
- Red copper, sheets of which can be rolled to a thickness of 0.05 mm. Due to its softness, relief embossing can be easily performed even on voluminous products of complex shape. High resistance to corrosion allows the installation of decorative elements made of hammered copper on the facades of houses.
- Various brands of brass with golden yellow color in different shades. High (up to 50%) zinc content increases hardness and reduces flexibility. However, despite its lower ductility than copper, brass is easily minted.
- Tompak is a type of brass with a low (up to 10%) zinc content. Due to the large proportion of copper, the metal turns out to be red in color with a yellow tint. The alloy with the addition of aluminum up to 5% acquires a color indistinguishable from the color of gold. Tombac is used to make badges, medals for anniversaries, cheap jewelry, and decorative elements for interiors.
- Aluminum and its alloys. The metal is easily minted, but due to its low melting point, care must be taken during heat treatment to ensure that the design does not become deformed. Duralumin imitates silver well, but it is difficult to work with, since due to its low flexibility, the metal may crack when knocking out the relief.
- Tin plate on which beginners practice their embossing skills. However, masters also do not neglect this accessible material.
- Ferrous low-carbon metals. The blanks are pre-annealed and etched to obtain a decoper, on which images with large relief or designs with small details are minted.
- Roofing iron for embossing contour images with shallow relief without background and small details.
- Stainless steel with a thickness of 0.5 to 0.8 mm. The metal looks beautiful, but due to its high strength and dense structure it is difficult to knock out. High resistance to corrosion allows us to make embossed memorial plaques and plaques for monuments and monuments from stainless steel.
- Cupronickel and nickel silver are nickel alloys with a high copper content (81 and 65%, respectively), so they are ductile and easy to polish. Chemical treatment makes the surface golden, silver, or imitates antique bronze.
Types of files and their purpose
As with any other instrument, there are differences in design, material and application.
Teeth size
The most common classification of files is based on the density of cutting teeth.
No. 1 – large notch from 5 to 13 teeth per 1 cm.
The tool is intended for rough, rough processing. If the material is sufficiently soft, you can confidently cut off a thick layer in several passes. Hard alloy workpieces are difficult to work with. The series is called “bastard files”.
No. 2 – medium notch from 14 to 25 teeth per 1 cm.
The most common and most versatile type of tool. In classical processing, this file is used after the brute file to smooth the surface. In reality, most often work is performed only by this number.
Any material can be sanded. Soft metal or wood quickly clogs the pores between the notches; cleaning with a wire brush is required. The series is called “personal files”.
No. 3 - No. 6 - fine notch from 26 to 80 teeth per 1 cm.
Intended exclusively for finishing. When working with soft material, it immediately becomes clogged with chips, which are difficult to remove. It is also used for jewelry making. Sanded surfaces have virtually no traces of processing.
Types of file cuts
For different types of material, special forms of notching are used. The most common are stamped teeth.
Single notch (simple). Used for processing products made of non-ferrous metals. The soft material does not clog the surface of the tool too much; if this happens, the single notch is easy to clean with a wire brush.
Double notch (cross). Used for unalloyed steel, cast iron, hard alloys of non-ferrous metals - for example, bronze. Belong to the list of universal ones.
Spot cutting (rasp). These tools effectively process leather, rubber and wood. Soft metals are ground down only to produce sawdust.
Arc stamped notch. Used for woodworking. Can be used for finishing leather.
Specialized working layers:
Diamond coating. Suitable for processing hardened steel, alloys, glass and ceramics. Diamond chips of the required fraction are applied to the smooth surface of the tool by soldering or gluing.
Reefs. Needle files are made of a special magnetic alloy. Designed for precision processing of jewelry - stones and metals. The surface can be sprayed
or have a complex (so-called Swiss) notch.
Classification of files by section shape
The main criterion when choosing a tool is its shape.
It is impossible to consider all types of files, so we will focus on the most common ones.
Having a set of 5-6 form factors in your workshop, you can process any part both externally and its internal cavities with holes.
Popular: Let's look at several ways to sharpen a ceramic knife at home
- No. 1,2 – Flat and flat pointed profile. This tool is used to process flat surfaces of workpieces. You can grind both the outer and inner sides. At a certain level of skill, craftsmen process convex semicircular outer surfaces;
- No. 3 – Square. Processing and enlarging rectangular and square holes. Allows you to form internal right angles. Also suitable for flat external surfaces;
- No. 4.5 – Triangular and triangular pointed. Machining internal sharp corners in holes, boring corners in grooves. You can work on the internal and external surfaces of the workpiece;
- No. 6 – Round. As a rule, they are not barrel-shaped, but have a slight decrease in diameter from the base to the spout. Designed for processing round and semicircular holes in workpieces. You can also bore semicircular recesses of small radius;
- No. 7 – Semicircular. They have two working surfaces. The flat side works according to number 1, the semicircular side is processed with large diameter holes and large radius recesses. Converging edges can be used to smooth out sharp corners;
- No. 8 – Diamond. A highly specialized file designed for processing gear workpieces. Has two edges - for acute and obtuse angles;
- No. 9 – Hacksaw profile. Designed for processing corners, making grooves, notches or planes in triangular or square holes.
Is file hardness a benefit or a disadvantage?
It would seem that the harder the steel, the better the quality of the tool. This rule does not work for files. What tool steel the files are made from depends on their purpose. According to Russian GOST, two types of steel are used for the manufacture of this tool (we are talking about files and needle files with notches):
- Alloy steel with high chromium content ШХ-15, 13Х;
- High carbon steel U10A or U13A.
Sharpening a cutting tool using a file
Knives, saws and axes can be sharpened and trimmed not only with sandpaper or whetstone. There is a tool that is always at hand. What kinds of files are there for sharpening - let's look at the example of a mechanical chain saw.
Popular: How to measure with a caliper
How to sharpen a chainsaw chain with a file
First of all, let's understand the principle of operation of a chainsaw tooth.
There is only one cutting surface, but sharpening is done at an angle. In addition, the cut depth limiter must have its own height. Therefore, a special attachment in the form of a bow saw is used for sharpening:
However, such a device is quite expensive, and there is no point in making it yourself. We don't do sharpening very often.
If you have a steady hand, you can sharpen the teeth simply with a bare file. The main thing is to correctly maintain the angle and radius of curvature.
And yet, for reliability, you should make or purchase an elementary template that will allow you to maintain the angle and depth. And you will control the horizontal position of the file yourself.
And if your file is dull, then a concentrated solution of citric acid, acetic acid or, as in this video clip, chlorinated iron will help restore it.
Pereosnastka.ru
Notch (touching)
TO
category:
Artistic processing of metals
Notch (touching)
Notching (tauching) is a unique, very ancient method of decorating bronze and steel products with precious metals. This method was used to decorate artistic products, household items, military equipment: swords, daggers, shields, helmets, and later firearms.
The essence of the process is that the outer surfaces of objects are incised (hence the name) and a gold or silver pattern is stamped onto these surfaces - a subtle ornament of curls and stylized plants, images of animals, birds or humans. Sometimes entire scenes of many figures were reproduced using this technique, as well as various ornaments and inscriptions, for example, ancient Slavic scripts made by Russian craftsmen, or sayings from the Koran on oriental products.
Historically, the notch comes from the so-called “chrysography”. This term in Ancient Greece was used to describe a kind of inlay of bronze items with gold and silver. The most ancient examples of chrysography date back to the ancient Egyptian and Cretan-Mycenaean culture, for example, a bronze figurine of the Egyptian queen Karomama (New Kingdom), decorated with a gold notch.
Also known are bronze daggers inlaid with gold, stored in the Cairo Museum, and a bronze chair from the Naples Museum, inlaid with silver (beginning of our era), as well as bronze objects from the excavations of Pompeii, decorated with the same technique.
Starting from the 9th and 10th centuries. decoration with gold and silver patterns extends to iron objects. The technique of gold notching on steel reached its peak in the 12th century. Examples dating back to this period are known in Ancient Rus', Byzantium, Syria, Iran, China, Japan, as well as in the art of the Caucasus and medieval Europe. The technique of gold notching reached a special peak in the 16th and 17th centuries, which is confirmed by the remarkable monuments of ancient weapons stored in the State Armory Chamber of the Moscow Kremlin.
Currently, in the Soviet Union, gold notching is used in their works by master artists from the village of Kubachi (in Dagestan) and the city of Zlatoust in the Urals; it has not been forgotten by Tula and Izhevsk gunsmiths. The technique of gold notching has been preserved abroad. Examples of it can be found in modern applied art of Czechoslovakia, Italy, Spain, as well as China and Japan.
Professor F. Ya. Mishukov identifies several different independent techniques of gold incision, which developed in a certain historical sequence, and each of them has its own specific artistic qualities.
Mortise tauching (inlay): 1) the design is cut out with a graver;
2) the design is cut out with a chisel.
Printed or surface tauching (notching): 1) tape tauching; 2) touching with drawn wire; 3) sheet tauching with dissection;
4) touching with subsequent aiming.
Mortise tauching (inlay). This is the most ancient option, originating from chrysography. It is the most labor-intensive and requires high skill and artistic abilities from the performer. Mortise tauching means that an in-depth design is engraved on the surface of a steel product, and the walls and edges of the design are slightly undercut, i.e., cut inward, so that the gold pattern holds more firmly. The depth of the pattern is maintained within 1-1.5 mm, and the bottom of the pattern is notched.
Depending on the tool used and how the in-depth design is made and the precious metal is applied, inlay is divided into two types.
The design is cut out using a graver. Drawings engraved with a graver are distinguished by their purity and fidelity to the outline. Then, exactly in accordance with the in-depth pattern on the steel, individual fragments of the future pattern are prepared from precious metals - gold, silver or their alloys. All parts are made either from one metal (gold), or in the desired combination.
For example, some parts are made of red gold, another part is made of green gold (an alloy of gold and silver). After the individual details of the composition (curls, leaves, letters, etc.) are made, each of them is placed in a recess prepared for it and driven in with a special small hammer flush with the background. The work ends with polishing the entire product.
An example of such mortise tauching, where the design is engraved with a graver, is a damask damask shield made in Azerbaijan in the 16th century. from the collections of the State Armory Chamber (Fig. 1). The shield is richly decorated with a pattern arranged in the form of spiral stripes filled with floral patterns alternating with images of people and various animals.
The figures are interpreted in the character of oriental miniatures of the 15th - 16th centuries. Gold of two colors was used for padding: yellow (pure) and green (alloy with silver).
How to make a notch on metal?
Among domestic metalsmiths, there is an opinion that to make any metal part, it is enough to give it an approximate outline - the rest can be finalized with a file. Together with a hammer and pliers, this hand tool is one of the three most popular assistants for any DIYer.
With their help you can perform a wide variety of work on metal and other materials:
- Removal of dirt, corrosion and various coatings;
- Surface sanding, from rough to finish
- Giving the required shape to the product;
- Removing burrs and flash;
- Cleaning contacts, preparing for painting;
- Sharpening cutting and sawing tools.
The operating principle is very simple. Using notches on the surface (teeth), a small layer of the processed material is removed. The depth of processing is regulated by pressing force, number of movements and speed.
The industry produces countless files and needle files designed for a wide variety of jobs and materials; we will help you understand the types of tools.
We make a punch, an awl and a scriber (marking punch) from drill bits
There was a small pile of drill bits in the strategic reserve, mostly three millimeters in diameter. And so, in my spare time, a couple of ideas arose on what could be done with them. For example, with their help, improve the awl that was at hand, which was used both as a punch and as a scriber (also known as a scriber, or a marking punch).
You need to sharpen the drills to the required sharpness and insert them into suitable handles. How it happened and what ended up happening in this video:
For those who don’t want to watch 10 minutes of all sorts of unsuccessful attempts and small details, we have a shortened version, without commentary and for 4.5 minutes: [Digest].
The stupidest fuss came with an attempt to bore the collet clamp of a good pear-shaped handle from 2.5 mm to 3.0 mm,
because there was no 2.5 mm broken drill available and I really wanted to invent a 10+1 boring method without using a specialized drill bit. As a result, the last attempt to sharpen this fragment of the drill itself onto a reamer drill led to the drill itself being ground down to a smaller diameter, as a result of which it began to fit perfectly into the chuck-clamp, after which it was sharpened on the other side with an awl.
All drills were sharpened on the grinding disc of the turned-on grinder, and the drill itself was inserted into a drill (it’s homemade - just a motor with a collet chuck):
The direction of rotation of the drill and disk is counterclockwise.
The handle for the awl is excellent, Soviet, in good professional shape, from some kind of incomprehensible, it seems, painting tool.
The handle for the scriber is the body of an old, poor (although the shape of the body fits very comfortably in the hand) fountain pen. It is better to use an iron case if available. Otherwise, it was necessary to add Poxipol to the head to strengthen it, and this already makes the tip non-removable, which will complicate its sharpening in the future.
In theory, everything is simple with a center punch - you can simply sharpen some steel rod and harden its tip. But... I wanted to use a drill, try to see if it would work, come up with technologies “how to do it,” and torment/flex. Therefore, a hole 3 mm in diameter, 1 cm in length was drilled in the end of the rod, and, by the way, it turned out great.
The sharpening angles were as follows:
Here you can argue and/or philosophize about what these angles should be. In one place on the Web it is written that the punch angle should be 100-120°, in another (especially for automatic ones) - 45-60°. About the scriber in one place it is written that it should be 8-15° (and in the photos it is 40-45°), in another - 15-20° to 50°.
I remember that during labor lessons at school there were scribers in the form of a wire bent into a ring on one side and with a very sharp sharpening, like an awl, on the other. So, for example, I could never see the marks on these scribers - they are too thin and merge with the scratches on the metal. In my experience, it is with this 45° tip that the brightest marks are obtained, and it is also easy to simply draw and even write on iron.
Following actions
After work to improve adhesion, the walls must be saturated with moisture. The best solution is to use a special penetrating primer. This should be done so that the surface is saturated with moisture and does not subsequently “take” it away from the plaster mortar. Special primer solutions provide an additional adhesive layer on the wall panel, which improves its adhesion to the plaster.
Carrying out notching work requires precautions: use safety glasses and gloves, and, if necessary, a mask to protect the respiratory system.
Thus, notches on the walls before plastering are a necessary element of the wall finishing process. They help better adhesion of the wall surface with the plaster mortar and ensure the durability and strength of the plastering.
Stages of all preparatory work
All stages of preparation before plastering can be highlighted in a small list:
- Assessment of the condition of the walls.
- Cleaning from excess dirt and dust.
- Notches for good adhesion of materials.
- Plaster.
First of all, the wall undergoes a vertical plumb test to remove and level all uneven, imperfect layers. For good adhesion of materials, it is necessary to clean all surfaces from dirt and dust. To prevent the plaster from swelling and peeling, the walls from cracking and fungal infections, it is necessary to prepare the wall for plastering.
Important! Notches are required for smooth wall surfaces.
What to do with wooden and stone walls?
In the case of stone and concrete foundations without the additional use of reinforcement, craftsmen also make sure to make notches using a hammer. The work is labor-intensive, so it is more expedient to introduce reinforcing mesh - it is fixed to the wall using self-tapping screws, as a result of which a reliable adhesion is formed.
Important! Plaster does not apply to smooth wood; instead of notches, the surfaces are sheathed with wooden shingles, reinforcing mesh, and reed mats.
The most popular shingles are slats made of semi-processed pine lumber, obtained by the torn method. The length of the blanks reaches 100-200 cm; they are nailed one at a time onto a wooden wall; ready-made panels can also be found on sale. If you plan to create a layer of plaster thicker than 4 cm on such a wall, you will need reinforcement with wire or metal mesh.
Compositions of solutions
Continuous leveling
of concrete surfaces indoors
is carried out
using cement-lime
mortar or using
plasticized polymer-cement mortar
based on a dry mixture or ready-made synthetic mixtures of factory production.
To increase the mobility of solutions
plasticizers are introduced into their composition
.
In rooms with air humidity no more than 60%,
for
plastering concrete surfaces
:
READ ALSO: Docke - reliable siding and the right choice Recommended compositions of plaster mortars
for concrete surfaces
are shown in Table 1.
Following actions
After work to improve adhesion, the walls must be saturated with moisture. The best solution is to use a special penetrating primer. This should be done so that the surface is saturated with moisture and does not subsequently “take” it away from the plaster mortar. Special primer solutions provide an additional adhesive layer on the wall panel, which improves its adhesion to the plaster.
Carrying out notching work requires precautions: use safety glasses and gloves, and, if necessary, a mask to protect the respiratory system.
Thus, notches on the walls before plastering are a necessary element of the wall finishing process. They help better adhesion of the wall surface with the plaster mortar and ensure the durability and strength of the plastering.
Compositions of solutions
Continuous leveling
of concrete surfaces indoors
is carried out
using cement-lime
mortar or using
plasticized polymer-cement mortar
based on a dry mixture or ready-made synthetic mixtures of factory production.
To increase the mobility of solutions
plasticizers are introduced into their composition
.
In rooms with air humidity no more than 60%,
for
plastering concrete surfaces
:
READ ALSO: Preparing walls for wallpapering Recommended compositions of plaster solutions
for concrete surfaces
are given in Table 1.
Preparation of concrete surfaces for plaster.
To the start of plastering work
door and window frames must be installed
, the windows are glazed.
Here it is necessary to clarify that the notching of concrete surfaces made in wooden formwork
, is not always required - the surface is already rough. If necessary, notches are made on the concrete surface manually or with a sandblasting machine (on large areas).
ATTENTION! Notching
smooth concrete surfaces
(made in steel formwork) is NOT REQUIRED - such surfaces
are not plastered
- they are leveled only
by putty
.
Plastering ceiling
made of monolithic concrete
or
precast reinforced concrete
is ALLOWED only if it is not possible
to eliminate unevenness by grouting
.
performed with strokes (at least 30 per 1 m²
)
3-5 mm
after
50-70 mm
, concrete sagging is cut down.
concrete coatings for plastering includes the following types of work:
ATTENTION! Concrete walls with large differences
surfaces, protruding places, as well as places where concrete surfaces meet metal and wooden structures
, and surfaces requiring a plaster coating with a thickness of more than
20 mm
(for example, for facades) must be covered with a metal mesh.
Plaster mesh
made of round steel
(wire rod) or
woven wire mesh
is fastened with tension and braided with wire on dowels: