Specifications
Plasma cutters are classified into transformer and inverter. Inverter-type units are in demand in households.
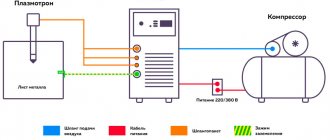
Structural elements include:
- The power source responsible for supplying current. The transformer is used to perform production tasks. The device is stable under unstable voltage and has an impressive weight. Inverters are highly efficient, economical, and suitable for home purposes.
- A plasma torch containing in its design: a nozzle, an electrode, a cooler, a cap. The electrode is located under the burner body and is responsible for forming the arc.
- The diameter of the nozzle affects the performance of the unit. The more air enters, the greater the power of the plasma cutter.
- Compressor - provides the system with compressed gas, transforms air into plasma.
- Cables and hoses connect the structural parts of equipment. The components transport compressed air. Cables carry electrical current. The length of the hoses determines the range of welding activities.
The devices are divided into contact devices, which involve contact of the plasma with the surface of the semi-finished product, and non-contact devices, where interaction with metal is not required. The units operate from a network of 220 V, 380 V.
Types of plasma cutting
There are two methods of cutting material: plasma-arc and jet. In the first option, the essence is that the arc burns between the electrode and the semi-finished product. The arc column is connected by plasma formed by heating the gas. The method is in demand in the manufacture of products of straight-line, shaped shapes, making holes and openings, and processing edges.
Plasma jet cutting is carried out on materials that are not capable of conducting electricity. The arc burns between the torch tip and the electrode.
PLASMA CUTTER AIRHOLD 42 FROM AURORA PROWhen the question arose that it would be necessary to cut metal and that it would have to be cut quickly and a lot, then questions arose about how this could be done. It is clear that a grinder is much more productive than a hacksaw for metal, but here we needed something even faster.
I had heard about plasma cutters, but I had never held them in my hands and it was decided to correct this gap. There is quite enough written information about this method of cutting metal, but I wanted to see how it happens live. The first video on this topic was the Gorynych plasma cutter, but frankly speaking, it did not make an impression.
Well, first of all, using a 1300-1500 W grinder, cutting off the piece that was cut off in the video will be faster. It is clear that the situation is somewhat corrected by connecting a compressor, but this is more of a device for crafts than for real work. Secondly, I didn’t like another problem with this plasma cutter – electricity and water. I stopped liking this combination back in the late eighties, when printed circuit boards were made using electrolysis and I had the temerity to get my cut finger into the salty solution in which the etching took place. This was the first and only time when I lost consciousness from an electric shock and, in addition, I broke my head while falling. No, I am in no way saying that this plasma cutter does not have a right to exist, but I did not like its performance and refilling with water, so I almost without hesitation crossed it out from the category of useful devices. Since at the same time the plans were to purchase a welding machine and the choice was made on the AuroraPRO INTER TIG 200, it was decided to take the plasma cutter from the same company, since if something happens, you will have to look for one service center, if necessary, you can pick the brains of one representative of the manufacturer’s plant .
The choice fell on the AuroraPRO AIRHOLD 42, since they don’t seem to have any more 220-volt plasma cutters. There is another device - MULTIWATT 40-160, it’s like three in one, but the price is quite heavy and I won’t lie - I’ve never liked combined devices - one fails, the whole device stops working. Although who knows... In the case of a welder + plasma cutter, there seems to be a saving, since this device has one power unit. On the other hand, with a separate welder and a separate plasma cutter, two people can work, but with one combined device, only one will work, i.e. There is no longer any talk about an assistant.
In general, I will leave the question about combi devices open - let everyone decide for themselves what they need. So, the plasma cutter arrived and I even tried to make some adaptations for it, but the first options soon showed their inconsistency - the magnets lost their magnetic properties when heated, and given the fact that I had to often use stainless steel, the relevance of magnets disappeared altogether - AISI-304 does not magnetize. Well, the fiberboard started to burn anyway. In general, I was finished with rulers of this type. And now, a year later, I decided to return to the topic of plasma cutters. For those who don’t know what kind of animal this is, this is not a big clue. The principle of operation is based on changing the shape of the electric arc by the gas flow - the arc becomes long and quite thin. Of course, it is thicker than a laser beam, but with the correct settings of the device, you can achieve a cutting width of 2 mm. Air under pressure is pumped into the hose and enters the burner. In my case, this is PT31 and a few words about how it works.
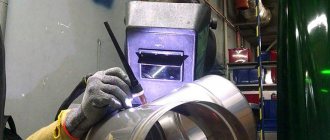
The handle into which the plasma torch holder is integrated consists of a ceramic cap that holds the entire structure assembled. And the design consists of a copper nozzle, a ceramic sleeve, which acts as an insulator and the electrode itself. The electrode, by the way, has the same dimensions on both sides and either of them can be inserted. This is quite convenient, since if the electrode burns out, you don’t have to change it, but simply turn it over. The air flow passing through the holes in the handle passes into the holes in the ceramic sleeve and rushes between the electrode and the nozzle. Passing through the hole in the nozzle, a rather thin stream of air is obtained, which forms an electric arc into a relatively thin jet of plasma. However, before the arc lights up, the air needs to go somewhere. For this purpose, the nozzles are provided with notches at the end. It is through them that the air escapes before the arc is ignited, and along them the molten metal flies out until the arc breaks through a through hole. This situation occurs if the cut starts not from the edge, but from the middle of the workpiece. Ignition of the arc on the AuroraPRO plasma cutter is contact, i.e. the nozzle must touch the part being cut. The oscillator excites an electric spark between the electrode and the nozzle, and a spark for a direct current of more than 20 volts and a bunch of amperes is an excellent reason to ignite an arc, which is what actually happens. The arc is blown into the nozzle by a stream of air, stretched and compacted, forming a fairly stable plasma jet with a temperature of several thousand degrees.
Upon contact with metal, the plasma melts the metal, and the liquid metal is simply blown out from the point of contact between the plasma and the metal by a stream of air. As a result, the cutting seam turns out to be relatively clean, and the snivells remaining along the edges of the seam are quite easily removed with a hammer or pliers. The only thing that should not be forgotten is that the current always follows the path of least resistance, and the distance between the electrode and the nozzle is relatively small and part of the electrical energy, instead of increasing the temperature of the plasma, flows uselessly through the nozzle into the metal being cut. That is why, immediately after ignition, the burner must be removed from the workpiece to be cut by 2-3 mm. This will prevent current from flowing through the nozzle and the plasma jet will reach the maximum value for the set current, and you will get the cleanest cut. So, the AIRHOLD plasma cutter is a two-component device, i.e. this is the device itself and the second part of this device is the compressor, since it is with its help that the plasma jet is created. The plasma cutter has a current regulator, and the kit includes an air reducer with a water separator or moisture trap, whichever you prefer. The gearbox is installed from the rear onto the studs on the housing using the supplied metal angle. The operating principle of the dehumidifier is quite simple. During operation, water is deposited on the walls of the dehumidifier and does not enter the apparatus. As soon as the pressure decreases, the return spring can no longer hold the valve and when it opens, it releases the remaining air, blowing out the water. The operating pressure is also reached - at the first moment of time, part of the air has time to blow moisture out of the desiccant before the relief valve closes.
It would seem that everything was thought out, but when autumn came and the fogs began to set intensely, I noticed that when the compressor started, several drops of water actually formed inside the moisture separator, and as soon as the air was supplied, these drops blew out and, picked up by the fan of the plasma cutter, they flew inside. To be honest, I squinted my eyes in anticipation of the boom. But it didn’t come - lucky. Since then, I first start the pneumatics, wait for the pressure to build up while blowing out the moisture separator, and then turn on the plasma cutter - this way there is less chance of water flying into the device. Since there are two regulators, the adjustment of each of them affects the operating modes and, to make it more clear, a bit of animation. So, the first mode is minimum current, minimum air flow. The arc turns out to be short and thin. This mode is well suited for cutting thin metals, up to 2 mm, or shaped cutting of metal up to 1 mm. Mode two – little air, a lot of current. This is not a desirable mode, since the cutter itself heats up significantly, the width of the cut becomes unreasonably wide, the likelihood of the nozzle burning out increases, and molten metal flies in all directions. Mode three – little current, a lot of air. This mode forms a long thin arc, the temperature of which is not very high and it takes a little longer to melt the metal. This is not quite the correct mode for cutting, however, it can be useful when heating bolts that cannot be removed - with short frying, you can warm up a stuck bolt quite strongly. The main thing here is not to overdo it and not burn a hole, or rather not to anneal the bolt head from the body. It is better to do a little training before using this method of warming up. Also, adjusting the air supply at low currents allows you to do things that are not quite ordinary. For example, cutting off a weld from a rotten part of a car body from the end. I didn’t film how this was done on the car - my brother comes to me on weekends and helps me assemble the rotten stuff I bought and I don’t want to be distracted by filming. Well, the essence of the operation looks something like this. The arc is directed along the unrotten metal and, almost like an autogenous gas, it simply blows away the remaining part. Again, before you grab a torch and run to cut your car, it’s better to practice on pieces of scrap metal. True true! I didn’t feel sorry for it when I burned through the wing - decorative plastic will still be put on there in order to hide the rot, but if the wing is good, then it will become clogged. Well, the fourth mode is a lot of air, a lot of current. This is already for cutting thick metals. The passport indicates a maximum thickness of 12 mm; slowly, with a good air supply, I cut 16 mm. The snot on the back side is a little more than usual, the cutting is quite slow, but it still cut. I also had to do a fair bit of grinding, but nevertheless the result was obtained - a stand was assembled for the mannequin, which was stuffed with sawdust and had quite a decent weight. That is why the stand had to be heavily weighted - it was extremely unstable.
For example, we cut a strip from a piece 13 mm thick. Let's start with low current and low air supply. We make marks, pin the ruler and start cutting. It seems like the arc is burning, but the jet never made it to the other side. We add air to 0.3 MPa with the valve open and set the maximum current. Things went much more smoothly, but my nozzle is almost at 90 degrees, and it is advisable to keep it at a small angle. I deploy the height limiter and notice that something is wrong...
More precisely, I pretend that I notice. The fact is that the nozzle installed on the burner is no longer badly battered, and by changing the angle of attack of the arc, the metal began to bubble. A little later I will explain what the problem is, but for now I just install a new nozzle and turn the electrode over. Things went quite happily and after cutting the metal I had to take a hammer - where the metal was bubbling, a good solder was obtained. Frankly speaking, I expected the cut to be uneven, but it went to the side much more. So this strip could be adapted, but now it will have to be grinded quite a lot. I’m not too worried about the sheet itself - you’ll still need to cut more, since a smaller size is required than the one that remains. Well, now let's take a closer look at the cut. It is obvious that the stream has gone astray. This occurs due to wear of the nozzle, namely due to the hole burning out and changing its shape, i.e. The air flow from the nozzle does not come out smoothly, but at some angle, which leads to this kind of jambs.
There can be several reasons for a nozzle burning out on a plasma cutter. The most popular one for me is that the air pressure has dropped, and the cutting current is quite decent - 30...35 amperes. The nozzle overheats and the edge of the hole begins to melt, losing its circle shape. The nozzle can also be killed when liquid metal splashes onto the nozzle hole. Of course, the slurry is blown out of the hole itself, but the slurry can stick to the edge of the hole, thereby spoiling the round hole and the stream begins to hit the side. The latter problem can be combated, thereby extending the life of the nozzle. It is enough to develop the habit of inspecting the nozzle before each cut and, if necessary, removing any adhering steel with a wire brush. Buying nozzles at local stores helps you develop this habit well. This piece of copper last year in the summer cost one hundred rubles. As soon as you remove the third or fourth nozzle, you will definitely think about how quickly money can burn out. I bought consumables on Ali - the choice is much richer, and the prices are quite reasonable. But here you should look at the Chinese with both eyes.
The fact is that they quite often equip nozzles for plasma cutters with the same number of electrodes, but they are not needed in FIG. The electrode is double-sided and one side burns out even slower than the nozzle, so when buying consumables it is better to take sets with 2 times fewer electrodes. In addition, I strongly recommend buying one complete set, i.e. The kit should include ceramic caps, ceramic sleeves, electrodes and nozzles. Over the past year and a half of use, one cap simply burst on its own. I didn’t understand the reason at all, I just took a piece and fell off. And two ceramic sleeves burst. One also burst on its own, and I crushed the second when I put it on the electrode. There was a burr on the ceramic and, without noticing it, I forcefully put it on the electrode, getting two halves of the sleeve. Therefore, although these consumables are required much less frequently than nozzles and electrodes, they should nevertheless always be available. Well, you can already choose the nozzles and electrodes according to their quantity according to your understanding, and of course, adjust how often you are going to work with the plasma cutter.
CHOOSE CONSUMABLES FOR PLASMA CUTTER
I forgot - the nozzles and electrodes are originally copper, but they sell both plain copper and chemically treated ones. I tried both. I didn’t measure down to the micron, but by eye the chemical treatment does not affect the quality and width of the cut, but the steel drops do not stick to the heaps so intensely. Therefore, if you are just starting to work, it is better to take nozzles with chemical treatment, and then, when your hand gets full, there will be no difference.
Since I need to quickly regulate the air flow, I moved the reducer to the front panel - now I don’t need to unfold the plasma cutter or go around it to change the flow. And now water from the dehumidifier will not get inside in any way. Here we should make a little clarification about the use of the term “air flow”. The kit includes a reducer that regulates the pressure after itself, which is why there is a pressure gauge on the reducer. As soon as the plasma cutter enters operating mode, the valve opens and the air begins to bleed out. The reducer tries to maintain the set pressure behind itself and opens a more controlled hole, increasing the air supply. Since the diameters of the hose to the burner and the nozzle opening do not change during operation, therefore, at a certain pressure, they are able to pass a certain amount of air through themselves, i.e. the constant cross-sectional geometry of the air exhaust parts creates a certain, unchangeable air flow. In other words, the pressure gauge readings can be interpreted as the flow meter readings. By the way, sometimes this is done. In this case, the pressure gauge has three scales - pressure, flow rate liter per minute of argon and flow rate liter per minute of carbon dioxide.
Here you should pay attention - the readings of the pressure gauge differ during a pause and during operation, therefore, when making adjustments, it is better to hold the burner in your hands from time to time, releasing the air - increasing the air flow, the arrow confidently goes up, but decreasing it does not move until the existing one is reset pressure. And since we’re talking about air consumption, we need to pay attention to the compressor. The version of the compressor that I have no technological reserve in terms of performance. In other words, this ultra-quiet German miracle sometimes requires a wait for long and frequent cuts. And waiting and catching up is the most sneaky thing while working.
That is why a propane cylinder was purchased at the ferrous metal collection point and converted into a receiver. I’ll say right away that such a rework is fraught with unpleasant things. The first problem is that the tap has a right-hand thread, and if you decide to use such a cylinder for a receiver, you will be puzzled by finding a fitting for a hose with a right-hand thread. Having visited a couple of stores, I found out that they didn’t have anything like that, so I decided to weld a half-inch steel coupling and screw a fitting for the hose into it.
Here you need to be extremely careful, because even if the valve on the cylinder is open, there are condensate vapors inside the cylinder and I have great doubts that someone wants to cause a cylinder explosion in their yard or garage. The first thing to do is drill a hole for the welded coupling. At the exit, the drill can heat the steel red hot, this is dangerous, so drilling should be done at low speeds with a continuous supply of water to the drilling area. It is better to drill with a 5-6 mm drill, and then drill the hole to 8-10 mm, also continuously supplying water. As soon as the hole is ready, you need to fill the bottle with water right under the hole and only then weld the coupling. I tell everything as it is - I didn’t fill it with water right away, and as soon as the electrode touched the bottle, I was glad that I had just pooped and didn’t have to wash my pants. A rather long stream of flame snorted and immediately went out. With my outstretched hand, I again twitched the electrode near the coupling and the hole again spewed out a flame, which immediately went out. The third time I didn’t play around anymore, but went for the hose and started pouring water. After the coupling was welded, the water was poured out, the cylinder was turned over and the bottom of the cylinder was allegedly re-welded with three electrodes. More precisely, the bottom was simply well heated and when the balloon was placed on the bottom again, the remaining water drained and evaporated. To be on the safe side, I kept the cylinder in the sun for a couple of days, fortunately the weather allowed, and only after that I screwed in the fitting and connected it to the compressor. Only after this did the supply of compressed air become sufficient. There is another compressor in the garage. My father-in-law bought this compressor and has had it for quite some time. I don’t want to disassemble the wheels it knocked down, so here’s a photo and a small clarification - this compressor is quite enough for continuous work with a plasma cutter. Therefore, if someone is going to buy an AuroraPRO AIRHOLD 42 plasma cutting machine for intensive work, then this version of the compressor is very similar to the Aurora Air-25 compressor - there are also two sockets for connecting hoses with their own pressure gauges and an air flow regulator, the same The engine power and performance have, indeed, already faded, but most likely they will be the same.
You can, of course, take BORA-6, but a difference of 800 rubles at such costs will not make a difference, but a productivity of 200 liters per minute versus 160 liters can be significant - according to the passport, a plasma cutter requires 170 liters per minute, therefore BORA-6 will work almost to the point of wear and tear. Personally, my lack of breath required an additional receiver, and this cost 500 rubles, i.e. the difference in compressor price has become even smaller. In addition, the compressor used is clearly overloaded - I had to install additional cooling fins, because while the receiver is filling, the compressor heats up to 70 degrees, and this definitely increases wear. If anyone hasn’t caught up with why I’m stuck with Aurora compressors, then I remind you that if something happens, you will need to contact one service center, and not two. Again, I don’t insist - the ruler is your own hand, you can even order a plasma cutter from China and pump the air with a bicycle pump. But first, it makes sense to think a little about this. Yes, a Chinese plasma cutter is cheaper, but pay attention to the warranty. The guarantee is only upon arrival and if the plasma cutter runs out after a month or two of operation, repairs will be done at your own expense, and repairs are not cheap. The point here is not only that the components are expensive, but also that the boards are generously coated with varnish to increase moisture resistance. Picking varnish gives repairmen such pleasure that for this thrill they definitely raise prices for repairs. There is another rake - now they are starting to put controllers almost everywhere, and if in such a device there is just a controller and its firmware is lost, then I can’t even imagine where you can get it. When you buy devices from officials, you get a real guarantee, and for AIRHOLD 42 it is two years. Yes, of course, if something happens, I will have to drag it to a service center 100 km away, and then go pick it up from repair, but the device will be repaired and the warranty will continue... I’m not trying to persuade anyone, I just voiced my thoughts, you have the right to do what according to your conclusions.
The first experiments using a plasma cutter showed a really high cutting speed, much higher than the cutting speed of a grinder. But with the plasma cutter, I personally faced a rather serious ambush - the plan was to cut stainless steel, and since air with a huge amount of oxygen enters the melting point quite intensively, the cuts were already covered with rusting oxides and after the cut I had to remove a certain layer of metal with a grinder. And this is where the dilemma arises - either quickly cut with a plasma cutter and then sand with a grinder, or immediately cut with a grinder, without further processing. Stainless steel is a thing with character and it eats up cutting discs quite intensively, and after trying several different options, I came to the conclusion that with a stainless steel thickness of more than 2-3 mm, it is better to cut with a plasma cutter, and then process the end with a grinding wheel, and with a metal thickness of up to 2-3 mm, immediately cut with a grinder with a cutting disc 1 mm thick, these are just 125 mm discs. We haven’t talked much about theory, we can move on to practice, and in order not to stray too far from cutting stainless steel, I’ll say right away that I tried feeding both argon and carbon dioxide from cylinders instead of air. With argon things are a little better, but at this consumption the cutting turns out to be really golden. With carbon dioxide, I couldn’t see any difference between cutting with air, so we’re closing this topic - the plasma cutter needs air.
So, we have the AuroraPRO AIRHOLD 42 - a plasma cutter using compressed air. The kit includes a PT-31 torch with a 5-meter cable, a 3-meter cable with a ground clamp, a reducer and a piece of pneumatic hose, I don’t remember how many, but exactly 3 meters. A plasma cutter requires an air supply of at least 170 liters per minute at maximum cutting modes. The cutting current is adjustable from 20 to 40 amperes. The power of the generator during autonomous operation must be at least 6 kW. A question may immediately arise: at a current of 40 amperes, the plasma cutter consumes about 6 kW. Where does everything else go??? After all, 6 kW welders develop a current of 200 amperes, but here it’s only 40. But it doesn’t go anywhere. The arc length of the Aurora plasma cutter can reach 2-3 centimeters, and this already requires quite a decent voltage - clearly more than for conventional welding. Using Ohm's law it is not difficult to calculate how many volts are supplied to the arc. To do this, divide the power of 6000 W by 40 amperes and multiply the not entirely successful efficiency of 95%. We get 6000 / 40 x 0.95 = 142.5 volts supplied to the arc. Let's check this in practice. I use a cheap Chinese oscilloscope, because if the arc goes out the oscillator will turn on and I’m not sure that the oscilloscope input will remain alive. At least this little bastard is not so pitiful.
As a result, with the current regulator turned to maximum, we got about 100 volts. At minimum - 80 volts, at idle the amplitude reaches 36 volts. If translated into Russian, then 42 amperes at 100 volts is 4200 W, of course, you need a network that can easily withstand 5 kW without network voltage dips, and a generator is certainly no less than 6 kW, so the power indicated in the passport appeared. By the way, at the moment of ignition of the arc of the plasma cutter, the oscilloscope restarts and this is just a clear indicator that at the moment of ignition the plasma cutter gives a fairly decent surge to the network and the plasma cutter and the oscilloscope are powered from the same carrier. This is an extremely unpleasant thing and it cost me three LED matrices. The first 50 W LED worked great for about a week, until I noticed that the brightness had dropped - a quarter of the matrix was no longer lit. I didn’t hesitate to attribute this to the quality of the matrix until I had to cut off a short piece of metal and started putting on a welding helmet. At the moment the arc was ignited, the matrix flared very brightly and I clearly saw that half of the matrix was no longer burning. Without hesitation, I remove the two twenties hanging above the soldering table and hang them over the workbench. Trial ignitions showed that at a current of up to 25 amperes everything is fine - the LEDs only flicker slightly and nothing more. But as soon as the current was set to maximum, during the first ignition, a quarter on one of the matrices flew off. Moreover, energy-saving lamps powered from the same line did not react at all.
After a little thought, I connected the lamps via an extension cord - they hung on above the soldering table and did not burn out, and the matrix hanging above the workbench was already practically dead. Trial fires showed that the outbreaks were significantly reduced, but still remained. I disconnect the network for the plasma cutter and for lighting, i.e. I throw a separate wire to the junction box. Tests again - the flashes were preserved, but a piece of the matrix fell out not the first time, but the tenth time. This is of course good, but still something is wrong. I didn’t start looking at the network with an oscilloscope, although I had already started preparing. It suddenly dawned on me that I was a pretty big piece of an idiot. Everything is sewn up with metal, but not a damn thing is grounded
, although they are connected to each other, sometimes with screws, sometimes by welding. I don’t have the opportunity to assemble proper grounding, but a little later, when I put things in order in the yard, I will definitely do this, but for now, an 8 mm bolt was welded to an ordinary crowbar about 180 centimeters long and this crowbar was welded in the corner of the room, right through the floors ( the floor is quite low above the ground, only three fingers) I drive it into the ground. I connect the workbench with this crowbar using a 6 square copper conductor and do a test ignition at maximum current. A barely noticeable blinking of the matrices, more precisely at that moment it was already half of one and a quarter of the second. And then, no matter how I ignite the arc of the plasma cutter, there is a barely noticeable increase in brightness for a fraction of a microsecond and not every time. That's it - the problem was solved in a fairly simple way, because I was already planning to fence the network filter. New LED lamps were assembled above the workbench and have been working properly since December 2016 to this day, and quite a lot of metal has already been cut with a plasma cutter... This is why the most basic things are forgotten to be done??? An elementary violation and I have three, almost dead, LED matrices. No, even theoretically it couldn’t kill me - all the hardware is connected to each other, therefore the potential difference has no place to come from, but I didn’t expect such a problem with the network. Let's return to the plasma cutter, more precisely to the PT-31 torch. From the point of view of fastening the distance limiters to the nozzle, this torch is not entirely convenient - for WSD60P torches there are special inexpensive brackets for holding the torch at the same distance from the metal being cut.
There is something similar for the PT-31, but they are clearly too sophisticated, since these guide wheels are an integral part of the compass, and I am not ready to pay 1500 for all this, either morally or financially. Therefore, without hesitation, similar devices were made, and in addition to the bracket, another stray was made with one leg. This crutch allows you to ride on metal that is not quite smooth, for example, on a sheet that has already been welded or has been damaged by rust. The devices are made using a regular rag and epoxy glue. The ceramic cap is wrapped in food-grade cellophane, and then a strip of fabric soaked in already diluted epoxy is wound. The length of the strips was 30 centimeters. Do not forget about the protrusion along which this workpiece will be cut and then tightened with a self-tapping screw. After winding the first strip, a bracket made of steel wire is applied and the second strip impregnated with epoxy is wound in the same way. To add density, all this stuff is wrapped with threads - they press the fabric much more tightly. After the glue has hardened, a cut is made along the protrusion with a hacksaw. A hole is drilled for the self-tapping screw and the castings are removed. The main thing here is to guess the height of the bracket - if it is very high, then the nozzle will not reach the workpiece and the arc will not ignite. If it is low, then the nozzle will touch the workpiece and there will be no use from this bracket. In order not to chase millimeters of height, I used a stainless steel filler rod - it is quite rigid and I adjusted its height already in the frozen mandrel by simply bending it in width.
Using this attachment, it became possible to cut metal with a plasma cutter using a regular ruler, since the flame is already far enough away from it and it becomes difficult to damage the ruler. However, there is another option for the line, but I don’t really like it because it requires both time and consumables. This ruler is made of a steel strip onto which diamonds are welded on one side. These diamonds create a gap between the ruler and the metal being cut, and the flame passes under the ruler without damaging the flat surface. However, when the nozzle touches this line, arc power is lost. To solve this problem, thermal tape is used, a polyimide tape 15 mm wide, which is wrapped around the nozzle. The tape is high-temperature, can withstand 260-300 degrees, and the width is almost equal to the height of the nozzle and, when installed on the burner, is additionally pressed with a ceramic cap. However, during cutting, the temperature of the nozzle rises so much that the tape begins to peel off from the nozzle and has to be replaced. In addition, there is one more inconvenience - 15 mm wide tape is not very popular and may not be immediately available. 12 mm is a bit narrow - the ceramic cap does not grip it, so you have to cut it at 20 mm.
The wear of the tape is also affected by the oscillator - if the nozzle does not touch the end of the workpiece, then a high-voltage spark pierces the wound tape into the ruler and the resulting hole quickly becomes frayed and the nozzle begins to touch the ruler. In general, it can be used, but it is better not at high currents and it is better to press the nozzle during ignition. According to the principle of this ruler, there is a square, diamonds are welded only on the long side. I’ll say right away that making a square is not such a simple task. The fact is that each welding point moves the angle away, so it is better to weld in single points, allowing the workpiece to cool. I was in a hurry and had to get 90 degrees by intensively welding one side, and then cut off these fused snot with a grinder. You can also use your second hand as a height limiter, but this method is more suitable for artistic cutting - it’s very difficult to make a straight line using a ruler this way, but cutting out all sorts of openwork figurines is quite convenient. I have already shown a compass for a plasma cutter, so I will give only a brief description here. The supporting rod is a stainless steel filler rod. Thermal tape is used to insulate the nozzle and is attached to the part through a drilled hole. The length of the rod is fixed with two screws, which clamp the rod between two steel bars. It took about an hour, maybe an hour and a half to make. Well, that’s probably all I wanted to say about the plasma cutter in general and the AIRHOLD 42 in particular. All that's left is to see what's inside. For you it will be a satisfaction of curiosity, but for me it will be a means of blowing off dust, since it has not been blown out since the moment of purchase. General impressions of this wonderful device. The thing is quite convenient to use and significantly increases productivity when cutting sheet metal. Allows you to cut metal in places where it is impossible to reach with a grinder. It is relatively unpretentious to the network - simultaneous metal cutting and semi-automatic operation were carried out, but I am 150 meters from the substation, so the voltage dips are not large. A plasma cutter definitely requires gaining experience - having bought it and turned it on right away, you shouldn’t try to cut something important - it’s better to practice on pieces of scrap metal. This especially applies to the use of a plasma cutter when performing car body repairs. By making several devices you can significantly facilitate the work and increase its quality.
Well, that seems to be all... If something is not clear, well, not clear AT ALL, then we look further. A woman who held a plasma cutter torch in her hands only a couple of times, cutting a few triangles for stiffening ribs. But then everything was set, and now she will try to completely understand this infernal machine. If after this you say that you didn’t understand how to use it, then I can safely say that there are still a lot of interesting things to do, for example, collecting stamps, making herbariums and ekibanos, writing poetry, driving cars around hypermarkets, sweeping yards, sitting in the library or fry cutlets at McDonald's, this will suit you, but plumbing and welding work is definitely not for you.
COMPASSES FOR PLASMA CUTTER
PLASMA CUTTER. Part 1
PLASMA CUTTER. Part 2
PLASMA CUTTER. Part 3
PLASMA CUTTER.
Part 4 Site administration address
Principle of operation
The operator activates the power source, current flows to the electrode. Afterwards, a duty welding arc is formed with a temperature of 6000-8000℃. It does not appear immediately between the electrode and the part.
Compressed air enters the nozzle chamber, conducting a current discharge. As it passes through the nozzle, it heats up and becomes ionized. Plasma is created, which flies out of the hole at a speed of 2-3 m/s. The temperature of the heated gas reaches 30000℃.
After the plasma contacts the surface, the pilot arc is switched off and the working environment is activated. The metal begins to melt. The particles are blown away by the flow of air masses.
Setting up a plasma cutter
The plasma produced by the air plasma cutting complex is ionized and heated air, which has passed into the fourth state of aggregation and become a conductor of electric current. The plasma temperature is almost 30,000 degrees. The plasma column melts the metal and blows it out of the cutting zone. Plasma cutters are widely used in all branches of mechanical engineering, during installation or dismantling work, during the repair of various equipment and in private households.
Unlike hand tools, a plasma cutter allows cutting to be completed much faster and, in addition, the edges of the part in most cases do not require additional processing. The cutting line can be of any configuration, which makes the plasma cutter a universal tool.
To understand the scheme for correctly setting up a complex for air plasma cutting (plasma cutter), we first define the main components:
Power source - generates cutting current with a bayonet-voltage characteristic. It can be transformer or inverter, with contact or non-contact ignition of the arc, industrial (connected to a three-phase 380V power supply) or household (connected to a single-phase 220V power supply).
A plasma torch is a cutter in which a plasma arc is formed and which is directly operated by a specialist when performing work. The main components of a plasma torch are a nozzle, through which you can control the shape of the plasma flow, and an electrode;
Compressor - necessary to supply compressed air to the system.
the program for setting up a plasma cutter for manual cutting using the example of JASIC CUT-100 (L204) equipment using a P-80 hand-held plasma torch. JASIC CUT-100 (L204) belongs to industrial inverter equipment, connects to a three-phase power supply and has non-contact arc ignition.
Mount the equipment so that there are no objects at least 0.5 m from the rear and front panels that obstruct air circulation and access to controls.
Adjust the cutting current on the power source using an empirical relationship: 3-4 Amperes per millimeter of thickness of a part made of ferrous metal, and 7-8 Amps per millimeter of thickness of a part made of corrosion-resistant steel (stainless steel). So, a cutting current of 80 Amps will be enough for high-quality cutting of carbon steel with a thickness of 20 mm.
Check the correct choice of diameter (in millimeters) of the nozzle outlet on the plasma torch depending on the cutting current:
1.1 mm - up to 40 Amperes;
1.3 mm - from 30 to 60 Amperes;
1.5 mm - from 50 to 80 Amperes;
1.7 mm - from 70 to 100 Amperes;
Adjust the working air pressure - turn on the air supply by pressing the button on the plasma torch on the plasma torch, while air is flowing out through the nozzle, set the value to 0.5 MPa on the pressure gauge located on the power source of the plasma cutter. The quality of the prepared air and its pressure directly affect the quality of cutting and the durability of the consumable parts of the plasma torch, since the air not only ensures the direct combustion of the arc and the blowing of molten metal, but also performs the function of cooling the plasma torch. Before feeding the air into the plasma cutter path, it must be cleaned of dust, oil, and also dried. To achieve optimal results, the air must meet the requirements of ISO 8573-1: 2010 Class 1.2.2.
Select the desired equipment operating mode: two (2T) or four (4T) cycles. In 2T mode, when you press a button on the plasma torch, the pilot/cutting arc lights up, and when it is released, it goes out. In 4T mode, the equipment continues to operate after releasing the button on the plasma torch. If you press the button on the plasma torch again in 4T mode, the equipment goes into the arc attenuation state.
Setting up a CNC plasma cutter differs only in the need to select the 2T operating mode; all other settings are the same as for manual cutting. When using a CNC machine, the control button on the plasma torch is not used; the operation of the power source is controlled from the remote control of the CNC machine.
In addition to the current strength, air pressure and the diameter of the nozzle outlet, the quality of the edges of the parts also depends on the speed of movement of the plasma torch. Cutting must be carried out at a speed that will not allow the flow of sparks to fall on the nozzle and insulating sleeve of the plasmatron. Too slow a speed will lead to burrs on the back side of the part, a wide cutting zone and overheating of the part, while a high speed will not allow cutting through the metal. The cutting speed is always selected empirically for each case separately.
Rules for operating the device
Plasma cutting of metal involves interaction with electric current and high temperatures. Persons who have reached the age of majority are allowed to work with the installation. The welder undergoes a medical examination and must meet health conditions.
The operator wears special protective clothing. Before carrying out welding activities, he undergoes instructions, studies the device and operating principles. The master must know the rules for using the device, the features of cutting material with various technical parameters, and first aid techniques in emergency situations.
Before starting to work with a plasma cutter, the welder checks it for serviceability and removes all objects that interfere with the production process. Before starting the device, the worker adjusts the indicators in accordance with the parameters of the workpiece: the type and thickness of the product.
Types of cutters and the purpose of each of them
A lot when choosing a plasma cutter will depend on what area you plan to use it for. The fact is that the design features of all types are very different from each other - each device has its own type of arc ignition, as well as the power of the cooling system.
- Instruments that operate in protective gases – hydrogen, argon, helium, nitrogen and others. Such gases have reducing properties.
- Cutters that operate in an environment of oxidation gases. Such things are usually saturated with oxygen.
- Devices used for working with mixtures.
- Cutters that work in liquid-gas stabilizers.
- Devices that work with magnetic and water stabilization. This is a special tool that is very rarely used, so it is quite difficult to find on the open market.
There is another classification that helps you divide and buy a plasma cutter according to the type of equipment that is used for the work.
- Inverter - an option recognized as economical, can handle metal parts with a thickness of up to 3 cm.
- Transformer - such devices are capable of cutting metal with a thickness of up to 8 cm, the option itself is less economical.
Based on the type of contact, devices can be divided into two groups - contactless and contact. By the name it is already easy to understand what methods of using a plasma cutter are available. In the first case, the device does not require contact with the metal being processed, and the thickness of the workpiece can be any, while in the second case, contact with the metal is required, and its thickness must be at least 1.8 cm.
Another category is the type of use and the ability to be powered by electrical energy. in this case, there are two positions - a household cutter, which operates from an alternating current network and a standard voltage of 220 V, and an industrial one, which can only be connected to a three-phase power supply with a voltage of 380 V.
Please note that even those cutters that have a minimum power will be from 4 kW. For this reason, when connecting it to a household electrical outlet, first make sure that it can definitely withstand such a load.
This load is not the only one, since in the plasma cutting system the device uses cooling, and for this purpose the standard equipment comes with a compressor, which will also operate from the mains. Take into account its power when connecting to home power.
Benefits of technology
Plasma cutting has advantageous characteristics over other methods of processing metal products. The technology is regularly improved, which makes it possible to obtain parts with high cutting accuracy.
The advantages include:
- Versatility – all types of metals can be processed thanks to the choice of the optimal mode. The material does not require preliminary preparation; the presence of rust, dirt or paint is allowed.
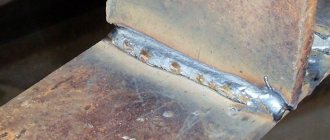
- Precision - unlike processing products with a grinder or gas cutter, no sagging or burrs remain on the workpiece. The cut remains clean; subsequent cleaning and removal of defects is not required.
- Possibility of making various geometric shapes. The plasma cutter easily copes with cutting material, forming a complex cut.
- Safety – the absence of flammable gases makes the metal cutting process safe.
- There is no risk of bending the semi-finished product - the metal is heated in a small radius, so the risk of deformation of parts is minimal.
The devices are easy to use; the equipment does not require preliminary settings for the supply of flammable gas or a stream of oxygen. The device starts by pressing one button.
Selecting the optimal current depending on the thickness of the metal
To completely cut through metal without defects, you need to correctly set the cutting current before starting the work process.
For steel with a thickness of 1 – 8 mm, a current in the range of 20 – 30 A is suitable,
Up to 15 mm – 30 – 50 A.
Up to 25 mm – 50 – 70 A.
If it is necessary to process metal with a thickness of 30–40 mm, you need a device with a maximum current of up to 130 A.
In addition, you should select the correct nozzle diameter depending on the cutting current. This affects the quality of the cut and the service life of the plasma torch parts.
The higher the current, the larger the nozzle diameter required. For 40 A the nozzle is 1.1 mm, from 30 to 60 A – 1.3 mm, 50 – 80 A – 1.5 mm, 70 – 100 A – 1.7 mm.
Standard air pressure is 0.5 MPa.
Disadvantages of working with a plasma installation
Processing metals with plasma cutting machines has not only positive qualities. The technology has its disadvantages:
- Limitation on workpiece thickness - the maximum permissible cutting thickness using industrial equipment is 100 mm.
- Requirements for cutting angle - a positive result is achieved when installing the plasma torch at an angle of 90 degrees to the workpiece. The permissible deviation from the norm is 10 degrees. If this indicator is exceeded, wear and tear on the device and consumables increases.
- It is not possible to use two cutters at the same time due to the complexity of the hardware installation.
- Work breaks – equipment must be turned off periodically. Each model has its own parameter for the duration of continuous operation. Before using the device, you must read the included instructions.
Strict adherence to the rules for working with equipment eliminates the shortcomings of the device.
Plasma cutting machines allow you to perform straight, shaped cuts in industrial and domestic conditions. Their choice depends on the operating conditions and purpose. Beginners are advised to familiarize themselves with the rules for using the device. Plasma cutting allows you to process metals with high productivity and create safe working conditions while observing operating rules.
Nuances of choice
When choosing a plasma cutter, you need to pay attention to the following points:
- Versatility . There are devices that can be used not only for cutting metal, but also for stick electrode welding, as well as for argon arc welding. However, it should be remembered that versatility usually has a bad effect on the quality of operations performed and productivity. As a rule, a universal plasma cutter cannot cut workpieces thicker than 11 mm;
- Current strength. The higher the current, the hotter the arc heats up; accordingly, the faster plasma cutting is performed, and the maximum thickness of the part that can be cut using this method increases. Therefore, you first need to decide for what purposes you need a plasma cutter, i.e. what parts you will have to work with. If you cut steel up to 20 mm thick, a device with a current of 20 A will be sufficient. If the thickness of the metal is greater, then you will need a more powerful plasma cutter - with a current of 40-60 A. For industrial devices, the current can reach 200 A and more;
TelWin Plasma 60 HF – high-quality plasma cutter from an Italian manufacturer
TelWin Plasma 60 HF
This model can be classified as industrial, since it has a relatively high power - the current is 60 A, and it is also designed to operate from a 380 V network.
The device can cut steel up to 20 mm thick. In addition, the manufacturer draws attention to the following advantages of the model:
- The presence of a microprocessor that controls many parameters of the device;
- Possibility of adjusting current strength;
- The built-in pressure gauge allows you to monitor air pressure.
This plasma cutter costs 110,142 rubles.
Resanta is another Chinese-made household plasma cutter with a current of 25 A. The manufacturer claims that this “baby” is capable of cutting metal up to 12 mm thick.
Another advantage of this device is its relatively low cost - the price is 28,900 rubles.
Gorynych is a compact multifunctional device from a domestic manufacturer with water cooling
Gorynych
Gorynych is a multifunctional device from a domestic manufacturer. In addition to plasma cutting, electric welding is also available to him.
Gorynych’s current strength is not large, 3–10 A, which allows him to cut metal up to 8 mm thick. Its main feature, in addition to its versatility, is water cooling. This allows the device to work continuously for 25 minutes.
In addition, it is very compact - the weight of the device does not exceed 0.7 kg. The price is within 43,000 rubles.