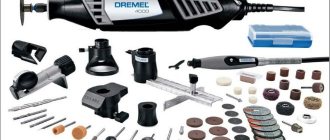
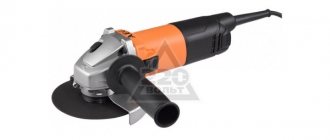
To process small items, you can use an engraver. Using a microdrill, grinding and milling of various materials is carried out. The use of various attachments allows you to expand the list of jobs that can be performed with a power tool. Often, beginning craftsmen are interested in the question: nozzles for engravers, which ones are used for what. Below you can learn more about the types of equipment and their scope of application.
To prevent the microdrill from vibrating during operation, it is necessary to first center the nozzle
What are engraver attachments?
Today, construction stores offer a wide range of attachments for working with engravers. The design of the equipment consists of:
- a shank with which the tool can be fixed in the equipment chuck;
- the working part interacting with the materials being processed.
When choosing attachments for an engraver, you should pay attention to the characteristics of the materials being processed and the list of tasks that you plan to perform. If the mini-drill will be used on an ongoing basis, it is best to immediately purchase a full set of consumables.
Important! Professional kits contain equipment that allows you to process metal, wood and other surfaces.
Classification of nozzles
There are a large number of varieties of equipment for working with a mini drill. The wide range on the market allows you to select attachments for wood and many other materials that engraving equipment can work with. Also, individual craftsmen make them themselves.
Structurally, the attachments (burs) consist of two parts;
- tail, clamped in the tool chuck (diameter from 0.8 to 8 mm);
- worker who processes materials.
Equipment is classified according to two main criteria:
- by the type of material from which they are made;
- by area of use (purpose).
By type of material processed
Based on the material, engraver cutters are of the following types.
- Made of hard alloys (carbide) with small and large working parts. There are different types of notches on them. Designed for initial or intermediate processing of workpieces of different hardness.
- Diamond-coated steel, used for basic work operations with various materials.
- Disc holders that can be equipped with felt, cutting, or rubber wheels, depending on the properties of the workpiece and the nature of the work performed.
- Rubber with the addition of corundum, used in processing metal workpieces.
- Abrasive, which are used to perform work on stone, metal, glass, and ceramics.
- Felt, intended for polishing wooden surfaces.
There are also combination burs that have a steel shank and a carbide working part. Their area of application corresponds to the material of the head.
Carbide equipment is of high quality, durable and is one of the most expensive consumables for Dremels . The shape of the tips determines the features of its application. With the help of such peak burs, it is good to process bone, plastic, and make tracing (indicate the contours of the picture). Diamond attachments are also of high quality, even if the kit they are included in is classified as cheap consumables.
On the market you can find a set of burrs, all the elements of which are marked with some color - it indicates the level of sharpening. Those marked black are the most productive burs, while the sharpness of green or blue ones is worse. The yellow-marked attachments are the best choice when finishing workpieces.
By purpose
You can use an engraver with attachments not only for engraving, but also for performing other work operations. The breakdown of consumables used in the operation of straight grinders is presented in the table below.
| Work performed | Nozzles used |
| engraving | the varieties discussed above are suitable |
| drilling | performed using steel or carbide drills |
| polishing | circles made of felt, cotton, felt, sandpaper, leather, as well as special devices (holders) that you can wrap yourself (for example, with felt) |
| grinding | grinding stones (of various shapes and from different materials) and wheels (of sandpaper), diamond rings, rubber cylinders |
| tongue and groove | burs with a spherical working part |
| cutting | cutting discs |
| milling | cutters |
| cleaning surfaces (for example, from rust, scale) | wire (steel), thread, fabric brushes |
| finishing of holes or cavities | diamond cutters |
| creating grooves | cone burs |
Consumables from each group can be used when processing various materials. At the same time, milling equipment is used mainly by professionals.
Dremels, which have a flexible shaft installed, are equipped with any types of consumables that fit the diameter of the tool chuck.
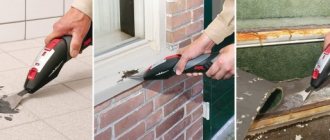
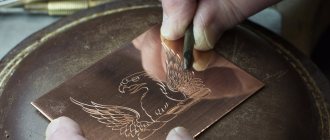
Engraving pen
The design of the graver consists of a handle, a ring and a blade. The handle, the outline of which resembles a mushroom, is turned on a lathe. A sleeve mounted on its tip protects the handle from cracks. It is convenient for novice craftsmen to engrave copper and brass products with a pen. Experienced engravers can work with any non-ferrous metals.
Note! When mastering engraving technology, the first step is to achieve clear application of straight and curved strokes.
With a sharp sharpie you can easily cut metal to a depth of 0.1-0.2 mm
Homemade attachments / cutters / consumables for engravers, drills and drills
The article will touch upon the topic of how to make consumables with your own hands. It's no secret that Chinese nozzles are of very low quality, while branded ones are overpriced. So in some cases it will be more profitable to do it yourself. Under the cut you will see my homemade attachments and also interesting solutions from the Internet .
- Abrasive attachments
- Petal circle for engraver
- Original sandpaper on a rubber drum does not last long, so you need to find an alternative solution. Cut out a circle of small diameter from plywood:
Let's give it a more even shape:
Making cuts with a hacksaw for metal:
We glue sandpaper into the resulting slots using epoxy resin:
We get:
Flap wheel for drill
The nozzle has a larger diameter. To prevent a “spread” as in the previous version, when gluing, the sandpaper must be tightened with an elastic band. This occurs because the base of the fabric absorbs the resin from the cut and becomes rough.
Finished nozzle:
- The advantage of flap wheels is that they last an order of magnitude longer than regular sandpaper on a drum of the same diameter.
- Emery for a drill from rollers from a tape recorder
- Older reel-to-reel tape recorders have large rubber rollers with a metal sleeve. We place a bolt on the bushing and glue sandpaper onto the rubber:
- Cutting wheels for engraver
- The topic is quite common, but I’ll still tell you for the sake of completeness.
- We take a thin cutting disc for an angle grinder, a compass with two needles, an awl, and unnecessary scissors:
1) We draw circles with a compass (you shouldn’t make too large circles, it’s inconvenient to work with them. The optimal size is slightly smaller than a standard circle) Make sure that the center of the circle is in the middle of one of the squares of the reinforcing mesh.
2) Use scissors to cut the disk into sectors, and then cut out the circles themselves located in the sectors. Metal scissors are suitable for this work, but ordinary stationery scissors can also be used, but this makes them more dull, so we take those scissors that we don’t mind.
3) Using light rotational movements of the awl, we begin to make a hole alternately on both sides. The diameter of the hole must be equal to the diameter of the screw. If the hole is any larger, it will break.
- 4) Grind the circle at low speed on an unnecessary sharpening stone:
- And we get reinforced cutting wheels:
Making such circles is much cheaper than buying them. They also last longer than purchased non-reinforced circles.
Decorative sanding attachment
A self-tapping screw without a head is screwed into the cork, and a washer is glued to the base. The chuck's jaws will rest against the washer and prevent the screw from being screwed in deeper.
- It is most convenient to use this attachment on a drilling machine. Instead of a self-tapping screw, you can screw a felt attachment into the cork:
- Drill polishing attachment
Another fairly common topic. The felt from the felt boot is clamped with a bolt with wide washers. Polishing paste, such as GOI paste, is applied to the felt.
- The following are a few examples of abrasive attachments taken from the Internet.
- Sanding drum for drill
- Sanding drum for engraver
On a lathe, a metal drum is turned with a slot into which the edge of the najak is tucked, and it is wrapped around the drum. Fixation occurs with an elastic band. The same structure can be made from plywood, as shown in the previous version.
- Grinding cylinders for engraver
- Comrade Marshall suggests making cylinders this way, I quote:
- In order to make this type of consumable, we will need: a durable, but as thin as possible fabric (preferably cotton), sandpaper of the required grain size, and most importantly, a tube of suitable diameter, on which the cylinders will be placed during gluing.
So, we take the fabric and cut it into long strips 12 mm wide. Then we cut these strips to the size of the diameter of the tube with an overlap of about 1-1.5 cm, pull them tightly onto the tube (so that they do not dangle) and glue our pieces directly on the tube using regular PVA.
The next task is a little more complicated: you need to correctly make a stencil, according to which the skins themselves will be cut out in the future. The stencil is shown in the picture on the right under the tube. We do this: take and cut off a piece of skin the same width as the fabric, but 1 cm longer. We apply it on top of the glued fabric and mark the place where the two ends of the skins should meet.
After this, we carry out the necessary geometric actions: from the point of the proper junction we draw a line across the skin, from the other end of the skin, at the same distance, we do the same, after which we draw diagonals in the resulting rectangles and cut off pieces of skin along these diagonals.
Now, when you place your stencil on top of the fabric glued to the tube, you get an accurate diagonal connection of the ends of the sandpaper. Now you have a stencil that you can trace with a pen along the outline on the back of the sandpaper.
Abrasive tools
Nozzles, the working part of which is made of rubber or abrasive, belong to the category of budget tools. Abrasive equipment is available for sale, painted in various colors. This allows the technician to quickly determine the category of attachments.
For example, green tools are made from silicon carbide. They can be used to process stone, glass and ceramic surfaces. Abrasive equipment is often used for boring holes, grinding surfaces, etc.
Abrasive attachments
As the name implies, this class of tool is designed for grinding or rough removal of a layer of material of small thickness. Usually a set of abrasives is supplied with engravers. There can be from 3 to 6 pieces, shank size 2.3 mm, with different shapes of the working part.
Abrasive attachments allow you to:
Tools of this type are quite rough. The results of their work are difficult to control. Therefore, they are most often used in everyday life, home workshops for operations without strict quality requirements. High-level professionals rarely use this type of tool.
In addition to the steel rod, the design contains a mixture of rubber to which various abrasive particles are added. It can be aluminum oxide or diamond chips. Abrasive attachments are used for working on metal, ceramics, glass, and other materials.
Some manufacturers add dyes to the body of the instrument, indicating the optimal scope of application. For example, a red product is made with the addition of aluminum oxide. It works well on metal surfaces.
The area of application depends on the color of the nozzle
Green bits are designed for engraving stone and ceramics. It is acceptable when working with glass. The body of such a nozzle contains silicon carbide. Like other general class products, painted ones are offered in different shapes and sizes.
Working attachments for professional engravers
A large number of professional sets of attachments for engravers go on sale. Manufacturers, in addition to cutters of various shapes and sizes that are included in the package, complement the sets:
- drills that turn the engraver into a multifunctional drill;
- felt and abrasive rollers;
- wire nozzles that help clean the surfaces being treated from rust;
- cutting discs for mini drills.
Professional kits will be useful not only to specialists, but also to home craftsmen who systematically engrave, polish and grind various surfaces.
What is important to know about nozzles
Stores sell dozens of attachments that are suitable for processing wood or metal, ceramics, etc. An inexperienced person may get confused in choosing due to the extensive range. However, any nozzle consists of only two main parts, which never change:
- Shank. Using this part, a person will be able to secure the element in the cartridge, and then begin processing the material.
- The second main part is the working part. It is designed to perform direct operations with various materials.
For the processing to be effective, it is important to use a special engraving paste. Especially if a person plans to thoroughly grind the surface. The product will be indispensable for everyone.
But there are not only processing attachments, but also those designed for cutting off excess parts or engraving the surface. More details about each product can be found in the instructions that come with the kit.
Fan
The shape of this type of equipment resembles a lady's fan. In the central part the structure is equipped with a small disk. The sandpaper is fixed using the overlapping petal method.
The equipment can change shape, which allows the master to process the most inaccessible places.
The use of professional attachments allows you to accurately apply images to the surface of various materials.
Crab Handles ♋ Almois Jobbing Official
Suddenly we make these three attachments (burs, bits) for a mini drill (drill, Dremel):
The multi-leaf emery brush (“daisy”) on the left is needed for uniform and silky (matte, “rough”) grinding of metal - a very necessary thing in the household. With its help, you can update any metal surface to a new state.
As side information, my drill is like this:
This is a Soviet 24 volt motor, long and narrow enough so that you don’t have to insert it into the handle tube, plus a Chinese collet chuck. Plus a homemade regulated power supply for KREN12A.
So, first we do the simplest thing, but, by the way, a childhood dream - an electric file (or a rotary file):
We pick out the roller from the lighter (by rotating it we knock sparks out of the silicon) and place it on some kind of rod. It is advisable that the rod have a thread at the end so that the roller sticks tightly. Ready.
And now the highlight of the program,
video of this action and everything else that will be described through text and photos below.
Here I would also brazenly want to point out that I came up with all three of these tools (more precisely, how to make them with my own hands) completely independently and made them 10 years ago. But now I’ve seen videos on YouTube from the last 2 years in which people do the same thing (except for the “daisy”) and they have enthusiastic comments, millions of views, blackjack and whores... So now I’m consumed with anger and frustration: my videos with brilliant ideas and really useful tips and crafts, almost no one watches it, and someone even dislikes it