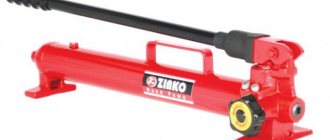
Description of the tool and its purpose
A bore gauge today is a high-precision tool that is designed to determine the size of holes, grooves and other internal elements of any product. It is distinguished by high reliability and ease of use. It can be used to measure a variety of parts with low mass. This instrument is also called shtikhmas. The word comes from the German language. Translated, shtihmas is a device or instrument that measures the diameters of holes.
The design of the bore gauge, in its classical sense, provides for measurement using two ball tips. This method is called two-contact. There are also three-point models for more accurate measurements that have automatic alignment. The mechanism is also equipped with a special element, thanks to which the measurement line is centered.
The types of instruments depend on the method by which the measurement is made. There are two options: absolute and relative. Based on this data, the types of bore gauges are divided. There are two main ones: indicator and micrometric devices.
A mechanical or digital element may be used to demonstrate measurements. Models with a screen, as a rule, weigh less and are practically not susceptible to mechanical stress. They also have a wider range of functions. Their memory can store the data of all measurements in the required sequence.
Characteristics and purpose of the nunometer
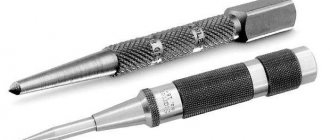
Currently, bore gauges look like tubular rods with a rounded tip. It is with the help of the tip that the instrument is able to measure places that are inaccessible to simple measuring instruments.
In this case, the measurement accuracy error is not reduced. The principle of operation of the bore gauge is that the rod is in a movable state. When immersed in the hole being measured, it transmits data to the reading device.
Mechanisms for transmitting readings vary depending on the type of instruments used. Consider a typical micrometer sample.
It includes the following elements:
- Screw.
- Connecting cap.
- Drum mechanism.
- Protective cap.
- Spherical type rod.
- Locking mechanism.
- Set of extension cords.
The structure of other types of devices may be different. All products are manufactured in accordance with GOST standards.
Like any other device, a bore gauge has its pros and cons. The main advantage is the penetrating ability, with which it is possible to make accurate measurements.
There aren’t too many downsides either – here they are:
- Replacing nozzles if the dimensions of the groove being measured change;
- The need to carefully handle the instrument.
Indicative bore gauge and its features
An indicator bore gauge is a device that uses a relative measurement technique. It must first be configured to a specific value, and then determine how much the real indicator differs from the specified one. The indicator bore gauge can measure holes from 6 mm. In this case, the device has a minimum error in the range of 0.015–0.025 mm.
The design of the indicator bore gauge is quite simple. It has only two components. The first is a rod with measuring nozzles, the second is a round indicator head with a scale on which two types of divisions are presented:
- The main scale with a step of 0.001 mm displays the relative deviation of the parameter being measured.
- Small scale. It marks the total number of revolutions of the instrument needle (a full revolution is 1 mm). With its help you can find out the size of the hole in millimeters.
The device is equipped with additional attachments, the use of which allows you to measure various parts in an extended range.
Before using the indicator bore gauge, you need to select a replacement element that will fit in length and attach it to the device. The tool is then inserted at an angle into the hole being measured. Next, light rocking is carried out to set it strictly perpendicular to the axis of the hole.
After completing these steps, the arrow will begin to oscillate. If its stroke is directed to the left, then the diameter of the hole is larger than the established one, if to the right, then it is smaller. To make the calculations, you will need some data. For example, if, when using a 10 mm interchangeable nozzle, the pointer moves 12 divisions to the right, then the final size will be calculated as 10−0.12 = 9.88 mm. When deviating in the other direction, the sign in the example changes to positive.
To ensure that all measurements are carried out correctly, the device should be held only by the special handle. You cannot touch the rod itself, since minimal heating will cause the metal to lengthen by several hundredths. This will give a significant error and lead to erroneous calculations.
Measurement methods
There are two measurement methods:
- Absolute - carried out using micrometric type models placed inside the part being measured.
- Relative – carried out using an indicator sample.
To successfully perform the operation, you need to take a bore gauge and set on it the approximate value of the hole being measured. The head part falls inside the hole, fitting tightly to its walls.
- For even immersion of the bore gauge, a rotating drum and ratchet are used. Next, the screw is tightened and locked, and the measuring tool must be removed from the hole being measured.
- The result will be the measured parameter on the scale plus the length of the head and, if used, the length of the extension. With the relative measurement option, rocking of the tool inside the hole for measuring cylindrical surfaces is allowed.
The deviation of the arrow on the indicator bore gauge to the left indicates that the measured diameter is less than the required value; when the arrow is tilted to the right, it is greater. Then readings are taken on the scale and summed up in the diametrical size of the hole.
For deep holes, extensions are also used. It only remains to add that, like any measuring instrument, bore gauges require precision and accuracy in their work.
How to use a micrometer bore gauge
For more accurate checking and measurements, a micrometric gauge is used - what it is was described above. This device shows real size values. The measurement error is very small and amounts to only 0.006 mm. To understand how to use a bore gauge correctly, you need to understand its features.
The micrometric bore gauge consists of the following elements:
- drum with scale;
- head for connecting the drum with extensions and removable nozzles;
- fixing screw;
- extension;
- tip - element for taking measurements.
A micrometric bore gauge is not used to measure the diameter of cylinders. With its help, only internal dimensions are determined. There are several ranges that it can measure (in millimeters):
- 50–75;
- 75–175;
- 75–600;
- 150–1250;
- 860–2500;
- 1520–4000.
The design of this device is similar to a micrometer. It also has a screw and a drum, rigidly connected to each other using a special cap. There is also a spherical tip rod, a safety cap and a locking stopper.
To figure out how to use a bore gauge, you need to know the rules for installing it. The measuring device is installed strictly perpendicular to the axis of the hole. One end of the measuring rod should rest on the edge of the hole, and the other should be moved all the way to the opposite surface. This installation principle is similar for all types of bore gauges.
Measuring and reading
Set the bore gauge to approximately the size being tested and insert it into the hole. With your left hand, press the measuring surface of the tip against one of the surfaces of the part being measured, and with your right hand, rotate the drum until the micrometer screw contacts the surface of the part at the opposite point.
By rocking the bore gauge with the center of swing located at the point of contact of the tip with the surface of the part, find the shortest distance between the measured surfaces. After this, fix the microscrew with a locking screw and check the rocking force again, which should be with slight friction.
When measuring the diameter of a cylindrical hole, move the bore gauge in the transverse direction, looking for the maximum size, and then in the axial direction, looking for the minimum value.
Remove the device from the part being tested and take a reading. To do this, you need to add up the length of the micrometer head, the dimensions of the extensions used and the scale value. An example of readings is presented in the table.
| Micrometer head length, mm | Extensions used, mm | Scale readings, mm | Part size, mm |
| 75 | 50 | 8,24 | 233,24 |
| 100 |
Upon completion of work, disassemble the bore gauge in the reverse order of assembly. Wash it in clean gasoline and lubricate it with anti-corrosion lubricant for long-term storage. This also applies to installation measures and extensions.
How to set up a bore gauge
Setting up a bore gauge is impossible without understanding its operating principle. You should know that it is identical to the operating principle of a micrometer, which allows you to compare the indicators obtained on the two devices. If the micrometer has an error within acceptable limits, then you need to follow the following procedure to set up the bore gauge:
- Select a base rod. It can be of any length and must be mounted on a measuring rod.
- The micrometer is set to the same value as the rod.
- The locking screw must be tightened to secure the value.
- The rod sleeve should be fixed in a vice, and its main part should be placed between the measuring jaws.
- The arrow must be aligned with the zero on the dial by rotating the caliper head.
In this way, you can calibrate the value of the device and adjust it to the data necessary for operation and accurate measurement. This will make it possible to measure with an accuracy of a hundredth of a millimeter. Setting up a bore gauge is a very important process that will affect the quality of work in the future. The same algorithm is used to carry out annual verification of the device.
Preparing for work
Before starting measurements, check that the micrometer head is correctly set to zero according to the installation standard.
The adjustment must be carried out at an ambient temperature within 20 ± 5 ° C. Insert the micrometer head between the measuring jaws of the setting standard, and press the tip rod against one of them. By rocking the top of the micrometer head and rotating the drum, determine the shortest distance. The measuring surfaces of the bore gauge should touch the working surfaces of the gauge with slight friction.
Secure the microscrew with the locking screw and remove the head. The zero division of the drum must exactly coincide with the longitudinal stroke of the stem.
After setting the head to zero, unscrew the tip from the coupling, select the appropriate extensions and connect them to the micrometer head. Screw the tip back in.
How to store the tool after use
Proper storage and operation of the device is necessary to ensure its operation and reliability of use. Since the purpose of the instrument is to make accurate measurements, it is necessary to maintain its integrity and avoid major mechanical influences that could affect the calibration. Failure to follow these rules can cause a lot of inconvenience later.
An important step when using the unit is verification. The interval of such examination is one year. During this period, the mechanism may lose its integrity or the strength of the fixing screw, and the accuracy of the readings largely depends on these factors.
The verification procedure includes a number of necessary and extremely important actions. They must be carried out in compliance with all standards, as well as the correct installation of equipment.
The purpose of the bore gauge is to provide accurate data on the internal diameter of the product being measured. In order for these indicators to continue to correspond to reality, it is important to store the instrument correctly. The storage procedure is carried out in compliance with a number of rules:
- the air temperature in the room should be in the range from 15 to 25 degrees;
- the humidity level should not exceed 80%;
- Before you start measuring something with a bore gauge, the needle on the scale must be set to zero.
Proper storage will help keep the tool tuned for a long time in order to carry out work without a high level of error. Also, such measures will allow the device to always be ready for operation, since the harmful influence of various factors is excluded.
Setting the bore gauge using a micrometer
First of all, the accuracy of the micrometer is checked using a gauge block. If the error is within acceptable limits, then you must act according to the following plan:
- a replacement rod is selected (for example, 10 mm long) and installed on the measuring rod of the bore gauge;
- the micrometer is also set to 10 mm, after which the locking screw is tightened;
- The bore gauge is fixed in a vice through a wooden sleeve on the stem. This ensures his immobility;
- the bore gauge rod is placed between the measuring jaws of the micrometer;
- the deviated hand is aligned with the pointer on the dial by rotating the indicator head.
To measure the diameter of a cylinder, the device is placed inside the hole so that its rod is perpendicular to the longitudinal axis of the product. The desired position is achieved with light rocking.
If the arrow deviates to the left from zero, then the diameter of the hole being examined is larger than the size of the sample. If to the right, then less.
We take readings: the arrow has deviated to the left by 15 divisions. Let's do the calculation: multiply 15 by the price of one division (0.01 mm) and get 0.15 mm.
Knowing the diameter of the sample (10 mm), we make the final calculation: 10 + 0.15 = 10.15 mm.
When taking readings, it is worth considering that the indicator has two scales:
- large – hundredths of mm;
- small - millimeters.
To measure large holes, additional extension rods are used, included with the bore gauge. More detailed information on how to use the device can be found in the operating instructions.
Assembling and disassembling the tool
To prepare the bore gauge for work, you need to perform certain steps in this order:
- Attach the meter to the fixture rod.
- Screw in the extension rod for final assembly.
This procedure for preparing the device for operation is basic and must be strictly followed. Disassembly is carried out strictly in the reverse order to eliminate the possibility of calibration violation. First you need to unscrew the rod so that the meter becomes independent of further actions, then remove the indicator itself.
If you do not plan to use the device further, you must do the following before storing it:
- First of all, the device must be wiped dry. This should be done as carefully as possible using a soft, lint-free rag.
- After this, all elements of the meter, except the dial scale, must be wiped with aviation gasoline or another substance suitable for this case.
- Packaging is carried out in a special case, which closes securely and eliminates the possibility of movement of parts inside.
Such care will help avoid corrosion on metal elements, eliminate the possibility of damage, and also fully preserve the functionality and configuration of the instrument.
If there is any doubt about the integrity or correct operation of the device, the following procedure must be followed:
- inspect the tool for markings and all components;
- check all elements for correct connection;
- all distances must fully comply with the standards;
- product error indicators must be within acceptable values;
- The device should not have any dents, chips, scratches or other damage that appears during improper use or storage.
Such an inspection will help eliminate incorrect operation and errors in measurements. Incorrect measurements can have fatal consequences in the production of precision machine parts.
Scope of use
The main task of the bore gauge is to calculate the absolute distance between the walls of the cavity. During application, the strokemass touches two points. For uneven edges and complex configurations, manipulations should be performed several times, using different positions.
The market is filled with popular models from the best manufacturers. However, they are all used for the following purposes:
- determining the degree of wear of the structure from the inside;
- in the manufacture of parts with an internal cavity;
- when checking the actual dimensions declared;
- in case of ovality.
The scope of application of the device for interior work is expanded. A review of reviews shows that without this device the following enterprises cannot function normally:
- For car repairs. We are talking not only about passenger cars, but also about specialized vehicles, where it is quite important to understand how great the degree of wear of a particular part is, and how quickly it should be replaced.
- Mechanical engineering. All units are subject to control, especially those that are constantly in a static state, rotating, or are expected to be in constant motion.
- Metalworking, hole drilling, slot milling.
- Certification and testing of all kinds of devices. For this purpose, the best measuring devices are used, which have been certified and approved for use for important purposes.
Rating of quality devices worth up to 500,000 rubles
Micron HM 1000-3000, 0.01 MIC PRO
Indicator type design. Refers to high-strength products. Accuracy class – 1. Designed for measuring the internal diameter of products. The method used is relative. The manufacturer has equipped his brainchild with an electronic indicator, which makes the device easy to use. All received data is reflected on a digital display. The case is equipped with a heat-insulating sleeve, which significantly increases the degree of protection of the device.
The set contains replacement inserts. The available measurement range is from 160 to 250 divisions. The device has a centering bridge to align the measuring line with the axial plane of the cavity. In the manufacture of the device, tool steel is used. The step size is 0.01. The manufacturer provides a warranty on its products for one year.
How much does the product cost? You will have to pay 361,999 rubles for it.
Micron HM 1000-3000, 0.01 MIC PRO
Advantages:
- long service life;
- reliability;
- low error rate;
- advanced functionality;
- professional level;
- increased strength index;
- convenient digital display.
Flaws:
- high price.
CHEESE NM 600-2500 0.01
Products from a domestic manufacturer. Belongs to the category of instruments with increased precision. Designed to determine the internal diameter of devices. The method used is relative. First class. The popular model is equipped with an electronic indicator. The received data is displayed on a digital display. Inside the case there is a heat-insulating sleeve, which increases the degree of protection of the device.
There are replaceable inserts. The measurement range is from 160 to 250 divisions. There is a centering bridge. The manufacturer uses high quality tool steel in the manufacture of products. Device type: micrometric. The step size is 0.01. Defects are not found on sale. Purchased for production needs. Requires careful handling. It must be verified before use.
You can purchase the product at a price of 299,000 rubles.
CHEESE NM 600-2500 0.01
Advantages:
- functionality;
- low error rate;
- professionalism;
- reliability;
- wear resistance;
- long service life;
- versatility;
- presence of a convenient electronic display.
Flaws:
- not identified.
Micron 50-100 0.001 u/k MIC
A device with first class accuracy. The type of micrometer is indicator. Purchased for taking measurements of internal cavities of various products. The method used is relative. The lower limit of measurements is 50, the upper limit is 100 mm. Step size is 0.001. Device type – electronic. Manufacturing material – tool steel. There is an electronic indicator. All information received is reflected on a convenient and practical digital display. There is a heat-insulating sleeve inside the housing. Replaceable inserts allow you to expand the measurement range within 160 – 250 divisions. The tool is equipped with a centering bridge.
The average price of goods is 284,930 rubles.
Micron 50-100 0.001 u/k MIC
Advantages:
- manufacturer's warranty – 1 year;
- reliability;
- long service life;
- low error rate;
- hull strength;
- advanced functionality;
- positive reviews;
- absence of marriage;
- ease of taking readings.
Flaws:
- not installed.
Rules for using the device
The first mention of the device dates back three centuries earlier. It looked more like a compass. The modern design is radically different from its ancestor. The needles were replaced with a spherical head and a movable rod, which greatly facilitated manipulation of the device and made it possible to determine the size of the smallest holes. In appearance, the product began to resemble a tube.
The main advantage of the device is the ability to determine the smallest diameters. Other devices are not able to achieve the desired result with maximum accuracy. As for the shortcomings, there are few of them, but they are worth mentioning:
- you need to regularly change the nozzles to study the size of the grooves;
- Careful handling and maintenance of the device is mandatory;
- sloppiness and an accelerated pace when working with the structure are unacceptable;
- the need for constant calibration.
The bore gauge is checked in the following cases:
- During commissioning.
- With regular operation.
- After long-term storage.
The procedure is established by special GOST 17215-71. According to this document, the following steps must be taken:
- visually evaluate the appearance of the product;
- study the markings and complete equipment;
- check parts for compatibility;
- using an instrumental microscope, check the division value on the scale;
- determine the radius of curvature of the head and tip;
- carry out error measurements using a horizontal optimeter.
What types of devices are there?
All popular models produced differ in functionality, characteristics, material of manufacture, area of use, weight, length, width and other parameters. However, all manufactured products are divided into two main groups:
| Kinds | Description |
| Bore indicator gauges (NI) | The relative method for determining internal parameters is used. In some models, the amount of movement of the movable measuring rod is transmitted to the reporting device through a wedge transmission. There are devices with lever transmission. Used for repairing power plants. Allows you to make control measurements of cylinder diameters. |
| Digital indicator bore gauges (SIC) | A distinctive feature is the presence of an electronic indicator and a digital display for easy reading of indicators. The relative method of measuring internal holes is used. You can set zero at any point, define any measuring system (inches or millimeters). |
It is worth noting that all manufactured equipment from domestic and foreign manufacturers can be manual or stationary.
High precision bore gauges (NI-B) can be found on sale. They are equipped with a measuring head with a reading accuracy of 1 micron. The devices are designed for high-precision measurements of internal grooves using the relative method. The upper limit of measurements is up to 450 mm. You can order products with verification and calibration.
Products are classified according to the shape of the measuring surfaces, and therefore the following designs are distinguished:
- conical;
- lever;
- telescopic;
- ball;
- wedge;
- with side jaws.
To measure micro-holes, it is worth purchasing a collet product. The set consists of a variety of interchangeable heads, which are installed depending on the task assigned to the device.
Rating of products priced up to 90,000 rubles
NI electronic 160-250 0.001 MIC Micro
The products belong to the inexpensive category. Has an increased accuracy rate. Allows you to determine the internal diameter of products using the relative method. First class. You can't help but pay attention to the electronic indicator. It allows you to display the received information on an electronic display. Data tracking is easy and convenient. For additional protection of the housing, a heat-insulating sleeve is used.
There are replaceable nozzles, which allows you to make a measurement range of 160 - 250 divisions. The manufacturer equipped his creation with a centering bridge to make it possible to align the measurement lines with the axial plane of the holes. Device parameters – 215*125*40 mm. Weight – 394 g. Material of manufacture – tool steel. The step size on the scale is 0.001. Device type – electronic. The manufacturer provides a 1-year warranty on its product. The product is sold in a convenient and practical case for storage and transportation.
The sellers are asking 57,650 rubles for the products.
NI electronic 160-250 0.001 MIC Micro
Advantages:
- reliability;
- low error rate;
- practicality;
- functionality;
- ease of use;
- compactness;
- can be ordered in the company’s online store.
Flaws:
- not found.
0.01 CHIZ NM 50-600 134435
Convenient mechanical device with an expanded scope of operation. It is in high demand due to its strength, reliability, and value for money. It goes on sale in a special case, which makes the process of transporting and storing the device convenient and safe. High precision device. During the measurement process, a minimum error is maintained. Used in the construction and industrial sectors. Allows you to measure internal holes in small and large parts. Measurement range – from 50 to 600 mm. Accuracy class - first. The step size is 0.01 mm. The error is at the level of 20 microns. Design parameters – 500*200*50 mm. Weight – 1 kg. The surface is smooth. Color – metallic. Manufacturer's warranty – for 1 year.
The purchase price is 35,348 rubles.
0.01 CHIZ NM 50-600 134435
Advantages:
- minimum error;
- practicality;
- ease of use;
- long service life;
- versatility.
Flaws:
- none.
NM 50-175 0.01 SHAN 136305
The micrometer type bore gauge is very popular due to its ease of use and reliability. The scope of application is expanded. Allows you to determine the internal size of products. It is supplied for sale in a practical and durable case, which makes it possible to store it and transport it to its destination. The set contains extension cords that allow you to expand the functionality of the device. First class. Error – 6 microns. The manufacturer provides a guarantee for its creation for a year.
The average cost is 21,220 rubles.
NM 50-175 0.01 SHAN 136305
Advantages:
- convenient case included;
- wear resistance;
- practicality;
- functionality;
- value for money;
- small measurement error.
Flaws:
- not identified.
GTO NI 18-50 0.001 DBGHP 185001
An indicator device with a division value of 0.001 mm. Purchased for the purpose of carrying out high-precision measurements of internal grooves of parts. There is a two-point contact with the surface under study. The manufacturer has equipped its products with an hour indicator. There is also a centering bridge. Works with structural elements, car parts, machine components. Error – 3.5 microns. Accuracy class - first. Manufacturer's warranty – 1 year.
Purchase price – 13,750 rubles.
GTO NI 18-50 0.001 DBGHP 185001
Advantages:
- low error rate;
- practicality;
- advanced functionality;
- value for money;
- positive reviews.
Flaws:
- not installed.
6-10 mm, 0.01 mm, CHIZ NI 43154
An indicator-type bore gauge is considered a practical and easy-to-use tool. Designed to measure the internal cavities of parts with extreme accuracy. Often found in car service centers and manufacturing plants. The range is insignificant, but the error is minimal and amounts to 0.008 mm. Dimensions – 100*100*600 mm, weight – 3 kg.
The average price is 13,567 rubles.
6-10 mm, 0.01 mm, CHIZ NI 43154
Advantages:
- ease of use;
- wide scope of application;
- practicality;
- minor error;
- acceptable price.
Flaws:
- not found.
NI 18-50 0.01 1 class. accuracy Calibron 71866
The design is intended for precise measurement of internal cavities of parts. The measuring principle is two-point contact. The method used is relative. First class. The holes have a centering bridge. The set contains replaceable rods with which measurements are taken. Measurement range – 18-50 mm. Error – 12 microns. Device type – indicator.
The sellers are asking 13,493 rubles for the products.
NI 18-50 0.01 1 class. accuracy Calibron 71866
Advantages:
- ease of use;
- practicality;
- strength;
- wear resistance;
- long service life.
Flaws:
- not installed.
Kinds
Let's look at the main types of bore gauges. As already mentioned, in addition to mechanical devices, there is a category of devices in which an electronic readout unit is installed. Although they are more expensive and do not have the same durability, they are much more convenient to use.
When taking measurements using electronic bore gauges, the method of comparison with the installation standard is used.
It is important that the setting measure is within the measuring range.
In contrast to this type, another type of bore gauges - micrometric - are intended for internal measurements using the absolute method. Their main feature is the presence of a micrometer head as a reading device.
According to GOST, the error of micrometric bore gauges does not exceed 0.006. In many ways, as far as the micrometer screw, drum, and readings are concerned, the measurement technique using this type of bore gauge is similar to working with a micrometer.
Separately, it is worth noting the lever bore gauge. It differs from the others both in design and principle of operation. An indicator also acts as its reading device (although there are also digital models). The advantages are small dimensions and weight, accuracy. Thanks to the lever mechanism, it is quite convenient to take measurements and adjust the distance between the measuring rods of the instrument.