Board with a groove: varieties, making a groove with a circular saw, drill and hacksaw
The type of connection based on the insertion of a tenon into a groove appeared in Europe almost simultaneously with floorboards and lining. The finishing material is simple and easy to install and has a lot of advantages. True, the cost is more expensive than ordinary boards and strips, but the joints are much neater, and the service life is much longer.
The groove connection increases the strength of the coating.
Types of groove boards
Many users have no idea how to choose a groove in a board, believing that the store will offer them only one option for connection and material.
This is far from true; there you will be greeted by a large assortment:
- Symmetrical groove. This is the simplest type. In it, the lengths of the upper and lower shelves are the same, and they protrude at the same distance.
- Asymmetrical groove. Here the upper shelves are longer than the lower ones.
- Block house, used mainly for finishing walls and ceilings. The planks often imitate the relief of timber and have a semicircular or shaped profile on the front side.
- Euro lining, like block house, is often supplied with a relief pattern.
- Decking boards, made of wood and polymer, also have tongues and grooves that simplify installation.
Note! If you plan to mount walls that are not level, have protrusions and dents without a groove board, do not expect good quality from the result. The cladding will not lie flat, height differences and cracks are inevitable.
Basic parameters and classification
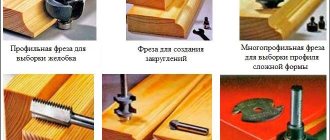
The parameters by which drill cutters intended for wood processing are divided into various categories are:
Basic geometric parameters of a wood cutter
Types by purpose
Today, many tools are used to perform milling work on wood using an electric drill, since technological operations with this material can be different. Depending on the main purpose, the following types of wood cutters are distinguished.
Using such a tool, the corners of wood products are rounded.
These cutters are used to cut V-shaped grooves on flat wood surfaces. Using such a tool, you can make various patterns and inscriptions on the product, as well as process edges.
These are wood cutters, with the help of which grooves and grooves of various widths and depths are cut out on the surface of the workpiece.
Such cutters are similar in purpose to disk cutters, but they allow you to create wider grooves on the surface of the product. Cutters of this particular type are used in window production, where they are used to cut grooves in wooden frames to accommodate glass.
Using cutters of this type, semicircular grooves can be created at the end of the workpiece. Wood fillet cutters equipped with a support bearing are used for the manufacture of decorative furniture slats.
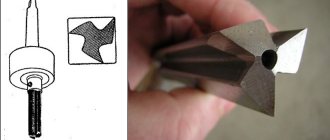
These are tools with a cutting part made in the shape of a reverse cone. With their help, you can create dovetail grooves in wood products. It is these grooves that are used to create open and hidden tenon joints between two or more parts made of wood.
These wood cutters are designed for processing the edges of wooden products. The design of the edge cutter may contain a bearing, which, resting against the edge of the workpiece, ensures its correct position and limits the depth of its cut.
Wood cutters of this type can be made with straight or helical cutting edges. Using such tools, flat surfaces are processed.
These cutters are also designed for flat surface processing. Unlike cylindrical ones, they have cutting teeth on the end part.
Using these cutters, chamfers are removed from the edges of the workpiece. Such a wood cutter, used for installation on a drill, can also have a thrust bearing in its design, which limits the depth of the tool’s cut into the wood.
These wood cutters are used to create complex grooves and recesses on the surface of the workpiece.
These are cutters used to form elements with a complex configuration on the surface of a wood product.
Types by design
Milling tools used in conjunction with drills can have different designs. Thus, there are solid and prefabricated wood cutters, which should also be selected depending on the characteristics of the material to be processed.
Making planks with grooves at home
Often you have to make furniture or make repairs at home, using the simplest methods and what is at hand.
If you need to make a groove in the board with your own hands, be patient and have the necessary tools:
- A circular saw. The most practical tool, but, unfortunately, not everyone has it.
- A regular hacksaw for wood. It will take longer to work with it, but this accessory can be found in every home.
- Electric drill. It is also quite accessible, but before making a groove in a board with a drill, it is advisable to practice on an unnecessary block, practicing the skill.
Making a groove with a circular saw
Making a groove with a circular saw.
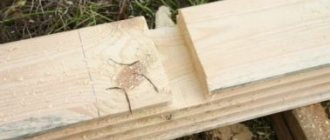
The optimal materials are wooden boards, bars and the like. The price of raw materials is minimal; in extreme cases, what is available on the farm is used. The most successful solution is a through, single open straight end connection.
The joint will be strong and reliable:
- It is recommended to make tenons with a thickness of ¼ of the thickness of the plank and a groove of the same size.
- The height and length of the groove must correspond to the dimensions of the plank.
- Prepare a pencil and ruler for marking.
- Decide on the coordinates of the cut and mark it.
- The cut should be made along a line inside the side that will then be separated.
- For a circular saw, the instructions recommend a blade width of 2-4 mm.
- Sawing in the middle of the marked line removes 1-2 mm of excess, since two grooves are made on each plank.
Note! To prevent the workpiece from being damaged, make cuts along the inner sides of the drawn lines. In this case, a visual correction is made for the thickness of the canvas.
- If you need to join two parts at a 90º angle, cut the pieces at 45º at the ends.
- For an end-to-end open miter connection (single straight), mark the cut locations on the oblique cuts of the planks.
- Before removing the groove from the board, double-check that the cut is correct on all sides.
- For an angular single connection that is not through the eye, an eye is made instead of a groove. In this case, the width of the tenon is left unchanged, and the length will be 0.3-0.8 of the width of the board being attached.
- Since the circular saw rounds the edges of the eye, leaving the shape of the tenon unchanged, it is advisable to refine the corners by turning them with a rasp.
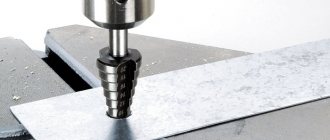
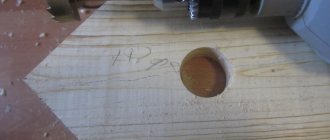
Groove using a drill
The photo shows a groove being cut out with a drill.
The method is quite labor-intensive, but it can be called an alternative to the one described above. If you were unable to get a hand router, prepare a drill and chisel, ruler and pencil.
- Select a drill with a diameter corresponding to the width of the future groove.
- To guess the depth of the groove, you can make a mark on the drill itself (for example, draw it with bright paint).
- Draw two parallel lines along the block at the required distance from each other.
- Having secured the workpiece in a vice, drill a furrow, carefully monitoring the vertical position of the drill and maintaining the depth.
- When finished, remove all excess with a sharp chisel and sand with emery cloth.
Note! It happens that a furrow with a concave bottom and a spike with a convex end are required. Before making the moon groove in the board completely, drill to a depth slightly less than required. Subsequent processing and adjustment can be conveniently done with coarse sandpaper or a round file.
Using a hacksaw on wood
Making a transverse groove with a hacksaw.
Well-done markings will help a lot here.
Select a hacksaw blade that is smooth and durable:
- To avoid mistakes, draw two lines along the length of the board, on opposite sides. The distance from the top plane to them will be the depth.
- Securely secure the block and begin sawing.
- It is important to monitor, checking the lines, how far the canvas fits into the wood.
- If the tool is skewed, you can ruin everything, so periodically watch the hacksaw’s entry into the material from the side angles.
- With a wide groove and a thin blade, it is more effective to make two cuts, again along the inner sides of the cut.
- All excess is carefully removed with a chisel and cleaned.
The sawing machine works neatly and quickly
When it comes to choosing grooves, rebates or tongues, all workshop workers first of all think about the sawing machine. As a rule, it takes less time to install the groove disk and set up than it does to prepare the router. In addition, I like the fact that the saw machine quickly copes with such work and it is convenient to work with boards and panels of different widths and lengths.
Grooving discs come in two types: dialed and adjustable (so-called “drunk”). We prefer compositors that make square, clean cuts. Of course, the most expensive type-setting disks cut cleaner, and the bottom of the cutting turns out to be flat, and the side surfaces are parallel and without chips. However, most set-up discs leave small triangular grooves in the bottom corners, caused by the beveled edges of the teeth on the outer discs. Adjustable (“drunk”) discs are attractive due to their low price and speed of adjustment, but they have a serious drawback - the bottom of the disc turns out to be concave, and the corners are not straight, and after working with them you have to resort to cleaning.
You can also do all three types of cuts with a 40- or 50-tooth combination saw blade. When choosing a groove or tongue, make the outermost cuts first, and then remove the material between them in several passes. Small irregularities at the bottom of the sample can be smoothed out with a sharp chisel or milling cutter.
In the same way, it is possible to cut folds, but we prefer to make them using two cuts. First, a cut is made to form the shoulder of the rebate. Then a high overlay (150-200 mm depending on the width of the workpiece) is fixed to the longitudinal (parallel) stop, the overhang of the disk is adjusted and a second cut is made at a right angle to the first. To avoid kickback when the blade jams and ejection of cuttings, make sure that the cuttings are not caught between the blade and the fence.
The best ideas on how to make a tongue and groove using hand routers, detailed instructions
It is easy for a home craftsman to figure out how to make a tenon and groove using hand routers. Tools used, detailed instructions on how to select a groove with a router.
Using tongue-and-groove joints at home will allow you to independently create beautiful furniture that is also reliable. Even the frames of low-rise buildings are connected using this scheme, especially when it comes to serious loads during operation. Therefore, it will be useful to understand how to make a tenon and groove using manual milling cutters.
Peculiarities
Computer numerical control equipment allows operator intervention to be kept to a minimum. After manufacturing, the part does not require additional processing.
Using machine tools, several types of processing can be performed:
There is also plasma treatment. But it is used less frequently than other types. Depending on the type of processing, there are both advantages and disadvantages. It is necessary to pay special attention to their consideration if you do not know which machine is better to choose.
The most suitable materials for work are sheet type materials. Of the listed types of manufacturing, the most popular is milling. on the machine ensures the production of parts with precise dimensions and smooth edges. Laser cutting is more suitable for cutting plywood.
When cutting, you must adhere to the rules for using the unit.
Using milling you can create almost all types of parts. Modern models are compact, so they can be placed in a room with a small area. Numerical control ensures easy operation. Thanks to this, you can handle plywood processing without any experience. When purchasing a machine, you will receive instructions that describe how to operate it.
Tools used
In this case, the sampling of material is carried out on the surface of the beams and boards from the side. The main thing is that the proposed connection maintains its dimensions in terms of geometry.
To complete the process using a milling cutter, it is possible to use tools equipped with shanks with a diameter of 8 or 12 millimeters. The so-called groove cutter will become a universal option when performing any type of work. The device is equipped with a cutting part, the basic operating principle of which is described as follows:
- The side surface is involved in the formation of the sides of the tenon, the wall part of the grooves.
- The side with the end part is used when processing the bottom. After this, the required layer of material is removed from the base of the spike.
The result is the simultaneous formation of both tenons and grooves on the surface on the sides. The sizes can be individually adjusted, and the owner has quite a wide range of options in this regard.
Sometimes for grooves and tenons they choose not a rectangular shape, but the so-called “dovetail” type. This option is relevant if increased requirements are placed on connection reliability. Accordingly, the cutter used is also called a “dovetail” in this case. Such work can be easily done with hand tools if the need arises.
Workplace requirements
Wood carving should be carried out in a prepared place, on a strong and stable workbench. Beginning craftsmen can use a tabletop, as long as its height does not exceed the belt line. The main requirement for the working surface is cleanliness and smoothness; if uneven surfaces appear, they must be removed immediately. The board on which the carving is made must be securely secured with clamps.
Under no circumstances should you sit on a stool, a wobbly chair, or work on your knees.
For beautiful and high-quality work on the work area, it is necessary to install good lighting in the form of 2-3 lamps or bright lamps. The placement of the light will be important; it should be set at different angles, above the carver’s eye level. In a well-lit and properly prepared workplace, even a beginner can learn more skills and quickly grasp the basics of mastery.
Geometric
Geometric carving is considered a more complex carving technique after contour carving; it differs in that the pattern is created not using lines, but by creating geometric shapes. Most often, beginning carvers use wedge-shaped notches in wood.
When performing geometric carving, it is necessary to select the optimal working material and prepare it, and then apply the desired design.
When drawing a sketch, a pencil, ruler and compass are used to ensure that all lines are straight and correct. If you can’t create a drawing on your own, you can use a ready-made sketch by printing it and using an awl to puncture the places where the lines intersect.
Sketches for geometric carving often consist of triangles that must have a notch, so the wood is cut at different angles, and the excess wood
cleaned up. Once all the triangles have been processed, you can move on to carving other elements. After the main work, it is necessary to clean the problem areas, for which a sharper tool is used. The finished pattern is sanded and covered with stain.
Making a device for picking out a tenon
When parts are processed manually, the milling cutter itself does not have additional spatial fixation. But the overall result of the work and the accuracy of the connection itself in the future depend on this.
To assemble the simplest design that can cope with the task, you will need to use:
- Several guides that remain stationary. They should be side and top or bottom.
- The length of the sample is adjusted through the use of an appropriate movable bar.
For manufacturing, the following sequence of actions is used:
- A plywood sheet is taken, from one edge of which the side elements are mounted in a vertical plane. It is necessary to create appropriate cutouts in the center of the material.
- The sides are equipped with guides. The base of the hand cutter moves along them later.
- The side strips are fixed on the upper guides. Then the movement of the working milling cutter associated with these parts becomes limited.
- The plywood sheet, which became the basis for the installation, also serves as a surface for installing the moving element. Then the amount of edge overhang for the future workpiece is easier to control under any circumstances. Fixation is ensured with ordinary screws and other types of fixing devices.
There are several points during manufacturing that require special consideration:
- The upper guides have a height corresponding to the sum of the thickness for the part under processing and a small gap at which the wedge involved in fixation is installed.
- The forming tenon has a certain length, which is taken into account when determining the vertical thickness of the cutouts in the side elements.
When such devices are used, the work is carried out with the participation of hand-held milling cutters of any modern model.
Fixtures are made in the following way if dovetail connections are required.
- A hole is created inside a sheet of plywood with several layers. The cutting part at the cutter itself protrudes from this part.
- A plywood sheet is prepared in advance, on the bottom of which the manual router itself is fixed. Clamps and screws are perfect for doing the job, as are other types of fastenings.
- The board, 2.5 centimeters thick, is attached to a plywood sheet, which subsequently participates in the movement of the prepared part. The function of the guides is taken over by the design. Boards are consumables with one-time use.
Step-by-step schemes for beginners
To understand the basics of wood carving, it is worth mastering the lessons step by step - from the simplest to the more complex. For beginners, and especially for children, you should immediately talk about safety precautions in order to prevent possible injuries.
To learn to cut
any objects with your own hands, it is important to know what is needed for this and what the sequence of actions should be.
The simplest technique is to learn contour carving, for which you need to prepare the basic equipment:
- wooden blank;
- chisels;
- blunt knife;
- pencil and paper for sketching;
- sandpaper;
- paints.
In order to cut wood , it is important to tell everything about chisels and show them in action. Handmade work is distinguished by its subtlety, so don’t rush and start cutting without a sketch. Drawings are prepared on paper, carefully thought out, and then transferred to wood .
The basics of working with chisels and a jamb knife are carried out on workpieces with straight and wavy lines.
A beginning carver must get a feel for the tool and learn how to work with it. As soon as it starts to work out consistently, you can choose a sketch and try to bring it to life. The most common themes for carving are animals and natural landscapes with various objects. After the work is completed, the workpiece is sanded and painted.
Contour
Contour carving is considered one of the simplest techniques, since patterns are applied to a flat prepared surface, going slightly deeper into the material, which allows you to form the outline of the future pattern.
This type of work belongs to geometric carving and is divided, in addition to contour carving, into triangular-notched and bracketed techniques.
To start work, you need to come up with or select a pattern you like and apply it to the tree
, which should be as smooth as possible.
Do not use sandpaper or other abrasive products on workpieces, as fine particles will interfere with neat carvings and cause the cutting tool to become dull.
The optimal cutting depth is considered to be 1.5-2 mm and the tool angle is 40°. Having made one line, you can start the next one, but tilting the cutting tool in the opposite direction to make a geometric recess . If the movements were made correctly, the edges of the lines will be smooth and the surface shiny.
Sources:
https://9692.ru/info/kak-sdelat-uglublenie-v-dereve/ https://vplate.ru/rezba-po-derevu/dlya-nachinayushchih/
Creating tenons on bars and boards
Processing is performed using the following sequence of actions:
- The part to be processed is mounted on a plane from the bottom side.
- The edge of the part where the tenon is formed accommodates the cutouts at the guides at the top. The structure moves inward until it hits the end.
- A movable type element must be fixed while maintaining a certain position.
- We use a wedge tool to connect the guides and the plane located at the top to each other.
- Connection of a hand router with the upper guides.
- Using a router tool on a home router table, wood is removed from one side.
- When the first side of the workpiece is processed, begin the second.
The operation will be successful only with high performance and accuracy parameters. Setup refers to the required steps before the instruments are turned on. To resolve the issue, actions are performed in the following sequence:
- The milling tool is lowered until it reaches the surface of the base.
- Measuring the thickness of a part.
- The thickness result is divided by 4. The result is the distance parameter that is maintained when lifting the cutter above the base.
How to cut square holes
Let's start with an easy one: learn how to cut
a square opening, such as a window. The simplest and most obvious way is to lay a grid under future windows at the stage of building walls in 3ds max. That is, when creating a box, we prescribe the number of segments in length, width and height for it.
Thus, all we have to do is transfer the object to Editable Poly, edit the position of the mesh and extrude the windows outward to the thickness of the walls using the Extrude command. Unnecessary polygons inside can be immediately deleted.
For those who don’t remember how to close a hole: go to the Border level, select the edge of the hole and press Cap.
The method really quickly helps to cut holes in the wall of a building, but it has disadvantages. Firstly, it does not work if the walls are not built from a box, but, for example, using the spline modeling method from a drawing. Secondly, the 3D object is cluttered with unnecessary edges that are absolutely unnecessary, for example, on the ceiling. Of course, they can be removed, but who needs extra work?
Some tips when working with a pendulum.
Be sure to use straight slot cutters. For example, the Enkor cutter, article 10504. This is the cutter that provides a smooth surface. The most important parameter is the total length of the cutter. The working length is no more than 10 mm. The Encor Expert cutter, article number 28026, has slightly better maneuverability. It is advisable to take cutters with a larger diameter, they provide greater removal and speed of work. However, long cutters with a diameter greater than 16 mm are unlikely to be found.
READ Stihl 250 Original And China Differences
Wood cutter "Dovetail"
For mortises and tenons under similar circumstances: only half the normal width. This is explained by the characteristics that compounds of this type have.
The main thing is to set up the device correctly and fix it in a suitable position.
The tongue-and-groove joint should end up with some clearance. It is necessary so that later you can conveniently use the adhesive composition.
How to choose a groove with a router?
The solution to the problem depends on where the grooves are located and what size they are. Here are some recommendations for home craftsmen:
- The use of open grooves involves securing it to the tabletop and guiding the workpiece along the cutter.
- Accuracy is determined by the height of the cutter and the location of the bar.
- It is recommended to use wood waste for trial operations. This allows you to avoid mistakes.
- Sampling is carried out in stages, with several passes being carried out.
Milling a pattern on plywood with an edge router
I decided to write a short master class on milling. This master class will help in implementing ideas for making interesting decorative elements using budget woodworking tools. After completing it, you will not have to turn to carpentry specialists for help. Because the lesson will help you master the skill of figure milling. In order to start studying this direction you will need: - a sheet of plywood; - pencil; — an edge router, any that weighs little and fits comfortably in the hand (usually the weight does not exceed 2 kg); — a cutter or several cutters of different diameters; - a little imagination; — work space (it will be dusty); — safety glasses; — protective headphones; - respirator (optional). First, find or buy a sheet of plywood. Usually a sheet of plywood has dimensions of more than 1.5 by 1.5 meters; find a hypermarket or store that could cut this sheet for you into smaller pieces so that you can easily transport it to your home or place of work, if necessary. . To work at the learning stage, you need a small sheet, even 30 cm by 50 cm, with a thickness of at least 1 cm (10 mm), is enough. Let's assume there is a leaf. At this stage you will need imagination, draw the sheet with any lines: straight, oblique, curved, in the form of balls, squares, perhaps these will be illustrations or stencils of leaves, insects, trees, etc., keep in mind that the smaller the size of the drawing, the You will need less of a cutter to select a design stencil from the plywood. Since the router makes a very loud noise when milling, and also generates a large amount of dust and gouging emissions from work, you will have to find and use glasses, headphones, and a respirator, the latter is optional. Below is my photo, which shows a sheet of lined plywood. A simple drawing was chosen, which I made in one minute. The photo shows that the milling cutter has already slightly selected part of the pattern and a kind of depression has been created. Please note that it is best to set the milling depth to the minimum possible, so the cutter will easily move along the surface of the plywood. If you set the milling depth to be greater than the thickness of the plywood, then it will be possible cut out objects and separate them from the general sheet, but that's another story.
Yes, and be careful, although the router is small, the number of revolutions per minute is about 30,000, which is very fast. Pieces of wood bouncing off the workpiece can accelerate to several tens, and maybe hundreds of kilometers per hour.
After about 40 minutes of work, you will get the result, well, someone may work slower or faster, it all depends on the complexity of the drawing. In general, working with an edge router is a great pleasure. This is what happened. The technique is not new, but you can depict something, especially if your imagination and hands are good. The choice of materials for work in this direction is possible with any wood; it can be any solid board, planed log, board, tabletop, steps. Regarding MDF, I don’t know how it will work, but you can try it if you want.
Source
Wide groove in the board. What to do?
Introductory: you need to make about two hundred cross-shaped connections of a board 40x120 mm (thickness x width), i.e. about four hundred grooves 20 mm deep and 120 mm wide. For such a volume, it makes sense to take the most suitable tool (for reasonable money, of course). Options with a circular saw and a router don’t work - it’s long and tedious (but it needs to be quick and easy). Chain saws are also sloppy and splash oil. You will be tortured with a jigsaw (and even the file will be taken away at such a depth). We stopped at the saber for now. But none of us have experience working with her, nor does she herself. Is it suitable for this purpose? What should you pay attention to when choosing a saber for this purpose? Or is there something more suitable? Thank you.
fast and easy often means crooked and inaccurate) the saber will cut a little less than a jigsaw. Look for a band saw, machine.
Cheap trimming will help you.
bkvel wrote: you need to make about two hundred cross-shaped joints of a board 40x120 mm (thickness x width), i.e. about four hundred grooves 20 mm deep and 120 mm wide.
What are you planning to do in the end? For a “blind” insertion, use a slotting machine, or a circular saw and a chisel (or milling cutter).
Vadim63 wrote: Cheap trimming will help you.
optimal. It is better if there is an adjustment of the immersion depth.
What is wrong with the router? it will be fine. I made 50*50*2000mm grooves at the end of the logs and here it is 20mm deep. I laid out several docks and along the guide. or look for a disk router for rent
bkvel wrote: long and tedious (but it needs to be quick and easy)
Is cutting accuracy important?
bkvel wrote: We stopped at the saber for now. But none of us have experience working with her, nor does she herself.
It is problematic to make precise cuts with a saber.
you can try a chain disk for an angle grinder like this
and an angle grinder in a casing with depth adjustment.
alzp wrote: you can try a chain drive on an angle grinder
I wouldn't risk it.
alzp wrote: you can try a chain disk for an angle grinder like this
and an angle grinder in a casing with depth adjustment.
We will be waiting for new funny stories in the topic “Death by Grinder”
Ledogor Bullshit. If you use it with a casing, the offset is 20mm, it can only be cut, as a last resort.
Ledogor wrote: We will wait for new funny stories in the topic “Death from an angle grinder”
is there at least one? They have been on sale for about 5 years now, which prevents them from being used in a closed casing.
alzp wrote: what prevents it from being used in a closed casing.
The same as the disk from a circular saw. The instinct of self-preservation.
Vadim63 circular saw disc is not intended for use in angle grinders. This disc is designed and also certified.
Vyacheslav I. wrote: What are you planning to do in the end? For a “blind” insertion, use a slotting machine, or a circular saw and a chisel (or milling cutter).
I agree. I would add another plane, not ice across the grain, but it will do. A dozen boards nearby, 5-6 cuts with a circular saw, a chisel, a plane, a chisel, perhaps a belt sander with 40 grit, and so on 40 times, and if you need super precision, then at home, probably a router.
Thanks to everyone who responded. I realized that there is no clear tool for such work.
Vadim63 wrote: Cheap trimming will help you.
How should she choose a groove? Just move the disc from side to side?
The price is not much. does not respond to introductions. This is a one-time job and will not pay off. Selling will be a problem.
ADM05 wrote: It is problematic to make precise cuts with a saber.
alzp wrote: you can try a chain disk for an angle grinder like this
I have some kind of internal prejudice about this.
alzp wrote: this disk is designed and also certified.
Why then don’t normal manufacturers have such disks?
Vyacheslav I. wrote: For a “blind” insertion - a slotting machine, or a circular saw and a chisel (or a router).
The insert is not solid, I don’t really want to select 400 grooves 120x120x20 with a chisel.
alzp wrote: what is wrong with the router? it will be ok
Also options. Those. so far there are three candidates: a saber, a router or a band saw (maybe also a crosscut). We need to decide one of these days what to choose. Of all this, there is only a milling cutter.
plus tapes that can be sawed in batches (3-4 boards at a time) without loss of accuracy. And it will be cheaper to find a sawmill with such a saw.
Senor_Renard I misunderstood you. I thought that we were talking about a band saw machine, and not about a sawmill belt. How can you choose such a groove on it, especially with 3-4 boards at a time?
I would make some kind of homemade product based on the principle on some kind of carriage. Something like a circular saw with a broach, only instead of a disk there is a mounted milling head.
Alternative methods
As mentioned, a stationary circular saw is very convenient for selecting quarters. (There is a separate article on our website about the types of circular saws and the features of their choice.) But it is not always in the master’s arsenal, and sometimes it is physically impossible to use it.
If you need to cut quarters out of thick, long boards, you can use a hand-held circular saw. The manufacturing principle and sequence of operations are the same. The difference is that in this case the board being processed and the tool change places. The board is fixed motionless, and the master moves the circular saw with a parallel stop along it manually.
If you don’t have a circular saw or a hand-held circular saw at hand, you can use a grinder with a wood blade or a hand router with a suitable cylindrical cutter. Both methods are very slow and are not suitable for large volumes of work. In addition, choosing a quarter with an angle grinder is inconvenient, dangerous and turns out uneven.
Read also: Welding inverter helper 140 diagram
Another way is to use an electric plane. However, most modern plane models are not suitable for this due to their design features. Watch the video that shows just this method of choosing a quarter.
Secrets of making half-timber frame joints
Half-timber cutting is a simple and reliable way to connect two identical parts at right angles. This method is useful when creating corner, cross and T-shaped joints. By marking and selecting half the thickness of the material in each part, you will get a neat and durable connection, which will become indispensable when assembling frames and timber structures.
Cutting into half a tree is done in different ways: using a router, circular saw or band saw. We'll show you how to create perfectly tight joints using a classic set of hand tools.
TOOLS
- carpenter's square;
- marking thicknesser;
- pencil or marking knife;
- axing saw;
- wide carpenter's chisel.
MILLING THE GROOVE/TENK JOINT
For large and wide parts of housings or long and narrow parts, milling grooves is relatively simple and safe. Select a cutter of the correct diameter, attach a ruler to the base of the router and make passes with it, moving the ruler along the end of the part (Fig. 8). Many routers are sold with a ruler, but to improve the quality of work, it must be pressed to the base with a clamp or screws.
The most accurate way to mill a tenon is to clearly set its thickness between the ruler and the cutter (Fig. 9). To support the base of the router, use a clamp to press a piece of thick board flush with the end of the workpiece.
Do-it-yourself half-tree corner joints
Half-timber corner notch (overlapping) is the most common type of frame connection. Its logic is extremely simple: at the ends of both parts, recesses (folds) are cut out along the width of the counter part. The fold forms an edge and a shoulder - they must be perfectly smooth and strictly perpendicular to each other. In a high-quality connection, the surfaces of both parts fit tightly and form a joint without the slightest gap.
Connection marking
Create markings for the fold selection. To do this, use a carpenter's square, a surface planer and a marking knife.
Measure the length of the edge along the width of the mating part. Draw marking lines on the edges. Set the thicknesser to half the thickness of the part and make side markings.
Rebate cutting
Using a back saw, saw off the waste part on each part, carefully following the markings without strong pressure or jerking.
Stripping the connection
Using a wide chisel, clean the edge and shoulder, achieving the tightest possible fit of the parts.
OPERATING THE DEVICE
Marking the grooves is very simple. Determine the shoulder line for each groove by making a pencil mark on the face of the piece to be worked. You can put the two side walls together and mark all the grooves at once, or mark the second side wall after routing the first.
Once the jig is aligned and the cuts are marked, align the straight edge with the mark (photo C), lightly tighten the clamps and make a pass with the router, then move the jig to the next mark. A well-chosen groove should fit the tenon without gaps or backlash (photo D).
T-shaped (T) connection
The lap joint is another variation of the half-timber joint, which is widely used in the creation of frame structures. In this case, the end of one part is adjacent to the middle of the second. A fold is cut out on the first (according to a similar pattern as in a corner joint), and a landing groove is cut on the second. Below is one of the schemes for creating such a groove manually.
Make markings on the front side, focusing on the width of the counter part.
Using a thicknesser and a square, mark the edges.
Make cuts in the waste part. They will facilitate subsequent sampling with a chisel.
Use a wide carpenter's chisel to remove the waste. Remove layers, moving from the center to the edges.
Clean the groove. The edge and shoulders must be perfectly smooth and meet strictly at right angles. This will ensure that the parts fit as tightly as possible.
Preparation
Before production, it is necessary to prepare the CNC machine for operation. Setting up the unit involves two stages. The first is represented by setting up tool blocks, and the second - by working mechanisms.
Setup is carried out step by step:
Additionally you need to check:
When serial processing with cutters, you should carefully monitor the processing of the first workpiece. With its help, you can determine whether there are errors after adjustment. If there are inaccuracies, additional corrections must be made. If there are several elements, the layout on the sheet saves plywood. After setup, there is no need to check the control program - it will produce parts according to similar parameters.
On the issue of fixation
Half-timber joinery joints do not have a mechanical connection, so they are secured using gluing. We discussed in detail how to properly glue wood and choose the appropriate glue in previous materials.
While drying, the structure must be secured with clamps. When placing the clamps, make sure that their pressure is distributed evenly. An incorrectly installed clamp can deform parts or disrupt the fit of the connection.
Unlike frame structures, logs or beams are strengthened using a different technology. In this case, screws, dowels or dowels are used to secure the connection.
How to cut round holes
"Manual" method
This method allows you to more accurately fit the circle into the 3-D model grid, but you will have to spend much more time. Create a sphere using Standard Primitives and convert it to Editable Poly.
Let's switch to Vertex mode and check the box next to Ignore BackFacing, this way we won't accidentally catch points on the other side of the sphere.
Mark any grid square, select its three vertices (as indicated in the screenshot) and connect them with a diagonal using Connect. We create two diagonals using this method.
Select a point at the intersection of the diagonals and press the Champfer button, enter the radius.
Go to the Edge level and select two opposing grid lines, then click the Connect button, set 4 segments.
We do this with all the edges adjacent to the circle.
Let's switch to the Vertex points mode; we should have selected points belonging to the future circle. Add the Spherify modifier.
We get a round hole. Now we can convert the object, for example, to Editable Poly, in order to manipulate it.
Creating a Square Hole Using Connect
We looked at another way to create a hole in this lesson. It can be used when working in 3D max to make holes in the wall of a building that has a more complex shape than a square. For this we use the Connect command.
The polygonal mesh is thus not cluttered, there are no extra lines.