Making your own stamp
If necessary, you can make a stamp yourself at home. The process is not difficult. But it should be borne in mind that the wear resistance of such an invention will be lower than that of a conventional stamp.
- First you need to prepare the image for the print. Next, the selected drawing must be transferred to tracing paper, and from there to foil. At this stage, the outline of the drawing is carefully traced with a non-sharp object (for example, a pencil).
- The design is printed on the foil in the form of indentations, which then need to be filled with putty or epoxy glue.
- Thus, a workpiece is obtained. It must be set aside until completely dry. This usually takes about two days.
- As soon as the workpiece is dry, it must be freed from the foil. For convenience, the stamp impression should be attached to the base. An old seal or any tablet with a handle will do for this.
Your handmade stamp is ready. All that remains is to place it in ink or paint and you can leave an imprint.
Cheaper, easier, more beautiful - is it always so easy to figure out?
Rubber stamps are made from hard or foam rubber. If you decide to learn scrapbooking for beginners, and do not want to spend extra money, you can opt for foam rubber products.
Stamps can be used as a business card for your mini business
Stamps for scrapbooking
Features of foam rubber stamps:
- leave a good clear mark;
- soft base;
- absorb ink.
These are suitable for one order or project, after which they will probably become unusable.
Stamps made of dense rubber can be made on a foam rubber pad, on a wooden or plastic block.
Interesting stamp models
If you don't know how to use scrapbooking stamps, the easiest way to start is with these. Simply apply ink and press firmly onto the paper.
Using a soft sponge, lightly coat the stamp with the special ink. Press the drawing firmly onto the paper and remove it carefully. If everything is done correctly, you will get a beautiful print.
Silicone stamps are transparent. This is convenient, because we see where and what our drawing will be added to. But even here there are no pitfalls. These stamps are soft; just apply some force and pull a little when attaching them to the block, and your drawing will take on new, less perfect forms.
Roller stamps are used for applying ornaments and are made of dense rubber. This is a miniature copy of a construction roller for painting walls.
Eraser stamp
Stamps from improvised materials
Simpler versions of seals can also be made. Various available tools are suitable for this. Here are some of the simpler options:
- Eraser stamp. You need to choose an eraser of a suitable size and apply a drawing on it using a pencil. Then use a utility knife to cut out the image. In this case, the base of the eraser remains the same size, and the drawing itself protrudes slightly on the surface.
- In the same way, you can make a stamp with your own hands from cork. Just keep in mind that in this case the contours and density of the pattern may differ due to the nature of the material (cork is looser).
- Suitable for making prints and cardboard. You can cut out various designs from it, which are then attached to a convenient surface (the same cork will do). The finished drawing can be immersed in paint and printed.
- You can use any objects to apply simple designs or geometric shapes. For example, using lids of different diameters you can apply circles. In this case, it is enough to simply dip the edges into the paint and then apply it to the surface.
You just need to use your imagination and you can find many other possibilities for stamping.
Programs for creating stamps on a computer
With applications, things are a little worse - their interface is not as convenient as in web services. The values of almost all parameters will have to be set manually in special fields - there are no usual sliders here. Plus there are not so many programs themselves.
Stamp085
The Stamp085 program has a rather outdated interface. It will take some time to figure it out. All settings are divided into tabs: “Form”, “Row Options”.
The disadvantage of the program is that you cannot expand the window to fill the entire monitor screen. The print layout will be displayed in a separate window, which will be even smaller.
However, the program is quite functional. Here you can insert pictures, select a geometric shape, draw a custom print shape, change color and much more.
Paid program:
- 950 rubles for the installer file sent to your email.
- 1300 rubles for the installer file on a separate disk. The disc is sent by mail.
You can download a demo version of the program to familiarize yourself with its main functions. The demo version does not have the ability to download, print and insert a finished seal into Word. Therefore, in any case, you will need to buy a paid registration code.
The program works without installation - just run the downloaded file and you can use it right away.
To avoid getting confused in the interface, use the following algorithm for creating a seal:
- Download the demo version of the program from the official website. Open the downloaded archive and run the file called “Stamp085d.exe”.
- A window with a preliminary registration code will appear. Click on the "Continue" button. A program window will open.
- Click the Preview button to control the changes you make to your print. A separate window will appear showing the layout.
- Go to the "Form" tab. Select a geometric shape for future printing. Available in triangle, oval, circle, square and custom shape. To draw a custom shape, click on the star button. Using separate lines, create a frame for future printing.
- If necessary, change the shape size in millimeters and radius. Specify the thickness of the lines and the spacing between them.
- Open the "Center" tab. Here you can enter text in the middle of the print and also add your own design. Specify text parameters: font type and size. You can highlight the text in bold or set the inclination of the letters. Enter the text itself in the field. Specify character and line spacing as needed.
- To add a picture, check the box next to “Figure 1 in . Select the bmp file that is stored on your computer. Wait until the image is uploaded to the service. If necessary, change the color of the image and adjust its brightness. Determine its location in the picture (block “Drawing displacement”: items “Along the X axis” and “Along the Y axis”). Increase or decrease the size of the design on the print (items “Height” and “Width”). You can also check the “Auto size” checkbox. Then the program itself will adjust the drawing for printing.
- Go to the "Strings" tab. Specify text parameters and enter the desired phrases in the “Top Lines” and “Bottom Lines” fields. In the upper field, write, for example, your status “Individual entrepreneur”, in the lower field - the name of your city.
- Open the Row Options tab. Uncheck the “Auto-distribution” checkbox so that the texts of the top and bottom lines stop merging. Adjust the interval if necessary.
- Adjust the width and height of the letters, the width of the indentation from the outer and inner lines, the thickness and color of the inner line of the circle. If necessary, move the text left or right along the circle line to align the text.
- When the print is ready, click on one of the buttons (if you previously paid for the program key or if you found a free key on the Internet): “Save print design” (floppy disk with print), “Print” (printer icon) or “Insert print into Word document (Microsoft Word logo).
- To save your print settings, click on the floppy disk icon. Select a folder to store the settings file on your hard drive.
To receive a registration code, click on the “Registration” button. A small instruction will appear on how to purchase a key, and two lines for entering the key. Pay the required amount and send a letter by email. In the letter, indicate the set of numbers from the “Key 1” field and information about the money transfer. They will send you key 2 - enter it in the second field. After this, all paid features of the program will become available to you.
MasterStamp
There are three geometric shapes available in the MasterStamp program: circle, triangle and rectangle. Each has its own tab. You can additionally insert a picture in the center into the round shape. You can change the layout in the program: there is not only Cyrillic, but also other character sets (for Western European languages, Hebrew, Arabic, etc.).
The position of the elements is adjusted in the same way as in Stamp085. Instead of sliders, there are special fields for x and y coordinates and for the number of pixels (px). The fields need to be filled in with numbers manually, which is quite difficult and inconvenient.
The created print can be saved to your computer as a separate file: in bmp or mst format. This file can be inserted into Word documents.
The program costs 250 rubles. Payment is made through mobile payment to Megafon, Yandex Money or Qiwi wallet. All details are on the official website of the program. After payment, send a letter to your email. In the letter, indicate the payment details and a unique code from the program (it is displayed in the “About the program” tab). In the response letter you will be sent a registration code - enter it in the field in the same “About the program” section.
There is also a free version of the application - with the ability to save prints on a PC in the same formats. But the downside is that such a seal will have a red inscription “Unregistered version”.
The program does not require installation. Download and use immediately. I’ll tell you in more detail how to work with it:
- Download the program archive from the official website. Open it and run the “MasterStamp.exe” file. The designer window will appear.
- Select the tab with the stamp shape you want to create: round, triangular or rectangular (Stamp section).
- If you selected a circle, check the boxes around the circle that you want to fill in (depending on the number of phrases you need to enter). Also mark the lines that will be located in the center of the circle. Enter the appropriate text into them.
- Click on the Font button to select text options for a specific line. Specify the font type, style (regular, italic, bold, etc.), character size. If necessary, underline or cross out the phrase. Select the color of the inscription. If you need to enter text in another language, specify a different character set in the special menu. To save the settings, click “OK”. Optionally, adjust the text settings for all other lines.
- Try to align the text of each line on the circle. To do this, enter the appropriate value in the “Circle Radius” and “Rotation Angle” fields.
- Select a position for the rows to be centered. To do this, enter the appropriate values in the fields: “X-coordinate”, “Y-coordinate”, “Rotation angle”.
- Indicate the number of circles you need on the print. To do this, uncheck or check the numbered circles. For each circle, select the line thickness (S menu) and radius (R menu). Also indicate a color for each circle.
- If you need a picture in the center of the print, please put o. Click on the "Open" button. Select the bmp file that is stored on your PC. After loading the picture, determine its position in the center of the circle. Move it to the right/left (menu “x”) or up/down (menu “y”).
- When the print is ready, download it to your PC. To do this, click on one of the buttons: “Save mst” or “Save bmp” (depending on the format you need). Select a folder on your hard drive to store the layout.
The procedure for creating a triangular seal is almost the same. You choose the number of geometric shapes on the template, the thickness of their lines, and the number of lines. Specify the font for each phrase and its exact location on the print (using fields for x- and y-coordinates). You cannot add a picture to the center of a triangular seal. When the print is ready, download it in one or two formats: bmp or mst.
To create a rectangular layout, open the Stamp tab. The logic for constructing the template is the same here. Select the required lines, enter text in them, adjust the font and position of the inscriptions on the stamp: you can move the text to the right, left, up or down. You can also select the number of contours, their position on the print and the thickness of the lines. It is not possible to add a picture to this layout. After all the steps, download the stamp in bmp or mst format.
Vegetables and fruits stamp
For those who do not know how to make a stamp with their own hands from improvised materials, you can use the simplest option: make stamps from vegetables or fruits that are found in the house.
In this case, everything depends on the density and structure of the selected product.
- For example, you can easily make a stamp from a potato with your own hands, just like you can from an eraser or cork. The vegetable is cut into pieces and a design is cut out on the cut.
- You can cut out hearts, stars, animal paw prints and much more.
- Other vegetables form a certain pattern when cut (for example, onions). It can be printed without additional processing.
Such simple designs can be used to decorate children's clothing or other surfaces.
How to use stamps in scrapbooking?
All stamps can be divided into two types:
- silicone;
Silicone Stamps
Silicone stamps are sometimes called acrylic stamps because they are invariably used in conjunction with an acrylic block. The block is a small transparent stand with markings. They are soft, thin and transparent.
- rubber.
Rubber stamps
Rubber stamps are considered more durable, but it all depends on care when using and storing them.
If you throw it into a large box of things and forget it for several years, it will certainly deteriorate, the design will become clogged with dust and debris, regardless of the material.
Ice cream stamp for sweet lovers
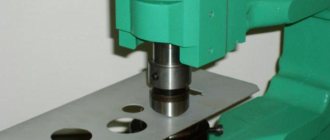
Where can I order cutting equipment?
To obtain high quality packaging, you need to purchase good technological equipment. The accuracy of size and shape, accuracy and reliability of assembly depend on the technology. It's not cheap. In addition, the production of cutting dies is a complex technological process. It requires certain knowledge, skills and experience. Before starting work, you need to draw up a project, set up all the knives and rulers correctly.
Now there is no need to purchase, install and work on equipment. Many manufacturing companies offer services for the production of die cutting molds. One of these companies, which has been on the market for a very long time, is Kristall. Projects of any complexity and scope will be completed here. Work is carried out on machines from leading foreign manufacturers with knives of the highest grade of steel.
Order cutting equipment from professionals. This will save your budget and time. And as a result, for not a lot of money you will receive a finished product of good quality.