When installing a new sewer system or replacing old pipes, you should know how to cut threads on a pipe, as this will simplify the selection of the necessary plumbing fixtures and the pipes themselves. Let's get acquainted with the types of thread, for what purpose it is needed, the main ways in which its size can be determined, and also what tool can be used to make it. We will also consider the process of slicing manually or using automatic devices.
Threaded pipe Source static.tildacdn.com
What is a thread and why is it needed?
Threading is one of the most popular types of fastening parts or mounting structures. It is used to connect several parts, such as pipes, into one structure. To do this, grooves are cut out on their side or inner part, which have a certain shape, angle of inclination and distance between the recesses (turn pitch).
Also, the notch can be on connecting parts, for example, taps or tees. Using this installation method, you can make collapsible or permanent structures, such as water supply, sewerage and other types of pipe systems. You can cut threads only on round or conical parts, since for other surfaces it will be inconvenient and impractical.
The most common thread profile option is triangular. It is very simple and affordable, but is not suitable for frequent system disassembly. If you need to frequently disconnect pipes or other parts, a round profile is used. It is most often used in plumbing. Other types of profiles are used in kinematic systems (for example, transmissions), but are not used in plumbing.
A type of kinematic cutting Source findpatent.ru
Origin and appearance
Cichlazoma severum belongs to the cichlid family and originates from the waters of South America. The first mention of them is found in the records of the Australian Johann Natterer, who discovered unusual fish living in the Amazon River basin.
But you can also find severum in other bodies of water. Brazil, Guiana, Colombia, Venezuela, and the upper reaches of the Rio Negro are the main habitats of cichlases.
Upon visual comparison, the differences between severus and discus become obvious. In the photo on the left is Cichlazoma severum, on the right is Discus.
The appearance of Heros severus resembles members of the discus family (Discus Cichlid). Because of this, it is often called the “false discus.” However, true discus are much larger than severums.
Severum lives up to its name, translated from Latin meaning stern, reserved. This is expressed both in the appearance of the fish and in their temperament.
The round body of cichlids, flattened on both sides, is colored grayish-green with brown splashes. Thanks to their laterally flattened body, the fish easily maneuver in the water, avoiding dense vegetation and fallen tree branches.
Types of thread
Thread cutting greatly depends on the surface on which it will be turned and for what purposes it will be used. For example, a conical one is good for sealing a joint, but it is difficult to make. There are 2 types of thread direction: right and left. The first one is the most common. It can be seen on bolts, screws, pipes and other connection elements. To screw a part onto such a notch, you need to turn it clockwise, and for the left - in the opposite direction.
Also, the thread can be single-start or consist of several parallel threads. In such connections, in addition to the pitch (P), the Ph parameter is used, which shows the distance between the grooves that are cut in one go. This is necessary in order to understand whether another turn will fit between the adjacent notches. You can see what thread cutting on pipes with several turns looks like in the picture below.
Example of the distance between turns Source https://ng.sibstrin.ru/wolchin/umm/in_graph/ig/004/000.files/102.jpg
There are several types of threads that perform different functions and are suitable for specific tasks:
- Metric (M) is its most common type in everyday life, but is completely unsuitable for pipes, since it is not standard. When cutting such a notch on a pipe yourself, problems may arise with the installation of additional modules or connection with a standard product due to a mismatch in pitch, angle and profile. The metric notch has a triangular profile with an angle of 60°, and the pitch is from 0.5 to 2 mm. The dimensions of the thread in the marking indicate its outer diameter, for example, M10 is 10 mm.
Metric notch Source upload.wikimedia.org
- Cylindrical (G) - referred to as BSPP and was invented in Britain. Because of this, all measurements for its standardization are carried out in inches, which is why it received the corresponding name. This notch is used in more than 90-95% of all systems that are connected to pipes and it is cut on all fittings that are used in plumbing, common in our market. The size marking of such a thread shows the diameter of its nominal bore, not the outer circle, and can range from 1/16 to 6 inches. This notch has rounded cuts at the tops and a profile angle of 55°.
Basic cutting methods
You can cut threads on pipes in one of two ways:
- automatic - on machines, power tools;
- manually - using hand tools.
For living conditions, of course, manual technology is more relevant. Cutting threads on water pipes or other pipes by hand is often done using a die.
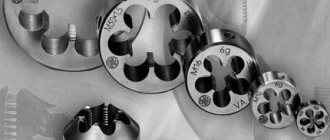
Solid dies for pipe threads, made of strong alloy steel, are available with a body diameter of up to 65 mm. Dies with a body diameter of up to 120 mm are available for metric threads. On the body of metric products there is a symbol “M”
A die is a simple device for cutting threads on pipes at home. The same tool is successfully used on industrial machines.
The device looks like a disk with several axial holes drilled along its inner diameter. The edges of these holes form several incisors (usually 8-10). The material for the dies is alloy steel or other hard alloys.
There are several types of such devices:
- solid;
- spring-loaded (split);
- clamp (sliding).
According to the design, the die is produced in the form of a circle, square, hexagon, or prism. The most common are disc (round) instruments. They are used for threading water pipes up to a diameter of 36 mm.
For ease of working with dies, use:
- simple knobs with locking screws - hand tools;
- threading chucks on lathes.
Cutting threads (metric, conical) of the best quality on pipes manually or on machines is provided by solid dies.
However, this type of tool, due to the rigidity of its own design, has its negative sides. The cutters wear out quickly.
A spring-loaded thread cutting tool is distinguished by the presence of a cut in the area of one of the axial holes. The presence of a cut reduces the load on the cutters, but at the same time the degree of rigidity required to achieve high cutting quality is reduced.
Spring-loaded (split) dies have a less rigid design, which makes it possible to cut threads on pipes and at the same time change the thread diameter in the range of 0.1-0.3 mm.
Such devices are characterized by increased wear resistance of the cutters, but do not provide high accuracy and cleanliness of thread cutting.
Sliding dies consist of two working parts. They are designed for installation in a fastening module - a clamp.
Fastening in the clamp is carried out by a mechanism consisting of a cracker and an adjusting screw. The screw adjusts the diameter size for thread cutting. Usually the die is equipped with a set of dies for several different diameters.
Method #1 - making pipe threads with dies
The process of creating a thread on a pipe with a die or die requires the mechanic to perform some preliminary actions:
- The surface of the pipe in the cutting area must be thoroughly cleaned.
- The end part of the pipe should be processed with a file (make an entrance chamfer).
- Apply lubricant to the surface to be treated to reduce resistance.
If possible, it is advisable to secure the pipe vertically, for example, in a bench vice, leaving free access to the upper part - the cutting area. The fastening force must be correctly calculated so as not to deform the pipe body.
Then take a pre-prepared driver with a roughing die (No. 1) of the required diameter and suitable thread characteristics.
An example of cutting a thread on a water pipe using a hand wrench. A die is inserted into the working cylinder of the driver and secured with two (four) bolts located opposite each other
The tool is held horizontally - perpendicular to the end area of the pipe. Place the roughing die onto the chamfer of the edge using the internal hole. Light pressure and successive short turns of 25-30° make the initial cut.
This work should be done carefully, slowly, constantly monitoring the right angle between the horizon of the ram and the vertical of the pipe.
Using this technique, the first two or three threads are carefully cut. Usually, after cutting the first two or three threads, the tool is firmly in its working position. Further, the right angle can no longer be controlled.
But the technology of cutting with short (without particularly strong traction) circular movements should be maintained until the end of the cut. It is recommended to periodically add lubricant at the cutting point.
After the first pass, twist the device and then repeat one or two more times with a finishing die (No. 2).
Image gallery
Photo from
Tapping with a fixed tap
Die cutting of external threads
Manual thread cutting machine
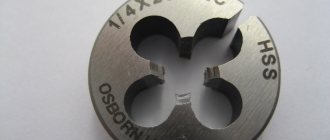
Working side of the thread cutting die
Method #2 - clump cutting technique
The die is a variation of the same die for cutting threads, including on pipes. A distinctive feature of the die is the ability to adjust the cutters.
A set of clamps for different sizes of pipe threads. Each of these devices is equipped with screws for fastening blocks with cutters. These screws can additionally change the thread diameter within small limits
There are clamps for manual use, as well as similar devices with an electric drive.
Option #1 - cutting with a hand clamp . Manual cutting of pipes is usually done with a clamp, which is installed in a ratchet holder. This holder makes the work of cutting pipe threads convenient and less complicated.
Of course, depending on the conditions of plumbing work, you can use other types of hand holders. For example, a standard locking knob with two handles.
The principle of creating a thread with a die is almost the same as the method of working with traditional dies:
- Clean the working surface of the pipe and make sure there are no defects.
- Sand the cut area until it has a distinct metallic sheen.
- Process the outer working part of the end edge at an angle of 45-60º (chamfer).
- Lubricate the prepared surface with technical petroleum jelly.
- Secure the pipe in a mechanical vice or hold it with a gas wrench.
After these procedures, the cutting tool (blank) is placed with the internal hole on the pipe chamfer and, with moderate, uniform pressure, they begin to rotate it with short reciprocating movements.
A convenient tool for working with a clamp is the so-called “ratchet” - a lever with idle reverse. Using such a hand tool, it is easy to cut threads on a pipe under different installation or repair conditions.
If a ratchet clamp is used as a holder, only forward cutting is carried out. It should be noted that the ratchet clamp is convenient to use when working in cramped conditions.
For example, when it is necessary to process a pipe laid in close proximity to a wall.
Option #2 - cutting with an electric clamp . Along with hand tools, electrically driven devices are widely used. The obvious advantage for the mechanic is a significant reduction in labor intensity.
But on the other hand, not all electric machines are capable of performing work in cramped conditions. In addition, when working with hand tools, it is possible to obtain a better result.
To obtain a similar result from electrical sockets, extensive experience with this tool is required.
Equipment for the clamp, supplemented with an electric drive. A modern, effective tool that significantly reduces the physical load of a mechanic. True, electric sockets are more often used in the professional sphere than in everyday life
Working with an electric clamp:
- Preparation of the pipe surface in the cutting area - cleaning, chamfering, lubrication.
- Fastening the pipe with devices capable of providing rigid fixation.
- Fixation at the starting point of the die holder with the clamp included in the kit.
- Checking the stroke and direction of rotation of the die.
- Cutting the first two or three turns in the jog mode.
Next, pipe threads are cut automatically. The cutting length is considered optimal when the upper edge of the die cutting heads reaches the leading edge of the pipe.
At this point, the operation of the device is stopped, the reverse rotation function is turned on, and the bug is twisted from the pipe with a push feed. Be sure to periodically moisten the cut area with oil throughout the process.
Method #3 - using lathes
Large-scale construction and repair work, as a rule, excludes the use of hand tools. Here, lathes are usually used to process the pipes accordingly.
Threading functions are supported by many universal lathes.
Lathes are used to produce threaded parts on pipes of different diameters. You can make threads of any configuration on a lathe
Using the machines, both internal and external pipe threads are made efficiently and easily. The pneumatic (or mechanical) fastening module of the lathe ensures high-quality reliable fastening of the pipe and precise supply of the workpiece to the cutter.
To perform thread-cutting functions, different types of cutters are used:
- rod,
- lamellar,
- intercalary
Work on lathes is carried out by specialists trained in this field and having the appropriate qualifications. Without experience and professional skills, trying to cut threads with your own hands on a machine is not recommended.
For home craftsmen who decide to take up plumbing and carve metal workpieces, the following tips will help them in their work:
Image gallery
Photo from
Selecting the appropriate drill diameter
Processing the workpiece with a file before cutting
Tapping in several stages
Parts with external and internal threads
Video description
This video shows how to make inch cutting with a die and die:
- Conical (R) - designated as BSPT and also has British roots. It has a pitch and profile angle similar to cylindrical threads. It is used for cutting notches into cone-shaped parts. In some cases, it is possible to connect parts with R and G notches. By creating additional tension on the turns during the joining process, the conical notch provides additional reliability of the docking units.
- Round (R) is a very rare type of pipe connection, which is used in places where it is necessary to frequently assemble and disassemble the joint. Even after frequent dismantling, such a mount does not lose its shape, reliability and tightness. The disadvantage of such a thread is that it cannot be combined with other types of notches. The round variety has a profile in the form of a circular arc with an angle of 30°.
There is an American standard for conical and cylindrical parts, which is labeled NPSM or NPTF. It has an angle not of 55°, but of 60°, similar to the metric one. This type of thread has its own thread size and profile height, but is found almost nowhere, since it is being replaced on the market by the British standard.
Example of American NPSM Source www.staniosind.com
See also: Catalog of companies that specialize in the installation of utilities: water supply, sewerage and heating
Performances
In accordance with GOST 6111, pipe threads are used in detachable connections of pipelines designed for pumping liquid and gaseous working media. Moreover, relative to water and gas pipes (GOST 3262), it can also be conical, which is explained by the practical convenience of screwing on/screwing on connecting parts. The angle at the top of the conical thread profile is 60°, and the taper angle depends on the diameter and pitch of the thread, but cannot be less than 26°, otherwise the connection may self-unscrew.
A characteristic feature of all pipe threads - metric and inch - is the rounding of the top of the thread profile, which with standard thread cutting methods is 10% of its radius. This is due to the convenience of cutting pipe threads and the reduction of internal stresses on a relatively small body of metal for pipes of any type and range.
GOST 6357 also provides for metric pipe threads, both cylindrical and conical, although in practice they are used less frequently. The inclination angle of the cylindrical thread profile is 55°, which increases the number of turns in the same cutting area. This increases the complexity of connecting parts of the pipeline, although it increases the tightness.
Other types of threads (thrust, trapezoidal) are not cut on pipes, since this is associated with the appearance of additional stress concentrators, which significantly weaken the cross-section of the material.
Tools
There are different pipe threading tools that can make notches inside or outside the structure:
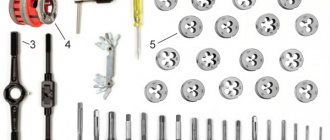
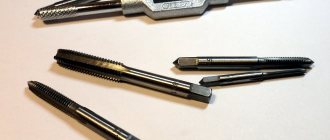
- A tap is a device for cutting internal threads. In appearance, it resembles a rod or drill on the outer surface of which there are notches and grooves applied in order to retract the handle. Taps are used for cutting or calibrating threads. Most often, their working part consists of 3 sections, which perform the functions of rough, intermediate and final cutting. Some manufacturers make a set consisting of 2-5 taps, which perform the notching separately. The tap can also be made for manual cutting or for processing parts on a machine. They are most often used for cutting metric threads, but there are varieties for cutting internal notches for pipe standards.
Set of different taps Source prosto-instrumenty.ru
Rules for cutting internal threads with a tap
When manually cutting threads, the tool is inserted into the hole vertically (without distortion). The driver is not rotated in the desired direction (clockwise for right-hand threads) all the time, but is periodically made 1-2 turns in the opposite direction.
With this rotational-return movement of the tap, the cut chips break, become short (crushed) and are easier to remove from the working area, and the process of thread formation is greatly facilitated. After cutting is completed, the tool is turned out by turning the knob in the opposite direction, then it is driven along the finished thread through or until it stops for blind holes. You must also adhere to the following rules:
When forming threads in tough and soft metals (aluminum, copper, babbitts and others), as well as in deep holes, the tool should be periodically unscrewed from the hole to clean the grooves from chips.
When using a tap kit, all tools in the kit must be used. Cutting immediately with a finishing tap or a medium one, and then finishing without a roughing pass does not speed up, but only slows down and complicates the cutting process. In addition, the thread turns out to be of poor quality, and the tool may break. The finishing and middle taps are screwed into the hole by hand (without a driver) until the tool follows the thread correctly, and only after that the driver is installed and work continues.
During the cutting process, it is necessary to carefully monitor the correct insertion of the tool so that it does not become distorted. To do this, it is necessary to check the position of the tap relative to the upper plane of the part using a square after every newly cut 2-3 threads of chips
Particular care should be taken when working with blind and small holes.
Tap design
Tap
(Fig. 1) is a hardened screw on which several straight or helical grooves are cut, forming the cutting edges of the tool. The grooves also provide accommodation for the chips generated during cutting; the chips can be removed from the cutting zone.
The tap consists of two parts
- a working shaft and a shank, at the end of which there is a square (for hand taps). The working part of the tap includes: a cutting (taking) part, which ensures the removal of the main part of the processing allowance; a calibrating part that performs final processing of the thread; chip flutes; feathers (thread turns separated by chip grooves) and a core, which provides the tap with sufficient strength and rigidity for processing. The tail part of the tap serves to secure it in the driver, which is used to carry out working and idle movements of the tap.
The working part of the tap is made
from tool carbon steels of grades U11, U11A, high-speed steel or hard alloy. The choice of material for the working part depends on the physical and mechanical properties of the workpiece being processed. For solid taps, the material of the tail part is the same, but for taps consisting of two parts connected by welding, the tail part is made of structural steel grades 45 and 40X: The number of chip grooves made on the tap depends on its diameter (three grooves for taps with a diameter up to 20 mm and four for taps with a diameter over 20 mm).
The main work when cutting threads is performed by the cutting edges formed by the intersection of the front surfaces of the groove with the rear (backed, made in an Archimedean spiral) surfaces of the working part. Relieving the back surface of the cutting teeth allows them to maintain a constant profile after regrinding, which is carried out centrally in sharpening shops.
As a rule, taps are made with straight flutes, but to improve cutting conditions and obtain accurate and clean threads, taps with helical grooves are used. The angle of inclination of such a groove to the axis of the tap is 8... 15°. To obtain precise and clean threaded surfaces in through holes when machining soft and tough materials, fluteless taps are used.
Rice. 1 Tap:
a – design: 1 – thread (turn); 2 – square; 3 – tail; 4 – groove; 5 – cutting feather;
b – geometric parameters:
1 – front surface; 2 – cutting edge; 3 – backed surface; 4 – rear surface; 5 – cutting feather; α – clearance angle; β – cutting angle; δ – sharpening angle; γ – front angle;
c – with a helical chip groove:
1 – groove; g - cutting blind threads; ω – angle of inclination of the helical groove.
Video description
This video shows the features of thread cutting with a die:
- A clamp is a device for cutting threads in hard-to-reach places. In appearance, it resembles a wrench, but instead of attachments for bolts, it has a hole for attaching replaceable cutters. The principle of operation of the clamp is similar to a die, only instead of a whole washer it uses its cutting edge, and for turning it uses a mechanism similar to a wrench. There are devices that, instead of a solid body, use adjustable or open-end wrenches for turning. Such a device will cost less than a solid socket with a ratchet, but when using them you can get injured, since the key sometimes jumps off.
Example of a die with different heads Source otk-instrument.ru
How to cut threads
Before cutting a thread, you should decide on its size, pitch and standard used. If you need to make a cut on a part that should fit an already finished element, then it is recommended to first understand its dimensions. To do this, look for the appropriate marking next to the finished thread.
If it is not there, then for measurement you can use a caliper or a special set with templates for notches of different standards. You can also use marked plumbing fixtures for this if there are no other options. With its help you can understand the diameter of the pipe.
To determine the notch pitch, you can mark 10 turns with a marker, measure the length of the entire section and divide it by 10. The resulting number will be the pitch. The thread cutting tool should also be selected based on the diameter of the pipe and the pitch of the notch on the part with which the connection is required.
Before working with dies or dies, you should clean the surface of the pipe on which the notch will be made using a file, sandpaper or a grinder with a grinding wheel. The end part of the part also needs to be turned and an entrance chamfer made on it to start working.
Example of an entrance chamfer Source upload.ecvv.com
Video description
This video shows how to cut an internal thread using a machine and a tap:
Tapping with an electric die is similar to the conventional process, but this tool requires more space and additional fixation to operate. Its advantage is that the labor intensity of the process for the mechanic is reduced. For any type of cutting, it is recommended to add lubricant during operation to the places where the cutting edge is located.
Thread cutting can also be done using a lathe. This type of work is most often used for large volumes of production. Using such a device, you can make both external and internal threads, but you need a trained specialist to work with them. Without proper knowledge, operating the machine can cause injury.
Example of plumbing fittings with thread Source static-eu.insales.ru
Briefly about the main thing
Threading is a convenient and reliable way to fasten parts and mount various structures.
There are different types of threads, but for pipes the most commonly used standard is cylindrical or tapered.
The simplest and most accessible tool for cutting external threads is a die, and for internal threads, a tap.
With the help of a die, you can save time and effort when cutting threads in hard-to-reach places, for example, near walls, and the electric device can make the notch independently.