Tin soldiers are boys' favorite toys of all times, but what can you create if you only have one soldier of a certain shape, but you need several of them for play or for your collection? In this case, you can try to do them without the help of others, however, a lot of patience and effort will be useful for this. How to create a tin soldier at home? Read this annotation, look at the pictures and try to make it. If you try, you should get a soldier.
In order to create a new tin soldier, a ready-made soldier will be useful as a standard. If it is painted, you need to wash off the paint from it with acetone, and then start making a mold for casting.
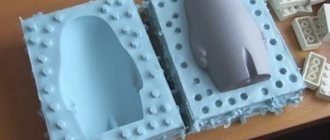
How to create a mold for casting tin soldiers
The mold for casting tin soldiers is made of 3 components: two parts are plaster, and the third is an alloy block.
1. Take a flat block of plasticine and press the sample soldier into it halfway, and press the iron bar against the soldier’s stand as shown in Figure 1.
2. Make a fence from the walls of a matchbox and protect the plasticine blank with it - just stick it into the plasticine as in Figure 2. Make two or three indentations in the plasticine, as in the figure. These holes will be useful when joining two halves of the future plaster mold.
3. Spread vegetable oil over the entire surface of the plasticine, the soldier pressed into it, the pits and the iron bar, and begin making a plaster mold. To do this, pour gypsum or alabaster powder sifted through a sieve into a cup and, stirring, pour in so much cool water so that the mixture looks like watery sour cream.
4. Slowly and carefully pour the plaster from the cup into the plasticine blank. With all this, you need to carefully watch that there are no bubbles. Due to the chemical reaction, the plaster will heat up slightly and it needs time to cool - 10-15 minutes.
5. When the plaster has cooled, carefully remove half of the plaster mold and pull out the soldier.
6. The second half of the plaster mold is made in the same way as the already made first one, only instead of a plasticine blank, take the first half of the mold together with the soldier placed in it. Place an alloy block on the soldier’s stand and stick a fence with plasticine (Fig. 6).
Lubricate the surface inside the fence with oil, fill it with watery plaster, and when it cools down, separate the halves of the mold, carefully pull out the sample soldier, and leave the mold to dry for a week.
7. In order to pour tin into a mold, you need to create a sprue in it - a special groove that can be easily cut with a knife from the edge of the mold to the base of the figure in both of its halves. Also, with the tip of a knife, you need to scratch scratches-grooves from the edges of the figure to the edges of the shape. These are air, through which the air displaced by the molten tin will exit the mold. The airs do not need to be made very wide, otherwise the tin poured through them will flow out of the mold.
8. Before casting, place a smooth sheet of paper between the firmly compressed halves of the mold and the alloy block for thermal insulation.
Combat ships
This is a creative work that gives the master a lot of scope for imagination. And all because there are many ships, both in type and in armament.
Like other military or military equipment, a ship can be made from paper. All you need is a piece of paper. A ship made from it can be decorated with a flag and an anchor; a match can be used as a flagpole.
The main advantage of such a product is that it floats well, but the main disadvantage is its fragility.
An advanced option for building a ship is the use of wood (pine and spruce - they are easy to process) or plywood. To work, you will need a knife, glue, a jigsaw, sandpaper, work gloves (to avoid cutting yourself) and small pieces of wood.
To make a deck, you can use plywood or corrugated cardboard (at least 3 layers), after cutting out the pointed bow and stern. Next, we simply connect the sanded wooden parts to the base, forming a deckhouse, upper rooms, towers with guns (matches). We decorate the resulting vessel at our discretion.
How to create a tin soldier at home, casting a soldier
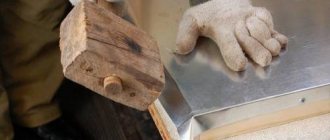
To cast the figure of a soldier, find a clean jar (suitable for Vaseline) and use pliers to bend it into a ladle shape (as in the picture).
From such a ladle it will be more convenient to pour liquid tin into the mold. Attach pliers to the ladle instead of a handle, put on a mitten or glove and carefully melt the pieces of tin in it on the stove.
When the tin has melted, firmly hold the two halves of the mold folded together in your hand (you need to hold them with the sprue pointing up) together with an alloy bar (as in the picture) and pour the liquid tin into the mold.
DO THIS CAREFULLY, DO NOT SPILL MOLTEN TIN ON YOUR HANDS OR LEGS, OR ACCIDENTALLY SPLASH IT IN YOUR FACE OR GET BURNED.
Then let the tin cool thoroughly, carefully open the mold and the tin soldier is almost ready. All that remains is to remove the excess with pliers and process the figure with a file. If the figure is unsuccessful, then it can be melted and the soldier can be cast again.
Popsicle stick soldier
Let's figure out how to make soldiers from thin and flat sticks. To create one person, prepare three identical blanks. You will also need a glue gun to connect them together with the end part. This will be the head, torso and legs. To create arms, one stick is cut in half and attached to the sides of the body, departing the length according to the size of the head from the upper ends. When the glue has hardened, the resulting figure can be additionally sanded with fine sandpaper and painted on both sides with paints.
Before you make soldiers, think about their purpose. If they are made for a child's play, then you need to make a solid base so that they maintain an upright position. This craft can be made as a Christmas tree decoration or as a pendant on the handle of a children's closet door. For this purpose, a hole is cut out on the top for threading the ring.
How to create a tin soldier at home if there is no standard
If there is no ready-made soldier for the standard, then you can copy a clear profile of the soldier from the drawing you like onto thick paper and cut it out. To create a relief cut out profile, you can glue thick pieces of paper onto it. They need to be glued one on top of the other on both sides of the profile (as in the picture), and the edges of the thicknesses can be leveled with plasticine. Small details can be scratched into a ready-made plaster mold.
Here are {instructions} on how to create a tin soldier at home. All that remains is to paint it with a narrow brush with oil paints diluted with oil varnish or turpentine. You just need to paint all the same-color parts first, and then, after letting them dry, the parts of the remaining colors.
Business idea - making souvenir figurines
In fact, every man in childhood dreamed of becoming the commander-in-chief of an entire army of tin soldiers. Years have passed, the modern level of technology development will allow you to fulfill your long-standing childhood dream. And not only do it, but also turn it into a fairly profitable business. The rarest option when desires coincide with abilities, and what you love is transformed into a profession.
- Development of miniature production
- A step-by-step plan for organizing your own business for the production of souvenir figurines
- Development of production of figurines at home
- Conventional casting without pressure
- Plastic injection molding
- Introduction of 3D printing technology
- How much can you earn from making figurines?
- Equipment for the production of souvenir miniature figurines
- Documents required for organizing a business for the production of souvenir figurines
- Which tax regime will greatly contribute to the development of your business?
Interesting read: Making perforated sheets
Development of miniature production
The creation of miniatures has been around for a long time. Since the heyday of Egyptian civilization, archaeologists have known bone figures of small warriors who served as toys for the children there. As society developed, the culture of producing toy warriors also developed. The detail grew, the colors appeared. From simple samples of handicraft production, not only applied standards of household toys, but also true works of art, which already had collection value, were gradually formed.
In the 20th century, the creation of small souvenir figurines was transformed into an entire industry with multimillion-dollar turnover. It is worth mentioning such production giants as the Canadian “Conte”, the Italian “Atlantic”, the Austrian “Elastolin”. In 1976, a truly epoch-making event took place. The Russian Alliance acquired technology and equipment for the production of plastic soldiers developed and launched into series by the South American businessman Louis Marx.
But technologies that half a hundred years ago were the lot of industrial giants have now become available to home craftsmen. Stable tin soldiers began to be born not only in the spacious workshops of industrial giants, but also in the small kitchens of communal apartments.
Toy soldiers - ancient toys
The history of the soldier goes back more than 4 thousand years. The oldest of them were found in the tombs of ancient Egyptian pharaohs. Made of wood, the figurines represented the guards protecting the deceased ruler in the afterlife.
The terracotta guard from the mausoleum of the ancient Chinese emperor Qin Shi Huang is known throughout the world. The full-length figures of his bodyguards are made with the highest detail, and the face of each is so individual that there is not the slightest doubt about the portrait resemblance.
In the Middle Ages, European kings and nobles became interested in playing soldiers. This was perhaps the only social stratum that could afford such pleasure, because the material for making figurines was most often precious metals. The games themselves had tactical and strategic aspects - in them, future commanders learned the basics of controlling military units.
In the XVII – XVIII centuries. More than one self-respecting royal court could not do without a collection of miniature warriors. And at the beginning of the 19th century, toy soldiers finally became available to the general consumer and reached the masses. This is connected, oddly enough, with the spread of cheap earthenware. Before this, most European tableware was cast from tin. But earthenware technology turned out to be much more economical, and tin foundries simply could not stand the competition. In search of a new market, they turned to the production of tin figurines. And so the textbook tin soldier was born. This happened in the German city of Nuremberg, and the first soldiers among collectors are called that: Nuremberg miniature.
See also: Ethnomir Puppet Museum
Remember, Andersen: from one tin spoon - 25 soldiers? If you compare it with the products of modern factories, you will be surprised at the size of the spoons of that time. But surprise will be premature: the spoons of that time were no larger than the spoons of today. But the soldiers, on the contrary, were inferior in parameters to their descendants at the beginning of the 21st century. The Nuremberg figures were flat, no thicker than 3 mm, and the height of the foot soldier was approximately 30 mm. So it's no surprise that one spoon yielded two dozen tin-resistant ones.
Subsequently, three-dimensional figures appeared, more interesting, but also more expensive, and the most expensive among mass products were made completely collapsible. Russian artist of the turn of the 19th – 20th centuries. Alexander Benois recalled that he perceived the appearance of just such collapsible soldiers as a real holiday.
In the twentieth century, the range of raw materials for the production of toy soldiers expanded significantly due to polymer materials. After World War II, toy soldiers became one of the most popular items on the toy market. During the same period, military-historical wargames (military-tactical games with soldiers) were gaining popularity. Unlike similar games of the Middle Ages and Modern times, they are now dedicated to specific events in military history, be it the Spartacus uprising or the Battle of Stalingrad. The main contingent of wargamers are not children, but young people aged sixteen and older.
See also: Original gifts for a man on February 23, 2022.
At the same time, collecting soldiers is also developing - both ancient ones from a hundred and two hundred years ago, and modern ones, produced specifically for collectors.
Be that as it may, the spirit of Andersen’s soldier did not burn out in the flame of the stove, but continues to warm the hearts of millions of “soldiers” around the world.
Kononko Yulia
A step-by-step plan for organizing your own business for the production of souvenir figurines
In order to start your own miniature production company, you need:
- Conduct detailed advertising research to find out who is working in this direction, whether there is a niche in the market for souvenir figurines, how you will attract customers, etc. In addition, you need to carefully study the needs, interests and financial abilities of representatives of your motivated audience.
- If an analysis of the market situation has shown that you have a real chance of occupying your niche and making a profit, you can begin to develop a detailed business plan. Pay attention! Two sections of a student's term paper at an economics university are not a business plan! In this case, you need a real monetary document that will give you a hint of what needs to be done to develop your business, taking into account your personal characteristics.
- After the preliminary steps, you can begin registering the company. Usually, individual entrepreneur documents are drawn up for this business, but if you have partners or you do not want to risk your property, then register an LLC.
- Along with preparing documents for business registration, calculate which tax regime is the most profitable for you.
- The next important point is the search for employees. If you doubt that you can solve this issue without the help of others, contact an agency that deals with employment issues.
- In addition, you need to find premises for company employees, purchase equipment, conclude agreements with suppliers of raw materials, wholesale buyers of finished products, etc.
In addition to the points listed above, you need to create an action plan for conducting marketing campaigns. Be sure to ensure that solving organizational issues does not exceed the scope of your financial abilities. Start-up capital must match your business plan.
Development of production of figurines at home
What is the creation of a miniature in a home workshop or small production?
Conventional casting without pressure
The most common and affordable development, which allows you to equip a machine right in your home kitchen, is pressure-free casting of lead-tin alloys and polymer resins into three-dimensional detachable or one-piece molds. The set of tools is small. A container for mixing components or melting raw materials, a set of metalworking tools for post-casting finishing and molds of figures into which the polymer or tin melt is poured.
Among the advantages of conventional casting without pressure, it is necessary to emphasize the availability, simplicity and absence of complex devices that provide such technology. Molds and master models for products can be made without the help of others, naturally, if you have certain abilities.
The disadvantages include a very small circulation of finished products and the impossibility of mechanizing manual labor.
Plastic injection molding
The next production method should include injection molding of plastic masses, such as low and high pressure cellophane, polystyrene, polyvinyl chloride. This development already belongs to the class of industrial production and requires quite expensive equipment in the form of injection molding machines, the presence of production facilities with a three-phase network, high-quality granulated raw materials, qualified adjustment and maintenance. Molds for the production of figures using this technology are made from tool steel or beryllium bronze only on high-tech precision equipment.
There are also many advantages. First of all, large runs of finished products. At one time, the Donetsk Toy Factory, using such technology and molds imported from other countries, was able to produce and distribute more than 140 million finished products in two 10 years. Positive aspects also include the virtually complete automation of work actions. The operator’s responsibilities include only monitoring the progress of work and adjusting the characteristics if they differ from the norm. It is fair to say that over the past two years, smaller standards of injection molding machines have emerged that are unrivaled for use on small production sites.
Introduction of 3D printing technology
An extreme and more innovative method of producing small miniature forms is the introduction of 3 D printing technology . Modern manufacturers provide the widest range of printers for full-volume printing, ranging from very economical models to the best models with very wide functionality that meet the most stringent requirements of industrial production.
This technology has a lot of advantages for us. Above all, this is the exceptional elasticity of production and its compactness. There is actually only one drawback. Highest cost of hardware and software.
Children's nostalgia and unchildish scandals: soldiers of the Soviet Union (23 photos)
Author: War_War
06 February 2022 15:04
Tags: Toys USSR Soviet Union children games soldiers
9207
23
One of the best gifts for a Soviet boy was toy soldiers. Tin and plastic, large and small. How toy armies were created, and what childish scandals sometimes shook the industry - in our almost detective story.
0
Source:
See all photos in the gallery
The soldiers of the Russian Empire were not much different from the European ones. A realist or a high school student could acquire an army of tin infantry, dragoons and Cossacks, or organize a wargame using paper fighters.
0
Source:
After the end of the Civil War and the introduction of a new economic policy, the production of toy soldiers fell into the hands of private owners. Nepmen, in pursuit of quick profits, sometimes got down to business too quickly. So that the supplies of the royal soldiers would not go to waste, they decided to give them a new life. And they simply swapped heads with reactionary Cossack caps for politically loyal Budyonnovsky helmets. However, such a castling outraged the press of the young republic.
×
0
Source:
The production of soldiers and other toys in the Union was almost 100% concentrated in artels. What were soldiers like in those days? Most often these were sets of posts made of tin alloy - the Red Army soldiers stood at attention or walked in a column. The detachment was supplemented by a commander, a standard bearer, a trumpeter, a drummer, and so on.
0
Source:
But there were also “action” soldiers: shooters with rifles, firing while standing or kneeling, prone machine gunners, motorcyclists and, naturally, cavalrymen.
0
Source:
The toy manpower was supplemented by tin clockwork tanks, armored cars and cannons.
0
Source:
Boris Emelyanov in his book “Stories about Gaidar” describes how they played in those days: “We built a fortified stone citadel from pieces of sawn sugar, and my green tin snipers settled in it. Gaidar's blue soldiers went on the offensive. The artillery preparation of his field guns was unsuccessful. Two wooden cannons could only fire chewed paper balls—there were no peas in the house—and the tin snipers laughed loudly in their sugar fortification at the enemy’s fire weakness.” The tradition of releasing paper warriors also continued. In addition, special stamps were sold that could be used to transfer the outlines of a soldier onto paper and then cut it out. Such soldiers were cut out of sheet metal, plywood, and even rubber. Now the figures of the 30s have become the object of a real hunt for collectors. Their cost reaches several hundred dollars. But don’t rush to start looking for toy antiques. There are a lot of skillful fakes walking around flea markets. You need to have a good understanding of the issue so as not to accidentally buy a “Stalin-era soldier” cast by craftsmen and aged in a pot with a flower. For this reason, many collectors prefer honest plastic.
0
Source:
The biggest disappointment for the boys in those years was the lack of enemies for the Red Army soldiers. The Soviet industry did not produce them. It was necessary to divide the armies either into conditional “red” and “blue”, or temporarily appoint some of the soldiers from their collection as “fascists” and “bourgeois”.
0
Source:
The situation began to change only in the 1970s. Then sets appeared dedicated to the Battle of Kulikovo and the Battle of the Ice. But you wouldn’t find counter-revolutionary cadets alongside the wonderful revolutionary sailors. Not to mention the toy Wehrmacht soldiers.
0
Source:
In the post-war era, the production of soldiers took on the broad rails of the engineering industry. Tin fighters were cast at large factories - Minsk and Bryansk motor plants, Leningrad carburetor plant, Tula cartridge plant and many others.
0
Source:
The creation of sets of soldiers in the Union was approached very responsibly. Thus, the author of the famous “Battle on the Ice” set of the Leningrad Carburetor Plant was Lev Razumovsky, a famous sculptor, artist and medalist.
0
Source:
He was brought in to create the set in 1972. For days on end he sat in the ethnographic museum, making sketches of the clothes, armor and weapons of Russian soldiers and the knights who fought with them. Then the sculptor created 14 double-sided reliefs. Each soldier was first sculpted from plasticine on a separate piece of glass - the obverse on one side, and the reverse on the other. Plaster casts were made from each relief, which were processed by the author and then transferred to the factory. There, their uniforms were taken off and shrunk several times.
0
Source:
Razumovsky created not only the characters in “Battle on the Ice”. He also sculpted the figures for the Sailors of the Revolution set, which can be seen above. And his “Battle of Kulikovo” went through many reprints and was published until the 2010s. Another flat “Battle of the Ice,” but in plastic, was created by the Soviet sculptor Zoya Ryleeva (she is also the author of the “Golden Sheaf” sculpture at VDNKh, which later became the “Friendship of Peoples” fountain).
The Soviet toy industry until the 1970s offered mainly flat tin (more precisely, aluminum alloy) and plastic soldiers. And the children wanted more realism. And the range of eras and peoples was extremely limited. There were practically no Streltsy, Peter's Guards, Suvorov's miracle heroes or soldiers of the Patriotic War of 1812 on sale. Historical continuity was traced only in a couple of sets of “blowers” (the so-called hollow plastic figures).
0
Source:
Yes, these are the miniature rubber infantrymen produced in 1812.
0
Source:
Things were worse with the armies of other countries. There would be no happiness... the bankruptcy of the famous American manufacturer of toy soldiers, Louis Marx & Company, Inc., came to the rescue. Soviet trade representatives bought the molds, the happy owner of which was DZI - Donetsk Toy Factory. Knights, cowboys, Indians, Vikings, pirates, Romans, and Egyptians became an absolute hit among the Octobrists and pioneers.
0
Source:
DZI also mastered Marx's giant (15-centimeter) soldiers - Vikings, American trappers, Neanderthals and Soviet soldiers. True, due to their size, they were less often involved in games and most often served as decorative items in Soviet apartments.
0
Source:
The Moscow Progress factory also produced notable sets.
0
Source:
Moreover, the original squad of Russian knights was opposed by five knights from an incomplete set of the Italian company Dulcope.
0
Source:
During the game, the designs on the shields were often erased, and the weapons were lost, which did not make these soldiers any less beloved. Lost ammunition was replaced with homemade ammunition or the soldiers were “armed” with ordinary matches.
0
Source:
There was almost a detective story associated with the recruitment of the DZI Indians. Soon, a wounded Indian with an arrow in his back disappeared from the kit.
0
Source:
There were persistent rumors that it was removed by censors for the excessive cruelty of the scene. However, according to the recollections of factory workers, the mold with the Indian was simply damaged, and they decided not to restore it. For the same reason, the number of knights was reduced by a couple of persons, which today are a particularly coveted trophy for collectors.
0
Source:
Another Indian from the set of the Moscow Ogonyok factory came under attack from the Soviet press in 1985. The Moskovsky Komsomolets journalist was outraged by the figure of one of the indigenous people of America with a knife in his hand and a “brutal” expression on his face. The Iroquois soon lost his bladed weapon, remaining in the strange pose of a boy making “ku” three times.
0
Source:
Exoticism has always attracted me. For Soviet children, foreign soldiers were so exotic - primarily from the GDR and Poland. In the GDR, quite massive soldiers were produced from elastolin - a rubber-like material based on chalk, glue and casein. By the way, mini-portraits of Reichswehr soldiers, and then soldiers of the Third Reich, were made from the same elastolin in the 1920s.
0
Source:
At the same time, the figures of knights, soldiers of the GDR army, “Zulus”, “cowboys” and Indians were hand-painted by homeworkers. The popularity of this scarce commodity is difficult to overestimate, given that Indians and cowboys were created based on the books of Karl May and East German Westerns, popular in those years. In the meantime, perestroika was setting in, and the palm in the production of soldiers was again seized by private owners.
Source:
Tags: Toys USSR Soviet Union children games soldiers
ANTI-FISH All about politics in the world
Do you like to remember how things were before? Join us, let's feel nostalgic together:
138 5 133
Liked
133 2
45
Partner news
How much can you earn from making figurines?
To pour or not to pour? This truly Shakespearean question is asked by any aspiring entrepreneur who is calculating the possibilities of starting such a business. Let's count.
The demand for toy, souvenir and collectible figures is quite stable, predictable and sustainable. It is satisfied in several sectors.
Interesting read: Making a polycarbonate greenhouse with your own hands
In the mass sector, these are low-quality crafts from Chinese manufacturers; in the souvenir sector, European manufacturers fill the niche at the highest price spectrum, and Russian manufacturers at the lower end. A separate sector of the market is collectibles. Personal masters with small editions and individual works of authorship rule the roost here.
The cost for a mass product ranges from 2.5 rubles to 35 rubles per product weighing raw materials from 20 to 100 grams.
The price range in the souvenir products sector is the widest. The cost of the product starts from 50 rubles and ends at 500 rubles. All figures costing more than 500 rubles should be classified as collectibles, which do not have the upper limit of the price spectrum and pricing is purely personal and justified primarily by market conditions at a certain point in time.
If you are considering the option of mass replication of products, then you should count on a starting investment of 3500-7000 bucks. These funds include the cost of a casting machine with a working chamber volume of at least 85 cubic cm, its installation, startup, adjustment and maintenance, rental of premises with the ability to connect a three-phase power supply and a supply of raw materials for 30 work shifts.
The profitability of production is 45-230% and the payback period for equipment varies from one and a half to four years.
In conclusion, I would like to draw attention to the ability to replace imported, primarily Chinese, products in the mass products sector. According to advertisers, 83% of the Russian miniatures market consists of products from Chinese manufacturers, who intensively and sometimes harshly shape it. The total turnover in this sector of the market is estimated at 23 million dollars, and taking into account shadow schemes, the market capacity is at least an order of magnitude greater. The development of Russian production has very broad prospects for the replacement of Chinese products and a suitable redistribution of commodity turnover in its favor. Why not take advantage of this opportunity.
Equipment for the production of souvenir miniature figurines
Depending on the expected scale of production of miniature figures, the following will be useful to you:
- Special forms for tin or plastic products (recommended for use at the initial stage of organizing a business). Mainly, it is used at home, without hiring professionals.
- Thermoplastic machines of various modifications, allowing the production of figures in large quantities.
- Development of 3D printing. The most promising option today, but it has a significant drawback - the highest cost. Most analysts involved in these issues say that very soon this development will push out other methods of producing figures.
In addition to the listed methods for producing souvenir figurines, there are a large number of other methods, but, usually, they all come down to the usual “filling” of molds, and only the names of the materials used for these purposes change.
Documents required for organizing a business for the production of souvenir figurines
The positive aspect of organizing your own miniature production business is that this line of commercial activity does not require design permits or licenses. The list of documents required to work in this direction is limited to the usual package of documentation, which is prepared by all businessmen, regardless of their field of activity.
A photocopy of your passport and TIN, a receipt for payment of state duty and an application in the established form - this is actually a complete list of papers that you need to submit to the tax office at the place of registration in order to receive an individual entrepreneur certificate. In some regions of the Russian Federation, you may be asked for additional documents, but this does not mean that they are hinting at “gratitude” in the form of a bribe. Typically, in similar situations, tax authorities comply with the decisions of local authorities.
When preparing documents to register your company, carefully select the OKVED code . In this case, you need to take into account not only the material that you plan to use for the production of your own products, but also the buyers of these products, as well as all its properties and methods of implementation.
What military-themed crafts can you make?
These are techniques, pictures, applications and simply greeting leaflets. Much depends on the material you are going to use. In some cases, things that have become unnecessary - matchboxes, paper sleeves, CDs - can be turned into interesting homemade products.
Creative imagination plays a decisive role here. Find out how to do this below.
Which tax regime will greatly contribute to the development of your business?
This question is usually personal. This is due to the fact that local authorities can independently set rates for certain taxes. But today, the most attractive regime is the simplified taxation system. You can pay 6% of gross income (revenue) or 15% of the difference between the company’s income and expenses.
Pay attention! If you plan to pay 15% to the municipal treasury, you must have documents confirming the expenses of an individual entrepreneur or LLC. The absence of 1-2 costly ones can be a prerequisite for severe penalties or other problems.
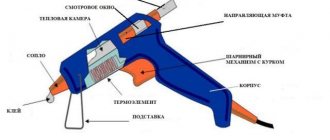
Tin casting
Tin is a low-melting alloy. It occupies the fiftieth space in the periodic table. It is quite widely popular in nature; for example, the ore for its production is intensively mined in the Laptev Sea.
Man began to use tin back in the Bronze Age. In particular, it was used to obtain bronze. Currently, it is used for the properties of solder, coatings, etc. In addition, tin is used in jewelry and during the production of toys, for example, tin soldiers, etc.
Tin casting process
The melting point of tin is only 231 °C. But its boiling point is within 2,300 °C. The temperature at which the alloy will be melted can be achieved at home. In other words, you can completely, naturally, by implementing certain rules and preservation techniques, perform tin casting at home. In industry conditions, special centrifugal casting machines are used for tin casting. To produce molds, gypsum, alabaster, epoxy-based resin, silicone and, of course, alloy are used.
Tin casting process in industry
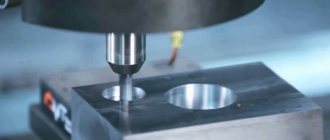
Creating a form is, nevertheless, a very responsible process. First you need to make a sketch of the future model. After that, the model is made from polymer clay. To apply small parts you have to use an awl. Another, very significant process is the production of injection molds. When manufacturing it, it is necessary to ensure that the correct connector is present. It is needed so that the finished casting can be removed without causing damage to the product itself.
Interesting read: Equipment for the production of plastic products
Silicone tooling for tin casting
Making equipment from silicone will require more material and time. This is why it should be subjected to a vulcanization process. But as a result of all the troubles, multi-turn equipment for casting tin products will be obtained. If, for example, the future part is very unusual, then it will be necessary to calculate the presence of embedded parts. It is also impossible to forget about the air channels; air must escape through them, according to the nature of filling the mold with tin.
The central element of the tooling design is the hole through which the filling will be performed. If it is small, then the alloy will flow extremely slowly and the solidification process may begin before it is completely filled. At the beginning of casting, it is necessary to connect the half-forms together and place them between a plywood sheet. The sheet must be at least 12 mm wide and the size must exceed the dimensions of the metal mold. Upon completion of assembly, the entire system is tied together with a tourniquet.
Two half-forms between plywood sheets, tied together with a rope
The development of casting is not particularly difficult; it makes sense to prepare the alloy for pouring after the final assembly of the mold. To do this, it needs to be thoroughly warmed up. When a yellow film appears on its surface, you can assume that the tin is ready for bottling. If the alloy is overheated, a blue or purple film will float on the surface of the melt. The molten alloy is poured in a narrow stream. In this case, to remove air, you can lightly knock on the body. You can open the mold only after the cast part has cooled one hundred percent. To remove the casting, you need to use forceps. You need to be prepared for the fact that the first product you purchase will have some surface imperfections.
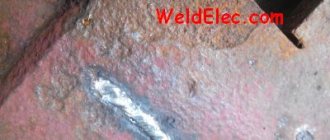
Removing excess tin (burr)
The sequence of mechanical processing looks like this. First, the burr is removed. So, they call the remains of the melt that flow into the seam of the mold. You can use a scraper for this. Side cutters are used to remove the sprues. For the final processing of the seams, use abrasive sandpaper with the smallest grain (zero).
From CDs
An interesting variety of war-themed composition can be made from unwanted CDs. To do this, you will need, in addition to the disks themselves, additional elements - colored cardboard, felt-tip pens, glue.
From colored paper we cut out a star, a flag, a coat of arms or an emblem of any branch of the military and glue it to one side of the CD. The hole in the center should remain free. On the other side of the CD we write a congratulation, a memorable date or something on a military theme.
Tip: it is better to apply a picture with a permanent marker - its durability will increase significantly and accidental erasure will be completely excluded.
This card can be hung in plain sight by using the hole left or threading a ribbon through it.
Another fun craft project is I Am a Patriot. Combine several products and create a model of a war memorial - a flat board as a base, armored vehicles or an airplane on a pedestal, a congratulatory inscription, a national flag and an eternal flame (it can be cut out of red cardboard).
You can take existing complexes (“Motherland”, “Mamaev Kurgan”) as a basis or come up with new ones. This piece will take its rightful place in your home or school!
Casting materials and tools
Tin is practically a beautiful material for casting both at home and in industrial settings. What tools and materials will be needed to produce the mold and perform casting. To produce the mold you will need sealant and plaster. The first will be used to make the equipment itself, and gypsum will be needed to produce the frame in which the technological equipment will be placed.
Tin Casting Tools
In addition to the listed materials, you will need lightweight metalworking tools - ratfils with a wide variety of cross-sections, pliers, a soldering machine, etc.
Cars
In a modern war, there is no way without a car. This means there is a need to make this model as well.
One of the original methods is the use of two-layer corrugated cardboard. This material holds its shape well and adheres well.
Note!
- Easter eggs made of beads (interesting weaving patterns) - how to weave an egg with beads with your own hands?
What to give to a classmate: how to make an unforgettable surprise with your own hands (Video + photo master class)
How to make a snowman with your own hands from cotton wool for a window, for a kindergarten, from scrap materials
Thanks to its rigidity, you can cut out the main parts of the car in advance and simply connect them in the desired sequence. The wheels can be folded from 2-3 layers of corrugated cardboard - for greater stability.
This technology is suitable for DIY assembly of any military equipment, including transport vehicles.
A jeep or truck can be created from plasticine. At the same time, the wheels can either be molded or replaced with large black buttons. Plastic or cardboard parts – frames and bumpers – can be attached to the plasticine body.
Tin casting molds
For the production of injection molding equipment, materials such as gypsum or silicone are used. Everything will depend on the part and its purpose. Plaster can be classified as uncomplicated. To produce it, you will need a wooden box, a certain amount of gypsum and a piece of steel tube.
Creating equipment is done in a couple of steps:
- Making consistency from gypsum. In appearance it must resemble thick sour cream.
- The mixture is poured into a pre-prepared box and smoothed.
- To obtain a half-mold, you need to take the part and partially load it into the prepared plaster. A similar operation must be performed with the 2nd part of the part. As a result, 2 half-forms will be obtained.
- The halves must be connected, either fastened with locks, or simply tied with a tight elastic band. It is necessary to insert a prepared alloy pipe into the space through which the molten tin will be poured.
Usually the injection molding equipment is ready for use. Melted tin can be poured into the resulting mold without a twinge of conscience.
What is the difference between gypsum forms and others - the main thing is that they have the least stability. If the surface is not prepared, then such equipment can withstand one or two cycles.
Tanks
The most affordable option for making a tank with your own hands from scrap materials is to glue it together from matchboxes. The more boxes you use, the larger the product will be.
In the basic version you need 3 pieces. 2 boxes form the lower platform, we attach 1 more on top - and the body is ready.
Next, you need to glue on the tracks cut out of green colored paper and attach the wheels (buttons) to them.
You can use a plastic cap as a tower. We attach a tool made from a tube to it. Then we mount the turret with the cannon on the hull.
Note!
DIY wall clocks - the best clock designs for children
What is a Candy bar - decorating a sweet table for a girl or boy for a birthday and New Year
- DIY New Year's gifts - interesting New Year's ideas for crafts. Master class on creating New Year's souvenirs
The second way to make a tank model with your own hands is to use plasticine as the main raw material. This will allow you to create a product with the correct proportions - an exact copy of the original.
The plastic mass can be combined with paper or wooden parts.
Its color depends entirely on the preference of the creator. The only caveat is that in place of the muzzle you will have to insert the same plastic tube, pencil or stick.
Main methods of tin casting
In the industry, there are several technologies that allow you to quickly and efficiently create castings from tin and its alloys.
More common can be called casting in a centrifugal machine.
The essence of this method is incredibly simple: the molten alloy is fed through a system of gates into molds placed around one axis and rotating at a certain speed. Their rotation causes a centrifugal force to be created, which forces the incoming alloy into the middle of the mold. In a similar way, excess gases are removed from the body of the future casting. This engineering solution makes it possible to obtain an alloy with a finely dispersed structure. Casting is done in metal molds made in production. Before pouring, compositions can be applied to the work surface to make it easier to remove the finished casting from the mold.