Restoring a plastic car bumper that has split into several parts, with missing fragments or broken fasteners is best left to professionals. Do-it-yourself repairs by soldering the bumper make sense for small cracks and chips with an area of up to 10 cm² , provided that most of the pieces have been collected. Before you solder a bumper on a car yourself, you need to find out what it is made of , select the appropriate tool and solder . In this article we will describe in detail how to solder a plastic bumper in different ways, depending on the material and the degree of damage.
Where to start repairing a plastic bumper
The damage needs to be assessed. In some cases, it is more profitable to purchase a new plastic bumper than to waste time, energy, and money on special equipment. And in the end you will not achieve a positive result.
In what cases is repair possible:
- A scratch has been identified;
- Dent detected;
- A crack or through hole has formed.
But in most cases, the plastic bumper receives several or all types of damage. Therefore, you will have to try to restore an attractive appearance and protective characteristics.
Features of sealing polyurethane parts
Polyurethane materials have a lower melting point than polypropylene materials, and when heated above +220°C they begin to collapse. Therefore, it is important not to overheat the part, otherwise the polymer will become brittle and lose its properties. Also, when performing preliminary preparation, the ends of the cracks in the polyurethane bumper are not drilled.
- The splits are reinforced with a special mesh or staples from a furniture stapler.
- For a heat gun or hair dryer, select a nozzle with a 10 mm nozzle.
- Then 8 mm wide polyurethane electrodes are laid on top and melted with a construction hairdryer. In this case, the polymer should melt quickly, but without evaporation. Just as in the case of a propylene product, the strips are fused starting from the middle of the crack, then the middle of the half, and so on.
Bumper repair tools
If minimal damage is detected, you can use glue or temporarily wrap it with tape to prevent the defect area from expanding.
Popular methods for repairing a plastic bumper:
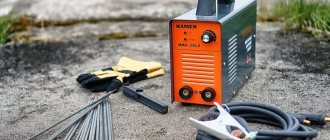
- Heated nitrogen guarantees high-quality welding, a reliable, durable connection and the absence of associated air pollution or oxidation. But you will need a special gas cylinder or generator;
- To repair polypropylene, the use of hot air is allowed. If the technology is followed, a strong connection can really be achieved;
- It is possible to use a soldering station or a special hair dryer with a special nozzle.
The selection of the appropriate joining method depends on the availability of materials, tools and the type of damage.
Welding plastic. Grades: polypropylene, fiberglass, polyurethane, hard plastics
Expert opinion
Ilya Vyacheslavovich
Consultant for body repair at krasymavto.ru
Ask a Question
Before you start repairing cracks on the bumper, you need to correctly determine the type of material from which the part is made. Manufacturers mark their product on the inside of the buffer using melting or stamping methods.
It is customary to label it like this:
- Latin letters PP or PPTV - the product is made of polypropylene;
- PUR – the bumper is made of polyurethane;
- PAG6, GF15, GF30 and ABS are hard plastics (have a very high melting point - about 5000°C);
- The fiberglass part is not marked.
If you doubt your ability to determine the material of the product, take a piece of the bumper from the reverse side and consult with specialists.
How to repair a plastic bumper
If a dent or crack is detected, then the plastic can be easily restored in two ways:
- Perform welding.
- Glue the damaged area.
Welding is considered a good solution to the problem only for advanced car owners. Glue is much easier to use for joining plastic.
But it is worth considering that you will need a suitable patch, putty to mask the joint, and elastic paint with characteristics comparable to the base.
Important: Use the correct adhesive for the type of plastic. Equally important is sufficient adhesion of auxiliary materials.
Useful video
A visual video about welding a bumper with your own hands from several parts:
Every car owner should know that burst bumpers cannot be glued together for a long time with any glue, they can only be soldered. There is no officially declared adhesive for thermoset plastics, polypropylene and other plastics. “Moment”, “Superglue” and other types of glue, even when using reinforcing fabric, move away from the plastic over time. Previous
RepairWhat comes first: primer before putty or vice versa?
Next
RepairCar putty technology: practical tips on how to putty both bumper and metal with your own hands
How to repair a crack in a bumper
This is the simplest problem with a plastic bumper. It can be easily fixed with your own hands.
Stages of work:
- The bumper can be cleaned and washed on both sides using soapy water;
- The damaged area and the area next to it are sanded;
- The crack is thoroughly degreased;
- A primer is applied to activate adhesion;
- A layer of glue and a fiberglass-based patch are applied on top;
- After hardening, the outer part of the patch is covered with identical glue;
- When everything is dry, you can proceed to sanding, thanks to sandpaper;
- Irregularities are hidden with putty. The surface is sanded and degreased;
- A primer is applied on top to improve paint adhesion;
- All that remains is to apply paint to the damaged and adjacent areas in order to disguise the fact of repair as much as possible.
You can admire the result. As a rule, even beginners succeed no worse than when using epoxy resin and other materials.
What leads to rapid wear of body parts?
All the time when the car is in use, its body and external elements are constantly exposed to the external environment, which does not have the best effect on them.
The paintwork fades over time when exposed to the sun; driving a car on poor-quality roads often leads to damage to the paint. This concerns the body.
But it is not the body that is much more likely to be damaged, but the attached elements – the bumpers.
They are located relatively low, so they are constantly exposed to negative factors during operation.
These include bouncing stones from nearby passing cars, a possible collision with various elements during careless driving or improper parking, and impacts of a low-lying bumper on the road surface when driving over strong potholes.
The smallest consequences of constantly receiving shock loads is the appearance of scratches on the paintwork, but very often such exposure leads to the appearance of cracks and chips.
First of all, it spoils the aesthetic appearance of the car. But if you do not take action, eventually the existing cracks will grow, and the bumper will simply collapse beyond repair.
Of course, having discovered a crack, you can simply replace the damaged element, but this is not economically feasible, especially if the crack is small.
It is much easier to restore it, and you can repair the bumper yourself.
The bumper itself performs a number of positive functions. In addition to its aesthetic function, it, taking on external influences, protects the radiator and some engine elements from damage.
Often modern cars have an air intake on the bumper, so this element also adjusts the direction of the incoming air flow.
In addition to the intake, fog lights are also often installed on it. In general, a bumper is definitely needed on a car.
How to get rid of scratches on a bumper
Sanding paper is used to get rid of minor scratches. This method is allowed even in cases of minimal damage to the paintwork.
It is better to putty on large scratches. But the standard version for metal will not work. A two-component composition based on polyester resins is used.
Important: Pay attention to the type of composition, since large grains are more difficult to grind.
They try to use a composition that matches the color of the bumper. But, if the scratch is too large, then after applying putty it is better to paint it.
Important points in preparation for painting
Eliminating defects is only part of the job. For a complete restoration, you need to know how to properly paint a car bumper. The process begins with preparation.
Putty is carried out in several stages:
- a special putty is applied to work on the plastic plane;
- the height is gained so that the putty protrudes slightly;
- the area is sanded until all irregularities are eliminated, which can be checked by touch;
The next step is degreasing. The primer is applied twice, ensuring each layer dries.
The moment of preparation involves not only processing the surface of the element.
Premises:
- the place where the work will be carried out must be cleaned, wet cleaned, and dust removed;
- The walls, ceiling and flooring are cleaned.
Automobile:
- it is better to dismantle the bumper, which will ensure a high-quality application of the paint layer;
- If dismantling is excluded, the car is covered with film.
Selection of paint:
- the best option is by VIN code, then the color match is guaranteed;
- computer selection is also effective, but some differences cannot be excluded.
What is the difference between soldering and welding
Many people think that this is an identical method for repairing a plastic bumper. But this is a fundamentally wrong judgment.
What is the difference:
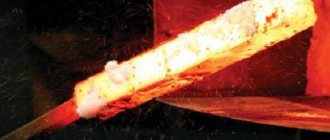
- Soldering. This is direct exposure to a soldering iron or a heated object. Unfortunately, the process is often accompanied by part of the plastic sticking to the soldering iron. As a result, soot is formed. This significantly degrades the quality of the seam connection.
- Welding. It is carried out due to melting by the action of hot air on both surfaces. They are evenly connected and a monolithic seam is formed without the formation of soot and other impurities.
These differences are worth considering. Therefore, next we will consider the process of welding a plastic bumper, since it provides a high-quality result.
Work order
The sequence of work to restore and solder the bumper can be represented as follows:
- first of all, the plastic bumper, which needs repair, is carefully removed from the car;
- Next, you need to wash it, degrease it and get rid of dirt and debris, remove the paint and varnish mixture from the damaged area;
- if the bumper splits into several pieces, then they are combined into the original integral structure, joining the edges;
- Now you can begin the soldering process, which boils down to progressive movement of the soldering iron tip from one edge of the crack to the other with a slight recess of the tip into the body of the bumper;
- then the plastic that was squeezed out during soldering is leveled over the surface with a soldering iron;
- After this, you don’t need to do anything on the inside of the part; the soldering area will still not be visible. And on the outside, you will need to treat the surface at the crack site - sanding, puttying, painting.
Sometimes bumper soldering is carried out using reinforcing mesh. This mesh should be used correctly for large and serious cracks. The peculiarity of this method is that after removal and cleaning, the master must “sink” the mesh into the plastic. That is, the mesh for soldering bumpers is carefully applied to the inside of the part and heated with a soldering iron. And when the temperature of the mesh becomes sufficient, you just need to press it into the plastic with a screwdriver.
In some cases, craftsmen first, in addition to the mesh, install brackets or fasteners on the bumper to tighten the crack. The features of this procedure will be discussed in the corresponding section.
How to weld a plastic bumper
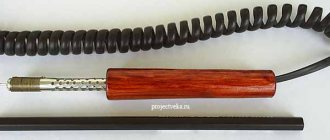
To form a high-quality seam, a soldering gun equipped with temperature control is used.
Welding stages:
- The hair dryer is set to the required temperature;
- "Castles" are created. To do this, a plastic rod is welded on either side of the crack. This is necessary to prevent the defect from spreading during the process of heating or pressing the rod;
For installation and operation of “locks”, 2 conditions are met:
- The temperature should be appropriate for the type of plastic.
- An electrode made of identical plastic is used.
After completing the welding process, grinding is used until the thickness of the connected parts is compared. This ensures maximum uniformity. In most cases, it is impossible to detect the fact of repair.
This method is used in the best car services. But this can be done at home or in the garage. The main thing is to ensure sufficient ventilation of the room.
Important: Do not use a soldering iron or metal mesh, as the formed seam will come apart after minimal impact.
Now we realize that first, it is necessary to assess the damage to the plastic bumper in order to select the appropriate repair method. To simplify the restoration, we considered popular methods of solving the problem.
Instructions. DIY soldering of plastic using brass mesh
For repairs, you will need a soldering iron with at least 40 W (preferably 60 or 100 W). Prepare pieces of brass mesh of such a size that, after soldering, there is about 2 cm of overlap to the sides of the crack. You need to solder the mesh on the inside of the bumper.
If the bumper is split or a large missing piece needs to be soldered, secure the parts with plastic ties or metal plates before starting soldering.
Drill holes along the perimeter of the fault in increments of 2-3 cm through which you can stretch the ties. The plates are fastened with bolts and nuts using the same principle.
After tacking in several fragments and reliably connecting the screed sections, the plates should be removed in order to properly solder the fracture site. If the broken pieces are small, grab them from the outside with a heated soldering iron (the tip must be recessed to half the thickness of the bumper).
Soldering points must be cleared of old paintwork. After tacking, be sure to reinforce the structure from the inside with mesh or epoxy and fiberglass. To reinforce the mesh, use a heated soldering iron to press it down approximately to the middle of the thickness of the plastic. On the front side, try to leave the surface as smooth as possible, since you most likely do not have an orbital sander, and it is difficult to sand the plastic by hand.