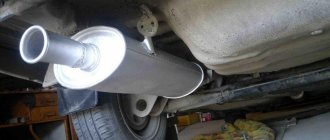
The muffler is an integral part of the vehicle's exhaust system; its task is to accept the mixture entering through the pipe, reduce its intensity and feed it into the exhaust pipe. Due to its specific functions and lower location, the part is subject to rapid wear, which is caused by:
- high internal pressure and temperature during operation;
- chemical activity of individual components of exhaust gases;
- vibrations when driving, friction and impacts on the road surface.
From this it is easy to conclude that the most common damage to the muffler is burns and cracks.
Both problems become worse as the metal gradually thins out. The same factor makes it difficult to repair mufflers using classical welding methods, because even under the most gentle operating conditions, an electric arc or gas flame will almost certainly not eliminate the damage, but will deform the metal or burn new “holes.”
What electrodes should be used to cook a muffler?
One of the systems of any car is a system for removing used gases.
Malfunctions in the operation of the recycled product removal system lead to an increase in the volume of noise that is formed in the car muffler, like a uniform, constant hum. There is also the possibility of a loss in engine power due to a clogged exhaust system, which in turn prevents the supply of incoming air flow. Another negative factor in system damage is an unpleasant odor inside the car, as well as the appearance of soot on the bottom of the car. The gas exhaust system is one of the main “vital” systems, so you should carefully consider problems associated with repairing the muffler and other parts of the system. Welding the muffler . Welding a muffler yourself requires that the welder has the appropriate experience to perform high-quality welding work. It is worth noting that the muffler can be repaired by welding only if a breakdown or mechanical damage was caused by hitting an obstacle. However, if a crack in the muffler is caused by corrosion processes, then welding will be ineffective, since the metal around the crack is often too thin for welding. First you need to prepare a patch, preferably made of sheet metal, and apply it to the place on the engine where the damage is located. Next, you should treat the surface of the edges of the damage and the applied metal with sandpaper, and you also need to clean the surfaces from rust and carbon deposits. For safety reasons, before starting welding work, do not forget to turn off the car's ignition and disconnect the battery. To avoid burning through the muffler metal, the patch should be applied where the metal thickness is higher. It is most effective to repair damage to the muffler using electrodes with a diameter of 2 mm and adjust the current supply on the device accordingly. Welding should be carried out with arc separation, and the movement of the electrode should be from thicker to thinner metal, that is, from the patch to the muffler metal. The resulting weld seam must be hammered away from slag deposits and visually inspected for the presence of pores on the seam. Operation is possible only if there are no pores, but if there are pores, then you need to boil it again and make an additional seam on top of the first one. After completing all welding work, it is necessary to remove scale by sanding.
The highest quality and most accurate welding can be achieved using a semi-automatic welding machine, however, to use it effectively, experience with it is required. It is more convenient to carry out welding work in an inspection pit. A more economical way to weld a muffler is cold welding , but its quality will be much lower. In this case, it is also necessary to prepare the surface, degrease it using acetone. After this, apply the prepared cold weld to the hole in the muffler, while carefully covering all the irregularities. The weld must freeze.
Source
Advantages and disadvantages
The quality of muffler repair is largely determined by the skills of the technician, as well as the properties of the materials used. Preference should be given to proven brands of cold welding with a heat resistance of at least 150℃. To repair single damage, paste-like materials are better suited; in combination with a bandage, it is better to use a liquid composition. The use of cold welding will provide the following advantages:
- relative simplicity and low cost of repairs;
- high speed of work and rapid hardening of the mixture;
- no risk of thermal damage to the metal;
- sufficient reliability of the connection (up to 120 kg/cm2 during tensile testing).
At the same time, you should remember some significant disadvantages of cold welding, most of which are associated with its incorrect selection, storage and use. So:
- expired material becomes brittle;
- under the influence of the external environment and sunlight, the composition of cold welding may change;
- the use of cheap “universal” welding is unacceptable due to the high operating temperatures of the muffler;
- connection strength is lower than that of arc welding.
Remember that the hardening of a cold weld is a chemical reaction of its components. Until it is completed (the process can take more than an hour), toxic gases will be intensively released into the external environment, which requires work to be carried out outdoors using personal protective equipment.
What electrode should be used to weld the muffler pipe?
Tell me what kind of electrode can be used to properly weld the exhaust gas system pipe. An annular crack appeared on the pipe near the clamp connecting the additional and main mufflers on Kalina (as in the picture, but the photo is not mine), and, accordingly, a loud exhaust. There is only a Resanta 160 welding inverter, and a regular old trans, but we don’t consider it by default; there are no other possibilities or welding options. What brand and dia. Is the electrode suitable for this pipe? The pipe is not rotten, there is some rust, but it is superficial.
Vidis wrote: What brand and diameter. Is the electrode suitable for this pipe?
well, for example TsU-5
Klez wrote: if your Resanta “digests” them
I don’t know whether this inverter digests these electrodes, because I recently purchased and so far only burned a dozen MP-3 red electrodes, so it was not without reason that I indicated the brand in 1 post.
cook with any, it won’t last long anyway
Resanta 220A LBekha digests exactly. But this junk is cooked by LBekhoy. It will break off next to the seam. It doesn’t matter what you use to weld it with. Can I put my words in the bank?
I used two TsL-11 to repair such a crack at the turn of the pipe from the resonator to the same joint with the plug. But my current pipe was closer to stainless steel. It seemed so dark, but there was no obvious rye, the surface was clean, without layers. It brewed very well.
Garik_31 wrote: There is a cast-iron-graphite donut between the halves, and everything moves on it.
Well, I don’t know how it “moves”, I just installed a piece of pipe, everything held on, didn’t break.. This “donut” is stuck to the pipe so that you simply can’t get it off. Although with corrugation, the option is ideal, the only question is its price.
Klez wrote: it’s easier to cut off the pipes (cones) and connect them with a spacer. for 2 clamps.
How to connect without cones? it is necessary to precisely adjust the spacers to the diameter or make cuts on it like a collet, but then gases will escape from under the cuts.
Should it really move there? After all, if you don’t tighten the clamp well, the gases will leak.
Vidis wrote: Should it really move there? After all, if you don’t tighten the clamp well, the gases will leak.
Definitely. That's why the donut lies between the hemispherical surfaces.
Garik_31 wrote: That's why the donut lies between the hemispherical surfaces.
and not just for sealing?
Vidis wrote: it is necessary to precisely adjust the spacers to the diameter or make cuts on it like a collet, but then gases will escape from under the cuts.
That’s exactly what I did, adjusted it tighter, made cuts, and actually wrapped the seal with asbestos cord. Nowadays there are a lot of all kinds of thermo-sealants, I think this is not a problem, but about the corrugation. The idea is very good, it’s worth thinking about. (You can always brew it, the question is how long will it last?) And with such experience as yours, 10 el, it will be problematic to apply the seam is high quality.
How to weld thin metal with an inverter - our tips
People buy an inverter mainly for working in the garden, welding a fence or gate, and other simple work. Often it is necessary to weld metal from 2 mm and above. “Dvoyka” electrodes are quite suitable for such work; they can be used to weld almost all rolled steel, which is used in the construction of fences and garages, and water pipes. And only when welding fittings or welding garage hinges may a thicker electrode be required - “three” or even “four”.
Thin metal
However, sooner or later the question may arise of welding the bottom of the car’s crankcase, welding the wing, or welding the muffler. In this case, the thickness of the metal is small, and problems may arise during welding - a thick electrode will burn through the metal.
The best welding option in this case is automatic or semi-automatic welding; classic arc welding can burn holes, so you shouldn’t take on an inverter without preparation and training!
Let's take a closer look at how to weld thin metal with an inverter .
Preparation for welding thin metals
The most important thing in this case is not to rush into completing the work, but to carefully select the welding mode. Determine the thickness of the parts to be welded, approximately the grade of steel, type of seam, and current value. It’s best to do all this using the welder’s handbook. The current value for the inverter should be the same as for DC welding. There are now electrodes on sale with a diameter of even 1 mm; do not hesitate to use a thin electrode - it is easier to make several passes along the weld than to patch a burnt muffler.
Test welding
Then try cooking. Select two pieces of iron of approximately the same thickness, and make a test seam in the same position as you will weld “for finishing”. If everything went well, you can proceed. If not, try experimenting. Set a different current value, use a different electrode and reverse switching polarity. Most often, changing the welding technique helps - weld in short bursts, allowing the metal to cool.
How to properly weld a muffler?
How to properly weld a muffler?
If a crack has formed in the muffler of the car's exhaust system (in the can or in the connecting pipes), then the muffler can be welded, but there are some restrictions. And not in all cases it is possible to weld the muffler. It is also very important to choose the right type of welding machine. And so, let's start by deciding in what cases the use of welding is justified, and whether it is possible to weld the muffler in principle.
Situations when welding the muffler is impossible
If the exhaust muffler has suffered a breakdown as a result of hitting an obstacle or as a result of mechanical damage, but it itself remains in good condition and retains the thickness of the steel on all surface areas, then in this case the use of welding is justified.
Low prices for spare parts for cars, click here!
If the muffler has been subjected to corrosion processes, a burnout has formed in it, and the muffler itself has been used for several years without replacement, then in this case there is no point in welding it, if at all. Here the simplest solution would be to completely replace the muffler with a new one, especially since its cost is not so high as to try to restore or extend the life of the old part. The remaining thickness of the steel in the old muffler may not allow it to be welded effectively.
What type of welding is used to make mufflers?
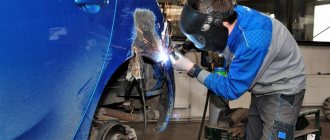
Is it possible to weld a muffler using electric welding? If you are a very experienced welder and are willing to spend a lot of time, then you can try welding the muffler using electric welding. In this case, the muffler should be welded by electric welding only spotwise and without moving the electrode, and this will take a very long time. Here we are talking about repairing the muffler can; the steel on the connecting pipes is thicker, and therefore the use of this type of welding is acceptable. If you don’t have good experience welding a muffler using electric welding, then you shouldn’t even try. You are almost 100% guaranteed to ruin this part of the exhaust system.
Silencers are made semi-automatically. It is also important to have sufficient experience. If you doubt your abilities, then finding out how much it costs to weld a muffler at the nearest service station is not difficult. It's better to leave this to the professionals.
How to weld a car muffler?
Before carrying out welding work, you should prepare the patch and also clean the surface at the site of future welding work. What electrode should be used to weld a muffler? It is better to weld the muffler with an electrode with a diameter of 2 mm; if you have an electrode with a diameter of 1.6 mm, then even better. The current on the welding machine is set to the corresponding electrode.
Welding the bottom
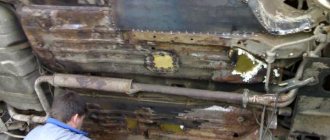
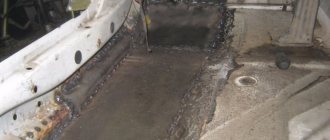
The bottom of the car when traveling is in extremely unfavorable conditions. It is affected by high humidity, flying gravel, tall grass, ice growths, and various mechanical influences. For cars with high mileage, the need for repairs is almost inevitable. Also, restoration of the underbody may be necessary after an accident.
Welding the underbody of a car is a difficult type of work. Despite this, it is quite possible to weld the underbody of a car with your own hands. To put patches on this part, you will need sheets of metal about 1-2 millimeters thick. If welding will be carried out using the arc method, then electrodes with a maximum diameter of 1.6 millimeters should be selected. Cut out the patches using metal scissors.
Treatment of the bottom after welding includes tapping it to identify defects. Before starting welding, the bottom of the machine must be thoroughly washed, dried well, and traces of old mastic, which acts as a protective coating, must be removed.
The bottom of the machine should be welded with short stitches two centimeters long, and the gap between the stitches should be five centimeters. This will ensure strength and tear resistance. There will also be a reduction in the influence of vibration when driving.
After completing the welding process, it is necessary to clean the seams with a grinder. The question inevitably arises of how to treat the underbody of the car after welding. This is additional protection during further operation of the car.
Before treating the bottom after welding, you should select the appropriate type of coating. It may be long-term or require regular updating. Long-term coatings include mastics containing rubber, bitumen or polymers.
see also
Comments 36
everything would be fine, but the icebestos cord is nowhere to be found now
milkweed! Half of Russia travels like this and nothing happens.
It will last for some time until the asbestos sticks, becomes hard and cracks from vibration. It will definitely last 3 months, but in the meantime, save up for a new spare part; there’s no point in cooking either, as experience shows, it won’t last long.
I did this: I took an asbestos sheet and soaked it in liquid glass. Then it wraps easily. It was in the same place. I've been riding for about 7 months. And he did everything right.
How to weld a muffler using electric welding yourself
A car muffler, operating in an aggressive environment at high temperatures and humidity, quickly becomes unusable. Corrosion, corroding the metal, destroys the muffler. In addition to the negative effects of rust, the muffler is easily holed on rough terrain due to its low location. The consequences of such damage are very unpleasant. The roar of a running engine begins to grate the ear, and the exhaust gases, losing their directional flow, enter the car interior. Of course, replacing the muffler with a new one solves all these problems. But you can get by with a less expensive method - welding. At first glance, welding a muffler may seem like a difficult task, but there is nothing difficult in this process if you understand a little theory.
general information
What can cause a muffler to malfunction? Our roads are not the best, which is why stones and small debris constantly fly under the bottom. Speed bumps that need repair can also damage the metal. But the biggest problem is the water, snow and mud that exist on the roads of our cities 10 months a year. And in some cities, roads are sprinkled with chemically active reagents that damage not only shoes, but also the bottom of the car.
Which welding method is better to weld a muffler?
The type of welding does not play a special role if you adhere to two basic parameters:
Semi-automatic welding has advantages when repairing a muffler compared to conventional electric welding. Its modes are more gentle on thin metal, and protective carbon dioxide will prevent overheating and oxidation of the weld. Thanks to this, the structure of the base metal will not change and will not lose strength. When working with conventional electric welding, it is necessary to select suitable electrodes for the metal being used.
Before welding the muffler, the battery should be disconnected to avoid a short to ground. Moreover, it is not at all necessary to take it out. It is enough just to disconnect the ground - the wire with a minus sign. It is usually black.
Damage Prevention
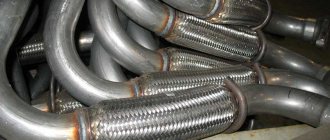
Muffler corrugation
Some motorists prefer to install a special corrugated tube where the muffler is attached to the manifold. The result is a flexible connection that dampens negative vibrations and reduces temperature.
It is recommended to regularly treat the muffler of your car with special anti-corrosion compounds, as well as heat-resistant paints. Thanks to this, you can really avoid burnout or the formation of holes due to rusting.
Painting
The final stage of welding the muffler is its painting. The applied layer of enamel will reliably protect the metal surface from negative factors. It is worth noting that ordinary paint will not work - the gulitel heats up to incredible temperatures (over 350 degrees Celsius). Therefore, all the enamel will simply burn out. This will release a characteristic odor.
But what to do in such a situation? The muffler should be treated with a special, heat-resistant (powder) compound. These can be dyes from the KO 828 and 8101 series. It is better to use products in cans. This way the enamel will lie evenly on the surface and cover all vulnerable and hidden areas. Just two coats are enough for the heat-resistant paint to provide reliable protection and extend the life of the muffler.
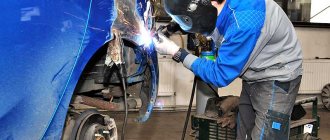
Do-it-yourself muffler repair using electric welding
To weld a muffler yourself, you only need to have a little skill in working with metalworking. The work can be done in any garage conditions. Penetrating corrosion must be completely cut out using an angle or straight grinder using a cutter.
Depending on the diameter of the defect, the work can be done in two ways. The first is to apply a patch, followed by welding it around the perimeter. This method is used for large defects or a large accumulation of pores in one place.
The second method allows welding without the use of patches, in which through holes are fused directly by an electric arc. This method is applicable only if the corrosion or defect is small. It will not be difficult to patch such holes either with an electrode, using simple welding, or with copper wire, when working on a semi-automatic machine.
Most often you encounter corrosion in the place where the muffler body and pipe are connected. After cleaning and removing rust, the gap between these parts increases significantly. You can increase the required thickness between them using a filler wire (electrode) or weld using pieces of prepared sheet metal. After applying the metal sheet, it should be grabbed, ensuring its fixation with the muffler body, and then proceed to the main welding.
Upon completion of the work, the heat-affected area and the weld itself should be painted over with paint. This treatment will protect the metal from corrosion and prolong the service life of the part. Before painting, do not forget to clean the seam from scale with a wire brush and degrease its surface. It should be remembered that not every paint is suitable for the muffler. For painting, choose heat-resistant paints or mastic.
Preparation for welding
Before welding the exhaust begins, you should prepare the surface and acquire the necessary equipment. To repair a muffler by welding, you will need:
- Welding machine. Welding of exhaust systems can be carried out by any low-power units. The most suitable would be to use a semi-automatic device with protective gas. The wire diameter for it should be in the range of 0.8-1 millimeter.
- Wire brush or sandpaper. With their help, the surface of parts is freed from rust.
- Grinder or grinder.
- Pieces of sheet metal. The size must be such that the defect is completely covered. Thickness - no more than two millimeters.
- Hammer or chisel. They will be needed after welding is completed to remove scale.
- Protective primer.
- Heat-resistant paint. It will provide additional protection from moisture.
To clean the surface of the parts you will need a degreaser.
Alternative muffler repair methods
It should be noted that there is another welding method that does not require the use of welding machines - cold welding. Here, composite materials based on resins and fiberglass are used to repair the surface.
These two components are mixed with a hardener and reliably glued to the defect site. Composite material is not subject to corrosion and is not afraid of high temperatures. This method does not require connecting to an electrical outlet and does not require special equipment, which makes it most convenient for travel. Preliminary work before cold welding should be performed in the same way as before conventional electric welding.
Instead of an introduction
The muffler is a part that is subject to destructive effects every day, as it is part of the exhaust system. Constant contact with chemicals, temperature changes, mechanical damage and, of course, corrosion. However, any novice motorist will be able to weld a muffler on his own, without the involvement of specialists. The main thing is to choose the most suitable method, based on the availability of materials and skills.
Can the problem be prevented? Believe me, until there are through holes in the muffler, there is no point in undertaking repairs. When a through hole appears, you will hear growling, knocking, and in advanced cases, smoke may appear in the cabin.
Application
Adhesive sealants or cold welding based on epoxy resins are suitable for eliminating gas tank leaks and restoring the radiator . There is also a solution for a hot muffler that is not afraid of temperature aggression.
Adhesive compounds recommended for restoring the exhaust system tolerate vibration, shock loads and stress without consequences. They have diffusion adhesion to steel and cast iron.
Precautionary measures due to the toxicity of the compounds:
Let's get to work - dismantling the element
Having prepared all the necessary tools and materials, you should proceed to welding the muffler. First you need to get to the exhaust system. It is better to carry out the inspection in a pit or overpass. If there is none, jack up one of the body parts and climb underneath. Usually the element rusts from the side where the pipe connects to the “can”. Next, we take two keys in our hands and unscrew the fastening clamp. Pull the muffler outward from the pipe grooves. Please note that the element may stick. In this case, you need to shake it from side to side, expanding the opening of the receiving pipe. It is better to weld the muffler when it is removed. Doing work locally is quite difficult (and unsafe, since there is a gas tank nearby).
Muffler repair
So, the most common malfunction is the formation of through holes and cracks. Depending on their number, size and location, you can decide whether you can do the repair yourself. If there are a lot of faults, then it is better to entrust this work to servicemen, otherwise you will simply waste a lot of effort and time. Well, if a small crack has formed, you can fix it yourself. Next we will talk about repair methods.
Welding
Let's start with the most complex and difficult to do at home - welding. Welding of the muffler is entrusted only to experienced craftsmen who have been holding the torch for many years. If you cook with an inverter at an amateur level, then think ten times before cooking a muffler.
Here the whole difficulty lies in the seams. They must be absolutely airtight, rigid and durable. In addition, you may simply not know when simple welding is enough for repairs, and when additional surfacing is required. Sometimes cracks literally grow along the surface of the exhaust pipe, and in this case you won’t be able to get by with just a seam.
Even if you are confident in your abilities, you need to have a semi-professional or professional semi-automatic welding machine in your arsenal. As well as a cylinder with protective gas, special filler wire and electrodes. This is a large and bulky piece of equipment that you are unlikely to store in your garage. So we do not recommend this kind of welding at home. It’s better to take the car to a service center right away.
Sealant
But this is a simpler option. Using a special sealant, you can quite easily and quickly seal small cracks and holes. Typically, such sealants are very resistant to high temperatures and allow you to carry out repairs in any conditions, even near your own entrance. Additionally, you can increase the sealing of the exhaust system, which is also good.
Repairing exhaust system components using sealant is one of the most budget-friendly options. This is why unscrupulous services often resort to this method. The service is required to do full-fledged high-quality welding, and not to fill the cracks with cheap sealant. Pay attention to this if you decide to have your car serviced.
So, to make repairs, you must first thoroughly clean the metal surface. Wipe and degrease the metal. Apply the sealant to the problem areas, distribute it evenly and leave for half an hour. After this, start the car and let it sit for 15 minutes in this state. Excess moisture from the sealant should evaporate. After this, do not start the car for 10 hours. This is very important. After this time, you can safely use your car, but keep in mind that the sealant will completely harden only after using the car for a day.
When compared with a method such as welding a muffler, the sealant certainly wins. A cheap jack and one sealant gun will be enough for you to make a complete repair. Even a person who has no idea how to repair cars can cope with such work.
Protective tape
Ceramic-based protective tape is not the cheapest, but quite effective method. Specialty stores sell rolls of protective tape that can seal cracks and holes. At first it may seem to you that the tape is not the most durable option, but believe me, it can withstand very high temperature loads.
To repair a muffler using tape, you need to wet it with water and wrap it in several layers around the damaged area. This is all. No more wisdom. But keep in mind that this method is only suitable for small repairs. If you find that your damage is covered with corrosion, then do not use tape, it is better to buy a sealant. If you notice that the muffler has begun to rot, it is better to replace it with a new one.
Causes
Typically, the service life of this element does not exceed two to three years. Why does he serve so little? It's all about the operating conditions. From the first day of operation, the muffler is in high load mode. Thus, the element is exposed to moisture, salts outside and high temperatures inside. The differences in heating are simply colossal. Of course, no metal can withstand such loads (and even if it can, such a muffler will weigh at least 10 kilograms). In addition, the inner walls of the element experience vibrations.
They are somehow damped through damping pads that are attached to the body hooks. But this does not mean that vibrations are excluded in the muffler chambers themselves. Also, one cannot fail to mention the location of the element itself. It is located in the rear of the body. All dirt and water certainly end up on its surface. In addition, the muffler is one of the lowest parts of the car. When overcoming steep climbs, you can easily catch its lower part on the asphalt or other surface. Yes, the element will not crack. But the partitions inside can become deformed.
But the quality of damping vibrations in the exhaust gas system depends on them.