A do-it-yourself puncture under the road is a completely feasible idea. For this you will need:
- Good physical shape, because the work will not be easy;
- Welding apparatus;
- Grinder (angle grinder, called angle grinder);
- Sledgehammer;
- 25 mm (minimum) steel bars (reinforcement), the length of which will be 10 cm greater than the road width;
- Sections of steel pipe of the required diameter, the length of which must also be 10 cm greater than the road width;
- Pump equipped with a hose, or equipped with a 12 mm plastic tube;
- 200-liter (preferably) plastic (steel) barrel with a wide neck;
- A hand drill designed for horizontal drilling;
- Funnel with a two-meter hose attached;
- Patience and more patience when performing manual horizontal drilling.
The first thing that needs to be done is to agree on the construction or reconstruction project
It is not worth performing a puncture under the road without a plan and approval, primarily for two reasons. First reason
This is personal safety. It may turn out that certain types of communications already pass under your site that you did not know about. There were rare cases when hidden pre-war communications were not known even after the project had been agreed upon. It is still worth taking precautions so as not to puncture the gas pipe adjacent to your site - the consequences can be disastrous.
The second reason
for which it is better to make an agreement - a fine from city authorities for uncoordinated actions. This is especially true for those types of communications that go beyond the boundaries of your personal area: cases when you need to enter a common main pipe, etc.
Sequencing
Using an angle grinder, a piece of reinforcement up to 2 m is sharpened, and the sharpening should be uniform and maximum. When using a cut longer than 2 m, there is a high risk of bending.
Now you can directly start horizontal directional drilling. This segment is driven into the ground in the desired direction using a sledgehammer, and the blows should always be uniform.
After the segment is completely driven in, you need to weld the next one onto it. Thus, the work progresses to the required depth. At the junction with the rock, the rod can bend a little, so you need to be careful. The work ends exactly at the moment when the working “head” appears at the exit point. This creates a guide rod.
Now a larger diameter pipe is taken and put on the fittings. Another small piece of a slightly larger diameter (a glass) is put on top of the pipe, which will protect the pipe from flattening during impacts, and after it is no longer necessary to beat, the glass should be removed. The pipe must be sharpened with a grinder so that the progress of the work is maximum.
After the pipe is driven to the maximum (no more than 2 m), you need to install a pump with water in it and turn on the supply. To artificially increase the pressure, nozzles to reduce the diameter are used. Water will come out of the open part of the pipe, for which a 200 liter barrel was prepared.
When work with the segment is completed, you need to remove the barrel to the side and empty it. Now you can weld another section on top and continue in the same way until the pipe exit from the other side is fixed. It is worth considering that one glass is used for the entire work.
A horizontal directional drilling rig is quite expensive equipment. But if there is no financial opportunity to purchase such special equipment, then there is the option of making mini HDD with your own hands. Such an idea is quite feasible, as many craftsmen have repeatedly proven by demonstrating their HDD installations on specialized forums. This installation is perfect for domestic use.
Let's figure out what is required to make such an installation, besides “direct hands”:
- Welding machine;
- Grinding machine (grinder);
- A good sledgehammer;
- Reinforcement with a diameter of at least 20 millimeters and a length of ten centimeters greater than the road width. You will also need steel pipes of the same length;
- Pump with hose;
- A tub with a volume of at least 150 liters (more spacious is recommended) with a wide “neck”;
- A drill with which the drilling will be carried out (you can also make it yourself);
- A funnel with a fixed hose at least 2 meters long.
Horizontal drilling
From the very beginning, it must be said that horizontal drilling of wells means drilling not only in a strict horizontal plane, but also downhill.
Purely geometrically, if we take as a basis a right angle, where the horizontal part is horizontally directed drilling, and the vertical part is classical, then in reality horizontally directional drilling is piercing the soil with a possible deviation from the absolute horizontal by 45 degrees in any direction.
In practice, horizontal drilling technology is implemented using a specialized installation with a movable mechanism for selecting the angle of entry into the ground.
The driving force of a drill can be different - from mains electricity with a voltage of 220 V and a power of 1.5 - 2 kW to compressors running on diesel or gaseous fuel with an output power of several tens of kW (for mines, oil and gas pipelines, there are installations with a power several hundred kilowatts.
A very important feature of drilling is the regular increase in the length of the drill, which means the rotation mechanism must make translational movements, exerting pressure on the working surface of the drill. Ideally, the maximum length of the drill is not limited, or rather, it is limited, but it is much longer than the length of the required passage.
Important: There is one very unpleasant nuance in horizontal drilling, and the longer the drilled channel, the more noticeable this feature is.
We are talking about the laws of physics and dynamics: - the longer the drill, the more strongly it is attracted by the earth according to the law of universal gravitation (Newton’s First Law); — as a consequence, the position of the drill in the ground is not ideally straight, but bent (hyperbolic), which, when the tool rotates, gives a large radial runout.
In practice, it looks like this: the longer the drill, the larger the hole in diameter you will get at the exit, the more significant the collapse of the exit edge will be. In principle, nothing particularly terrible will happen, but if after drilling it is necessary to insert steel pipes, then problems may arise with calibrating the hole to the diameter.
Application of the horizontal drilling method in practice
Initially, this type of drilling was used only in the mining industry (oil and gas wells, horizontal pits in coal and salt mines), but with the advent of more compact units, it became possible to use this technology in road construction and when laying utilities.
Private land ownership (country houses, cottages, dachas) serves as an excellent field for domestic use of horizontal drilling installations.
With its help, you can perform several types of labor-intensive work in an extremely short time with minimal contamination of the site and changes in its surface: - the horizontal drilling method is used to make drainage ditches under the road with subsequent strengthening of the resulting channel; — horizontal drilling services are in demand for laying a water supply system using polypropylene pipes, HDPE or LDPE pipes; — inclined horizontal drilling is necessary for the correct orientation (downhill) of the sewer line;
— horizontal drilling of soil, as such, can become the main type or method of creating closed-type drainage systems.
Advice: If horizontal drilling is carried out not by professional workers of a service organization, but by the owner of the site, then you should remember that the speed of rotation of the drill, the translational force applied to it, and the choice of the drill head itself depend on the nature of the soil and its fundamental composition (if exactly, then a coronary cutter, often simply called a crown). In order not to burn out the installation for horizontal directional drilling, you need to remember a very simple rule for using drill bits: - loose soils, sandstone and turf are taken with any drill (of naturally suitable diameter); — wattle, clay and salt deposits encountered – with a two-pointed crown;
- if there is a backfill of crushed stone, natural stone and other solid substances, then you cannot do without a four-head cutter with pobedit or carbide plates (grades T5K10 or T15K6).
Important: Drilling horizontal wells is accompanied by quite powerful vibration, which can cause the soil to sag and collapse, making drilling useless.
To prevent this, it is necessary to strengthen the resulting channel in parallel with drilling operations.
That is, the length of the drill, in addition to the direct tip, is in a jacket, which helps maintain the desired result.
Rural workshop: do-it-yourself horizontal drilling
It is, of course, possible to disturb the idyll created by a landscape designer, or to destroy a newly repaired road in order to dig a trench, but there is a cheaper and relatively simpler way.
In order to make a horizontal drilling installation with your own hands, you need to acquire the necessary material (pipes).
Choose one of them of a suitable length (if you are going to make a channel under the road, then the length of the pipe should be at least half the width of the road) and make teeth at one end. They do not need to be sharpened or sharpened in any way - it is enough to cut them with an ordinary grinder.
The resulting tool is called a “bolt”. At its other end, two through holes (from 16 to 25 mm) are drilled strictly along the diameter, into which a corresponding metal rod is inserted.
Do you want to feel like a strongman? Twist the handles sticking out of the pipes yourself! Tired of it? Then horizontal drilling with your own hands receives a bonus in the form of a little mechanization - another one is welded into the middle of the pin threaded into the pipe, so that its axis coincides with the axis of the pipe. Now the free end must be secured to a rotary hammer (preferably industrial) or an electric motor (with a gearbox for reducing speed and increasing power) and start rotating.
Horizontal drilling under the road, in open ground, drilling with a slope - the same thing, only with manual control.
Important: When carrying out independent work, be sure to remember safety, and do not try to change the direction of drilling if at least a third of the drill has already entered the ground. It should be noted that when operating the bolt, all the mined rock gets inside the tool, so do not forget to clean it in a timely manner for ease and accuracy of work.
Tip: To make the bolt work easier and the hole to be more accurate, cut the teeth at the end of the pipe oriented in the direction of the intended rotation. After this, move the teeth slightly apart so that the diameter of the working part with the teeth is slightly larger (5-7 mm) than the main diameter of the pipe. This will facilitate the drilling process and protect the canal walls from crumbling.
Techniques for laying pipeline lines
Among all the known methods of laying pipe lines, the following are most widespread:
- direct puncture;
- so-called “pushing” of the soil;
- drilling (horizontal);
- penetration using shields.
In order to choose the appropriate pipe laying option, you will need to decide on the following things:
- the condition of the soil in the wiring area (including the presence of natural waters in it);
- the nature of the development;
- parameters of isolation of the laid channel from external factors;
- length of laying;
- pipeline diameter;
- economic justification for this particular installation method.
Advantages of the puncture technique
One of the most used methods for laying pipes is puncture, used when working in clay and loamy soils (with pipes with a diameter of up to 550 mm). Let us immediately note that the length of the section laid in this way should not be more than 60 meters. In addition, in such a situation you cannot do without special equipment (winches and jacks, in particular).
The use of this method has undoubted advantages, thanks to which it is possible to carry out all the work without destroying the roadway (or any other building structure). Indeed, in this situation, you are laying a pipeline directly under structures or structures located on the surface of the earth.
Recently, a method of laying pipes that does not involve digging any trenches has become increasingly popular among builders and is gradually replacing other options for their installation. Experts consider “puncture” the most reliable method and associate this with such advantages as:
- Preservation of the integrity of the area “pierced” by puncturing the soil.
- No threat to communications located in the neighborhood.
- Possibility of refusing special (heavy) construction equipment.
Drilling rig
Horizontal drilling machines, as one of the automated options
Well construction is carried out not only with the help of a sledgehammer, as they also use a more modern method using a special horizontal drilling installation. This allows large-scale work to be carried out. But the use of such equipment increases the cost of work several times.
The main thing when using such an installation is not to forget that it must be installed in accordance with technologies and standards. Working with drilling equipment requires taking into account all the rules, so before starting work, you need to read the instructions. The drilling rig is divided into two types.
Manual installation
By rotating the pipe, gradual drilling occurs. The soil is washed out in the manner described above; for this, work sometimes has to be interrupted. In this case, it is also advisable to use reinforcement.
Types of manual drilling equipment
Electric
Horizontal drilling is the most common
The drilling machine moves on a rail, so the drilling speed is higher. But in this case, problems often arise when it hits the rock, but if it is not very strong, then the installation will cope with it. The process is faster, but the drilling rig is expensive.
Drilling with modern, high-tech equipment does not always go quickly, so it often hits dense rock. If the process occurs automatically, then a pump with a filter for pumping out must be connected to the reservoir for the washed-out soil.
After finishing drilling with your own hands, in all cases the pipe is left in place, but sometimes it is replaced with polypropylene, because it has a longer service life.
Related video: Horizontal drilling with a homemade drill
Selection of questions
- Mikhail, Lipetsk — What discs should I use for cutting metal?
- Ivan, Moscow - What is the GOST for rolled sheet steel?
- Maxim, Tver - Which racks for storing rolled metal products are better?
- Vladimir, Novosibirsk — What does ultrasonic processing of metals without the use of abrasives mean?
- Valery, Moscow - How to forge a knife from a bearing with your own hands?
- Stanislav, Voronezh — What equipment is used for the production of galvanized steel air ducts?
Do-it-yourself horizontal drilling drill - Metals, equipment, instructions
Horizontal directional drilling is the process of laying pipes without digging trenches. This method of laying pipes and other communications is carried out under highways and railways, which makes it possible to maintain the integrity of structures. To implement such technology, you will need a special installation for horizontal drilling.
Why drill using the horizontal method?
HDD horizontal directional drilling technology is in great demand, which is often associated with great savings opportunities. Moreover, the savings are 2.5-3 times compared to vertical trenching technology.
The technology under consideration is used for laying pipes, which will subsequently serve as a protective sheath for power and telephone cables.
The pipes being laid are called sewer pipes, in which electrical, telephone and fiber optic wires are laid.
The horizontal method is also in demand for laying pipelines through which drinking water is transported and sewage and storm drains are drained. The use of this technology ensures the preservation of the natural landscape, which is also a significant advantage.
Additional advantages of the sewer drilling technology under consideration are:
- Reduced financial costs for labor, since all work is performed using specialized equipment. The human factor is present only when operating this equipment.
- Laying and constructing pipelines not only under structures such as highways and railway tracks, but also under bodies of water, for example, across a river mouth.
- Minimum number of employees. Depending on the length of the route, a team of 3-5 people is required to construct the pipeline.
When deciding to carry out HDD for sewerage construction, the customer benefits in the form of good savings.
How horizontal drilling occurs - equipment
The following techniques are used for horizontal directional drilling:
- The horizontal drilling drill is the main machine.
- Location drilling systems - control equipment.
- Additional equipment and components.
When drilling, it is important to ensure control over the drilling machine, so location systems are used for such purposes. These systems play an important role, since the drill during operation is located in the soil outside the visually controlled zone. Due to location systems, the collision of the drill with various obstacles, for example, stones or other types of communications, is eliminated.
The basis of such a system is a mini-probe that tracks geolocation during drilling. The probe is attached to the drill head, and all information from the device is sent to the operator’s console, which controls the mechanism. HDD installation is a professional type of equipment that has a complex design, as well as high cost. The basis of the installation is represented by the following structural parts:
- body;
- motor;
- chassis.
Let's look at the functional part of the installation.
Structural components of the drilling rig
A horizontal drilling rig for laying communications consists of three main parts or sections:
- A drill is the main device that makes a trench underground for the subsequent laying of a pipeline.
- The hose for supplying water to the drill is a cooling system, since the metal is heated during operation of the drill. To extend the life of the cutting teeth, water is supplied to them during drilling.
- Control panel - presented in the form of a remote control.
These are the main elements of the working device that perform horizontal drilling.
Such installations are classified according to the criteria of limiting pulling force, which have distinctive indicators:
- hole sections;
- channel length;
- bentonite consumption;
- bending radius of drill rods.
All these indicators are the main characteristics of installations. The most important criterion is the bending radius, which characterizes the ability of the installation to bypass different types of obstacles. Secondary equipment, without which it is impossible to obtain a horizontal type trench, includes:
- Clamps and adapters are used to construct the required length of the pipeline.
- Expanders - used depending on the need to obtain a channel of the appropriate diameter.
- Pumping equipment - provides water supply to the installation.
- Generators - for uninterrupted operation of the installation.
- Lighting.
Before you begin the drilling process, you need to choose the right drilling rig. Based on all the above factors, a suitable installation and components are selected.
Let's start drilling - important stages of preparation
Do-it-yourself horizontal drilling involves making a puncture using professional equipment. Before you start making a channel under a road or railway tracks, you should prepare for this process. To obtain a drilled hole, it is necessary to level the site on which the equipment will be placed.
The size of the site on which the installation will be placed must be at least 10x15 m. The site is made exactly at the site of the planned puncture under the road. Only after the site of the required size has been prepared can the corresponding equipment and equipment be transported.
After placing the equipment, the anchor installation procedure is carried out, which is implemented using augers. After the anchoring procedure, the process of adjusting the angle of entry of the drill into the ground is carried out.
It is also necessary to first prepare an installation that prepares the bentonite solution. This solution is mixed by a special machine, which should be placed next to the drilling mechanism. The distance between these devices must be at least 10 meters. A bentonite solution is used to strengthen the walls of the well, as well as to remove soil from the channel being drilled.
The preparatory process also includes the following activities:
- Construction of special pits at the entrance and exit of the canal. Excessive amounts of solution will move into these wells.
- Determine the presence of underground communications that should not be affected by the drilling rig.
- Study the nature of the soil, on the basis of which a decision will be made to select the optimal route for drilling.
- Set up communication between the foreman and the equipment operator.
How the process itself will go depends on the preparation stage, so this event should be treated with particular importance. When drilling, safety precautions are observed, on which the health and life of workers depends.
Pilot well - what is it and why?
When the preparation stage is completed, you can begin horizontal drilling with your own hands. Initially, a pilot hole is drilled, the hole diameter of which is 10 cm. Drilling a pilot hole is a training hole, on the basis of which the serviceability of all systems is determined, and the efficiency of drill movement is assessed.
If the pilot well process is not completed, then horizontal drilling is prohibited. The initial position of the drill is at an angle of 10-20 degrees to the ground (inclined drilling).
This angle decreases depending on the required drill depth. As soon as the required depth of the drilling rig is reached, the direct process of drilling in the horizontal direction begins.
The direction of movement of the drill is regulated and corrected by the operator based on geolocation data.
After the next 3 meters of movement of the drill, its position is checked using a positioning system. After passing a given point, the drill moves up to the exit. The exit of the drill must be pre-calculated, and the site must be prepared at this location. The size of the site is smaller than on the installation side, but it must be prepared.
Channel expansion - the final stage
As soon as the pilot channel is completed, you need to begin the procedure for expanding it. The drill head is dismantled and a rimmer must be installed in its place. This is an important structural element of the installation, which is used for laying the pipeline using the horizontal method. This device serves to expand the pilot channel.
The rimmer helps increase the diameter of the channel in the return path, that is, from outlet to inlet.
Depending on the task of obtaining the diameter of the hole, increasing the size of the channel can occur several times.
Increasing the size of the well is carried out before communications are laid. During the work process, it is imperative to ensure that coolant is supplied to the drill. Interruptions in the supply of coolant will lead to overheating of the installation and failure of geolocation equipment.
Pipeline laying
Now let's look at what the method of laying pipes into a prepared hole is. For this, swivels and brackets are used that are attached to the pipe. It is these elements that are the basis for fastening and fixing the pipeline, due to which the pipe is pulled into the channel.
https://www.youtube.com/watch?v=joY-vwi1ctEu0026t=8s
To fix the pipe using a swivel, a special head is fixed to its beginning. Drilling strings are attached to this head. If the well is small-sized, into which it is planned to tighten polymer pipes, then tightening is done with your own hands or using the forces of drilling machines. As soon as the pipe is pulled into the channel, the GB process can be considered complete.
A horizontal puncture is a responsible undertaking that should be thought through from start to finish. Initially, a project is prepared, on the basis of which the optimal location is selected. Only after the project is ready can the implementation of the process begin.
Important points when drilling
When drilling a well, you need to take into account such a factor as soil shedding. Both plastic and steel pipes can be pulled into the channel. It is only important to take into account one criterion: plastic can be laid under a bend, for example, when punctured under a reservoir, and metal pipelines must be laid only in an exclusively horizontal direction.
Laying pipelines underground using the
- Horizontal Directional Drilling (Navigator Vermeer drilling system);
- Soil puncture (mini soil puncture installation)
The construction of external underground communications using the method of directional drilling and mini-puncture of the soil allows for the following work:
- In urban conditions (a large number of existing utility networks and roads).
- Under highways, railroads, dams, rivers and other natural and man-made barriers. more details
- In country and cottage villages, preserving the landscape and protecting the peace of neighbors. more details
- In cramped conditions, for example, between a fence and a road, neighboring houses, working in a basement or cellar, etc.
- All year round (winter - summer).more details
We account for the following cities where trenchless pipe laying using the HDD and puncture method was carried out: Dolgoprudny, Reutov, Zheleznodorozhny, Domodedovo, Taldom, Podolsk, Tula, Yaroslavl, Korolev, Likino Dulevo, Klimovsk, Shchelkovo, Serpukhov, Ivanteevka, Pushkino, Krasnoarmeysk, Lyubertsy, Krasnozavodsk, Pavlovsky Posad, Dmitrov, Khimki, Balashikha, Zaprudnya, Dubna, Vidnoye, Zelenograd, Kubinka, Kashira, Narofominsk, Ruza, Khotkovo, Zagoryanka, Voskresensk, Sergiev Posad, Monino, Iksha, Noginsk, Staraya Kupavna, Povarovo, Sofrino , Stupino, Aleksandrov, Tutaev, Chekhov, Elektrostal, Fryanovo, Fryazino, Orekhovo Zuevo, Moscow (more than 200 underground passages were completed). As well as settlements and towns, such as: Muranovo, Lesnoy, Barvikha, Lesnye Polyany, Pestovo, Kishkino, Tolstopaltsevo, Bear Lakes, Alabino, Nikiforovo, Razdory, Razvilka, Rasskazovka, Sokolovo, Tishkovo, Moskovsky, Komyagino, Eldigino. Nikolina Mountain, Gorki, Bakhchivanzhi, Testaments of Ilyich, Klyazma, village. Biokombinat, Zevalovo, and many others.
The laying of external utility networks underground using the puncture and HDD method for private households is very relevant. In almost every one of them, it is necessary to install or replace an underground water supply system, remove a pressure or gravity sewer, insert an electrical cable, or a casing for a gas pipeline. There are neighbors around, a road, lake or river, forest or ravine nearby, that is, cramped conditions for laying utility lines using the trench method. Laying communications using horizontal directional drilling (HDD) or piercing the soil using a mini-piercing installation remains the only way to build your underground networks.
Will help you avoid serious costs!
Save the road, buildings, and surrounding landscape! Keeping yourself and your neighbors on your toes!
In the case of imposing strict requirements to prevent damage to the landscape and the environment, trenchless technologies are the only way to carry out work on the installation of utilities (pipelines).
Flexible pricing policy and individual approach to each Client,
| +7 Sergey+7 Alexander |
Working with legal entities
We work with individuals
Self-puncture is performed using the following technology
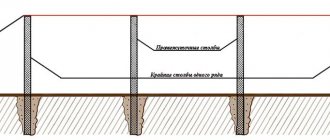
- Along the expected puncture line, the pointed end is driven into the working pit with a sledgehammer into steel reinforcement. It serves as a guide for the pipe and warns of difficult obstacles in its path. The length of the reinforcement rod should not exceed two meters, otherwise the material may be deformed under the blows of a sledgehammer. As it enters the ground, the next section is welded and hammered in again. Work continues until the end appears on the other side of the road;
- On both sides of the road under which communications need to be laid, two pits (pits) are dug symmetrically. The depth of the pits should be slightly greater than the depth of the pipe. The pipe will be driven horizontally through the first pit until it appears on the other side. The dimensions of the working and receiving pit are selected taking into account the above and must provide for the possibility of a person being freely in it;
- Using the same technology, a puncture is made with a pipe placed on the fittings. To prevent the ends from breaking, a nozzle with jagged, sharpened edges is installed in front, and a glass-shaped nozzle is installed at the back. Under the blows of a sledgehammer on the bottom of the glass, the pipe begins to go into the ground. As it moves, the earth becomes compacted in the pipe and movement stops. A jet from the water pump removes it quite easily. Further actions are consistent until the nozzle appears in another pit.
There are various variations of this method:
- Using a bailer made from a large hydraulic cylinder;
- Using a mini horizontal drilling unit or various auxiliary means for driving in reinforcement, for example, a drill;
- Puncture at the pump base.
Having scoured the Internet, we found a thousand and one more ways of “author’s” laying communications underground. We have never doubted the unique abilities of folk craftsmen, but we still recommend that you use one of the methods we propose, since these methods are the most reliable and have a technical basis. It's better not to take risks.
Since the issue of self-piercing is mostly of interest to private property owners who want to either modernize their site or connect communications to it, it is worth remembering that even if the land is on your property, you cannot just take it and drill under it. This is especially true for work that is planned to go beyond private territory. We also note that punctures over 10 meters in length are performed using special equipment and using the HDD method.
Horizontal directional drilling process
When all preparatory work is completed, you can begin to directly drill a horizontal well. Now you will have to arm yourself with a sledgehammer. Using it, a pointed piece of rod must be driven into the ground in the direction in which the second pit is located.
After you have completely driven the section into the ground, use a welding machine to weld the next one onto it and continue this way until it reaches its destination - in our case, this is the second pit. If suddenly on your way you encounter hard rock, for example, a stone, you can bend the rod slightly, so be vigilant and extremely attentive.
Now you need to take a metal pipe of a larger diameter and put it on a piece of reinforcement. On top of this pipe we put another one of even larger diameter, it is this that will protect the main pipe from possible impacts, which quite often accompany the work process. The pipe must also be sharpened to achieve maximum efficiency.
After you manage to drive the pipe to the maximum possible depth, you can run a pump with water into it, which will clear it of dirt, in this case mainly represented by earth.
Necessary equipment
Equipment for horizontal drilling is quite expensive. But if there is no financial opportunity to purchase such equipment, then you can make a mini HDD with your own hands. This idea is quite feasible, as our craftsmen have repeatedly demonstrated by showing their HDD installations at various forums.
The manufactured equipment is ideal for domestic purposes, as it allows you to perform horizontal drilling with your own hands of any complexity.
For example, when working with pipelines, it is often necessary to make a horizontal move. This process is quite complicated, and only a physically strong person can perform it.
To perform drilling you will need:
- Medium and high power welding machine (inverters can be used, but their frequency power is low).
- A grinder or grinder with 180 or 230 mm discs, and it must be two-handed.
- The consumption of disks will be quite large, so you need to purchase more of them.
- Sledgehammer.
- Reinforcement Ø from 20 mm and a length of 10 cm longer than the hole being drilled and steel pipes of the same length.
- Pump with hose.
- Tub with a volume of 150 l. (recommend larger ones) with a wide neck.
- Drill (can be made by hand).
- Funnel with a hose 2 m long.
DIY drill for HDD
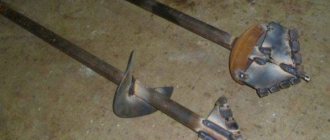
The main element of the HDD installation is the drill; it is the drill that bears the main function of the drilling process. The drill can be purchased at a specialized construction equipment store. But, since we decided to make the HDD installation ourselves, we will try to cope here ourselves.
To make a drill you will need the following:
- a durable pipe with a diameter of up to 5 centimeters and a length that will correspond to the length of the required well;
- two small tubes with a diameter of 4-5 centimeters and a length of 10-12 cm (future handle);
- a piece of sheet steel with a thickness of at least four millimeters;
- machine for cutting hard metals;
- electric welding machine;
- burner (blowtorch).
Let's start making an HDD drill with our own hands:
- We cut a circle from a piece of sheet steel so that its diameter coincides with the diameter of the future well.
- In the central part of the circle we make a hole the size of the main pipe.
- We remove one segment from the resulting ring. Its size depends on the size of the stones that prevail at the drilling site.
- Using a sledgehammer, we “roll” the steel ring into a spiral shape. The extreme cutting part must be sharpened for more efficient drilling.
- Now you need to make the tip. This can be done using a small piece of sheet steel. We heat the steel with a torch, having previously clamped it in a vice, after which we give the piece of steel the required shape.
- We weld the resulting tip to the end of the main pipe. The tip should be like a continuation of this pipe, increasing its length.
- Weld two pipes to the main pipe, which will serve as future handles.
Stages of work when performing HDD with your own hands
Performing horizontal directional drilling using a homemade HDD installation is carried out in several stages:
Preparation.
At this stage, two holes (small pits) are dug parallel to each other, opposite an obstacle (a road, for example). The depth of the pits should be approximately 20-30 centimeters greater than the planned depth of pipe laying.
Pilot well.
At this stage, a preliminary well is made between the pits. The first piece of pipe is taken, the pipe guide needs to be sharpened using a grinding machine. The pipe is driven with a sledgehammer with the sharp end towards the receiving pit. Having hammered the pipe completely, the next section of pipe is welded to its end and also driven in. This continues until our tip appears in the receiving pit.
The driven rod, between the starting and receiving pits, subsequently serves as a guide axis.
The final stage.
The pipe is driven in again, similar to the previous stage, but larger. After that, using a pump, excess soil is washed out of the pipe under pressure.
It is worth saying that such DIY HDD requires a lot of labor and patience. To make a horizontal well, even a small one, requires a lot of effort.
Stages of work
Do-it-yourself horizontal drilling is divided into several stages.
First
At the first of them, pits are dug on both sides of the road. Their depth should be equal to the depth of the pipe being laid and another 20 centimeters should be left to make it convenient to work.
The work will be carried out from pits, so they must be a continuation of the trench, and their length must be equal to the length of the minimum pipe section. And the pipe itself is hammered in with a sledgehammer. The dimensions of the receiving pit (as a rule, 60*60 is sufficient) should be such that it can accommodate people comfortably.
Second
At the second stage, you should mark the axis of the pipe. A piece of pipe is taken and sharpened using a grinder like a lance. This is done so that the pipe fits better into the ground. This length of pipe is then driven into the ground to form an axle. We do not recommend using a length of more than two meters, otherwise powerful blows of a sledgehammer will bend it. Having driven in the first section of pipe and welded it using a welding machine, we take the next one and proceed in the same way. We do this until our rod appears in the receiving pit.
Note that this steel rod acts as a guide. The pipe should then be driven in along it. This is done so as not to damage the pipe if there are obstacles in the form of stones or bricks along the path.
Third
At the third stage of HDD, done with your own hands, a piece of steel pipe is taken and put on a guide pin. Then (preferably in advance) a removable glass nozzle (the so-called “heel”) is made from a piece of pipe with a large diameter. This nozzle makes it possible to avoid flattening the pipe, which will become clogged. And it is recommended to sharpen its driven end with a grinder along the edges.
A glass nozzle is put on the part of the pipe that will receive the sledgehammer blows, then several blows are applied, and then the “heel” is removed. Next, take the hose, push it until the pipe stops, and then turn on the pump. It is recommended that instead of a hose, use a 12 mm and pre-straightened (using a blowtorch) plastic tube.
To increase the pressure of the water flow coming out of the tube (hose), you should put a nozzle on it - a coupling, which will narrow the main diameter of the tube. The washed-out soil will come out of the open end of the pipe along with the water. Therefore, it is necessary to dig a pit under the pipe where it will flow. To collect the turbidity in a barrel, use a funnel, onto which a two-meter hose is placed.
As a funnel, you can use a five-liter plastic bottle with the bottom cut off. Place the pump in a 60% filled barrel, immersing it in the middle of the barrel. We recommend using a narrow plastic bucket as a filter for the pump, drilling small holes in it.
Fourth
After this, the do-it-yourself horizontal drilling installation proceeds to the final, fourth stage. We washed the soil from the pipe, take a sledgehammer. Next, having welded the next pipe section, we repeat the cycle until a pipe appears on the opposite side of the road.
This is how homemade horizontal drilling is done. And if you don’t have enough patience and you get tired of swinging a sledgehammer, we advise you to turn to professional specialists.
Horizontal directional drilling has long been used in the construction of pipelines of various levels. And if large-scale work requires serious professional drilling rigs, then for a country house, construction or, for example, in the case of a country house, manual devices will be quite appropriate. Horizontal drilling with your own hands is possible and this process is much easier than it seems at first glance.
Homemade drilling, horizontal or vertical, does not require large investments (except for physical labor) and the use of bulky equipment. After all, if we are talking about this, then the work will be carried out in the area of a single house. No one will carry out such work independently on large socially significant objects.
How to make a puncture yourself
The practical implementation of the method of trenchless pipe laying with your own hands is possible only over a relatively short area (no more than ten meters), as well as if you are in good physical shape, which would allow you to perform heavy work operations. As for the equipment necessary for such work, you will definitely need the following simple tool:
- a simple welding machine;
- ordinary "grinder";
- small sledgehammer;
- reinforcement no thicker than 20 millimeters;
- steel pipe of your chosen diameter (several pieces);
- pump equipped with a plastic pipe;
- plastic barrel with a neck (capacity up to 200 liters);
- funnel with a hose up to 2 meters long.
The trenching process usually includes the following steps:
- Preparing a ditch on both sides of the route (with a margin of 12-13 cm). When digging it, the axis of the pipe that you plan to lay is outlined.
- After this, a pipe blank is taken and the end that is intended for driving into the ground is sharpened. In this case, it is best to cut teeth on it using a grinder.
- As you carry out all these operations (after each successive pushing of the pipe), you should wash out the soil from its hollow part.
- After each successive “rinsing” of the pipe, you should continue plugging it in with a sledgehammer.
Step-by-step making of a drill for a well with your own hands
Constructing a drill for a well with your own hands is within the capabilities of any home craftsman. However, it requires not only skills in handling tools and desire.
You should first select the most suitable drilling technique for your site, and, based on this, choose one of the options for a manual drilling device.
The features and nuances of making various modifications of drills at home will be discussed in this article.
Features of manual drilling
Construction of deep wells in a suburban area is not always advisable. In many cases, when groundwater is located relatively close to the surface, you can provide water supply to a residential building or country plot yourself.
This option allows you to save on hiring professional drillers with special equipment. It is quite possible to drill a shallow aquifer well with your own hands. You just need to design a homemade drill for drilling wells.
It should be borne in mind that it is not always possible to drill yourself without turning to specialists, even with relatively shallow water.
If there is rock, a rocky layer, or a compressed gravel-clay conglomerate between the surface and the aquifer, then drilling through such a layer with a manual device will be problematic or even impossible.
This will require heavy mechanically driven drilling equipment.
But, if you are the happy owner of a plot with soft or loose soil, there is a reason to arrange a water intake yourself. There are several basic drilling technologies, for which various devices are used:
- Percussion. The drill is driven deep into the soil by falling from a certain height, or by driving it with a massive hammer.
- Auger. The drill rod has a spiral auger at the end that goes into the ground when rotated.
- Rotary. In this case, the rotation of the rod is used with simultaneous erosion of the soil by the aqueous solution supplied to the well.
The rotary drilling rig is very complex in its design and principle of operation. For its operation, components and assemblies are required that cannot be made independently - pumps, pumps, swivels, etc.
d. Therefore, it will be very difficult for the average homeowner to assemble such a device. It is much easier to create drills for water wells that operate on the impact or rotary principle.
Making a percussion drill
Before you make a drill for a well with your own hands, you should carefully familiarize yourself with the principles of impact technology. There are two options for the working device:
- A driving rod with a spear-shaped tip. Used to construct Abyssinian wells.
- A hollow bailer chisel made from a massive piece of pipe.
The operating principle of these devices is also different. The driving rod is driven deep into the ground by vertical blows on its upper end with a hammer-driver, or simply with a massive sledgehammer.
The chisel itself acts as a striking mechanism. It rises to a certain height and then drops down.
For ease of use of impact devices, they are placed on a frame in the form of a tripod or rectangle.
Barbell
The frame is made of metal pipes or angles.
The recommended height of the structure should be at least 3-4 m so that the hammer or chisel in free fall can gain sufficient speed for deepening.
The frame parts are fastened together by electric welding or with a bolted connection. The first option is simpler, but after drilling is completed, the structure will have to be cut into pieces.
This does not really matter if you do not intend to use this drilling device in the future. If you plan to continue to use this mechanism, then it is better, spending a little more time and effort, to connect the frame elements with bolts. The collapsible version will allow you to transport the drilling device and also simplify its storage.
At the top of the frame we attach blocks through which the cables will be thrown. These cables lift up the striking part of the drilling rig being created - a hammer-hammer or a chisel. Lifting is carried out either directly by hand or using a collar. The last option is best used when the mass of the impact part is very high and it is difficult to lift it by hand.
Next, we proceed to the manufacture of the impact element. To drive an Abyssinian well, it can simply be a massive piece of metal suspended on a frame using a block system. It operates on the principle of a hammer: falling from a height, it hits the top of the driven rod, deepening it into the soil. The bailer itself acts both as a striking element and as a recessed part of the machine.
Bailer
To make a bailer you will need a piece of heavy pipe with a diameter of 10-12 cm and a length of up to 1.5 m. The mass of the workpiece should be approximately 50-80 kg. This weight will allow you to easily lift the chisel using the muscle power of one or two people. And at the same time, the chisel turns out to be massive enough to go deep into the ground when dropped from a height of 3-4 m.
Making a spiral screw drill
For auger drilling, drills equipped with a helical spiral are used. Such devices are driven into the ground not by blows, but by rotation around its axis. Making a homemade drill for a well with your own hands of a similar design is a little more difficult than a bailer bit. However, if desired, it is quite possible to create such a device.
The basis of the auger drill is a 32-50mm steel pipe. Sharpened knives cut from hard steel are welded to the lower end of the pipe. A piece of old spring is perfect for them. The length of the protruding parts of the knives should be equal to the diameter of the auger or slightly exceed it.
With the help of knives, when the drill rotates, dense layers of soil are loosened, and then removed upward using turns of a spiral auger.
Screw
Making an auger is the most labor-intensive and complex process in making a do-it-yourself auger drill. Its petals are cut from a steel sheet 5-6mm thick. The first step is to mark the workpiece.
Using a compass, draw a circle of the required size on the sheet. The diameter of this circle should be equal to the diameter of the well.
Then we draw another smaller circle inside it: the diameter of the inner circle is equal to the diameter of the pipe taken as the basis of the drilling mechanism.
The next step is to cut out both circles using an autogen machine. The result should be a donut-shaped piece. We cut one edge of this “donut” and bend the edges of the cut at an angle of 25-40° relative to each other. This will be the first turn of the auger spiral of the drilling device.
We put the resulting workpiece on the base pipe and weld it. In the same way, we make another turn of the auger, put it on the pipe above the first turn, connecting them to each other. The number of turns depends on the height of the drilling device, and can range from 2 to a dozen or more.
The easiest way to deepen an auger drill is with human muscle power. To do this, levers from two pieces of pipe from half a meter to one and a half meters in length are attached to the top of the pipe with welded spiral petals. The greater the length and diameter of the drill, the longer the levers should be. They are secured by welding, bolts or keying.
Feature
The peculiarity of auger drilling is the need to regularly lift the drill to remove loosened soil.
With a large depth of the well and a significant mass of the drill, it can be difficult to perform such an operation by hand.
To make the task easier, you will again need a frame with a lifting device - blocks and a collar. If possible, you can also use an electric winch for lifting.
Making a spoon drill
For constructing a water-bearing well in soft or loose soil, another version of a rotary drilling device - a spoon drill - is perfect.
It allows you to quickly select the soil, because the soil is loosened not only by its lower end, but also by its sides.
To make such a device yourself, you will need a thick-walled steel pipe about half a meter long.
A vertical cut is made in the pipe, from one end to the other. The lower end of the pipe is slightly bent inward with a sledgehammer to form a scooping spoon - one side of the end is bent more strongly than the other.
Then we tap the pipe with a sledgehammer along the longitudinal cut so that one edge of the cut protrudes outward. All protruding, or cutting, parts of the workpiece are sharpened with a grinder.
A rod is attached to the upper end of the drill, causing it to rotate.
An important nuance is that the rod is attached not along the central axis, but with an offset of 1-2 cm.
This is necessary to allow the side edge to grip the soil. The cut soil accumulates inside the drill and is removed when removed from the hole. A thick drill is usually welded to the bottom of the drill - it serves to center the direction of penetration into the ground.
Useful recommendations from experts
If the depth of the water exceeds the length of the drill, then it can be extended by joining another pipe on top. They can be joined using a threaded coupling or a welding connection.
When using small diameter pipes, bolts or cotter pins can be used. However, such a connection is not very reliable, and with a large rotational force, the bolt can be sheared and the rods will become disconnected.
Getting the drill remaining in the well can be very problematic.
Before starting to design the device, it is recommended to draw up a drawing of the drill for the well. This will give you the opportunity to have a visual example of what should come out in the end. Attempting to create a drilling mechanism using the “scientific poke” method is more exciting for some home craftsmen, but takes too much time and effort.
An easier manual version of drilling a well is using a bailer bit.
Raising and releasing the impact tool requires less force than rotating a buried drill. In addition, even one person can drill using the percussion method. True, this method is very long, and the work can drag on for several days.
If you cannot lift the auger drill out of the well yourself, you can make the task easier by building a device for the lever. For example, placing a barrel next to it and throwing a block over it. Tie one edge of the block to the drill, and apply physical force to the other edge.
After finishing the work, the drills should not be disassembled or thrown away - they can be used to later make holes for fence posts, pile foundations, etc. Did you find this article helpful? Give it a thumbs up!
Please subscribe to the CHANNEL