The operation of welding hinges is a mandatory part of the installation of entrance doors, wickets and metal gates. In order to weld fittings, the craftsman will definitely need an electrode welding machine, a welding mask, gloves and overalls.
It is necessary to prepare bearing metal loops (they should be stronger, the heavier the future structure will be). A grinder, solid oil, litol or other oily liquid can also be useful.
How to properly weld hinges on a metal door at home
Installation work on installing fastening elements for metal doors requires a responsible approach. This is due to the weight of the structure and the inability to make adjustments by correcting errors made during the assembly process. The expression is relevant: “measure seven times, and cut once,” since “measure” is thick iron metal, and “cut” is a “grinder” or a welding machine. Installation errors are unacceptable due to the catastrophic consequences.
General view of metal doors
Lifetime
The teardrop canopy distributes the weight of the door equally across the entire ball bearing surface. Unlike the commonly used ball to set the door in motion, a washer bearing allows the door hinge mechanism to last longer. Thanks to experiments conducted on the strength of a modern drop-shaped canopy, it was concluded that the minimum service life is 53 years.
Model size and characteristics
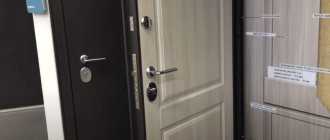
Replacing the entrance door hinge: we will weld a new one with a technician visiting Moscow and the region
Hinge failure is not uncommon today. Such damage occurs on gates and entrance doors. The welding itself must be carried out in strict accordance with safety rules and regulations. The work must be entrusted to a specialist with relevant experience and approvals. To weld a torn loop, the craftsman uses gas or manual arc welding technology. Here are just some of the services that our service technicians provide:
- Marking. Using a pencil and tape measure, you need to mark the places where the marks will be placed. This will prevent the front door from skewing.
- Lubricate the hinges with grease. The procedure is performed to avoid their caking, and you should also grab them in several places.
- Directly replacing and welding a new hinge on the front door.
- Checking the performance of the canvas in the apartment. If the door closes smoothly, then the hinges are already completely welded. Before putting the work into operation, the specialist sets the technological distance between the frame and the sashes.
Why do you need a roller bearing?
A ball bearing is used between the running joint parts. Such a mechanism is always metal and is of high quality, since it bears the main weight. In addition, thanks to the stop, the friction force of the running parts is reduced. Bearings are used in ball or washer form. They are treated with oil lubrication for better performance. Usually they are lubricated when the doors are hung, but after some time the lubricant dries out and is periodically renewed.
Drop-shaped garage hinges
Welding
Next, you need to prepare the hinges - clean them of rust and fatty deposits, lubricate them with grease or other similar compound. This will prevent so-called hinge sintering when you start welding.
Now you need to use the welding machine: first, the fittings are welded to the gate leaf, and only then to the support pillars. In this case, it is necessary to constantly monitor the quality of the resulting seams.
When all welding work is completed, it is advisable to process the new seams with a grinder.
You can weld hinges on a gate, garage door and on a metal door according to the same scheme as described above.
However, it should be noted that the craftsman usually has the opportunity to weld the fittings onto the door at the moment when it is in a horizontal position on a flat area, which greatly facilitates the process.
This does not work out with gates: the support pillars, as a rule, are installed much earlier than the actual installation of the curtains begins.
OUR ADVANTAGES
1. Qualified service.
2. Own lock store.
3. Real time of arrival of a specialist at the address.
4. Quality certificates for all types of locks.
5. Warranty on locks and labor from 1 to 3 years.
6. Receipt of strict reporting on the results of work performed.
7. A large selection of locks from a specialist for any budget.
8. Specialists have all the necessary permits and licenses.
9. We have been working since 2005 in St. Petersburg and Moscow
10. Discounts on work for Pensioners, WWII Veterans, Students, New residents
Door repair requires an integrated approach to solving the problem and is not always limited to just replacing the finish, lock or fittings; in some cases, professional help will be needed. As you know, all methods are good for the stable functioning of a door structure. For example, over time the doors begin to sag, in which case the master must weld the hinges. Moreover, the possibility of their wear cannot be ruled out, so repairing door hinges will not be possible without welding.
A couple more useful tips
Recommendations from experts will help you weld canopies efficiently:
- It is better to install hinges on garage doors by placing them on the ground;
- vertical seams are made from the bottom up, preventing molten metal from draining;
- For convenient closing of the valves, a backing is placed under the bottom hinge before welding.
The process of welding hinges is simple, but you should not rely on the accuracy of your eye. It’s better to double-check with measuring instruments seven times so that you don’t have to redo everything. Haste when testing the gate, without waiting for the welds to cool completely, will also lead to the work being repeated.
Stroyobzor.info
Stroyobzor.info - the site provides a complete description of building materials used in both low-rise and industrial construction
- home
- Site Map
- Materials Zero cycle Piles
- Brick, stone, blocks
- Concrete, mortar, cement, additives
- Bulk materials
- Concrete products
- Construction fittings
- Foundation
- Window
- Facade materials
- Insulation materials
- Roof
How to weld metal doors with your own hands
Welding a metal door with your own hands is not difficult. The finished door will not be inferior to factory products. What tools are needed, how to carry out welding step by step - we analyze all the details.
A door to a home should combine reliability and beauty. Today, metal door structures are manufactured and sold by many organizations. But the reliability of many inexpensive models leaves much to be desired. And those products that combine a high protection class with an aesthetic appearance are usually very expensive. The solution to the problem is to weld with your own hands exactly the metal door you need.
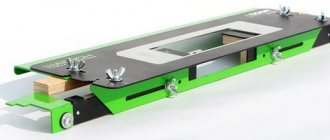
Box diagram
In order not to encounter unpleasant surprises during the work process, the manufacture of the door must begin with drawings. Ready-made diagrams are found on the Internet (we also provide a ready-made drawing). Self-production of the project is also allowed.
Begin work by measuring the parameters of the door opening:
- Opening width
- Opening height
- Wall thickness
The standard canvas size is 2 m in height and 0.9 m in width. A smaller door will be inconvenient to pass through; a larger door will be either too heavy or not reliable enough.
If the doorway is significantly taller or wider than the standard size, the empty space is filled with additional blocks. For large heights, install a blind block above the door frame; for a wide opening, install a blind or hinged element on the side. Blind elements can be covered with a grille, glass or a solid sheet of metal.
The door frame is designed so that its dimensions in all dimensions are 20 mm smaller than that of the doorway (or the opening obtained after installing additional blocks). This amount of space makes installation easier.
Where and how to install hinges
In order to calculate the number of hinges, calculate the weight of the door leaf. As a rule, a minimum of 2, maximum of 4 canopies are used. The first hinge is placed 0.15 m from the bottom edge of the door, the second - 0.15 m from the top edge. The remaining canopies are placed so that the distance between all elements is the same.
The part of the canopy equipped with a groove is attached to the top, the part equipped with a pin is attached to the bottom. The upper part is welded to the door frame, the lower part to the frame. All welding work at this stage is carried out in a horizontal position, fixing the hinge elements with clamps. Upon completion of the work, the welding seams are ground.
Welding without plates
If the weight of the gate is light, you can do without plates. The welding technology will be slightly changed:
- The support and frame of the gate are laid horizontally so that their surfaces are in the same plane. A gap of 3-5 mm is left between them.
- 20 cm is measured from the top edge of the frame and a loop is placed in the gap. To raise it a little, you can use two matches, placing them perpendicular to the gap and installing a hinge on them.
- The hinge is fixed by spot welding: the lower element with the pin is welded to the support, the upper element with the groove is welded to the frame.
- To check how well the hinges work, it is not at all necessary to lift the sash: it is much easier to turn the support. If everything is normal, final welding is performed along the entire length of the fastener.
These methods are suitable for installing new gates, doors or gates. If it is necessary, for example, to replace old hinges on an already installed gate, experienced craftsmen suggest proceeding as follows:
- Secure the plaits to the loop.
- Laying the sash horizontally, weld the top part of the hinge.
- Place the sash in the opening and secure it.
- Insert the bottom of the loop into the top. Mark on the support the place where the bottom plate should be.
- Weld the lower part to the support.
After welding the door hinges, the seams are cleaned, primed and painted. Further care of the hinges comes down to regular lubrication, which will prevent rust and reduce friction.
Lubrication should be carried out only in the warm season, otherwise the hinges may freeze. Before applying lubricant, it is recommended to remove the door from the hinge, remove the remains of the previous composition, dirt, rust from the pin, and clean the groove.
Welding the ears
The order of work here will look like this (for convenience, let’s imagine that the hinges need to be welded onto an ordinary metal gate).
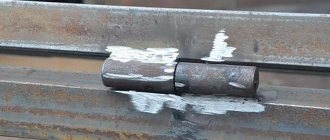
First, thick metal plates are welded to the hinges - they are called plates or ears. This is done like this:
- two plates are laid horizontally so that there is a gap of about 2-3 millimeters between them;
- a loop is placed in the gap;
- These same plates are welded to the loop with a continuous seam - one to the top of the loop, the second to the bottom.
The presence of lugs greatly facilitates further work and increases the service life of the gate. They do not allow the fabric to “tear” even with the heavy mass of the entire structure.
Types of loops and their properties
The gate lasts for more than one year. At the same time, it must provide reliability and a good level of protection, and the hinges that hold it must:
- turn without effort;
- do not make sounds;
- don't hang out;
- be strong.
The quality of the product, the reliability of the manufacturer and the permissible load are important.
If you hang heavy sashes on weak elements, they will quickly fail. Sometimes the number of loops increases to six instead of the standard four.
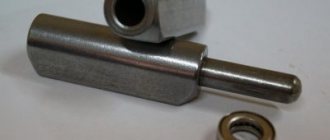
- Cylinder-shaped (drop-shaped) - the design has a support bearing, is not used for light gates, load - up to 400 kg.
- In the form of a cylinder with an amplifier - the design includes a support bearing, and for reinforcement there are plates that are designed for better load distribution. For such loops the maximum load will be 600 kg. They are fastened by welding or screws and are suitable for swing gates.
- Through - this type of hinge is used when it is not possible to weld them or use screws. To fix such a hinge, you need to drill through the post, and it will be attached to the sash using nuts. Can withstand a maximum of 200 kg.
- Three-section - for very heavy large sashes. They are highly resistant to burglary. They are secured by welding.
- Forged (zhikovina) - the installation of hinges of this type has been used since ancient times. In addition to the fact that they perform their function well, these loops are very decorative. It is best to use them for wooden gates.
- Arrow hinge – made of steel, with hinges, suitable for heavy gates made of thick metal. They can be made curly. They are most widespread when used on garage doors.
- Adjustable - provide for changing the position of the sashes in height. They are usually used when the support posts can change their position. The maximum load of these loops is 200 kg.
Marking
The next step is to lift the gate leaves to a vertical position and install them “idle” to where they should be located.
Don't forget that the doors should open outwards. If they open only inward, then in winter with heavy snowfall this will result in serious problems.
Then you should mark the locations for future installation of hinges on the gate - they should be located at a distance of approximately 20 centimeters from the lower or upper border of the door leaf.
Sometimes, if the structure weighs too much (more than 200 kilograms), another additional fitting is placed at the top of the support.
All hinges must be installed strictly vertically; even a tiny misalignment during welding will lead to difficult closing or opening, and therefore to rapid destruction of the support bearings. The evenness of their position can be checked with a plumb line or laser level.
Selection of loops and their quantity
If you decide to use welded hinges to install the gate, you can choose from several types:
- the simplest and most inexpensive option is a split cylinder with a rotating axis in one part and a cavity-cap in the other. Such hinges require periodic lubrication, without which they quickly begin to creak;
- The most popular are hinges of the same design, but improved with a ball or bearing on which the axis rests. They can be either two- or three-section;
However, it is not enough to know how to weld hinges to the gate - first you need to calculate the load on them and decide on the quantity. This is not difficult to do if you know the weight of the sashes.
Hinges without plates can withstand a maximum of 400 kg depending on their diameter and the length and thickness of the metal. And hinges with plates that take on part of the load are designed for a more impressive weight - they can withstand up to 600 kg.
Knowing the design load on the hinges and the weight of the structure, you can determine the required number of hinges. Of course, there will not be less than two of them per sash. And in the case of heavy gates, the number of canopies is increased to 3 or 4. An additional hinge is installed just below the top one, which bears the main load.
By the way, you can strengthen ordinary hinges yourself by welding to them plates cut from thick metal of a suitable size. The weld must be continuous.
Household repair No. 1
Choose reliable craftsmen without intermediaries and save up to 40%!
- Fill out the application
- Receive offers with prices from masters
- Select performers by price and reviews
Post a task and find out prices
- Minor household repairs
- Renovation of apartments
- Articles
- Renovation of apartments
Gates are an integral part of any personal plot and private house. They protect the home from unauthorized entry. You need to understand that the correct opening and closing of doors is the most important characteristic, which entirely depends on the quality of the hinges. The correct installation of these elements to the round posts is also very important.
To properly weld hinges, you must first understand how they work together. Both loops should be located on a straight line of the axis. In other words, when installation is completed, the lower loop should be under the upper one. Only in this case will a uniform load distribution be achieved.
How to weld hinges on gates correctly?
Even a professional welder may not know how to properly weld hinges to round posts. The task is complicated by the fact that the loops are cylindrical in shape. First, this element is welded to special plates, but this must be done on a horizontal flat surface. In addition, the plates must be welded with a continuous, even seam, and nothing else.
To select plates by size, you need to consider:
- characteristics of the material used in the manufacture of gates;
- gate length;
- their weight.
An experienced welder, even without additional equipment, will determine how long the weld should be so that it can support the weight of the door.
To ensure that the hinges are welded correctly, you will need high-quality consumables and equipment. You can't do without:
- records;
- plumber's hammer;
- Bulgarians;
- electrodes;
- welding machine;
- workwear;
- metal door hinges.
It must be remembered that welding of the hinges must take place directly at the location of the gate. To install the canvas in a vertical position, you can use a plumb bob. That is, the gate doors must be installed exactly as they will be after welding. Measurements must be taken carefully to avoid defects. The training video shows how to do it correctly.
Stages of welding loops
The most difficult part is the vertical seams. Without records it will be almost impossible to make them. We must not forget that welding work should begin from the lower hinges, and not from the upper ones. The bayonet part is welded first. This is done by smooth movements of the electrode from top to bottom.
After the first stage, you need to check whether the gate opens correctly. A regular laser level will help here, which shows the location of the axis of the welded loop. If there are no distortions and everything is done correctly, work can continue.
So, welding work consists of several stages. For everything to be done correctly, you need:
- raise the gate so that it stands vertically;
- check their correct location (a plumb line is used for this);
- attach the hinges at the places where they are attached (you need to make sure that they are parallel to the line of the edges of the sash);
- weld to the posts and to the structure fabric;
- thoroughly clean the seams (it is best to use a grinder).
Recently, gates made of corrugated sheets have increasingly begun to be produced. In this case it is necessary:
- build jumpers that will run parallel to the bottom and top;
- fix the jumpers (it is best to use squares);
- arrange them in such a way that they divide the canvas into three equal parts;
- weld the hinges to the jumpers;
- After finishing the work, cover the corrugated sheet on the hinges.
To ensure everything is done correctly, it is advisable to watch the training video.
General recommendations
It must be remembered that if the metal hinges are welded incorrectly, the doors will close with great difficulty. To avoid this, you need to follow the advice of experts:
- straight hinges need to be welded only after laying the gate on the ground;
- before welding, it is advisable to make a footrest by placing its lower loop;
- in the event that the loop is fixed on a round stand, approximately 5 millimeters must be released outward;
- You can use a rectangular piece of wood before finally securing the hinges. This will help you install them correctly.
- you need to cook from bottom to top using small potholders and observe the order of work;
- The gate should be opened only after the hinges have cooled.
Gate hinges are quite easy to install yourself, but not everyone can do it. If you do not have the opportunity or the necessary skills to install hinges, you can use the services of professionals.
The most convenient way to search for performers is on the Yudu website. This service has registered experienced craftsmen who will weld hinges on gates professionally and at very low cost. Thanks to a convenient search system, you can find a specialist very quickly.
We cook the doors
First we cook the door frame. We make it from a profiled pipe 40*40 mm. Cut pieces to size. If there is rust on the pipe, we clean it. We fold the clean blanks, set the corners, and grab them together.
Welded the door frame
After welding, we check the corners and measure the diagonals. If there is even the slightest deviation, we correct it (hitting the floor with an angle usually helps, the main thing is not to overdo it).
We weld the hinges. We retreat about 20 cm from the bottom and top, mark, cook, making sure that they are on the same straight line. A laser level is very useful here, and if you don’t have one, you have to measure the distances many times to set it accurately.
Next, we cook the internal frame from a 40*20 mm pipe. We calculate the dimensions so that the gap on all sides is 3-5 mm. In one of the long pipes we cut holes for locks.
Basic truths
The process of installing hinges can be considered using the example of a metal gate. In order for it to properly perform its main functions, a number of conditions must be met when welding hinges:
- Provide a gap between the support post and the gate frame, which should be 3-5 mm.
- Provide a gap of several millimeters between the hinge and the gate frame by welding plates - metal plates of the required thickness - to the hinge. In total, for each loop you need two strips, the length of each of them is 2 mm less than the length of half.
- The optimal distance from the edge of the gate to the loop is 15-20 cm. If you need a middle loop, then it is located exactly in the middle between the outer loops.
First, the lower part of the fastener (with the pin) is welded to the post, then the upper part (with the groove) is welded to the sash.
A properly assembled structure should have the following parts:
- a loop;
- plate; wicket frame;
- support pillar;
- lower part (with pin);
- upper part (with groove).
All loops must be coaxial, that is, their centers must be on the same straight line. The alignment requirement is extremely important. It is on its compliance that it depends on how evenly the weight of the gate will be distributed on the fastenings and, accordingly, how long they will last.
To work, the master will need:
- welding machine;
- metal plate for making plates;
- Bulgarian;
- hammer;
- plumb line;
- oil for lubricating hinges;
- protective equipment - mask, gloves, overalls.
Installation recommendations
The reliability of the gate directly depends on compliance with the rules of their installation technology. First, the support pillars are attached. If the canvas is made independently, the dimensions of the frame will be determined only after the first stage. It is important to remember the technological gap.
In the lower part, the distance to the ground surface must be at least 100 mm. This is necessary to compensate for possible subsidence of the structure. Corrugated sheeting can be used as a cladding material. To securely fix the corrugated sheet, additional stiffeners are welded. Additionally, you can provide a small gate. An alternative is to make it separately, if the width of the installation opening allows.
After welding the hinges, the surface is cleaned of rust, a layer of primer and paint is applied. To avoid extraneous sounds when opening, the hinges are lubricated with grease.
As an example, it is recommended to watch a video about professional welding of hinges on gates:
Which loops to choose
When choosing hinges, you must be guided by the parameters of the object on which they are going to be welded. Garage hinges, by definition, should be larger and stronger than hinges for a modest gate or door.
Typically, hinges with ball bearings are used for gates and metal doors. Moreover, such hinges and hinges in them can be of different shapes:
- cylindrical;
- square;
- hexagonal;
- drop-shaped.
Most often, cylindrical models have been used lately; square and hexagonal versions are found much less frequently in hardware stores.
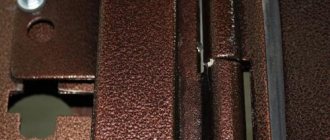
And about the last drop-shaped loops (canopies) on the list, special mention should be made. Their use allows you to slightly simplify the installation process. There is no need to first attach ears to them - this is the main advantage of the teardrop shape.
Without any preparation, such loops can be welded to a support post. Moreover, only the top of the lower part of the canopy should be in contact with the post, and the top of the upper part should be attached to the gate leaf.
Drop-shaped products must be welded carefully - after welding they should still rotate easily and freely. And only if this is really the case, you can begin further work.
Aesthetic characteristics of the model
When attaching teardrop-shaped fittings, the weld seam is neat. This improves the overall aesthetic appearance of the mechanism. The added bonus to this is strength and durability. It is worth saying that this kind of hinged structure has a smoothly polished surface. This means that the powder paint will adhere to the door and onto it firmly. The paint will protect the surface of the door mechanism from chips and unwanted physical impacts during operation, and the externally painted hinge element to match the door looks beautiful and organic.
Wicket made of corrugated sheets
For gates and wickets made of corrugated sheets, it is important to select hinges that are suitable in type and size. Properly selected products will improve the aesthetics of the entire structure and significantly extend the years of its service. Profiled metal sheets, as a building material, are very popular in every region of the country. It has low cost, good technical characteristics, and resistance to the vagaries of nature.
He is easy to work with. Corrugated sheeting has different markings, levels of rigidity, wave shapes and their height.
Attaching hinges to a gate frame made of corrugated sheets
The metal fabric is presented in a wide range of colors, which simplifies the buyer’s choice.
To carry out structures in a vertical direction, such as gates, it is preferable to choose canvases marked “C8” - “C20”, where “C” indicates the wall purpose of the product, and the number following the letter is the height of its waves in millimeters.
In addition, corrugated sheeting is beautiful and has a wide range of additional advantages. This building material can be either simply galvanized or painted with paint with polymer components. It is painted corrugated sheeting that is recommended for the manufacture of wickets, fences and gates.
This metal sheet has 2 layers of protection:
- anodic;
- dye.
The average weight of a profiled sheet is about 5 kg per m2. This allows you to use not the most massive and complex, and therefore not the most expensive, hinges for fastening the gate.
Scheme for installing a gate made of corrugated sheets
It is easy to make a gate from this material yourself according to a pre-prepared drawing.
Rolled metal, for example, square pipes, is often used as a frame for the canvas. Support posts are also made from pipes (100 mm). The height of the pillars is determined by the height of the gate, to which is added at least 130 cm, which will be buried in the ground.
Installation work
Cylindrical welded hinges are considered popular, but they are inconvenient to install. But drop-shaped canopies with an external cross-section simplify the welding process. Intermediate plates or corners for attaching the profiled overlay are not required, as is observed when installing a cylindrical model. The operating principle remains the same.
Its production in the form of potassium occurs on a lathe, but rods that are already correctly profiled in advance are taken as blanks.