Before welding a profile pipe, you should read the recommendations of professionals and watch a training video. Welding a profile pipe is a specific procedure that requires the use of a certain set of skills. How well the work is done directly determines how long the result of the work will last. Of course, professionals can best cope with the task, but there are cases when it is necessary to complete the given range of work yourself. If you approach the issue as responsibly as possible, you will end up no worse than the specialists.
Re-weld the hinges on the gate. Types of loops
It is important to choose the right fasteners, taking into account the weight of the door and its dimensions. For heavy metal doors, modern industry produces the following types of hinges:
- Cylindrical. The most popular because they make it possible to open the gate to the maximum angle. Disadvantages include difficulty in attaching to a flat surface.
- Teardrop-shaped. They are a type of cylindrical hinges.
- Hexagonal.
- Square. Used extremely rarely.
In this article you will learn how to properly weld hinges
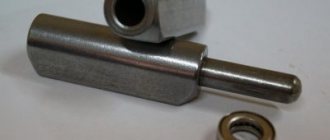
Regardless of the cross-sectional shape, a door hinge is a part consisting of at least two elements. In the simplest hinges, the connection of these elements is made by a pin and a counter groove. Their main advantage is their low cost and ease of further maintenance (lubrication). At the same time, simple hinges fail faster.
In more complex designs, at the end of the pin there is a movably fixed ball (ball loops), the function of which is to replace sliding friction with rolling friction, which, as is known, is much less. This makes it easier to open and close the doors, and the hinges themselves will last longer.
There are also hinges equipped with ball bearings, but it is not recommended to use them for heavy doors, since the complex mechanism quickly becomes unusable. For massive gates and gate leaves, hinges are produced that are additionally reinforced with plates. Due to the plates, the weight of the door is more evenly distributed on them, which allows you to increase its service life.
Reinforced ball ones are considered the best option for heavy metal doors, garage doors and gates. They compare favorably with their cheaper counterparts in their long service life, ability to withstand significant weight loads and ease of installation.
In that
For heavy metal doors, the welded method is recognized as the best. It allows you to fix the hinges as securely as possible, eliminating play and gradual loosening of connections.
Advantages and disadvantages of fences made of profile pipes
The advantages of this type of fencing include:
- Low financial costs for materials.
- Possibility of building on your own.
- Quick installation.
- The strength of a welded profile fence is not inferior to brickwork.
- Durability. On a reliable foundation with regular maintenance, the fence will last 50 years.
- Creation, through combination with other materials, of an original design. Decorative forged elements will make even a simple welded fence unique.
The accessibility of viewing the site from the street is considered a disadvantage. However, places that are undesirable to be shown to strangers can be protected with wooden, plastic, and metal panels. The rest of the area will be well ventilated and illuminated.
How to properly weld droplet loops. Welding hinges with your own hands
How to weld hinges: technology of work
Installation of metal doors, as well as gate doors and gates, requires welding of hinges to the door leaf and frame. How to choose hinges for installation, how to weld hinges on your own, and what equipment you will need for the job - answers to all questions can be found in this article.
Installation of hinges by welding
Loop selection
The correct choice of hinges for metal gates, gates and doors should be based on several factors:
- determining and selecting the type of loop;
- determining the number and overall dimensions of the loop.
Types of loops
First of all, welded hinges differ in shape. They can be:
- cylindrical. A variation of this group is the welded drop-shaped loop;
- square. They are used extremely rarely. Currently practically not produced;
- hexagonal.
The main types of welded loops, differing in shape
All welded hinges can be additionally equipped with a ball that acts as a bearing. The ball makes it easier to open the door and reduces friction, which negatively affects the life of the fittings.
Welded hinge equipped with a ball bearing
Also on sale you can find reinforced welded hinges, which are used for installation on a metal door of large size or weight. Additional plates allow you to evenly distribute the load on the hinge, which increases the service life of the product.
Welded loop complemented by metal strips
How many hinges do you need to install?
The number and overall dimensions of hinges are selected depending on the weight of the door leaf. The greater the weight of the door, the larger the hinges required, and the number of hinges increases.
Table for choosing the sizes and number of door hinges
Installation of welded hinges
Let's look at how to properly weld hinges. To do this, you need to go through three main stages:
- preparation of equipment and materials required for work;
- preparing a metal surface for welding;
- welding hinges on the door.
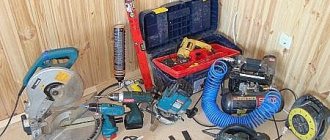
Tools and materials
Before properly welding hinges on a metal door, gate or gate, you need to prepare the materials necessary for the work:
- loops selected according to all the rules indicated above;
- metal plates (if welding of hinges is carried out with reinforcement of the structure with plates). The dimensions of the plates are selected based on the weight of the door leaf. The greater the mass of the door, the larger the plates required. For example, garage hinges for gates of standard sizes (approximately 2.5 * 2.5 m) are welded onto metal plates measuring 80 * 80 mm;
- electric welding machine;
- dry electrodes. To carry out the work, it is enough to have electrodes with a diameter of 3-4 mm;
- a brush with metal bristles for preliminary cleaning of the work surface;
- personal protective equipment for the master.
Special protective clothing and mask for welding work
Preparation
When answering the question of how to properly weld hinges on gates and other metal doors, it should be mentioned that the preparatory stage is in practice the most important.
At the preparatory stage it is required:
- mark areas for installing hinges. If two round hinges are installed, they should be located at a distance of 15-20 cm from the top and bottom of the door leaf. Additional hinges are located evenly along the entire height of the door;
- all areas in which hinges are supposed to be welded must be cleaned of dust, rust, and so on. To carry out cleaning, use a brush with metal bristles, dry rags and, if necessary, treat the surface with some kind of solvent;
Cleaning the metal surface before welding
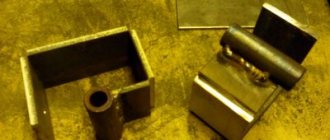
- process the loops. The surface on which the weld will be located also needs to be cleaned. In addition, the inside of the hinge, where the ball bearing is located, must be thoroughly lubricated. For lubrication, you can use litol, solid oil, and so on;
Preparing the loop for installation
- if the hinges are installed using metal plates, then at the preparatory stage it is necessary to weld the inserts to the hinges. Welding of hinges and plates is carried out with an even seam;
Reinforcing hinges with metal plates before installation
- connecting the welding machine. When working with equipment, it is imperative to connect grounding;
Equipment elements and device regulation
- The device is adjusted using regulators located on the equipment body and by testing the production of a weld.
Achieving a high-quality weld by testing and adjusting the apparatus
Welding
It is recommended to weld the hinges in a horizontal position of the door and door frame. If you install the box first, you will have to perform a vertical weld, which causes difficulties even for an experienced craftsman.
Welding rules
In the process of installing metal pipes, welding is mandatory, which allows you to quickly and efficiently connect all components of the system into a single circuit. Profile products are subject to welding more often than other elements, but still remain popular among consumers.
When welding, you must use protective equipment
Among their advantages are:
- Loyal pricing policy;
- Small mass of finished products;
- Durability of operation;
- Resistance to mechanical damage.
Profiled pipes allow you to recreate absolutely any system, regardless of the complexity of the design. The only thing you have to decide on is the type of welding to use.
Today the following varieties are actively used:
- Electric arc;
- Gas;
- Contact.
Proper organization of work involves preparing a workplace with the ability to securely fix the pipe from all corners, observing safety precautions and basic skills in working with a welding machine and metals of various densities.
The seam should be perfectly smooth and sealed, which will allow the system to be used for many years.
If you don’t have the skills to work with a welding machine, it’s better not to experiment and trust the specialists. Improperly welded pipes are more likely than other elements to corrode and leak.
How to weld loops on a round pipe. We weld the hinges with our own hands
As you know, there are different types of gates and hinges should also be welded to them in different ways. Next, you will learn how to secure hinges on a round and square post. We will also tell you how hidden internal hinges are installed on gates or wickets and how to weld hinges on gates made of profile sheets.
Installing awnings on a round pole
In order for the awning to function normally on a round post, it needs to be slightly moved away from it. To do this, it is best to place a small metal plate under it, about two to three millimeters thick.
When welding canopies to a round post, push them outward by 5 mm on it and on the gate. This will eliminate the gap between them when closing.
Also, from the middle of the post, the loop should extend to the outside by five to six millimeters. Then the gate will be installed exactly in the middle, and the loop will be able to move along its axis without jamming and very smoothly.
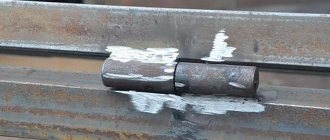
We weld the curtains on a square support
Here it is already necessary to install the hinge flush. It is not necessary to make a lining, but it is better to play it safe and do it. First, apply a loop and grab it with several points so that it holds on its own.
You need to cook from bottom to top using small oven mitts and follow the order of work.
After this, take a flat wooden block or a metal corner and align the loop with it so that it stands level, simultaneously checking everything with a plumb line.
To eliminate possible welding deformations, the canopies must be welded to the canvas and the frame “crosswise”.
After both hinges are secured, you should put the gate on and check its movement, if everything is in order, continue welding. At the end, clean the seams with a grinder and you can paint them.
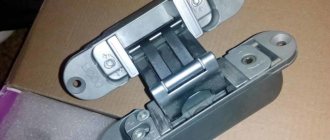
Installing hidden internal hinges
If you want to keep the hinges out of sight, making your gate more attractive, then you should use special hidden hinges for internal installation. But it is quite difficult to install such hinges and you need to have skill and dexterity in welding; if you are an unprofessional welder with experience, then you will not be able to master such work.
It is best to entrust the process to a professional, then the installation will be done efficiently and the gate will be installed reliably and for a long time. Of course, you will need to pay money for such work, but the quality is worth it.
Installed on a fence made of profile sheet
The process of installing hinges on such a fence is somewhat different from the standard one, although there is also nothing super complicated or time-consuming in it, you just need to have the desire and strive to get the highest quality result from the work done.
Metal hinges for gates made of corrugated sheets
So, the entire installation process consists of the following stages:
- Two small jumpers are made, align them parallel to the long side and secure them at the top and bottom, respectively.
- The distance between these jumpers will make it possible to install three such elements.
- We weld our hinges to the installed jumpers.
- The profile sheet must be screwed on top of the installed hinges, since during welding work it can simply burn and lose its attractive appearance. Garage door hinges are best suited for such purposes.
Why are mounting plates used?
Such plates help simplify work and lighten the load on the curtains. They are welded in advance before the installation of the hinges themselves begins.
The dimensions, shape and thickness of such plates will depend on the parameters of the gate that will be installed. In addition to lightening the load and installation, such elements can perform decorative functions.
Tips for choosing
There are four main selection criteria:
- Before starting work, you should sketch out a diagram and think about what types of crabs and in what quantities will be needed to install the structure - and only then buy products of the required configuration.
- The second important criterion is the thickness of the connection elements: in no case should you buy crabs made of steel with a thickness of less than 1.5 mm - hackwork will not provide the required strength and rigidity of the structure.
- Elements must not have cracks, chips, dents, or deviations from geometric dimensions and shape.
- Under no circumstances should there be any rusty spots on the surface - the coating must be intact, without scratches, chips or discontinuities.
How to properly weld hinges on a gate made of corrugated sheets. Hinge installation sequence
- How to weld hinges on gates so that the metal does not move and the gate opens easily. For straight hinges, it is recommended to weld them onto the gate first while it is on a flat surface, on the ground or on a mounting table.
- The procedure for both loops is identical. After the loops have already been tacked, you need to use a rectangular block (30x30) to set the loops, placing it along the loops.
- Next, two tacks are made on each side of the loops. Cook the loops using short potholders, alternately on each side of the loop.
- Then the loops are welded to the posts. The gates are set with the required gap of one to one and a half centimeters in the middle, the gap near the pillars can be two to two and a half millimeters. The bottom of the loops is tacked to the posts; if necessary, you can use inserts between the posts and loops made of a round or rectangular section of a suitable size.
- Now you can carefully open the gate, carefully holding it, and if the gate opens easily, then several tacks are made from the outside.
- After closing the gate, it is necessary to make a stand in the middle so that they do not sag during cooking. The welding seam is laid from bottom to top. After welding, it is necessary to allow the hinges to cool, and only then can the gate be opened. To weld the hinges on the other side, a stand is also made under the gate leaf.
For half the length of the loop, a backing of two to four millimeters is made under the lower half of the loop, and the upper part is grabbed from the end. If the gate is installed on round supports, then the hinges extend 5mm outside the gate, and if the supports are rectangular, then they must be welded flush.
Scope of application of crab systems
Crab joints are used for the installation of light and small metal structures. Using crab clamps you can mount:
- Greenhouses, greenhouses, winter gardens.
- Summer showers, beach changing rooms.
- Canopies for cars and people, canopies, gazebos.
- Light fences, supports for climbing plants and grapes, brackets.
- Enclosures for animals, racks for cages, animals, storage and drying of light feed (hay-straw).
- Benches and benches, shelving, advertising structures.
- Seasonal tents, tents for outdoor celebrations.
- It is possible to use crabs for minor repairs of welded structures (as a temporary measure).
Installation of crossbars
After the concrete has hardened, you can proceed to installing the frame fence rails. They use the same square profile, but smaller in size (40x20).
The length of the crossbar must be no less than the length of the span; this will allow the logs to be joined directly to the support tube and will add reliability to the structure. If the logs are longer than the span, the excess metal can be cut off with a grinder.
The crossbars are fixed using brackets and bolts. The fence bracket without welding performs its function perfectly. A metal that resists oxidation well and does not rust, or is coated with an anti-corrosion substance, is better suited for fastening.
To install corrugated sheets, roofing screws are used. The sheet thickness should be at least 0.5 mm, and the wave height should not be more than 20 mm. If thinner sheets are used for the fence, it is necessary to install additional rigidity logs.
Rules for making connections
To fasten the clamps you will need two wrenches of the appropriate size. Bolts and nuts are most often used M8. Before installing the structure, it is necessary to cut the profile pipes in accordance with the drawing and remove burrs from the ends.
The pipes are inserted into the clamp, slightly twisted with bolts, angles are checked, and the bolts are tightened. You need to ensure that the pipes are inserted into the clamp all the way. If you are installing a large structure, it is advisable to “bait” the entire structure, measure the verticality and squareness of the corners and then tighten all the bolts, starting from the bottom.
This work is best done with an assistant.
You can assemble part of the structure on a flat horizontal platform, and then lift it and install it. Having installed the two walls of the greenhouse, install and attach all the transverse pipes, measure them, and finally tighten the bolts.
Ease of mounting with brackets
Brackets are produced for external and internal fastening to posts, for connecting profiles along the length; with their help you can “rotate” the fence. The main size is for posts 60x60 and veins 40x20, but X-brackets are also produced for other sizes of profile pipe. Assembly is done quickly using roofing screws. You can just as quickly remove it and correct the error or use it in another place.
2 mm steel and protective coating guarantee a long service life, and replacement during repair is very easy.