Welding the ears
The order of work here will look like this (for convenience, let’s imagine that the hinges need to be welded onto an ordinary metal gate).
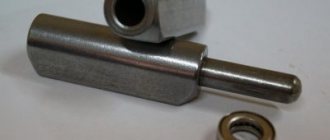
First, thick metal plates are welded to the hinges - they are called plates or ears. This is done like this:
- two plates are laid horizontally so that there is a gap of about 2-3 millimeters between them;
- a loop is placed in the gap;
- These same plates are welded to the loop with a continuous seam - one to the top of the loop, the second to the bottom.
The presence of lugs greatly facilitates further work and increases the service life of the gate. They do not allow the fabric to “tear” even with the heavy mass of the entire structure.
Sash designs
Even such a simple design as a gate leaf or wicket can be made in different ways, and there are many options. First of all, the location of the jumpers differs:
Each method is tested and works, providing a sufficient degree of rigidity. Here you choose what seems more correct or reliable to you.
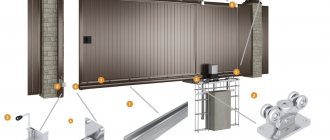
Gate design made of metal profiles with jibs
There is a difference in the design of the gate itself - with or without a stationary frame (top crossbar). With a frame, the gate is more stable, but then there are height restrictions: tall vehicles - trucks or special equipment - will not be able to enter the yard. With proper reinforcement of the racks (pillars) and properly made doors (with reinforcement in the corners), gates without a frame will also be reliable.
Gate design with top crossbar and crossbars
When installing a gate with a frame, the metal consumption is greater - per the length of the lintel, but the pillars can not be additionally reinforced: the load on them is less.
Cross-shaped lintels on metal profile gates
To make it more convenient to attach the profiled sheet, a thin-walled metal profile 1 cm wide is welded along the outer (sometimes internal, as in the figure above) perimeter of the sashes. This must be taken into account when determining the dimensions of the blanks for the sashes.
To make the structure as rigid as possible, so that it does not “walk” or make noise in the wind, reinforcements are made in the corners. And again there are two ways. The first is to weld the corners cut from sheet metal.
Reinforcement of sashes with metal plates
The second is to install short corner jibs from the same pipe that was used to weld the sash frame.
The second method of strengthening gate leaves
There is also a difference during assembly: at the joints, the pipes are connected at an angle of 45° or simply end-to-end. More professional - at 45°, easier - end-to-end. Some assembly methods do not provide for the possibility of connecting at an angle at all (if both doors are assembled in one piece, and only those hung on poles are sawn into two parts).
Different methods of joining pipes
Another subtlety that depends on the amount of snow in winter. As you can see in the photo, the bottom bar of the sashes is raised to different heights from the ground - somewhere a few centimeters, somewhere 20 cm and higher. Depends on the height of the snow cover in winter: if snow piles up and the gates are as high as the ground, you won’t open them. To prevent any living creatures from climbing into this gap in the summer, after the snow has melted, a plank is screwed onto the screws, and in late autumn it is removed again.
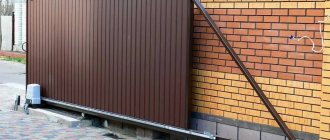
You can install automation on swing gates. Then you can control them from the remote control and there is no need to go out into the snow and rain.
Loop welding technology
Before we talk about how to weld hinges on gates, it is worth taking a closer look at the conditions necessary for their normal operation.
Even if the load is calculated correctly, the hinges may not be able to cope with it if their position deviates even slightly from the vertical. They will quickly fail. And the second point: there should be a small gap of 1-2 mm between the hinge body and the support post so that the metal parts of the post and the mating part of the canopy do not touch or rub against each other. The same gap should be left on the side of the sash.
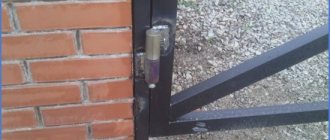
Hinges for gates
Gates are made in a variety of sizes and shapes and from various building materials.
Today, the most popular gates are products made from wood and profiled metal sheets. Such designs are not very massive products of medium weight or even light. In many ways, the durability of these sashes depends on correctly selected and properly secured hinges.
Simple homemade hinges for gates
Video description
To understand what we are talking about, watch the video
The nuances of installation on supports of different sections
The supporting posts on which the sashes are hung can be round, square or, less commonly, rectangular in cross-section. There is a difference between how to properly weld gate hinges to round posts or supports made of profile pipes.
If the profile pipe has smooth edges without bends or distortions, then it will be easy to cope with the task of how to properly weld gate hinges to square posts. They are installed on the outer plane of the support.
Canopy with plates on a square postSource distroy.ru
In the case of a round support, you must first decide in which direction the doors will open. Then they find the most protruding line (the middle of the pillar relative to the opening) and step back from it a few millimeters outward - in the direction of plowing. 5-6 mm is enough for the wicket or gate leaf to move smoothly and without jerking around the axis of the canopy. Since it is more difficult to weld hinges on gates to round posts than to square ones, here you need to be especially careful and attentive, maintaining the same indentation size for all hinges.
Installation and welding work
Experienced welders recommend first welding the canopies to the sashes, laying them on a flat horizontal surface. A half in the form of a hollow cylinder is welded to them, and a mating part with a pin (pin up) is subsequently welded to the supports. They retreat approximately 15 cm from the top and bottom edges.
Wicket frame with welded hingesSource www.chipmaker.ru
Then the sash with welded canopies is installed in the opening on stands that provide the required distance to the ground, and is rigidly fixed with clamps, pliers and other devices. They do this so that it stands strictly vertically, and there is a gap of 5 mm or so between it and the support. To do this, use a laser level or a plumb line, and spacers of the required thickness are inserted between the elements.
Other craftsmen prefer to first install the gate, and then weld the hinges to both it and the post. There is no big difference, everyone does what is convenient for them.
Another option is to make the upper and lower ribs of the frame whole when making the sashes and cut them after hanging them on the hinges. Source sqezo.ru
Now let’s talk about how to properly weld canopies on gates. The sequence of work looks like this:
- 1.5-2.5 mm thick wire is wrapped and twisted around the loops at the top and bottom to form a gap between it and the welding plane. You can place matches or other objects of suitable thickness, but they fall out, move or break, which is very inconvenient;
- The places where the canopies are attached are marked on the supports and an even long block or profile pipe is applied to them. Fix it level, ensuring a vertical position.
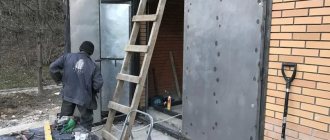
Photo report on the manufacture and installation of gates
This is one of the options for how to make a gate from corrugated sheets with your own hands. The technology is not the best, but not the worst either: everything has been functioning without problems for the past six years.
Hinges are welded to the installed posts of 80-80 mm, the counterparts are welded at the required distance on the vertical parts of the posts made of 40*40 mm pipe - on the right and left. We hang the posts on hinges on the post, place a layer of the required thickness between them and the posts and secure them with a clamp.
We hang the racks on the hinges welded on the posts
We measure the required height and cut off the excess, from above to the racks, not to the posts, and weld a cross member from the same pipe 40*40 mm. The quality of the welding is not important at this stage. For now, we are tackling the parts, not worrying about the thoroughness of the seam - then we will bring it to standard. The main thing is that everything is smooth and stays together. Therefore, we grab it with dots in several places.
A cross member is welded to the gate posts
We grab the pipe at the bottom in the same way.
We weld the lower pipe
Find the middle of the cross beams. From the middle in both directions we set aside 3 mm. We make clear marks. We measure the distance between the upper and lower beams, cut off two sections, and weld them along the marks (there should be a gap of 6 mm between the two vertical pipes).
We weld two vertical pipes in the middle with a gap of 6 mm
We measure the distance between the two posts of one half of the gate. They should be the same, but it is better to measure separately. Cut the pipes to the required length and clamp them at the desired height. If you need more crossbars, install them too.
Welded cross members for increased rigidity
Along the marked center with a grinder, we make through cuts at the top and bottom, dividing the gate into two halves. So very simply we got a gate that will open and close without any problems.
Divided gate halves
The gate frame is ready. We remove it, lay it on a flat horizontal surface and weld the seams well. This is where the quality of welding is important, we make sure the bath is full and try not to burn holes. We clean the finished seams, prime them, and paint them.
Having laid the sash on a flat horizontal surface, weld all the seams
Let's start assembling the support for attaching the profile sheet. To reduce the windage, it was cut into two parts, so that the sheet was not whole, but cut. To do this, we use a profiled pipe 20*20 mm. We cut it into pieces of the required length, so that it can be secured along the inner perimeter.
We cut a pipe 20*20 mm and screw it along the inner perimeter
We place them in the same plane as the outer part - the sheet will be screwed on from the inside. We fasten it with self-tapping screws, having previously drilled holes of the required diameter.
How to attach strips for corrugated sheets
This is what the finished gate frame looks like
We paint the finished frame - inside with light gray paint, outside - red-brown, to match the color of the corrugated board. Leave to dry.
Let's start installing the profiled sheet on the gate. It is cut into a slightly smaller size than the main frame - there should be an indentation of 2-3 mm around the perimeter. They are laid on prepared supports and secured from the inside around the perimeter with self-tapping screws.
Installation of profiled sheets on gates
You can take special ones, with caps and gaskets, but they put them on regular ones.
To save money, we used ordinary metal screws
We can say that the gate is ready.
All that remains is to install the locks. You can, of course, install a lock and handle, but the quality of inexpensive ones is very low, and taking expensive ones is currently an unaffordable luxury. Therefore, bolts were welded from the remains of pipes and fittings. They definitely work under any conditions.
One (the top one) is mounted on self-tapping screws with a counterpart on the sash, the two lower ones are attached to the racks. Small holes are drilled in the ground in the right places, in which sections of round pipes, the diameter of which is larger than the diameter of the rod, are concreted. The gate is made using the same method, only there is a lock embedded in it.
Do-it-yourself finished gates made of corrugated sheets
With this manufacturing technology, gate leaves are guaranteed to open and close. If there were some distortions when installing the pillars, they are taken into account. When presented step-by-step, the whole process does not look complicated, but it is. If you weld all the parts separately, the geometry must be ideal, and you also have to make sure that the pipe does not move during welding. See several different technologies for making gates from corrugated sheets in the next section, where video lessons are collected.
Video description
See how it looks in this video:
loops with twisted wire are pressed against the block and the post and are also fixed in a vertical position;
the loops are welded to the supports at 2-3 points;
in the same way, they grab the second (upper) part of the hinges to the frame or leaf of the doors;
when the tacks have hardened, the gate is checked for opening - it should swing open 180 degrees without jamming or warping;
if everything is in order, the sashes are closed again, fixed and the hinges are welded onto the finishing surface with a continuous seam from the bottom up;
cooled seams are cleaned of scale with a hammer and sanded with a grinder to give a more aesthetic appearance
But this work must be done carefully so as not to damage the joint. After painting, the sanded joints will become almost invisible Source i.ytimg.com
After painting, the sanded joints will become almost invisibleSource i.ytimg.com
Do not open the gate until the welds have completely cooled and gained strength.
Metal gates can also be hung on other awnings, which are secured with screws or nuts. But the welded method is more reliable and durable, especially if you know how to properly weld hinges on gates and strictly follow all the requirements regarding their installation technology.
Installation Guide
The hinges are installed on the side in which the opening will occur. Work is carried out in a horizontal position; surfaces involved in welding are degreased and treated with a brush, having previously removed the layer of paint coating in the area.
The location of future hinges is outlined - they are placed 15-20 cm from the upper and lower edges of the gate. To do this, the door is placed inside the opening on mounting pads that provide a gap between the bottom edge of the gate and the ground. Level by changing the height of the linings. It is recommended that at least two people perform this operation. Having leveled and fixed the canvas, apply the awnings, mark their location on the gate and on the door frame.
After applying the markings, the swing element is removed from the stands, removed from the opening, and returned to the horizontal plane. The hinges are welded in disassembled form: the upper half is allocated for the door leaf, the part with the pin is for supporting structures. The part is laid along the marks and secured by preliminary spot welding. Check the level to see if there is any misalignment. If the axis of the canopy is parallel to the plane of the swing element, major welding is performed along the entire contact line. The finished continuous seam is cleaned with a grinding machine.
The lower part of the loop is welded to the loot. If it is not possible to lay the support horizontally, then they work in a vertical position. Tack spot welding is performed according to the following algorithm:
- Above.
- From below.
- In the center.
- In the center of the upper half of the future seam.
- In the center of the lower half of the future seam.
Process technology
Installing plates
Many inexperienced welders have certain doubts about the possibility of welding cylindrical hinges to a flat surface. There is no doubt that this procedure with round loops is much easier to perform than with square and hexagonal ones.
In order to properly weld round hinges, you need to take care of installing the plates - they are welded to the hinges themselves using a welding machine. It is necessary to do this with an even seam. By welding the plates to the hinges, a convenient platform is created for installing the hinges on the gate itself. These irreplaceable elements are selected in accordance with the weight of the gate and the strength of the material from which the plates are made.
Reinforcing loops with plaits
Some craftsmen weld hinges without using plates. This option is also possible, but thanks to their use the fastening is more reliable.
Installing gates
Before welding the hinges on the gate, the gate leaves must be correctly positioned in the opening of the garage or fence. The complexity of the procedure lies in the fact that the gate should be placed in the opening before the hinges are welded, that is, virtually by eye. To position the gate as accurately as possible, you need to use a building level and a lot of patience. Adjustment of the gate position should be carried out as many times as necessary until the gates are in a level position. Only after precise placement can welding be carried out.
Gate hinges with welded plates
We weld the hinges to the gate
Now let's figure out how to properly weld the hinges on the gate. Despite the apparent complexity of this procedure, it is quite possible to perform it with the proper skill and patience. Welding hinges on garage doors is carried out in several sequential steps listed below:
- Lubricate garage hinges with welded plates with grease to ensure their smooth movement after installation. Also prepare thin linings for the hinges - their thickness should not exceed 5 mm. They are necessary primarily for round hinges.
- Make the correct markings of the fabric for the loops. So, it is necessary to mark indentations from the edges of 25-30 cm. The markings are applied with a construction pencil.
Prepared plates
- Weld the hinges to the door leaf. To do this, first weld the bayonet parts of the hinges, at first only slightly grabbing them by welding, then weld the metal from the bottom to the top, while ensuring the most even seam.
- After welding the first seam on all hinges, you need to use a level (it is better to use a construction level for these purposes) to check the correct opening and closing of the gate. If no defects are found, you can continue.
Iron loop welded to the gate
- After the installation of hinges on the gate by welding is completed, you need to carefully process all welds with a grinding machine. The last stage is painting the gates and hinges in any color you like. That's all!
As you can see, attaching the gate hinges yourself is not such a difficult task, impossible to do at home. It is enough to have the necessary equipment at hand and strictly follow the recommendations for action specified in this manual.
If you are installing garage door hinges, weld them in such a way that the doors open outward. Otherwise, big problems will arise after the snowfall.
Buying Tips
In order to make the right choice, you need to study the features of each type of loop . Reinforced options are usually in demand, but there is not always a need to purchase expensive products.
When choosing, take into account what material the doors are made of and what load the hinges need to withstand. Gates made of corrugated sheets have through or hidden hinges. Reinforced hinges are more suitable for heavy forged and metal doors.
For high gates made of corrugated sheets, choose classic products (in the shape of a cylinder). Hanging hinges are selected taking into account the load they will have to withstand. Products with an eccentric are chosen for the home (on doors, furniture or light gates). For automatic doors, induction magnetic hinges are purchased.
In areas with heaving soil, which increases during severe frosts, adjustable hinges for swing gates are installed. In winter, in such areas, the axle of garage door canopies is subjected to heavy load, so the hinges need to be constantly adjusted. Otherwise, the canopies may warp, which will damage the entire structure.
You should not purchase products from an unknown manufacturer or skimp on fittings, the quality of which also determines the reliability of the gate design.
Selection of loops and their number
Please note that welded hinges most often have a round cross-section and, when assembled, will resemble a cylinder. But their cross-section is teardrop-shaped, with a point along the walls
The configuration will not affect the performance characteristics of the product in any way, and it is also selected solely for ease of installation - for some it is more convenient to attach some, and for others the rest. But in fact, it is not enough to know exactly how to weld the hinges to the gate - first you need to calculate the load on them and decide on the number. This is not so difficult to do if you know about the weight of the sashes.
Hinges that do not have plates can withstand a maximum of 4 quintals depending on their length and diameter, as well as the thickness of the metal. And the loops with plates that take on all the loads that are designed for heavier weights - they can withstand up to 6 centners. Knowing the design type of load on the hinges, as well as the structural weight, you can determine their required number. Naturally, less than two pieces per sash will not work. And if the gate is heavy, then the number of canopies should be 3-4. The additional loop needs to be installed slightly lower than the top one, which will bear the main load. By the way, you can even strengthen simple hinges yourself by welding to them plates cut from thick metal of the required size. The weld seam should be continuous.
Selecting the optimal size
In order for the hinges to hold the metal sheet, it is necessary to select their dimensions correctly. The diameter of the clamps varies between 10-32 mm. The loop diameter step is 2 mm per increase. The height of garage hinges ranges from 60 to 160 mm.
An important point when selecting dimensions is the reliability and ease of use of garage doors. To prevent the blade from jamming when opening and closing, it is recommended to leave a gap of 0.1-0.2 mm between the axis of the clamps and the opening of the housing . In terms of their dimensions and weight, the hinges must correspond to the material from which the doors are made. Depending on the canvas installed in the garage, the number of loops also depends, ranging from 2 to 4 elements.
Welding
Next, you need to prepare the hinges - clean them of rust and fatty deposits, lubricate them with grease or other similar compound. This will prevent so-called hinge sintering when you start welding.
Now you need to use the welding machine: first, the fittings are welded to the gate leaf, and only then to the support pillars. In this case, it is necessary to constantly monitor the quality of the resulting seams.
When all welding work is completed, it is advisable to process the new seams with a grinder.
You can weld hinges on a gate, garage door and on a metal door according to the same scheme as described above.
However, it should be noted that the craftsman usually has the opportunity to weld the fittings onto the door at the moment when it is in a horizontal position on a flat area, which greatly facilitates the process.
This does not work out with gates: the support pillars, as a rule, are installed much earlier than the actual installation of the curtains begins.
Basic truths
The process of installing hinges can be considered using the example of a metal gate. In order for it to properly perform its main functions, a number of conditions must be met when welding hinges:
- Provide a gap between the support post and the gate frame, which should be 3-5 mm.
- Provide a gap of several millimeters between the hinge and the gate frame by welding plates - metal plates of the required thickness - to the hinge. In total, for each loop you need two strips, the length of each of them is 2 mm less than the length of half.
- The optimal distance from the edge of the gate to the loop is 15-20 cm. If you need a middle loop, then it is located exactly in the middle between the outer loops.
First, the lower part of the fastener (with the pin) is welded to the post, then the upper part (with the groove) is welded to the sash.
A properly assembled structure should have the following parts:
- a loop;
- plate; wicket frame;
- support pillar;
- lower part (with pin);
- upper part (with groove).
All loops must be coaxial, that is, their centers must be on the same straight line. The alignment requirement is extremely important. It is on its compliance that it depends on how evenly the weight of the gate will be distributed on the fastenings and, accordingly, how long they will last.
To work, the master will need:
- welding machine;
- metal plate for making plates;
- Bulgarian;
- hammer;
- plumb line;
- oil for lubricating hinges;
- protective equipment - mask, gloves, overalls.
At the preparatory stage, you should mark the gate frame and sash, determining the places where the hinges will be welded. Clean them from dust, dirt, and rust. To do this, you can use a wire brush and solvents. Next, a similar treatment is performed on the surface of the hinges, and lubricant is applied to their inner part.
The traditional welding method involves the installation of plates at this stage, for which it is recommended:
- Take 2 identical plates of the required thickness and length. Place them so that there is a gap of 2-3 mm between them.
- Place the bottom part of the loop on them.
- Weld the loop to one of the plates (in this case, to the right one).
- Do the same for the top of the hinge and weld it to the left plate.
- Then you need to install the shutters in the working position and fix them.
- The plates with the lower part of each hinge are spot welded to the post, then the upper hinge elements are inserted into the lower parts and spot welded to the sash. After checking the alignment of the hinges and the operation of the gate, final welding is carried out along the contour of the plates.
Features of welding hinges to gates made of corrugated sheets
Profiled sheets are often used as a material for fences and gates. What do you need to consider if you need to weld hinges to such material and how to do it?
- Make lintels that will run parallel to the vertical side of the sash.
- Fix the jumpers in the places where the hinges are welded. They should divide the sash into 3 equal parts.
- Loops are welded to the jumpers using a welding machine.
- To hide the welding area and the jumper, screw small pieces of corrugated board on top.
Types of loops
Taking into account the GOST classification, gate curtains are divided into the following categories:
- Cylindrical.
- Through.
- Hidden.
- Articulated.
- Decorative forged.
- Teardrop-shaped.
- Adjustable.
Cylindrical (regular and reinforced)
Mechanisms with a cylindrical configuration have a support bearing. They are used on small gates with permissible loads of up to 400 kg. Models with reinforcement have special plates that help distribute the load evenly over the surface of the post or fittings. The modification is in demand for products made from profile pipes. They are usually welded to garage doors using an ordinary welding machine or secured with a screw connection.
Depending on the side of placement, reinforced models are available on the right and left. The standard diameter of the product is 50 mm, and the permissible load is 600 kg.
The permissible load on hinges with a support bearing is 400 kg, on reinforced ones - 500 kg.
End-to-end
If it is not possible to secure the curtains by welding or screwing, a through option can be used as an alternative. To install the mechanism, you will need to drill mounting columns along the length of the frame and place part of the retainer in them. The final fastening of the product with your own hands is done with nuts of the appropriate size. Such fasteners can handle loads of up to 200 kg.
The permissible load on through hinges is 200 kg.
Hidden
Unlike previous varieties, hidden loops are well camouflaged, because they are installed in a sash frame and welded to the frame and the transverse surface of the pillars from the inside. It is quite difficult to detect the placement of such fittings, which increases its resistance to burglary. Such loops are used at those facilities where valuable property is stored. The products are distinguished by their durability because they are isolated from harmful influences.
Installation diagram for hidden hinges.
Articulated
This group includes reinforced and semi-hinged elements. In the first type, the axial rod is attached to 2 halves of the card. This provides a cylindrical joint that rotates easily. The half-hinged option involves placing the axis rod in only one half of the card. The design is not particularly reliable.
Decorative forged
They are considered an outdated type of gate hinge, which does not lose popularity despite the availability of more effective solutions. Most often, forged curtains are found on wooden fences and are used as a decorative element. At the same time, there are mechanisms on sale that are not inferior in strength to modern analogues.
Decorative loops.
teardrop-shaped
Teardrop-shaped fasteners are equally effective on metal and wood structures. Their popularity is due to their increased strength and resistance to mechanical loads. In addition, the fittings look original.
Adjustable
This option is suitable for any garages, warehouses and other similar facilities. Due to the design features, the mechanisms allow you to adjust the position of the sashes in height. Such hinges are in demand when there is a possibility of deformation of the support posts. They can handle loads up to 200 kg.
Adjustable hinges, permissible load - 200 kg.
Choosing material for garage hinges
Hinges for garage doors are made from metal profiles, black steel or low-alloy alloys. When choosing a material for fasteners, it is necessary to take into account the grade of steel of the body so that it can ensure high-quality weldability with the steel frame. Parts made of black steel are welded using electric welding by processing around the perimeter of the body or flange plates. Hinges made of alloyed materials are spot welded using argon or carbon dioxide welding.
There are no significant advantages that make it worthwhile to mount gates on stainless steel hinges, except that they are not subject to corrosion. In addition, the coefficient of friction in these joints is higher than that of carbon steel with standard characteristics.
Types of hinges and their installation
Loops can be divided into several types:
Cylindrical with bearing for support.
Used for mounting standard gates that are not too heavy in weight. It is not recommended to load such systems with a load of more than 0.4 tons since this is their maximum permissible weight. This information should be asked before purchasing because it may vary for each model and brand.
They look like a cylinder that is divided into 2 parts. One of them has an end in the form of a rod, which, during installation, enters the second part with an empty core and a ball at the bottom. This bearing makes the mechanism smoother during movement if too much load is applied. On one of its sides there is a special place for installing a plug, which can be removed.
Cylindrical hinges for gatesSource vorota-goroda.ru
Reinforced structures in shape.
They cope with loads of up to 0.6 tons and differ from the first ones only in the fastening plate, which makes it possible to correctly distribute the mass over the surface. Such a mechanism can be installed using welding or, as in interroom passages, with self-tapping screws, and the opening of doors when using such a hinge can be in both directions.
This fastener is made of durable steel, which increases the maximum permissible load weight and durability of the product. Before purchasing, it is recommended to check the bearing for special markings.
Through.
Used when welding or other fasteners cannot be used. To install them, the gate support is drilled through and secured with nuts on the other side. Such loops can only withstand small weights, their maximum is 200 kg. They are made right-handed or left-handed, and can also be equipped with canopies.
Hidden.
They have a special design that can be easily hidden if the gate is closed. They are attached to the side of the post, which acts as a support, and to the inside of the frame. The advantage of this design is that these hinges can only be dismantled with special tools.
Hidden mechanismSource www.travelnews24.ru
Three-section overhead (magnetic).
They are made as hinged or semi-hinged, and can be used for gates with a large weight. There are three types: decorative, standard and removable.
There is also a difference in the shape of the loops:
- Cylindrical. They are tightly fixed on the surface of the gate, as well as smooth and easy rotation of the mechanism.
- Square. When installing, you need to step back a little from the frame. The fixation is more reliable than the previous ones.
- Hexagonal. Universal hinges that can be fixed both cylindrical and square.
- Teardrop-shaped. They are used for various structures and have high strength and resistance to loosening.
When choosing gate awnings, it is important to ensure that they match the material. If the hinge doesn't fit metal or wood, it won't last long. . Drop-shaped loopsSource news2.ru
Drop-shaped loopsSource news2.ru
Types of hinges and awnings
In order for the gate to function for a long time and properly, you need to choose the right hinges for it. Fittings for any swing structure are one of the most important elements.
Gate hinges are selected depending on the following factors:
- sash weights;
- load that can withstand (depending on this, the number of loops changes);
- gate material;
- sashes dimensions.
Gate hinges also differ in the method of fastening:
- tightening with screws;
- welding;
- nuts or screws.
When choosing hinges and awnings for gates, consider the following:
- The noise level should be kept to a minimum. Ideally, the gate swings open without any noise at all;
- the leaf of the shutters should not sag;
- gate hinges must be durable and resistant to burglary;
- ease of rotation;
- opening width of the doors.
Cylindrical hinges
Cylindrical hinges with a ball (bearing) inside are perfect for standard swing gates that are light in weight. The maximum load on one industrial gate hinge should not exceed 400 kilograms. The maximum holding weight varies depending on the class of loop used. This should be clarified when purchasing.
Main types of cylindrical hinges
The internal filling of the loop is hidden by the body and looks laconic and attractive.
Reinforced cylindrical hinges
Reinforced cylindrical hinges with a ball allow you to hold sashes with greater weight, up to 600 kilograms. Externally, they differ from simple ones only in the presence of two additional fastening plates. Such fasteners allow you to divide the mass of the frame between the leaf and the gate supports.
Reinforced cylindrical hinges
To fasten such hinges you will need a welding machine or high-quality screws. Manufactured for right-hand and left-hand opening.
Through loops
If you cannot use screw fastening or welding, then through gate hinges are ideal for you. To fasten them, you will need to drill the gate support column and use screws or nuts. The disadvantage of such industrial loops is the small retained mass - up to 200 kilograms. Produced right- and left-handed.
Through loop
Overhead three-section hinges
Canopies for technical sectional gates are most in demand in the case of a large mass of leaves. They have earned great popularity due to the fact that:
- reliable and wear-resistant;
- take on the entire mass of the sashes and prevent sagging;
- open and close smoothly and quietly;
- the highest level of burglary resistance among all types of hinges.
Forged husks
Don't let the name scare you - these hinges are time-tested. Their designs are many hundreds of years old. Nowadays they are used primarily due to their attractive design. They can be made in the form of any shape. They look best with wooden and metal doors.
Materials and tools
To do the job well, you will need professional tools
In addition to the welding machine, you will need the following tools and consumables:
- welder's protective mask;
- measuring instrument: ruler, tape measure, building level;
- lubricant for hinges - grease or a composition similar in properties to it;
- An angle grinder will be needed to clean up welding seams and dismantle an incorrectly installed hinge group.
Support pillars are best made from a profile pipe of square or rectangular cross-section. This will ensure the reliability of the structure and facilitate the installation process of the canvas.
Beginning of work
The cylindrical shape of the hinges often makes inexperienced welders wonder: “Does this even weld?” It's cooking. Loops made from a hexagon or tetrahedron are actually more difficult to weld. Using the correct technology, the loops are first welded to special plates. It is advisable to do this on a flat horizontal surface, for example, on an anvil (at the same time, you can attach the “minus” of the welding machine to it). An essential requirement: the plates must be welded to the hinges with a continuous seam.
It is not difficult to choose a suitable size dress. We take into account the weight of the gate and the strength of the material from which they are made and determine by eye what length of welding seam can withstand the weight and not allow the door structure to deform. The plates provide a convenient working “platform” for welding work, and they also serve as distribution plates for the door leaf, which prevents the latter from “breaking” even with the overall heavy weight of the door structure.
Gate installation
Welding of hinges with already welded plates must be done permanently, having previously placed the gate in the “native window”. That is, the gate will have to be fixed “idle” and reach its required position even before the start of welding work. The position of the doors must be checked and double-checked as many times as the average first-grader knows the numbers - at least ten.
Welding work
After a thorough check of the location of the gates and the pre-measured and marked fields for the plates has been made, welding work can begin with the lower hinges on the posts. Vertical welds are the most difficult job for a welder. But thanks to the plates, even an inexperienced welder can handle them. Once one bayonet part of the hinge on the sash is welded, you can use a laser level to verify the correct location of its axis and to determine the exact location of the second bayonet hinge.
Completion
After carefully welding the bayonet parts of the loops on the pole, you will need to attach the inserted upper parts of the loops to them immediately with the balls. Then press the baited part against the door leaf as tightly as possible and continue welding work.
At the end of the welding work, the seams can be processed with a grinder.
This technology has been successfully used by all door installation services for a long time. It will not be difficult to do this yourself if you have welding skills and the necessary equipment with consumables:
- Metal door hinges;
- Plates/plates;
- Welding machine;
- Electrodes;
- Bench hammer;
- Welding mask, gloves and overalls;
- Bulgarian.
Please note that the gates must open outward, because if the gate opens inward during heavy snowfall in winter, this can become a big problem!
Video - creating swing gates
Video - installing garage doors
Completion
After carefully welding the bayonet parts of the loops on the pole, you will need to attach the inserted upper parts of the loops to them immediately with the balls. Then press the baited part against the door leaf as tightly as possible and continue welding work.
At the end of the welding work, the seams can be processed with a grinder.
This technology has been successfully used by all door installation services for a long time. It will not be difficult to do this yourself if you have welding skills and the necessary equipment with consumables:
- Metal door hinges;
- Plates/plates;
- Welding machine;
- Electrodes;
- Bench hammer;
- Welding mask, gloves and overalls;
- Bulgarian.
Useful tips for welding gate hinges
Incorrect fastening of iron hinges to gates leads to poor operation of the gates. Over time, they will have difficulty moving or may not be able to function at all.
To prevent such troubles, experienced professionals give several useful recommendations.
- When working with straight hinges, it is better to weld on a horizontally lying gate (the leaf can be placed on the ground).
- Before welding, it is recommended to make a backing 1/2 loop long. The part should be placed under the bottom of the loop, and the top should be grabbed from the end side.
- When attaching hinges to a round post, make an external allowance of 5 mm. When working with a rectangular support, fixation is carried out flush.
- Before final fastening, a rectangular block is placed along the hinges and the devices are corrected if they are crooked.
- It is better to weld with small tacks. Actions are performed twice and from all sides.
- Before fixing the hinges from the inside, it is necessary to check the ease of movement of the gate in weight. Incorrect operation is corrected by welding, soldering several points on the outside.
- To avoid sagging of the sashes, before the final welding of the hinges of the fabric, the stand should be closed and placed in the center.
While the hinges are hot, the gate does not open. The structure can be used as soon as the devices have cooled down.
Preparatory work
They start by welding the plates to the hinges. This step can be skipped if you are using ready-made canopies with mounting plates or when mounting them on round poles of small cross-section. The plates are cut from sheet steel using a grinder, choosing sheets with a thickness of at least 5 mm.
Before assembling the hinge, its internal part (the place where the bearing is located) is carefully treated with lubricant, and the area allocated for welding is cleaned of dust and rust. Cook on a horizontal surface. Two plates are laid side by side along the long side with a gap of 2–3 mm. Half of the canopy is placed on top, welded to one of the plates with a continuous seam. A similar operation is performed with the second half. The resulting seams are carefully cleaned.
Important: according to fire safety rules, welding work is carried out either on unpainted or fully painted, dry parts. Paint that is not completely dry can ignite from a spark.
Additional recommendations
Failure to comply with the requirements when performing welding activities can jeopardize the final result. To avoid this, just consider the following recommendations:
- Before assembling the hinges, you need to prepare and analyze a diagram showing the placement of the fittings. This minimizes the likelihood of redoing the work.
- Hinges with a straight configuration are best attached to gates placed on a flat surface.
- The gate may only be opened after the seams have cooled completely.
- On round posts the curtain is extended 5 mm outwards, on rectangular posts it is welded flush.
- The seam is made from bottom to top.
Varieties
Hinges allow you to smoothly open and close the gate without making a single sound
All types of loops can be divided into three groups:
- classic;
- decorative;
- hidden.
The first ones have a normal appearance, because the consumer encounters them quite often, since they are installed on entrance and interior doors. Even though we are talking about gate hinges, they are not particularly different. In this case, there is one aspect that plays an important role, this is the special treatment of the material, thanks to which the hinges will withstand any weather conditions.
Increased reliability is one of the most important characteristics during hinge production. This element must withstand heavy loads, because the gate is heavy and is also used regularly. Therefore, additional bearings are often installed to improve the data. You can often find hinges without ears on sale, since the consumer can independently weld them to the product, depending on the structure of the system.
Articulated
Hinges are in great demand and this can be reasonably explained. They allow you to easily and smoothly guide the gate and are resistant to breakage, which is an important indicator. Some of the hinges of this device are designed for installation on large gates, as they can withstand heavy loads. Spontaneous opening and closing is excluded if the structure itself is installed correctly and this fitting option is selected.
For the manufacture of hinges, durable and reliable metal is used, which has excellent performance. Heavy gates will last a long time with this installation.
Hidden
They resemble classic ones, but the main advantage is their increased burglary resistance, and for many this is the main indicator. Removing such gates will be problematic and will also take a lot of time.
Decorative
According to the principle of operation, they do not differ from the classic ones, but they look more aesthetically pleasing and can emphasize the design of the gate installation. Hinges can be antique, forged, or in a certain style. Welded structures are strong, reliable and provide safety.
teardrop-shaped
They take their name from the shape of the bearings, which are an integral part of the structure. Such hinges are in demand during the installation of garage and entrance gates, steel doors and even safes. Thanks to the teardrop shape, the problem of uneven movement is solved, so if you have heavy swing gates, this option will be one of the best. When opening, you will not hear creaking or noise, the structure will move smoothly.
Cylindrical
They are suitable for a massive frame where strength and resistance to heavy loads are required. They have support bearings that do their job for a long time. In such hinges the crown will be hidden in the body.
Adjustable
This type of hinge is distinguished by its ability to be adjusted, which is an indispensable advantage in certain situations. Thanks to them, you don’t have to worry about the sashes jamming. As for the cost, it all depends on the variety you have chosen, as well as the manufacturer, because everyone sets their own prices.
Pros and cons of swing gates
Among the advantages of gates with a swing structure, the following should be noted:
- Simplicity of design. It is quite possible to make it yourself. It is enough to use a sheet of metal, a metal profile or fasten boards together to get gate leaves;
- Convenience. It lies in the fact that due to the simplicity of the design, you can always open your gate. They extremely rarely jam or otherwise break;
- Wide selection of locks - any will do, you can even use a simple bolt;
- Possibility of easy automation;
- Long service life;
- Possibility of adjusting the opening of the valves;
- Low cost.
How to properly weld hinges on gates - procedure
Garage doors are an indispensable element of any garage, which performs both a protective and decorative function. When installing gates for a garage or other purposes (for example, for a yard), the question almost always arises of how to weld the hinges onto the gate so that it serves you as long as possible.
Correct welding is of decisive importance, because incorrect formation of the weld and various other defects can significantly reduce the strength and reliability of the entire structure, and also affect the reduction in the service life of the gate. How to ensure the security of property in your garage (you can install a lock for this) and ensure the correct installation of door hinges? This detailed guide to action will definitely help you.
Rules for caring for garage hinges
The main wear of garage door hinges occurs due to unevenly distributed load, negative external influences and untimely lubrication. To combat the effects of abrasion and corrosion, the following steps are recommended:
- remove the doors from the hinges and remove any rust that has formed;
- wipe off the old lubricant and remove dirt with fine sandpaper;
- treat the rotary axis with grinding paste;
- remove remaining paste with solvent and clean the hinge hole;
- apply a new layer of lubricant.
Properly selected hinges in size and material ensure a long service life. Timely maintenance of fasteners promotes ease of use and prevents rust.
Loop selection
The correct choice of hinges for metal gates. gates and doors should be based on several factors:
- determining and selecting the type of loop;
- determining the number and overall dimensions of the loop.
Types of loops
First of all, welded hinges differ in shape. They can be:
- cylindrical. A variation of this group is the welded drop-shaped loop;
- square. They are used extremely rarely. Currently practically not produced;
- hexagonal.
The main types of welded loops, differing in shape
Experts recommend choosing cylindrical or teardrop-shaped hinges, since this type is the easiest to install.
All welded hinges can be additionally equipped with a ball that acts as a bearing. The ball makes it easier to open the door and reduces friction, which negatively affects the life of the fittings.
Welded hinge equipped with a ball bearing
Also on sale you can find reinforced welded hinges, which are used for installation on a metal door of large size or weight. Additional plates allow you to evenly distribute the load on the hinge, which increases the service life of the product.
Welded loop complemented by metal strips
The most optimal option for a welded loop is a cylindrical ball loop, supplemented with strips. It is this kind of fittings that will serve for a long time without unnecessary problems.
Classification of products according to GOST
Manufacturers produce hinges in a wide range. To select a product, they use GOST, namely a table that shows the technical parameters of the product. GOST (state standard) is the main document by which the dimensions, weight, load, shape for each type are determined.
According to GOST they are divided into the following types:
- cylindrical;
- cylindrical reinforced;
- end-to-end;
- secret;
- three-section overhead;
- invoices.
Uniform weld seam