Installing the door leaf involves attaching the hinges, which are holders. To carry out the work without damaging the door, experts recommend using special templates. In addition, each door is equipped with a lock, the installation of which can also cause problems for an inexperienced technician. A lock template can make installation much easier. What kind of equipment is this and how to make it yourself, read on.
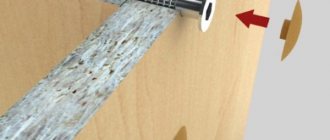
Ready-made tool for inserting various locks and hinges
What kind of router is needed to install a lock?
The insertion of hinges and locks requires samples of very different sizes. For loops – shallow, according to the thickness of the loop web. Under locks – a large and deep selection. Therefore, professionals who install doors most often use two different routers:
- easy to select for hinges;
- powerful with a large cutter for selecting fits under locks.
When choosing a router for inserting locks, the first thing to determine is its ability to complete the task, that is, to reach the bottom of the planting in depth. The following milling cutters are suitable for this:
- cutter stroke from 70 mm and above;
- shank size (collet fit) 8-12 mm, preferably 12 mm;
- cutter length from 110 to 130 mm.
As a rule, milling cutters with such characteristics in terms of immersion depth have a power of more than 2 kW and a weight of about 6 kg. They easily cope with the task, but they are not very convenient to work with due to their large dimensions and weight. Therefore, other, lighter options are selected with the same depth indicators, which are convenient to choose for locks and hinges.
As an example, BOSCH GOF 1600 CE PROFESSIONAL:
- electric motor power -1600 W (1.6 kW);
- cutter speed - from 10,000 to 25,000 rpm;
- the amplitude of the cutter's stroke up and down is 76 mm;
- replaceable collets for cutters with shanks - 8 mm, 10 mm and 12 mm;
- weight 5.8 kg.
There are models with characteristics suitable in depth with the same or greater power, up to 2.5 kW, and from many other brands.
A more powerful and heavier router is less convenient for such work due to its greater weight and dimensions, but it copes with the task more easily, since when cutting deep niches for locks and latching handles, the router experiences significant loads.
To limit the sampling depth, an adjustment stand with three screws at different heights is used. This function is available on almost all models, so when choosing it it is not highlighted as special or separate.
Installation
Having screwed one part of the hinge to the door leaf with self-tapping screws, proceed to inserting the other part into the hinge beam. Different masters carry out this stage in different ways.
- First way . Mark the location of the hinge on the box until it is inserted into the opening. To do this, place it on the floor, place the door leaf inside and, taking into account the upper gap of 3 mm, mark the location of the hinges.
- Second way . When the box is inserted into the opening, the door is placed against it, placing stops underneath. Align to the desired height, taking into account the upper gap, and mark the loops in this position.
- Third way. Although experienced craftsmen do not shift the loops from the originally made marks during the insertion process, they still measure the location of the cards embedded in the canvas just in case.
- The measurement is taken from the top edge of the fabric to the beginning of both loops. For example, the top edge of the top hinge is located 20 cm from the top edge of the door, and the top edge of the bottom hinge is 170 cm from the top edge of the door.
- Then marks are made on the loop beam for the upper edges of the second parts of the loops. In this case, 3 mm is added to the obtained values for the upper gap. In this case, marks are placed at a distance of 20.3 cm and 170.3 cm, respectively.
- Draw arrows indicating in which direction from the mark to embed the loop. Both arrows will point down, as the top edges of the loops are marked.
- Then the second parts of the loops are cut in according to the same pattern.
- This method is convenient when the master works alone and there is no one to help him hold the canvas for method number 2.
Which cutters to use
To insert a lock into an interior door, groove end mills with a cutting edge on the sides and end are used.
There is a specialization - cutters designed specifically for this operation. They meet the requirements for the depth and width of the cut, the cutters are made of hard alloys (type VK8), which equally well select grooves in wood of any hardness, MDF, plastic and composite materials, and cut through laminate well.
These cutters are available in different sizes. Average values:
- height of cutting knives 30 mm;
- diameter of the working part of the cutter is 12 mm;
- total length of cutter 120 mm;
- shanks in three options - 8 mm, 10 mm and 12 mm.
When the cutter stroke on a router is 70 mm, such a cutter can select a groove for a lock with a depth of about 90 mm.
Large cutters are also available:
- working part diameter 16 mm;
- total length 130 mm.
Their cost fluctuates around 1500 rubles, plus/minus 300-500 rubles. But there are copies costing only 150-500 rubles. and over 3000 rub.
The leaves of many modern doors made of MDF, blocks (not solid wood) may have a small thickness of the side bar into which the lock cuts. For example, 50 mm, beyond which the void begins. For such doors it is not necessary to use long cutters with a large cutting depth.
Common mistakes
- Incorrect determination of the door opening/closing direction. This is an important initial stage that needs to be treated with great care.
- If you mix up the parts of the detachable hinge, the part with the rod will be at the bottom and the door will not be able to hold on.
- Marking on the hinge beam without taking into account the upper gap. If you do not provide a gap of 3 mm and measure 20 cm from the top of the counter, then the door will rub against the top bar and close with difficulty.
- A too tight fit of the hinge cylinder to the door leaf leads to poor closing of the door.
- Screwing in self-tapping screws without first drilling a hole for them. In this case, the canvas may crack and split.
- Installing the loop and fixing it with self-tapping screws at the location of the knot. You cannot screw screws into a knot, because the wood in this place may crack. If a knot is found on the canvas, then the loop is slightly moved to a safe place.
If you follow the recommendations and pay attention to possible mistakes, even a novice master can install a mortise hinge.
Templates
One-time work can be accurately completed without special complex templates, using only a parallel stop, which limits the displacement of the cutter beyond the markings to one side.
But for professional work with large volumes, special templates are often used. These can be either sets of templates for different configurations of fittings, or universal ones with adjustable sizes.
Both homemade and factory-made ready-made options are used.
An example of the design of one of the factory templates:
The device makes it possible to install and move the router in the position required for sampling exactly in place.
Example of homemade templates:
It makes sense to make such a device when there is a large amount of work to be done.
How to install a lock on an interior door
Inserting a lock into an interior door always begins with markings. To prevent the cutter from tearing out the edges of the laminate, the slot location is sometimes covered with masking tape and markings are made on it. Or cut with a sharp knife.
The selection for locking is done in 2 levels:
- a small sample for the overlay strip, to the depth of its thickness.
- deep sampling under the body of the castle itself.
First, the height of the lock is determined. Then a lock is applied from the bottom mark upwards, and marks are made along its cover plate.
The markings for the lock itself are applied after a small sample has been made for the overlay strip. The markings for the lock itself are done like this:
- The center of the door leaf is located in thickness. For example, if the thickness is 37 mm, the center is marked 18.5 mm from the edge.
- The thickness of the lock is measured. If it is 18 mm, 9 mm are marked on both sides from the center of the canvas.
- Several such markings are made, then they are connected by a line of a pencil or marker.
The length marking is made according to the actual size of the lock, it is applied and the markings are made according to the fact.
Instrument setup
The setup is carried out two times:
- For shallow cutting under the lock trim plate, the cutter extends beyond the support platform to the thickness of this strip. For example, 2 mm. A parallel stop is set so that the cutter cannot go beyond the edge of the marking on one side, but follows exactly along the marking. The second marking line when cutting without a template is controlled manually, visually.
- After shallow sampling, the cutter is released to the required depth under the deep sampling, under the lock itself.
An approximate progress of work on such an insert can be seen in the following video.
It is approximate because the marking sequence is different here - all the markings for the overlay plate and the lock body are applied at once. But after selecting a niche for the bar, the markings for the lock itself are removed. Therefore, it is better to adhere to the markup order described above:
- Marking for the bar.
- Sample.
- Marking for the lock itself.
Selecting a lock using not just one parallel stop, but a double-sided adjustable template is shown and understood from the following video:
Features of working with different types
Installation differs depending on the type of fittings. Types of mortise hinges :
- detachable;
- universal.
Detachable hinges are easier to install, since the two parts are installed separately, after which the door is hung. This type is used when you have to frequently remove the interior door, for example, when moving furniture. Divided into left and right. When purchasing them, you must take this point into account. Detachable hinges require clear markings, without the slightest errors.
It is more difficult to install a universal hinge, since the hinge is fixed to the box after the second part is secured to the canvas. Therefore, the door must be held in weight or use stops. This type is one-piece. If you need to remove the door, you will have to unscrew the hinge.
According to the installation method, mortise hinges also include hidden hinges. It can be difficult for a non-professional to install them, because the body with a hinge is placed inside the canvas. Using a router, a deep seat is made. Installation requires extreme precision.
What cutters should I use to install hinges?
The hole for the hinges can be made with the same large cutter as for the lock. But, as a rule, groove cutters with a cutting edge at the end and sides of a smaller size than for a lock are used for this.
A special loop cutter looks like this:
It has a shorter shank and a wider cutting part than the locking cutter.
Professionals who have to work with dozens of doors every day use not only a separate cutter for hinges, but also a second lightweight cutter. On it, the required depth is set once according to the thickness of the hinge, and there is no need to change the adjustment for the lock and back for the hinges each time. This speeds up the work.
Marking
The location of the upper and lower hinges is marked on the door leaf.
To do this, use a tape measure or ruler to measure 20 cm from the top and bottom edges. To avoid mistakes, craftsmen draw an arrow indicating where the loop will be directed from the mark. The arrows are directed towards the center of the door end. Place the loop map against the mark and trace its outline with a sharpened pencil. The hinge part must not touch the door leaf.
It is not recommended to simply measure the length and width of the card and draw a rectangle with this data on the end, since the card may not have a strictly rectangular shape - it may be beveled or trapezoidal.
The loop will fit perfectly into the groove made along the contour. In order not to confuse the loops during installation, they are signed with a marker B (top) and H (bottom).
How to embed hinges with your own hands
Setting up a router comes down to two steps:
- setting the cutter to the required depth according to the thickness of the loop;
- if the sample is made with fixtures, install a parallel stop or a double-sided template to the required dimensions, exactly according to the width of the sample.
The cutter can be easily adjusted in depth using the following technique:
- The clamp for fixing the platform in height is released, and the router is placed on a flat surface.
- A loop is placed on the platform strictly horizontally (without lifting due to the bushing).
- The router is lowered so that the cutter touches the loop.
- The position is fixed.
The loop can be placed not under the cutter, but on the depth limiter regulator on the platform, then everything is the same.
The loops are placed at the location. The main thing is to maintain the alignment of the loops, the axes must be on the same line. If the hinge axes are fixed crookedly relative to each other, when opening/closing the door the hinges will break off, the door will open tightly or not close completely.
To control alignment, you can use a flat corner or block, the length of which is enough for 2 loops. The dimensions to the edge of the door leaf at both ends of the marking are also verified, that is, both hinges must be strictly parallel to the door leaf and located at the same distance from the edge.
The contour is marked by cutting through the perimeter with a sharp chisel, mounting knife or chisel. A deep slot is desirable, then the laminate will not tear during sampling. The marking must remain on the canvas, since it is initially applied outside the loop.
There are loops with rounded and right corners on sale. The cutter leaves a semicircle at the corners of the sample. If the loop is rectangular, the roundings at the corners of the sample are selected using a chisel.
Ideally, the loop should not dangle in the niche, but should sit tightly under light blows of the hammer.
The fit on the door frame (post) is marked and selected in the same way. The whole process can be seen clearly and clearly in the video below; it shows the complete insertion process, and sampling on the box (stand) starts from the 15th minute.
If the canvas is several mm shorter than the rack (permissible gaps), the difference is divided in half at the top and bottom. That is, after installing the door in place, there should be equal gaps at the top and bottom of the door leaf, for example, 2-3 mm.
As a result, a manual electric router is a modern tool that is great for inserting locks and hinges into interior and other wooden doors. The master’s task is only to correctly set the milling depth, guide and hold the cutter within the markings.
Inset
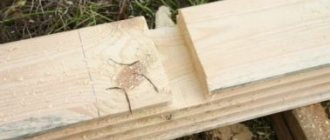
The hinges are cut in stages:
- Use a sharp knife to cut the outline. If the coating is laminate, then it is removed with a chisel inside the cut out contour. It turns out to be a small step. Then, when working with a chisel, the tool will not come off; it will be buried and rest against the step.
- If veneer is glued, then it is carefully removed from the area under the hinge. If you do not cut through it first, then when working with a chisel, you can unwittingly damage the veneer in adjacent areas and accidentally tear it off.
- In order to find out the depth of the future groove, place the loop card sideways to the end and draw a line with a pencil, noting the thickness. It is to the thickness of the metal that the recess will need to be made.
- The chisel is placed against the edge of the recess, resting it on the “step”. In this case, the short side of the working part is directed towards the material being produced. By hitting with a hammer, the material is sampled to the required depth.
- After making the sample, attach a map and use an awl to mark the locations of the screws. In this case, the center is slightly shifted in the direction opposite to the loop cylinder. Later, the screw with its head will move the loop towards this edge and the loop will fit most tightly.
- Use a thin drill to drill holes for the screws. It is not recommended to screw them directly into the door, as the door leaf may split.
- When placing a hinge in a gap, many craftsmen advise not to bury the card flush, but to leave a protrusion of the card of about 0.5 mm. This is done so that the door can be adjusted during installation by recessing the hinge a little deeper and leveling the gaps.