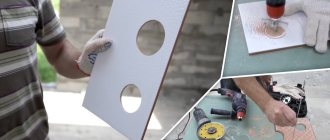
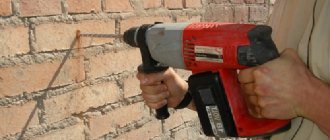
When carrying out home renovations, you often have to make large diameter holes in tiles. These could be niches for installing sockets (switches) or passages for laying plumbing pipes. Unlike porcelain tiles, tiles are not as difficult to process, but when drilling, care and special tools are required. You can use crowns (similar to drilling porcelain stoneware, concrete or even drywall).
However, such a tool has certain disadvantages:
- crowns are produced to a certain diameter, to drill various holes you need to have a complete set, and this increases costs;
- During operation, a lot of heat is generated (a high contact area increases friction);
- the crown throws out incomparably more dust and debris; this should be taken into account when working in a room where the finishing work has been completed and furniture has been installed.
Ballerina on tiles
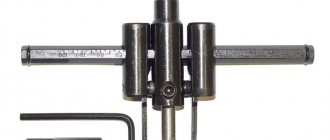
Therefore, experienced craftsmen use a circular drill for tiles - in common parlance “ballerina”. Structurally, the tool is similar to a compass. The center point (also known as the axis of rotation) defines the center of the hole, and the movable part rotating around the axis defines the radius. Ballerina on tiles has two working elements. The central (axial) element is nothing more than a feather drill without chip outlets (they are not needed when working with tiles).
This part performs two functions: centering (the tool should not move during operation) and holding the moving part at a set distance from the axis of rotation. The main axis is made of mild steel, and the cutting edge is made of hard alloys: most often it is victorious.
Tool working surface
The pen tip should protrude 4-8 mm in relation to the cutting edge of the moving part. This is due to the need to first go deeper into the surface of the workpiece (to be fixed on the drilling axis). After which the asymmetrical cutting edge will work strictly along the line of the circle, and the tile drill will not jump off the markings.
The moving part consists of a fastening mechanism (without the possibility of axial movement along the central element), an external lever with which the radius of the hole is determined, and a cutting edge.
The main cutting element is made in the form of a tip made of a hard alloy (possibly diamond or corundum coating) of a special shape. The edge of the outer radius must be perpendicular to the plane of the workpiece.
This ensures relative accuracy of the hole size. The inner edge has a bevel of up to 45° for efficient removal of waste from the work area. The sharpness of the edge is the same on both sides of the tip, while the inner (beveled) part experiences increased stress.
The tool is essentially disposable, since it is impossible to sharpen the carbide tip at home. However, there are samples for intensive use that are equipped with a replaceable nozzle.
This design allows you not only to save on work (the tip costs less than the whole device), but also to change the cutting element depending on the type of material.
The tool can be equipped with additional equipment - a protective basket. It keeps drilling products (especially large fragments) in the work area, preventing debris from flying around the room.
In addition to its main purpose, the device helps keep the axis of the ballerina perpendicular to the tile.
How to prepare to drill out tiles
What can make working with the material more difficult? Let's remember how it's done.
Material characteristics
The innovative specifics of the process involve firing at high temperatures.
Also, the material has a high density and has a particularly hard (especially if there is glazing) surface, while it is characterized by specific fragility.
The material does not have plasticity, and due to this, if not handled very carefully, drilling and cutting, it can crack, form chips and even fall apart.
Moreover, the hard surface has an abrasive effect on cutting tools, rendering drills unusable and dull in a short time.
Rules for drilling tiles
Because of this, it is very important to follow a number of specific rules:
- tiles do not like vibration influences,
- tiles are afraid of heavy loads,
- tiles do not like excessively revving modes of drilling tools.
It follows that you need to use special drills made of heavy-duty materials that can easily overcome solid structures. They must also contain a specific sharpening and configuration.
Preparing the tools
What you need to drill out tiles from tiles
without loss?
A good screwdriver with a fairly powerful power source. Sometimes such a tool is completely sufficient. Electric drill with speed control option.
The simplest, already forgotten by some, hand drill . In most cases, it is completely sufficient for making small and not very deep holes. Moreover, there will definitely be no problems with adjusting the rotation speed. In most cases, even a regular brace is used.
Special devices - jigs : they can be used to make the process easier for drilling straight holes. Using suction cups, they are fixed to the surface, preventing the drill, especially at the beginning of work, from moving to the side.
Specialized superchargers . At low pressure, they supply water to the workplace, which cools the hot tool.
Drill
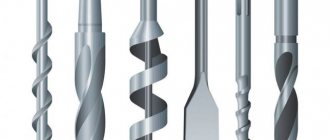
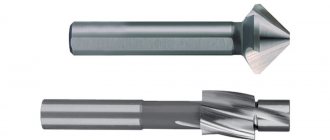
Special spear-shaped (feather) drills designed specifically for tiles. They are convenient for making holes of medium and small diameter (for dowel fasteners).
For good clamping in the tool chuck, the tool is equipped with a cylindrical shank. Drills with a hexagon are produced to suit the size of standard bits - they are used when working with a screwdriver.
In an ordinary tile, such a drill can make on average no more than thirty holes before it fails. If you have to work with ceramic granite, then this figure is reduced to two or three pieces.
Core drills with corundum or diamond coating , which are included in the category of professional tools: they will work perfectly not only with tiles, but also with ceramic granite.
Such drills are like a hollow tube, thus significantly facilitating the work process. Waste is removed through the cavity without interference. In most cases they are made to make very large holes.
Ballerina drill . Can be used for one-time work when it is necessary to make a hole of significant diameter. It has a low price and easily copes with the established task.
Drills with heavy-duty carbide tips . This option is not one of the most successful, since difficulties may arise when passing the mechanism through the top, very strong tile layer. They are more suitable for deepening holes that have already been made by other nozzles.
Carbide very durable drills with acute angled one-sided sharpening . They pass through the hardest layer located on the outside of the tile perfectly. Products of this type, made by a good manufacturer, will last a very long time.
Reminiscent of those just mentioned, tungsten carbide coated drills . They are used not only for drilling ceramics; they can also be used on hard materials of natural origin, such as granite and marble. They are mainly sold in sets of different diameters and are used more often by specialists.
Method of drilling holes with a ballerina
Please note:
Before starting drilling, when the intended hole is marked, mark the drilling center mechanically. For this, a regular drill is used. The ballerina may slip on the tile (at the first touch) and scratch the tile.
The use of hammer drills is prohibited. If you have a multi-mode drill, the hammer function should be disabled. It is recommended to immerse the workpiece in water in advance. There will be no harm to the tile, and there will be much less chipping and dust.
In principle, there are two ways of drilling: before laying the tiles, and on the finished tiled surface.
Drilling individual tiles
The workpiece is placed on a flat surface. The thickness of the backing should allow the center drill to deepen 4-8 mm relative to the main cutting element.
You can hold the tiles with your hands, although it would be better to secure them with clamps. You must be prepared for the fact that after the ballerina passes through, the cut out circle will rotate freely. For control, it is recommended to periodically stop the process and check the depth of the cut.
Drilling a hole in the tile with a ballerina with a basket - expert advice
Device Features
The ballerina got its name due to its external similarity, because it consists of a central stabilizer and a drill that passes through the stabilizer on the side and exits through the other side. The device looks like a compass and actually works the same.
However, the ballerina alone will not be able to make the required hole of a certain diameter in the tile. To do this, you will need a regular drill and suitable tile drills.
How to drill a small hole
To cut small holes, you need to mark the tile and select a drill bit. The most convenient option would be a drill with a diamond coating , but such devices are not cheap. A spear-shaped drill with a Pobedit tip can be a replacement. Its feature is an arrow-shaped tip , thanks to which the drill does not slip on the smooth surface of the tile. A sharp cutting edge reduces the contact area, so less pressure on the drill is required, which means there is little risk of cracking. As a last resort, it is permissible to use a well-sharpened ordinary concrete drill , but working with it requires precision and accuracy.
Before starting work, stick a piece of masking tape in the area of the future hole - this will help fix the drill and prevent slipping.
At the beginning of the process, while the drill is passing the surface layer of the tile, the drill should operate at the lowest speed . When the drill penetrates the thickness of the tile, the speed can be increased. strictly forbidden to use the shock mode - this will immediately lead to the formation of cracks. If, after drilling the tile, it is also necessary to drill into the concrete wall on which it is attached, then the drill must be changed to a drill for concrete and continue drilling with it. Here it is already allowed to turn on the drill at high speeds and use the impact mode.
Making a ballerina cutter
A ballerina drill significantly saves time when processing (milling) the contours of a cut hole. Processing is carried out automatically using power tools (drill, hammer drill).
Therefore, the physical effort expended when working with a ballerina is also insignificant. Given these advantages, home craftsmen want to have such a tool in their workshop. Moreover, making a ballerina with your own hands is not at all difficult for a competent craftsman.
For this you will need materials:
- Working (metal) plate with dimensions 200x25x4-6 mm.
- Bolts: M8 grade - 2 pieces (in addition to them you need to take 2 nuts and 4 washers) and M10 grade - 1 piece (in addition to them you need to take 2 nuts and 1 washer).
To work you will need tools:
- To mark the work surface: a marker and a ruler with centimeter divisions.
- Painting tape.
- Stationary machine or power tools (hammer, drill).
- Vise.
- File.
- Kern.
- Grinder equipped with grinding and cutting discs.
- Drills for metal with a diameter from 9 mm to 10.5 mm.
- Keys: open-end and adjustable.
- Screw clamps.
Step-by-step instructions on how to make it yourself
- Marking and processing of the work plate.
- Creation and processing of working grooves.
- Manufacturing of cutters.
- Connection of cutters to the working plate.
- Marking (gradation) of the finished drill.
- At the first stage, we cut a 20 cm long strip from the metal sheet. This will be the basis of the tool being created.
- Using a drill with a diameter of 10.5 mm, we drill a through hole on the machine in the pre-punched center of the work plate.
- Stepping back 1 cm from the drilled hole to the edges of the working plate (at the same level as the central hole), we make marks (punch) on the plate for future drilling.
- The distance between the marks must exceed the diameter of the holes that will subsequently be drilled. This precaution will help preserve the drill.
- Using a grinder cutting disc, you need to create two oblong grooves by combining the existing holes. The working plate is in a vice during this operation.
- Using a file (square or flat), we process the resulting holes. The free movement of the incisors will depend on the thoroughness of this operation (we remove irregularities, hangnails, and tubercles).
- Pressing the work plate tightly against the table (we use clamps or a vice), we smooth out all the irregularities and sharp corners with a grinding disc. We insert an M10 bolt into the central hole and screw one of the nuts onto it from the reverse side.
- We put the second nut (lock nut) on it and press it tightly using an open-end (or adjustable) wrench. To make the cutters, we wrap the upper parts of the M8 bolts with masking tape. We fix the bolt heads in a vice.
- Using a grinder's grinding disc, we cut off the thread, processing the bolt on both sides until a metal handle 4-5 mm thick is formed.
- The pointed ends of the bolt, shaped like a one-sided hook, will serve as the working cutters of the drill. The resulting cutters must be inserted into the grooves, having previously been laid with washers on both sides.
- This will increase the area of their contact with the working plate.
- The rod of the future tool and the cutters should be located in opposite directions. The thread sections remaining on the side surfaces of the bolts will allow you to screw on the nuts and secure the cutters tightly.
- Using a ruler and a marker, we mark the entire plane of the working plate, making marks every 0.5 cm. Later on these marks it is necessary to make notches that will be clearly visible during operation.
How to avoid splitting tiles when drilling
- To calculate the place where the drilling will take place, it is necessary to retreat from the edge of the tile at least 15 millimeters. In this case, the risk of chips and cracks will be minimal.
- Before you start drilling into the tiles, you need to soak them in water for about 30-60 minutes. This is, of course, if the tiles have not yet been laid. The tile will absorb moisture, this will help avoid small chips.
- It is also recommended to constantly moisten the drilling site with water; this additional precaution will help avoid splitting and replacing a piece of facing masonry.
- The best option is a hole in the seams between the tiles.
How to use a ballerina correctly
First of all, it is worth noting that all work in this case is carried out exclusively on the front side of the facing material.
- First of all, you need to measure a point on the tile that will mark the middle of the required hole.
- Next, you need to use a drill with suitable drill bits, drill at the indicated point about 2/3 of the total thickness of the tile, at this stage you will need to remove the tile drill.
- Instead, a ballerina is installed, the central stabilizer of which is installed in a pre-drilled, blind recess in the tile.
Thus, using a drill, the ballerina is used as an attachment, with the help of which it is possible to carefully make a hole of the required diameter. All you need to do is put the stabilizer in the right place and start the device.
Adjustable tool overview
Ballerina – adjustable drill. One of its structural elements is a bracket with a scale printed on it. With its help, you can independently set the required diameter. And in a three-cut drill, the cutting elements move synchronously along special grooves.
Before starting work (drilling), it is necessary to set both cutters at the same distance from the central hole.
Drilling with a tungsten bit
This method can also be used when the tiles have already been laid.
- For convenience, we recommend using a special template, due to which the crown will not slip or move.
- We press the template against the wall.
- We do not press too hard with a drill with a crown and make a hole at low speeds, gradually increasing it a little.
Drilling tiles for a socket or pipe using video
How to drill tiles for dowels
- Where we will drill, we need to stick masking tape.
- Using adhesive tape, mark with a cross the point where we will drill.
- Insert the required drill bit into the drill or hammer drill.
- At low speed, drill a hole in the ceramic tile.
- After drilling the tiles, you should replace the drill with a regular one for concrete. Select the drill size according to the dowel size.
Advice! To drill a hole of a certain depth, simply measure the required distance on the drill and make a mark at this level.
- Drill the hole all the way, the drill can be put aside.
- Now it is better to blow out the hole so that there is no huge amount of concrete dust left there.
- Then we insert the dowel into the hole and you're done.
This way you can drill a hole with a diameter of up to 12mm.
Drilling tiles using video
Specifications
Carbon steel is used to make the device. It is an alloy of carbon and iron. The amount of carbon determines the strength of the tool, its ability to resist load. For greater wear resistance, less sensitivity to overheating and deformation, some manufacturers add chromium, silicon, tungsten, vanadium, and molybdenum to the alloy. For example, the P6M5 marking indicates that the steel from which the cutter or drill can be made contains 6% tungsten, 5% molybdenum, this increases strength.
For strength and increased service life, the drill tip can be tipped with carbide. Such devices give a cutting depth of 30 mm, and without soldering - 25 mm.
Comfortable operating speeds for the tool will be from 1000 rpm to 1400 rpm.
The ballerina, depending on the functional accessory, makes holes whose radius ranges from 20 to 150 mm, while the diameter of the cut circle will be 2 times larger. For example, using a tabletop drilling machine or drill, a ballerina for metal allows you to cut or drill holes in metal with a radius from 22 to 105 mm. The thickness of the material being processed should be up to 14 mm. The material can be steel, cast iron, brass, bronze, aluminum.
Types by number of incisors
The design of a ballerina is influenced by the number of incisors with which it is equipped (their number can vary from one to three).
- The design of ballerinas equipped with one cutter has a special adjustable bracket with a tightening screw. To start working with such a tool, use a bracket to move the cutter to the required distance from the axis of the central drill, and then fix its position using a tightening screw.
- The cutting tools of two-cut ballerinas are also located on a bracket, which is motionless. Adjustment of the position of the cutters relative to the axis of the central drill is ensured by movable holders on which clamping screws are installed for fixing the cutting tool. The position of each of the incisors of such a ballerina is set separately, and, of course, their distance from the axis of the central drill must be the same.
- The three-incisor ballerina for tiles and ceramic tiles has the most complex design. The basis of such a tool is a round disk-type platform, in special grooves in which the cutters move. A special scale applied to the body of the device platform in the area of its grooves allows you to accurately set the position of the cutters and, accordingly, obtain holes of the required diameter. The movement of all three cutters of such a device is synchronized, which allows you to quickly, easily, and most importantly, accurately set the position of each tool relative to the axis of the central drill.
The protective basket on some instrument models protects against flying fragments
Modern models of one- and two-incisor ballerinas are also equipped with a scale for determining the exact position of the incisors relative to the axis of the central drill. It should be borne in mind that the accuracy of the holes obtained by a ballerina with such a scale is much higher than when using a simpler tool.
It is necessary to choose a ballerina of a more complex design in cases where it is necessary to drill a large number of holes in ceramic or tiles. A tool equipped with multiple cutters not only improves the productivity of the drilling process, but also creates holes with higher accuracy.
What is the problem
Porcelain tiles and tiles have a working surface of increased rigidity. Because of this, a regular drill (for wood or metal) can damage the tiles. Common mistakes leading to splits and cracks in tiles:
- Marking using rough objects (nails, screwdrivers, chisels)
- Drilling at high speeds.
- Using the shock mode.
- Using the wrong drill.
In order not to spoil the facing material and to work more efficiently, it is necessary to follow the correct technique and use a special tool.
How to choose and what to pay attention to
Choosing a high-quality circular drill is quite easy
The main thing is to know the main points that you should pay attention to first, but also not to lose sight of the little things
The design is a very important point: a wood ballerina comes with one chisel or two or more. For frequent use, it is better to purchase an option with two or three cutting elements. It is easier to work with such devices and the quality of the processing performed will be at an acceptable level.
It would not be superfluous to be able to replace individual parts. Inexpensive circle drills can have a solid shank with a permanent center drill and rod.
Metal, its quality determines its strength and ability to withstand workloads. High-quality tools are made from high-strength steel or alloys. The shank and cutter holders are shaped using a machine tool. The rod is usually stamped and made of the same metal.
Cheap options often use soft metal or alloys, which can be brittle. Under load, parts may become deformed or break. Such a tool will not last long and it will also be difficult to achieve accuracy from it.
The quality of workmanship, the main feature is the absence of backlashes and distortions. All parts must fit together and be securely fastened with fixing screws.
The markings of a high-quality ballerina's barbell are stamped. Sometimes the divisions are highlighted with bright paint for better visibility.
Cutters and high-quality cutting elements are made from hardened tool steel. They are secured to the holders with rivets or soldering. Solid cutters with holders (made of the same metal) quickly become dull and are not durable.
Manufacturer, when choosing any tool and consumables, preference should be given to well-known and long-proven brands and brands. The most common are Topfix, Stayer, Irwin, Strum.
Purchasing an adjustable circular drill for use at home, or if you need to drill several holes, is completely worth it. This eliminates the need to purchase an expensive tool that may only be needed a few times.