How to make a tongue and groove with a hand router
To make this tenon joint, we will need the router itself and the work table.
To facilitate the process, you can make an additional device such as a conductor. The procedure is as follows:
- We install two slatted stops on a plywood sheet, cut out holes to suit the size of the groove for the drawer and the leg. Rack stops must be secured across the width of the router. They fix it across the working plane. To fix the longitudinal displacement, two other stops are placed at the ends of the intended location for installing the joinery machine.
- To move the workpiece along its length, we mount a pair of bars to the tabletop that correspond to the dimensions of the workpiece.
- We mark the axis and dimensions of the grooves. We install the additional device so that the markings on the workpiece and the jig completely coincide.
- It is necessary to set and secure the stop.
- Secure the jig to the bars using self-tapping screws.
- It is necessary to take a straight cutter and set the milling depth, taking into account the thickness of the manufactured jig. After this, you need to fix the workpiece with a clamp and process the groove.
- For small production volumes, it is best to do this on a circular machine.
- First you need to measure the depth of the groove, which will correspond to the length of the tenon.
- We measure the resulting value on our workpiece. The length of the tenon will be determined by the difference between the width of the workpiece and the length of the groove, the height of the workpiece and the width of the groove, divided in half. The resulting material residues should be removed to obtain a spike.
- After this, you should set the size on the machine equal to the length of the groove, taking into account its width. The circular saw should be fixed at a level equal to ½ the difference between the width of the workpiece and the length of the groove from the tabletop line. Make a couple of cuts along the length of the tenon.
- We fix the saw blade at a height equal to ½ of the difference in the heights of the workpiece and the width of the groove from the tabletop line. Two cuts are made from the end of the workpiece.
- Let's start sawing. To do this, it is necessary to fix the circular saw to the length of the tenon, and the distance from the disk to the stop should correspond to a value equal to ½ of the difference in the width of the workpiece and the length of the groove. We make two cuts along the width of the product on both sides.
- We adjust the distance from the cutting disc to the stop. It should be equal to a value equal to ½ of the difference between the heights of the workpiece and the width of the groove. We make two slits. We round off the edges of the resulting tenon with a carpenter's knife and sand it with sandpaper.
Tenon cutter for router
Tenoning templates come in a variety of configurations. They serve to facilitate the work of cutting joints such as tongue and groove, as well as to speed up the work. With their help, you can make frames, box joints, and cut out various joints for furniture. The size of the groove, as well as the evenness of its edges, will depend on the shape of the template tooth. To make a tenon cutter with your own hands, you will need guides, with the help of which you will mill the tenons. They should be mounted on two opposite sides of the housing in a checkerboard pattern, located equidistantly. If these conditions are met, they will fit together perfectly.
Dovetail wood cutter
They are most often used in conjunction with milling machines and machines for making grooves in products made of hard and soft wood. Manufactured from monolithic hard alloys.
Designed to work in conjunction with cylindrical cutters.
How to choose a groove with a router
When performing this work, you need to know that the technique will directly depend on the location and size of the groove. If it is open, then your tool is attached to the tabletop, and the workpiece is guided along the cutter. Accuracy will depend on the position of the plank and the height of the cutter. To avoid mistakes during the sampling process, always make a test run on scrap wood. Sampling should be done in stages, several passes must be made. After each pass of the cutting part of the router, to prevent it from overheating, it is necessary to remove waste from the working surface of the tabletop. This can be done using a template cut out of plywood, which should be followed by a cutter with an upper bearing.
We hope that the information obtained from reading this article will be useful to you and useful for use in the household.
Source: pro-instrument.com
Main types of nozzles
A cutter is a rotating part that is dotted with teeth over its entire surface. Such elements can be found in different configurations. Using a cutter, you can process not only wood, but also plastic or metal, but they are still usually used for wood.
There are the following types of products:
- End.
- Edges.
- Grooved.
It should be noted that it is worth periodically applying lubricant to the support bearing. Thus, the parts will last much longer.
End mills
This type of part works not only because of the use of axial load. Such cutters involve the use of side edges, which makes it possible to move the cutting element within the support area. The result is neat selections that are formed in the tree.
The number of cutting edges may vary and this will affect the cleanliness of the cut. Typically, this type of attachment has a monolithic design, but there are also crown attachments that are used for wood drilling. This option should be used in a situation where there is no router at hand.
This category has several varieties:
- Spiral.
- End
- Burrs.
- Conical.
- Profile.
- Spherical.
End ones are used to form grooves that have different configurations and sizes. They can be used not only for processing wood, but also to create a groove/tenon.
A profile cutter can perform certain tasks:
- End processing.
- Creation of grooves with a rather complex configuration.
- Decorative design of ornaments.
Wood edging
Edge cutters for hand routers represent the largest group and are most often used for hand tools. They are used to make edges on wood. This option is often preferred by home craftsmen, since even in the largest sets the bulk of the parts are edging attachments. It is much easier to purchase such a set of cutters than to select everything separately.
This variety includes:
- Profiles, which are used to create complex shapes of the edges of parts.
- Shaped or molded, which are indispensable for rounding and rounding edges.
- Conical, which are used to remove the corner chamfer.
- Disc-type, with the help of which grooves are formed in the edge parts.
- Rebated ones that remove quarters in the edge parts.
- Wood fillet cutter. Typically used to make grooves.
- Figirey, used to create panels.
Typically, edge cutters are equipped with a bearing. This way you can limit the stroke of the tool, and thereby prevent excessive penetration into the surface of the tree. It is worth noting that the cutting edge will not be placed at the same level as the bearing. Using the support platform, you can adjust the depth into which the cutter will plunge.
If the nozzle produces too large cuts, then the work must be done in stages, each time deepening the tool into the material until the desired configuration is achieved.
The figurine cutter has a large weight, as well as a diameter. With the help of such tools you can work on stationary structures.
Grooving equipment
Using a wood groove cutter for a hand router, grooves are created. There are several types of nozzles:
- Fillets, with the help of which semicircular grooves are made.
- Conical, thanks to which you can apply threads to a flat surface.
- T-shaped, creating a corresponding pattern.
- Shaped.
- Elements called “Dovetail”.
- Straight grooves, which are intended for cylindrical parts.
- Combined, with the help of which large-sized wooden panels are connected.
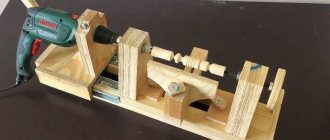
Making tenons with a hand router
When making wooden products, a flat tenon is the most reliable way to connect parts. You can make a spike using a hacksaw - a reward and a chisel. But this is not the best option. It is more convenient to make spikes using simple electric tools.
The most suitable machine for making tenons is a stationary router. In the photo you see a manufacturing method using a saw mounted on the router shaft. The spike goes through both sides, so it will be exactly in the center.
The tenon can also be cut in a vertical position; for this you will need a circular saw with a variable saw height. To hold the workpiece, it is better to make the guide ruler of the circular saw higher than the length of the tenon, for example 10-15 cm.
There is another option, this is making tenons with a hand milling machine. In terms of time, if you take into account the settings of a circular saw or a stationary router, it will not be much longer. There is no comparison in terms of convenience, spikes can be made anywhere, it is enough to have at least a small work table. How to make a tenon box joint with hand tools, see the article dovetail tenon.
Let's go in order.
1. We prepare the parts in pure size. When marking, you need to add the length of the tenons to the length of the parts. For example, for doors, spikes are usually made 55-70 mm long. , for tables or chairs, depending on the thickness of the legs, approximately 30-40 mm. .
2. Using a ruler and a square, we mark the shoulders of the tenon on all sides. Then use a hacksaw to make shallow cuts along the markings. These will be the shoulders of the tenon.
Tenon-groove connection: tenoning device and cutters for a hand router
Knowing how to make a tenon and groove with a hand router, you can even at home make not only beautiful but also reliable furniture, but also various wood structures characterized by excellent load-bearing capacity. The tongue-and-groove system connects not only elements of various furniture (tables, chairs and shelves), but also frames of low-rise buildings that experience significant loads during operation.
A tongue-and-groove joint made by hand
In order to make a tenon on a wooden beam using a hand router, several conditions must be met:
- securely fix the workpiece and correctly orient it in relation to the guide sole of the router;
- set the height of the working part of the cutter so that the tool removes a layer of material of the required thickness from the surface of the workpiece.
Even using the simplest tenoning device for a router when performing such processing, you can not only increase its productivity and quality of the result, but also make the technological process safer. It is especially important to use such a device, which can be made with your own hands, in cases where furniture is produced not in single copies, but in series (in this case, the craftsman has to perform a large number of similar operations both with the same type and with wooden pieces of different shapes and sizes details).
The use of devices will speed up the process of making joinery joints using a router
Guide rail
Having a similar purpose to the rip fence, the tire is responsible for the accurate movement of the cutter in a straight line. The time spent on work is noticeably reduced due to the use of the tire. It also allows you to guide the tool on the table at any angle to the edge.
Some mass-produced tires include a separate component - a shoe. It is connected to the router by rods and, passing along the bus, moves the milling head along a given path.
The tire is best combined with a tool whose base stands on retractable legs. This eliminates the height difference between the guide rail and the router.
It happens that the functionality of commercially produced tires is not suitable for the user. You can always create an individual version of the router guides with your own hands. The most elementary one is a long, even beam - in other words, a ruler. The master only needs to provide it with fasteners, and the tire is essentially ready. To make a simple device, you don’t even need a drawing.
Of course, such a homemade version will not be stable. The combination of a plywood base with a board nailed to it will be more stable in operation. The edge of the router base will rest against the board, and the edge of the base will mark the processing area. This design is used when using cutters of the same diameter.
Another option works when wood cutters can be of different sizes. Here the board acting as a ruler is not nailed to the base, but is reinforced with clamps. Thanks to this, it can adjust the distance from the working area according to the diameter of the cutter.
Tools used
The creation of tenons and grooves, with the help of which the connection of two wooden blanks will be ensured, involves taking a sample of material on the side surface of a beam or board using a hand router. In this case, all geometric parameters of the elements of the future connection must be strictly maintained.
To perform this operation with a hand router, you can use tools with shanks with a diameter of both 8 and 12 mm. The most universal in this case is a groove cutter, the cutting part of which works as follows:
- the lateral surface forms the walls of the groove and the sides of the tenon;
- the end side processes the bottom of the groove and removes a layer of material of the required thickness from the base of the tenon.
Cutting a tenon with a mortise cutter
Thus, using a tool of this type, it is possible to form both a tenon and a groove on the side surface of a beam or board. Moreover, their sizes can be adjusted within a fairly wide range.
In cases where higher demands are placed on the reliability of the connection of wooden parts, the grooves and tenons are made not of a rectangular shape, but of a shape called “dovetail”. Grooves and tenons of this configuration are created using dovetail cutters. It is also possible to perform the procedure for forming grooves and tenons of this shape with a manual milling cutter, but for these purposes you should use devices of a different design.
Dovetail sampling using a template
So that the question of how to make a groove in a board or beam or a tenon on their side surface does not cause any particular difficulties, it is better to use a power tool equipped with comfortable side handles, a wide guide sole and the option of protecting the spindle from turning during the process of replacing the cutter. In addition, it is desirable that such equipment have a side stopper, due to which the overhang of the cutter used with it will always remain constant.
Selecting the right equipment
A manual milling machine is selected according to the type of work and the planned load. There are main types of equipment for woodworking:
- vertical – top type;
- lamellar;
- edge
Horizontal lamellar router. A disk with teeth along the edge moves parallel to the sole and cuts grooves in the side surface for flat keys in the mating parts without marking. The use of the tool is narrow. The lamellar type of tool is in demand in the production of furniture and building wooden structures. It is rarely purchased for a home workshop if the owner is seriously interested in making furniture and has models of universal hand routers available.
The top type router is universal for wood processing. It is he who is capable of performing almost all operations. Its kit includes several devices that allow you to process the ends and work along the plane of the board. Basically this is a parallel fence with rods, milling bushings and a set of cutters of various types. The former guide the machine exactly along a straight cutting line or help make an even circle. The bushings guide the machine along the template, repeating its shape of any complexity.
To make grooves, cuts for locks and canopies, and create beautiful edges of any configuration in wood, a top-type router is suitable.
How to make a tenon pick-up device
When forming tenons on wooden workpieces with a manual router, it is not fixed in any way in space and is brought to the workpiece manually. That is why it is very important that when using a power tool, the workpiece is in a device that can ensure not only its reliable fixation, but also the accuracy of the spikes formed on its surface.
The design of the simplest device that is able to cope with such tasks is:
- several fixed guides (lower, upper, side);
- movable bar, due to which you can adjust the sampling length.
Device No. 1 – for removing the tenon
Such a device is manufactured, the dimensions of the components are selected individually, in the following sequence:
- Along the edges of the plywood sheet, vertical side elements of equal height are fixed, with cutouts made in the central part.
- Guides are installed on the side elements along which the sole of the hand router will move.
- To limit the movement of a hand router along the upper guides, the side strips should be fixed to them.
- On a sheet of plywood, which plays the role of the base of the device, it is necessary to install a movable element, with the help of which the amount of overhang of the edge of the workpiece will be adjusted. For fixation, you can use a regular thumbscrew or any other suitable fastener.
When manufacturing a device of the proposed design, the following points must be taken into account:
- The height of the upper guides should correspond to the sum of the thickness of the workpiece and the small gap required to install the locking wedge.
- The cutouts in the side vertical elements are made of such a width that it takes into account the length of the tenon being formed.
Device No. 2 – for making a groove
You can work using the device of the proposed design with a hand-held milling cutter of almost any modern model, the options of which provide the ability to adjust the cutting speed, feed rate and overhang of the working part of the tool used.
To create a dovetail tenon on the side surface of a beam or board, a device is used that is manufactured as follows.
- A hole is made in a sheet of multi-layer plywood from which the cutting part of the dovetail cutter will protrude.
- A hand router is attached to the bottom of the prepared plywood sheet. To do this, you can use clamps, screws or any other fasteners.
- A 2.5 cm thick board is fixed to the surface of the plywood sheet on which the workpiece being processed will move. It will act as a guide element. This board is a consumable material and is used once with a cutter of a certain diameter.
Circle milling
To perform tasks at home, a device that can make it easier to cut round blanks may be useful.
For example, a compass is often used, which you can create with your own hands.
This device is made according to the following scheme:
From available elements, a piece of plywood, self-tapping screws, a wooden wing and a bolt with a nut are used to make the device. You will also need a router, saw and screwdriver. A small marking is made on a piece of plywood. A platform is outlined on it, the length of which is 15 cm and the width is 5 cm.
It is important that the length exceeds the processing radius, and the width exceeds the size of the router pad. Holes are made for the mounting bolts (their diameter is 2-3 cm). Perka is used for drilling. A groove is cut through the middle strip
It is necessary to ensure that its width does not exceed the size of the axle bolt. A recess is made at the bottom of the plywood sheet to accommodate the nut and washer. Another nut is secured in a wooden wing. Now you can assemble the main axis. Instead of a stud, use a bolt with a sufficient length, having first sawed off its head. The compass is installed on the router and the functionality is checked.
Creating tenons on bars and boards
Using cutters for merging wood for a manual router and the device described above, processing is performed in the following sequence.
- The part to be processed is placed on the lower reference plane.
- The edge of the part on which the tenon will be formed is placed in the cutout of the upper guides and is advanced in it until it stops at the movable element of the device.
- The moving element is fixed in the required position.
- Using a wedge element, the upper plane of the part is pressed against the upper guides.
- A hand router is placed on the upper guides.
- Using a tool mounted on a router, the tree is first removed from one side of the tenon being formed.
- After processing one side, the workpiece is turned over and the second side of the tenon is formed.
Cutting a tenon using jig no. 1
Even such a device, which is simple in design, allows you to process tongue-and-groove joints using hand mills with high accuracy and productivity.
Before starting work, such a device must be configured. This can be done using the following algorithm.
- The tool installed in the hand router is lowered until it comes into contact with the surface of the base plywood.
- The thickness of the part is measured.
- The thickness of the workpiece is divided by 4. The result will be the distance by which it is necessary to raise the cutter above the base surface.
Cutting a groove using tool No. 2
Using a dovetail template, grooves and tenons are created at half their thickness, which is explained by the peculiarities of this type of connection. To make a groove in timber and boards, as well as to form a dovetail tenon, the device also needs to be adjusted and its components fixed in the required position.
Device No. 3 for dovetail in action
It should be borne in mind that the tenon and groove created on wooden blocks and boards must be connected to each other with some gap, which is necessary to accommodate the adhesive composition.
And finally, a couple of videos illustrating the process of creating a tongue-and-groove joint using a hand router.
Source: met-all.org
Processing of wooden parts
The first thing you need to learn is to correctly set the milling depth. To do this, you need to set the zero point. It is impossible to set it rigidly, because it changes every time the cutter is changed. The zero point is the position of the tool when the end of the cutter touches the material and is fixed with a special device called a clamp.
It is necessary to pay attention to the fact that each router has a different position when fixed. To control the depth of immersion of the cutting tool into the body of the material, a stop pin with a coarse adjustment scale is used.
When milling with an end mill, the counterforce from the cutting force moves the router to the side. To prevent this from happening, you need to use a rip fence. The milling process is as follows. Place the cutter along the marking line and secure the position of the stop with a special screw. Set the milling depth and turn on the machine. If the rip fence is installed on the left side, you need to pull the router towards you, when on the right side - away from you.
In order to select a quarter on a beam, you need to set the cutting edge of the cutter at the very edge, fix it, set the depth of the quarter, turn on the router and pull it towards you (if the stop is on the left edge of the beam). Milling the surface of narrow bars has its own peculiarity. The problem is that it is very difficult to hold the router on the narrow side of the workpiece. If it wobbles during operation, the groove will be inaccurate.
Working with a hand router can replace working with a planing machine. To do this, you will need several accessories for the milling mechanism. It looks like this: attach a milling mechanism to two equal-sized slats and use it as a planer, where a large-diameter milling cutter is installed instead of a shaft.
The best ideas on how to make a tongue and groove using hand routers, detailed instructions
It is easy for a home craftsman to figure out how to make a tenon and groove using hand routers. Tools used, detailed instructions on how to select a groove with a router.
Using tongue-and-groove joints at home will allow you to independently create beautiful furniture that is also reliable. Even the frames of low-rise buildings are connected using this scheme, especially when it comes to serious loads during operation. Therefore, it will be useful to understand how to make a tenon and groove using manual milling cutters.
Tools used
In this case, the sampling of material is carried out on the surface of the beams and boards from the side. The main thing is that the proposed connection maintains its dimensions in terms of geometry.
To complete the process using a milling cutter, it is possible to use tools equipped with shanks with a diameter of 8 or 12 millimeters. The so-called groove cutter will become a universal option when performing any type of work. The device is equipped with a cutting part, the basic operating principle of which is described as follows:
- The side surface is involved in the formation of the sides of the tenon, the wall part of the grooves.
- The side with the end part is used when processing the bottom. After this, the required layer of material is removed from the base of the spike.
The result is the simultaneous formation of both tenons and grooves on the surface on the sides. The sizes can be individually adjusted, and the owner has quite a wide range of options in this regard.
Sometimes for grooves and tenons they choose not a rectangular shape, but the so-called “dovetail” type. This option is relevant if increased requirements are placed on connection reliability. Accordingly, the cutter used is also called a “dovetail” in this case. Such work can be easily done with hand tools if the need arises.
Guide rail
use a piece of chipboard
First you need to find out the distance from the edge of the milling base to the center of rotation, and it is always the same. To do this, you need to screw a guide to the unnecessary part of the material and make a test cut. Then you should measure the gap from the edge of the cut to the tire, to which the radius of the cutter is added. As a result, it will be possible to obtain the required value. For example, it is 59 mm, and the diameter of the groove cutter is 14 mm, that is, its radius is 7 mm.
Then you should draw a line for the cut, from which we retreat a distance of 52 mm (59-7), and draw another one. We fix the guide along it and make the cut.
Making a device for picking out a tenon
When parts are processed manually, the milling cutter itself does not have additional spatial fixation. But the overall result of the work and the accuracy of the connection itself in the future depend on this.
To assemble the simplest design that can cope with the task, you will need to use:
- Several guides that remain stationary. They should be side and top or bottom.
- The length of the sample is adjusted through the use of an appropriate movable bar.
For manufacturing, the following sequence of actions is used:
- A plywood sheet is taken, from one edge of which the side elements are mounted in a vertical plane. It is necessary to create appropriate cutouts in the center of the material.
- The sides are equipped with guides. The base of the hand cutter moves along them later.
- The side strips are fixed on the upper guides. Then the movement of the working milling cutter associated with these parts becomes limited.
- The plywood sheet, which became the basis for the installation, also serves as a surface for installing the moving element. Then the amount of edge overhang for the future workpiece is easier to control under any circumstances. Fixation is ensured with ordinary screws and other types of fixing devices.
There are several points during manufacturing that require special consideration:
- The upper guides have a height corresponding to the sum of the thickness for the part under processing and a small gap at which the wedge involved in fixation is installed.
- The forming tenon has a certain length, which is taken into account when determining the vertical thickness of the cutouts in the side elements.
When such devices are used, the work is carried out with the participation of hand-held milling cutters of any modern model.
Fixtures are made in the following way if dovetail connections are required.
- A hole is created inside a sheet of plywood with several layers. The cutting part at the cutter itself protrudes from this part.
- A plywood sheet is prepared in advance, on the bottom of which the manual router itself is fixed. Clamps and screws are perfect for doing the job, as are other types of fastenings.
- The board, 2.5 centimeters thick, is attached to a plywood sheet, which subsequently participates in the movement of the prepared part. The function of the guides is taken over by the design. Boards are consumables with one-time use.
Creating tenons on bars and boards
Processing is performed using the following sequence of actions:
- The part to be processed is mounted on a plane from the bottom side.
- The edge of the part where the tenon is formed accommodates the cutouts at the guides at the top. The structure moves inward until it hits the end.
- A movable type element must be fixed while maintaining a certain position.
- We use a wedge tool to connect the guides and the plane located at the top to each other.
- Connection of a hand router with the upper guides.
- Using a router tool on a home router table, wood is removed from one side.
- When the first side of the workpiece is processed, begin the second.
Wood cutter "Dovetail"
For mortises and tenons under similar circumstances: only half the normal width. This is explained by the characteristics that compounds of this type have.
The main thing is to set up the device correctly and fix it in a suitable position.
The tongue-and-groove joint should end up with some clearance. It is necessary so that later you can conveniently use the adhesive composition.
How to choose a groove with a router?
The solution to the problem depends on where the grooves are located and what size they are. Here are some recommendations for home craftsmen:
- The use of open grooves involves securing it to the tabletop and guiding the workpiece along the cutter.
- Accuracy is determined by the height of the cutter and the location of the bar.
- It is recommended to use wood waste for trial operations. This allows you to avoid mistakes.
- Sampling is carried out in stages, with several passes being carried out.
The main thing is to get rid of wood waste in a timely manner after completing each stage. Then the instrument will definitely not suffer from overheating. When doing the work, it is easiest to use a template cut out of plywood. They pass through it with the cutter itself, with the bearing installed.