Hunting skis are a mandatory and very important piece of equipment for every professional hunter and fisherman.
Skis intended for hunting have little in common with ordinary (recreational) or sports models, and even to a person who is poorly versed in them, the differences will be clearly visible.
The sliding surface of sports skis is much larger and thanks to it, falling through in loose snow is excluded
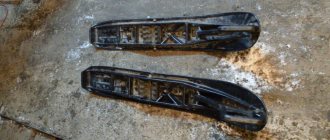
Unfortunately, not every store offers a similar product at a reasonable price, much less skis that are 100% suitable and comfortable, so this equipment is strictly individual. In this regard, homemade skis are increasingly in demand among experienced hunters. Currently, experienced masters of “skiing” can offer hunters the following popular products: camo skis or boot skis. The working surface of skin skis is covered with pieces of skins, making it easier to glide over the snow and help climb uphill. However, with these positive qualities, there are also disadvantages such as greater weight and complexity in manufacturing.
Came skis
Hunting skis and their types
Hunting skis differ from ordinary skis in their design - they have a shortened nose and a reinforced middle. Due to this, the resistance of the snow when walking is reduced and durability is ensured.
Can be made of wood or plastic. Their strength is almost the same, but plastic ones are considered more practical, since they do not need to be regularly processed and lubricated. The disadvantage of plastic ones is that they are slippery and are more suitable for sports. This is why they are rarely used by amateurs. Fishermen and hunters choose wooden ones. The latter can be made independently.
Wooden skis come in the following types:
- Golitsy are the simplest skis made of wood. They will have to be lubricated with special products before each exit.
- Kamus - elk or horse skin is used to create them. The skin is attached from below, and the base is wooden. The design allows you to move quickly through the snow, while on loose surfaces they do not fall through.
- Combined. Best value for money and convenience. Only pieces of horse hide are glued to the lower part, which significantly reduces the cost of production.
Mounting bases
Afterwards you need to prepare two bases for fastenings. They should be made in the form of small planks with a recess in the form of a transverse path. They need to be placed in the center of the skis, and then moved 3 cm towards the heels and marked with a pencil. Then the bases for fastenings must be placed on glue and secured with self-tapping screws. If the skis are thin, the screws should go from the bottom, and if they are thin, from the top.
Skis on which the bindings are installed incorrectly move to the side when moving. Therefore, this step must be performed very carefully.
Materials for making skis and camus
The main material for creating skis is wood. For the camus you will additionally need some skin. The requirements for wood are:
- strength;
- elasticity;
- flexibility;
- ease.
Birch, aspen, cork, Manchurian walnut, Amur lilac, willow, and fir trees have such qualities. You can take any of the proposed ones, but it is important that the wood is straight. You can also make hunting skis from plywood yourself, but the plywood needs to be of the highest class.
Similar material is used for camus, but they also require skin. It should be taken from the shin of an elk, horse, deer, or wapiti. There is an elastic pile on the shin area of these animals. With it, movement on snowy slopes and loose snow will be convenient.
Wood harvesting
Before you make skis for hunting, you need to prepare the main material - wood. Wood harvesting is done in winter. During this period, the moisture in it freezes, which makes working with wood easier. Although craftsmen suggest making preparations in August, because at this time the heat has already subsided, and working with wood is more comfortable than at sub-zero temperatures.
Note! The selected tree should have no traces of rot or branches, especially small ones.
You can get high-quality material by following these steps:
- Remove the bark.
- Saw the deck into boards, thickness 50 mm, length according to the expected length of the snowshoes.
- Tie the boards together and insert a spacer in the middle.
- Dry for 3 weeks in a cool place.
- After drying, apply the contour of the ski and remove excess.
How to do
Not everyone knows how to make hunting skis with their own hands. It's easy if you follow the steps. It is necessary to prepare the wood so that it is dry and without knots (chips, cracks, rot).
The optimal thickness of the boards is 1 cm. Step by step steps:
- Prepare the wood.
- Make cross cuts.
- Chop off the excess, trim the workpieces with a plane (electric planer).
- Place the boards in a container, fill with water, laying the boards between them.
- Place the boiler and boil for 1.5-2 hours.
- Transfer the boiled boards to the machine to make the nose of the ski track, giving it a shape so that it does not break.
- Heat the folds.
- Round the heels and toes of the ski tracks, cutting off excess material with a hacksaw, from the center to the ends, to avoid splitting the wood.
- Drill holes (2 mm in diameter) on the heels and toes, having previously marked them with a pencil.
- Burn each hole with a hot awl to harden it to prevent tearing under load.
- Pass the rope through the holes, pulling it tight.
Read also: Cross-country ski bindings
Basic tips to consider when making homemade hunting skis:
- Dry well on the board for at least 1 month to give the skis an effective (suitable) shape.
- Steam the noses of the skis in boiling water for at least 0.5 hours. You can’t do it longer, because excessive steaming can lead to cracks (creases) in the inner parts of the socks.
- Bend the socks at the ski tracks on a wooden template (you can make it yourself), making the curvature with a margin, since the dried boards will bend by 10-12 mm.
- You should not make skis longer than the height of the hunter.
- It is advisable to impregnate finished products with resin, diluting them with turpentine (tar) in a 1x1 ratio.
Sizing
Homemade wooden hunting skis must fit in size, for this you need to know how to determine it. To do this, you need to know the weight of the person who will walk on them. The rule works here: 1 kg of weight corresponds to 50 cm² for each ski, the length is no greater than the height of the person for whom it is created.
Calculation example:
- The hunter weighs 90 kg, his height is 1.75.
- Looking at the formula, the ski area for it is 4500 cm².
- Skis for a hunter should be 1.7 m long and 26 cm wide. If you plan to travel on the plain, then the length can be slightly longer, for mountains - shorter.
Another sizing option does not involve calculations. More specifically:
- install the skis with their toes up, their length does not exceed the height of the arm extended forward;
- width is the distance between the index finger and thumb;
- thickness is the distance between the ring and middle finger of the hand at maximum spread; this parameter will need to be brought up to 8 mm on flat areas, and 5 mm on the bend.
Device
Skis for hunting differ from sports options:
- Type of fastening. For ease of walking for a long time and instant removal from your feet, it is better if the fastenings consist of 1-2 straps.
- Width. Models with a width of 15-16 cm are suitable so as not to fall under the snow.
Plastic skis glide well. Wooden models cannot accelerate much, but they move quite well on an unstable route with descent and ascent.
Bending
You need to make 2 bends: front and back. At the initial stage, wood can be bent by heating, firing and steaming. After this, each is placed in a special bending machine. It is necessary to ensure that there is no distortion, otherwise the material will be damaged.
Steaming is convenient to carry out when the ski is already secured in the machine. This will help you get the best result. You need to cool it in the cold, but this can only be done after successful bending. When the material has completely cooled under the required conditions, it is necessary to inspect it for distortions; if there are any, the skis will move incorrectly.
Gluing
Gluing is done in a thick layer between the skin and the ski track. It is important that the camus adheres well to the edges and does not warp after drying.
Products should be dried at room temperature. After they have dried, you can thread the straps through the previously drilled holes for fastenings. Thus, skis with a camus will be much stronger at bend.
It is advisable to apply glue to the camus in 2 layers. After drying, apply 1 more layer, rolling it over the moistened skin with a roller, squeezing out excess glue to completely straighten the skin. The camus should fit snugly against the sides of the skis.
Marking holes for fastening straps
The next stage in the technology for creating homemade skis is marking the holes for the fastening that secures the leg. Stages:
- Place the ski on its edge and lift it in the place where the leg will be fixed.
- The ski will stand at an angle of 45⁰ to the floor, the nose is raised up.
- Place a mark at the point at which the ski reaches the indicated position and draw a line across it across the width.
- Draw another parallel line, retreating 4 cm from the first mark towards the bow.
- Find the middle on both lines and place your fist so that it is located in the middle of the central marks.
- Make marks where the fist corresponds to the lines drawn earlier. These 4 points will be the holes for fastening.
All that remains is to burn the marked holes and connect them with deep grooves. They are needed for tightly laying belts in a homemade product.
Subsistence
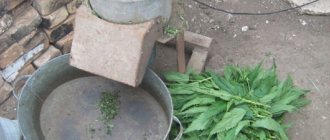
Finished skis need to be protected from moisture absorption, so they are thoroughly fattened. It is very good for this operation to use a mass cooked according to the recipe of the old masters. Pour 400 g of linseed oil into the kettle and bring to a boil. Birch tar is added to it in the same amount and boiled for another 1 hour. Then you will need 200 g of paraffin. After the latter has completely dissolved, the pot is set aside and red wood alcohol (400 g) and formaldehyde (200 g) are poured into it. While the mixture is hot, cover the skis very generously. After the product has been absorbed, the coating is repeated until the wood is completely saturated. Next, the skis are dried and, if desired, covered with drying oil.
Making kamus
If you decide to make a kamus, then the next step is preparing the skin. Steps:
- Remove any remaining fat and meat from the skin.
- Stretch dry it.
- Cut the camus to the size of the ski with a margin of 1-2 cm for the turn.
- Soak the skins in water.
- Fold the fuzzy edges towards each other.
- Sew with strong thread.
- Dry. When gluing, the camus may be slightly damp.
Gluing
After drying, the camus needs to be glued, this should be done carefully, because it is this part that prevents it from slipping on the snow. For gluing, you can use epoxy or wood glue. You can make a fairly high-quality adhesive composition on your own. For this you will need fish skin. Manufacturing process:
- you need spawned chum or catfish;
- Remove skin from fish, remove scales and fat, soak in water;
- after soaking the leather, roll it onto a wooden stick and wrap it in a cloth soaked in water;
- hang over the stove or coals;
- steam until you get thick gluten.
When gluing, the composition is first applied to the camus. The first layer is allowed to dry, then the second is applied. Next, the kamus is applied to a wooden blank and pressed. It is convenient to roll the product at home with a roller. This must be done until the skin is completely smooth.
To record the result of the work, you should wrap the camus with a bandage - this guarantees a strong grip on the sides. All that remains is to dry it in a cool room with good ventilation.
Preparing glue for gluing
The glue must be waterproof (thick), so you can use wood glue (epoxy) with the addition of vinegar to make it waterproof.
Read also: Nordica ski boots
If it is not possible to purchase high-quality wood glue, you can make it yourself from fish skin (catfish, chum salmon). For what:
- remove the skin from the fish,
- clean,
- soak,
- wrap it around a stick
- wrap with wet cloth on top
- steam over a fire (stove) to obtain glue with a viscous consistency.
Storage
Skis are used only in winter. The key to long-term use is proper storage. This applies to both factory and homemade models. Rules:
- Connect with each other.
- Hang on a hook or nail.
- The room should have normal humidity and ventilation.
- It must be placed so that no water gets into the fasteners.
Advice! If the fasteners are loose, then you need to unscrew the screws and fill them with epoxy glue, then put the screws in place. Skis must be checked before each use.
The production of hunting skis is a feasible task, but it requires a lot of time and patience. Their quality is affected by the choice of material and the correct implementation of all the above manufacturing steps.
Wood preparation
To make hunting skis, you can use a wide variety of wood - aspen, spruce, birch, and so on. When choosing a material, you need to proceed from its availability and performance properties. The most durable skis are made from birch and maple. The lightest are spruce and aspen. It is more convenient to move on such skis, but you will have to be careful, as they are inferior in strength.
It is better to harvest wood for skis in autumn or spring . It should be stored in a well-ventilated area. When summer is over, you need to cut off the bark from it and store it for another year.
With such a long preparation, the wood will be of the best quality. If you speed up drying, cracks may appear at the ends - thus, the material will not be strong and reliable enough.
It is better to prepare material for two or three pairs of skis at once. Then it will take less work per pair than if you prepare material for each set of skis separately. In addition, without proper experience, it is easy to damage the material during the manufacturing process, after which it will be unusable. Therefore, it is better to have several sets of blanks on hand at once.
What products need to be resinized?
Only wooden skis can and should be oiled. The plastic itself is resistant to moisture. Wooden fibers gradually become soaked and begin to rot, crack, and delaminate. You need to soak your ski pair not only before the start of the season, but also after it ends. This is due to the fact that when storing skis on a balcony or in a storage room, they may become unusable due to changes in temperature and changes in air humidity.
Do not store wooden skis near heating elements, in direct sunlight or near sources of open flame.
Assembly
In ski manufacturing, assembly is carried out using two technologies:
- laminate the layers yourself - epoxy resin is applied manually to each layer;
- apply prepregs using reinforcing materials impregnated with epoxy resin at the factory. Here the proportions will be met perfectly. Prepregs harden when exposed to high heat.
Vacuum infusion is not recommended: some areas of the ski between the base and the core may not be saturated.
How can you lubricate skis at home?
In stores and other points of sale you can find many different products designed for ski fans. If a person does not plan to engage in it seriously, then there will be no need to spend money on expensive formulations presented in the form of aerosols or branded paraffins. For those who are interested in how to lubricate their skis for better glide, a wide range of different ointments are offered.
Such products are presented in two types: for better glide and grip. Beginning athletes can use universal kits from well-known brands: Visti, Swix or Briko. All products are color coded according to the temperature at which they must be used. If the temperature is above zero, then liquid formulations are used. For negative values, the following classification applies:
- 0 to -2 – purple color;
- -2 to -8 – blue;
- -5 to -12 – light green;
- -10 to -25 – dark green;
- -15 to -30 – black.
When figuring out how to lubricate skis, you need to pay attention to common paraffins, which, according to their properties, are divided into options for sliding and securing. It is worth knowing how to lubricate your skis so that the snow does not stick in the absence of other means, you can use wax and paraffin from candles, but medical grade is better. There is a widespread belief among people that you can use soap, but in reality it will not do any good.
Conservation. Should I do it?
I think it is necessary, especially if these are expensive, “combat” skis, the gliding quality of which you want to maintain for as long as possible. If you do not preserve your skis after the season, over the summer the sliding surface without paraffin will oxidize and dry out - therefore, it will absorb paraffin less well and work worse during the season. It’s better, of course, to take care of your inventory in the spring. If there are chips or scratches, they must be sanded using a machine and covered with universal paraffin at an average temperature of -2 - 8C.
Sliding Surface Finish
The choice of treatment for the lower part depends on weather conditions. For forest hunting on loose snow, fur-lined skis are used. For spring hikes on rough crust, skis are made, because the frozen snow strips the wool.
Resining
The skis are made thicker than kamus skis. A gutter is sometimes chosen along the bottom plane. Skis will be resinized after production. The operation is repeated every season.
Before going out hunting, the bottom of the loins is treated with 2 types of ointment. Gliding ointment is applied to the toe and heel parts no more than 30 cm on each side, for the toe - on the remaining surface. The product is selected taking into account the temperature conditions.
Camus padding
Kamus - skin from the shins of animals (deer, elk, horse), prevents skis from slipping. For 1 pair it takes up to 12 pieces. Fleshed skins are soaked in pickel:
- 3 liters of water;
- 2 tbsp. spoons of salt;
- bottle of vinegar essence.
After 3 days, the camus is rinsed and dried. The skins are collected into a strip, the pile should lie in one direction, along the course of the ski. Cross sections are aligned. In order not to cut the fur, cuts are made from the side of the flesh with a sharp knife. The cut out pieces are sewn from the inside out using a furrier's stitch using nylon thread folded in half. The seams are flattened with a hammer.
You need to glue the skin to the wood along the entire lower surface, starting from the nose. PVA glue is applied to the ski. Simultaneously with gluing, the skin is stretched and nailed to the end with small nails.
Skis should dry in the machine for 5 days. After this, the edge of the skins sticking out from above is cut off flush with the upper surface.
The upper part of the skis is covered with yachtlak or wood enamel for outdoor use.
Ski poles
Hunters use only one stick. The traditional stick (kaek) at the bottom expands and bends like a putter. Its length is from the fingers of the hand raised up to the ground. Sometimes a spear or a ring made of willow twig is attached to the top.
Many hunters prefer to cut a spear at full height and walk with it. If such a stick breaks, no repairs are required; you can cut down a new one.
It is not easy to perform skis according to instructions. You don't always get what you need the first time. But handmade equipment has always been and will be dear to the hunter.