A spotter is a device that allows you to perform spot welding. This device is used for connecting thin parts and performing straightening work. Most often, the spotter is used for restoration work on the car body. Equipment of this type is used by car service employees. But if necessary, you can assemble the spotter yourself using a welding machine.
Scheme for a homemade spotter
A homemade spotter can be made from an old inverter. But for this you need to know how the structure is assembled. The work of a spotter depends on a number of required components:
- welding transformers;
- primary winding;
- diode bridge;
- thyristor.
The equipment operation diagram is determined along two diagonals. The power of the transformer of the first diagonal is higher than the second. Therefore, it accepts voltage after turning on the device. Electricity flows through the secondary winding through a diode bridge and a relay into the capacitor. Thanks to this system, charging is ensured. In this case, voltage passes through the transformer and does not accumulate. With this starting scheme, the thyristor closes.
To start welding, you will need to open the thyristor. After turning off the charging of the capacitor, the secondary winding of the transformer will receive sufficient current for welding . You can see the elements of the scheme in more detail on the plan.
How to make a puller
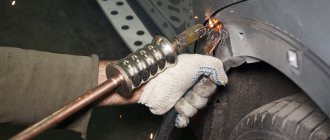
Spotter welding is effective for recreating a flat surface on damaged car bodies. But this requires some accessories. One of them is the puller. This is an exhaust device that allows a small area of metal to be drawn out, leaving the surrounding part in place. If you simply weld the spotter tip to the dent and pull it back, then the entire area will give way along with the dent. You will get a bulge on the body. This accessory allows you to hold the surrounding surface and draw out only a point.
You can make your own homemade puller from a caulk gun. It can be purchased at a hardware store. When purchasing, you should choose a model with thicker handles, as this will affect subsequent operation and service life. Next, several manipulations are performed, clearly shown in the video, in the following steps:
- Disassembling the pistol. The sealant container is removed from it. The front stopper and the seals under the tube are unscrewed.
- Several rings of different diameters must be cut from sheet iron with a wall thickness of 3 mm. To save on material, they are drawn in one circle, in descending order. The width of the ring varies from 20 to 30 mm. The smallest ring should fit freely, but without unnecessary play, onto the receiving socket at the handle of the glue gun and pressed with the factory nut.
- Two squares of sheet iron with a wall thickness of 3 mm and side dimensions of 20 x 20 mm are welded to a small ring. One hole is pre-drilled in them.
- From circles of larger diameter, supports are made on the body for dents of various sizes. To connect them to the main structure, strips of metal with parameters 15 x 150 mm and a thickness of 3 mm (2 pieces) are taken. One of their edges is welded to the opposite sides of the large circle, and the second is bent at 90 degrees inward. Holes are drilled at these edges, identical to the fastening on the smallest circle. With a bolted connection, the structure is assembled together and resembles a cone.
- A homemade puller must be attached to a power source from the spotter. To do this, take a brass cylinder, in which the turner drills the middle to the exact diameter of the rod from the silicone gun. A hole is drilled in the side of the cylinder and a thread is cut to secure the contact.
- A welding tip is fixed at the end of the cylinder.
A puller can also be made from pliers. You will need a rod, a system of rings to create a stop, and a powerful narrow spring to return the compressed handle. The rod is welded to one of the working sides of the pliers, a spring is attached to it and a stop is attached. The current from the device can be supplied through the terminal on the top end or on the side of the brass cylinder. Such accessories for a spotter may not look very presentable, but they serve their purpose well.
Housing and components
When creating a homemade device, the housing is selected. The base of the device is a dielectric tile. Parts made from other materials are not used for this purpose. The dimensions of the base are chosen arbitrarily. It is necessary to ensure that all used components can be placed on it. At the same time, they must be placed so that free access to them is provided during installation and if necessary.
In order not to make mistakes in the calculations, a drawing is prepared in advance, including the components used.
A suitable option for performing the functions of the housing is an old welding machine. A microwave oven is also used as a housing. Fastening the components depends on how you plan to make the device: stationary or portable. When choosing the second option, the components are distributed evenly and mounted using fasteners. Handles for transportation are installed on the outside of the case.
Considering the weight of the equipment, wheels should be installed under the base. Thanks to this, the device does not need to be lifted when moving.
Do-it-yourself spotter: description and operating principle of the device (100 photos)
Almost anyone can assemble a homemade welding spotter; you do not need to be an expert in electrical engineering or mechanics. Spot welding with a spotter is most actively used when repairing dents on car bodies.
Schematic diagram
The only thing that will make you scratch your head is the circuit diagram that you need to understand. This is a diagram of the simplest of the different types of spotters.
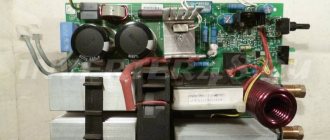
The main unit of the spotter will be a welding transformer, and the voltage transmitted to its winding is supplied through a diode bridge, which contains a transistor. This resistance is controlled by changing the voltage transmitted by a low-power transformer.
Required materials for assembly
- Welding transformer;
- Supply transformer;
- Diode bridge capable of operating at a voltage of at least 5-8 V;
- Set of diodes (12V);
- Thyristor (hammer);
- Variable resistance, the nominal value of which is 100 ohms.
The most inaccessible element in this circuit is the welding transformer.
If desired, you can make it yourself. To do this, you need to purchase or manufacture a magnetic circuit whose working cross-sectional area will be more than 350 square meters. millimeters.
To protect yourself from a painful electric shock and prevent damage, you must first follow the instructions for working with the spotter and well insulate the windings of your homemade transformer.
Suitable for this purpose:
- Cardboard or paper;
- Varnished fabric;
- Paraffin-soaked rags.
The ends of the winding must be of sufficient length so that they can be connected to the terminals and to the electrical circuit of the installation.
Case manufacturing
The first thing you should tackle is making the base for attaching the homemade spotter. For it, it is better to choose a material based on a dielectric. To manufacture an unsuitable housing, it is better to draw up a detailed drawing and indicate the location of the main structural components.
An old microwave or welding machine can be a good option for the housing. It is necessary to remove excess equipment and place new one so that the load is evenly distributed throughout the volume of the box. If you plan to move the spotter frequently, you can install wheels on the bottom of the body.
Accessories
The manufactured spotter needs to be equipped with the following key elements:
- Manipulator gun;
- Welding cables;
- Reverse hammer (inopuller).
In order to choose the right welding cables, you need to know that for every 10 amperes of the maximum possible current value, you need to use 1 sq. mm section. The length of the working cable should not exceed three meters, and the cable weight should not exceed two. Otherwise, there will be large voltage losses.
The ends of the cables must be equipped with connecting elements to connect them to the gun and spotter. To connect to a spotter, it is better to use quick-release terminals, and for connection to a gun, a threaded section would be the best option. Before assembling, familiarize yourself with the photo of the spotter and the main components of the device.
Working pistol
If you plan to use a spotter regularly, then the best solution would be to purchase a factory pistol.
This is due to the fact that the gun is the main working element and will be constantly exposed to high currents, and if it malfunctions, it can cause harm to the person using it.
But if the application is limited to special cases, it is quite possible to make it yourself.
For the base, you can take a standard glue gun or a manipulator from an old welding machine. You need to make an insulated handle for the manipulator; PCB is perfect for this purpose, from which you need to cut two symmetrical rectangular parts.
It is necessary to install a bracket in the handle to secure the electrode from the working cable. Also, if desired, you can equip the handle with lights that will signal the presence of voltage.
A copper rod is ideal for creating a bracket. An electrode from the working cable will be connected to it; it is better that this electrode can be removed from the device without disassembling the handle.
Homemade reverse hammer
If the previous points have been completed, then difficulties should not arise in the future. Making a reverse hammer yourself is an economically profitable enterprise, since factory hammers are quite expensive.
The part of the polyurethane foam manipulator in which the container with the contents is located is best suited for this purpose. 3 rods are welded to the vacated area, which will become uprights.
In the rod of the device, you need to remove the stop and the curved part, and in its place a bracket is installed to connect the cable from the spotter.
DIY spotter photo
Making a pistol
Without a pistol, the spotter will not perform its functions. This component is also known as studder. The choice of operating mechanism depends on the intended purposes. Spotter pistols are divided into two categories:
- factory;
- homemade.
To work with a high frequency of spotter use, factory models are purchased. Such devices are capable of providing sufficient performance for the assigned tasks for a professional welder.
A homemade spotter gun is recommended for use in household work where a heavy load on the equipment is not required. The following are used as homemade working mechanisms:
- glue gun;
- semi-automatic welding machine.
To make a handle for a studder, getinax or textolite is used. The thickness of the material ranges from 12 to 14 millimeters. Two rectangles of the same size are cut out of it.
A niche is created in one of the segments to accommodate the fastening element. This part of the workpiece is intended for fastening:
- electrode - a copper rod with a diameter of 8 to 10 millimeters;
- light bulbs;
- buttons that turn on the backlight;
- switch that supplies the pulse.
The button must be placed strictly in the created recess. A homemade bracket is used as a fastening element. A pipe made of copper is used for its production. It is necessary to obtain a square or rectangular cross-section.
When the spotter is operating, the electrode must be replaced periodically. To make this task easier, when designing the device, it is necessary to place the electrode so that replacing it does not require disassembling the entire structure.
The gun is connected to the spotter using a five-core welding or control cable. The cores are connected to:
- switch;
- backlight bulb;
- switch light.
The end of the cable is placed in the hole in the bracket and secured with a soldering iron . Before this, it must be cleaned.
Inopuller or reverse hammer
An inopuller for body repair is an expensive device. But self-production is carried out according to a simpler scheme than assembling a pistol. This component is manufactured on the basis of a gun for installation work. The reverse hammer and attachments are produced step by step:
- removing the top for attaching a foam balloon or sealant;
- welding racks instead - made from rods with a diameter of 6 to 10 millimeters;
- welding the ring to the racks - take as a basis the same rod that was used for the racks, and then fasten it into a ring with a diameter of 100 millimeters.
Transformer and its modification
The spotter, made from a DIY welding machine, works using a transformer. The generation of current for welding and the power of the spotter depend on the welding transformer. Such a device is difficult to find on the electrical appliance market, so in any case you will have to make the machine yourself. The basis of the transformer is a magnetic wire with a cross-section of 400 square millimeters.
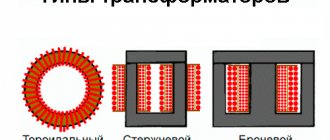
Transformers are divided into two categories: plate and strip. Devices of both categories are produced in three forms:
- w-shaped, also known as “armored”;
- o-shaped, also known as “string”;
- toroidal.
A suitable option for a homemade spotter is the third, since it has the lowest weight and minimal volume of secondary winding layers. Transformers have different numbers of turns on the body. The number of turns that the primary winding of the working device includes depends on the voltage received. When performing winding, test runs are carried out until the indicator reaches 1 Volt.
DIY spotter: detailed assembly instructions
The spotter belongs to the category of equipment for performing contact welding. During operation, the unit produces a current discharge, which melts the metal in a split second and allows spot welding without the usual pliers.
For correct operation, a replaceable attachment is used - a reverse hammer, which simultaneously with the spotter straightens out dents, thereby imparting lost rigidity to the metal and returning its original shape. If you want to use the unit for small amounts of work, then it is easier to assemble the device from improvised means. In this review from the editors of Seti.
guru we will answer the question of how to make a spotter with your own hands, we will consider the sequence of assembling such a unit from various household appliances and unnecessary equipment.
Industrial spot welding device
A do-it-yourself spotter is most often used for straightening a car and leveling out dents on metal.
This type of equipment is very popular among workshop technicians, since during the process of straightening the body there is no need to dismantle the fender or door of the car. All work can be carried out directly on the outer part of the casing.
It is especially convenient to work with the device in those places that are difficult to get to.
During operation, the device produces a discharge, the metal heats up, and welding occurs at the point of contact.
Welding with a spotter does not leave deep marks and, after leveling, can be easily removed with a grinder.
The fact is that heating and cooling at the point of contact occur so quickly that the metal does not have time to oxidize and react. Moreover, homemade models can be adjusted in such a way that the current strength and exposure time can be changed depending on the thickness of the metal that needs to be processed.
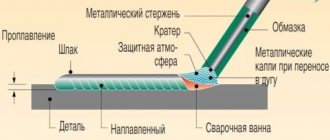
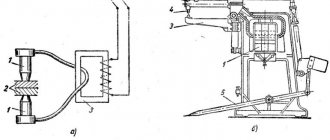
The spotter consists of the following elements: 1 – reverse hammer, 2 – housing where the power supply and control unit are located, 3 – hook, 4 – electrodes, 5 – gun. Two cables come from the body of the device: ground and the working wire with the gun. The gun is what the welder operates in his hands.
The operating technology is as follows: The mass is fixed to the body of the car from which the battery has previously been removed. The gun starts the current flow. When the trigger is pulled, a discharge occurs that melts the metal.
At the same time, or before this stage, the master knocks out small “mounds” with a reverse hammer, onto which a discharge is applied by a spotter.
They are subsequently cleaned, thereby thickening the metal and obtaining the necessary shape and strength.
For your information! The action of the spotter is based on such a physical phenomenon as current resistance. In this case, the use of conventional welding materials (consumable electrodes, welding wires and others) is not required.
Working diagram of the spotter
To correctly assemble the tool, you need to understand the basic operating diagram of the spotter.
Power supply diagram.
This scheme works according to the following principle: when the spotter is turned on, voltage is supplied to transformer T1. Next, it is converted and supplied from its secondary winding to the diode bridge.
Then it passes through the closed contacts of the “Impulse” switch to capacitor C1, which begins to charge. Since the thyristor is closed at this time, no electric current is supplied to the welding transformer.
Schematic diagram of the spotter operation
To start this transformer and receive welding current on its secondary winding, it is necessary to change the position of the “Impulse” switch, which will disconnect capacitor C1 from charging and connect it to the thyristor control circuit. The current generated as a result of the discharge of the capacitor first passes through the resistance (R1), which is responsible for the operating modes of the device, and enters the control electrode of the thyristor, which leads to its opening.
DIY spotter for body repair
The tip of the spotter is similar to a pistol; in manual mode, you can use it to adjust the time required to straighten the part; to do this, simply press the button and do not release it.
There are several options for making a spotter for body repair with your own hands from used devices. Let's look at each assembly option in detail.
We select components
and the most difficult part of the job is choosing the right transformer. To create the necessary current pulse, you need a 1500 A transformer. If you don’t have one at hand, a little later we’ll tell you how to make it yourself.
In addition to this most important part, to assemble the spotter you will need: a reverse hammer, a control unit (it contains a 200 V thyristor), a diode bridge, a contractor (220 V), and a 30 A relay.
How to properly convert a transformer for a spotter
Rewinding the transformer is the most labor-intensive step. Typically, copper or aluminum wire is chosen for these purposes. Let's look at the order of work in more detail.
| Illustration | Description of action |
| For work we use 2 empty coil blanks, our task is to combine them into one | |
| We cut off the protruding side parts from two coils, glue them with second glue, wrap them with cloth and fill them with varnish. We glue the corners with cardboard. This is done so that the wire does not bend when winding. We got one big blank. | |
| We begin winding the wire in several layers, diameter 1.1 mm. In our case, we got about 112 turns per row. We lay each layer with insulating paper. This will minimize the risks of interturn short circuits. | |
| Let's make a branch. There will be three of them. You can change the voltage on the secondary without winding it. This will slightly increase the load on the primary, but for short-term work, for example, switching the current from 3 Volts to 5 Volts, it is quite suitable. | |
| We take the wires out of the coil |
Important! The length of the outgoing ends of the secondary winding of the transformer must provide for the possibility of its connection to the output terminals, and the primary - for connection to the electrical circuit of the device. It is advisable to impregnate the transformer you have made with shellac.
If you want more knowledge on how to properly wind a spotter transformer, watch this video
Manufacturing of the control unit
The task when assembling the control unit is to correctly connect the jumpers to break the contacts of the primary network. We provided the basic diagrams earlier. In addition, the control unit contains wires, contacts for the start button, as well as other switches necessary for operation.
Selecting a spotter body and power cable
Even though you are making a homemade instrument, you need to take care of aesthetics. Therefore, it is important to make the body of the unit (what those who turn to you for help will pay attention to) functional and convenient. Think in advance about which control elements you want to place and where.
An example of the location of controls on the body of a homemade spotter: 1 – button to turn the device on and off, 2 – current regulator, 3 – pulse regulator, 4 – lever for switching from manual to automatic mode, 5 and 6 – welding cables.
The body for the spotter can be made of different materials: metal, plastic and even wood. Some craftsmen use a PC system unit. This is quite convenient, since it already has the ability to install microcircuits and coolers. Sometimes a wooden box with a hinged lid is used as protection.
Some models have a retractable telescopic carrying handle.
The task is to ensure the possibility of opening the box and access to all controls at any time. The dimensions of the housing are selected individually; it is better to treat the structure with a dielectric material.
On the reverse side of the cable for ground, you can install a quick-clamping element (crocodile) or equip it with a terminal for threaded fastening.
Particular attention should be paid to the quality of the welding cable.
The length is calculated according to this principle. For every 10 A of the maximum permissible current that the spotter produces, there should be 1 mm² of cable cross-section.
For the mass, use a cable whose length does not exceed 1.5 m, for a worker - no more than 2.5 m.
Making a working welding gun - detailed photos and video instructions
The welding gun is one of the most important elements of the spotter. If you plan to use the device quite actively, it is better to buy a ready-made sample. But for small-scale work, a homemade unit is quite suitable.
The peculiarity of the gun is that it can combine one or more functions: used as a welding machine, as a reverse hammer.
Some craftsmen simplify and speed up their work as best they can. Let's look at how one of these devices works, the most interesting in our opinion is a gun for welding washers using a spotter.
| Illustration | Description of action |
| The design involves the use of a pneumatic gun, which provides hooks for effective fastening with a spotter. The cylinder and piston of a pneumatic drive are essentially an ordinary metal tube and a metal round rod. | |
| The body was made of stainless steel 1 mm thick. The central moving mechanism, the shutter, was made of a millimeter-thick copper pipe. | |
| The pipe was cut, straightened and 2 pieces of copper plate were made. A cutout was made in one plate for the washer to be welded, then the 2 plates were connected to each other. Thus, we managed to avoid milling work. | |
| The gun is a pneumatic drive for the shutter; it helps to distort it and thereby push out the next washer for welding. |
In most cases, the assembly glue gun serves as the basis for the welding gun. The task is to develop a design that would allow the electrode to be changed without disassembly.
Sometimes another attachment is used for work - a puller for a spotter. It performs two functions at once: welding and surface leveling.
| Illustration | Description of action |
| As we can see, the nozzle allows not only to carry out resistance spot welding, but also to slightly level the surface at the same time. | |
| During the work process, do not forget to check the level |
Making a reverse hammer for a spotter with your own hands
A reverse hammer (the top one in the photo) is needed to straighten the body surface.
Usually it is assembled from metal rods, welding them and shaping the tip with nuts.
The blank on the pin must move freely to create reverse thrust during operation.
A sharp tip must be welded to the end of the electrode, which makes contact with the surface of the body when straightening the car.
We offer you a short video instruction on how to make a reverse hammer.
What can spotters be made from?
To make a spotter, old welding machines, batteries and even used microwave ovens are used.
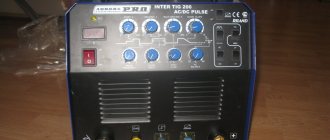
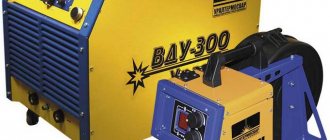
DIY spotter from an inverter welding machine
However, most often an inverter welding machine is used as the main unit for converting a spotter.
The welding machine contains everything necessary for the operation of the device.
The main thing is to prepare a transformer to create the required current and make a gun.
If you have a backup welding machine, then we will help you decide to convert it into a spotter. How to make a spotter with your own hands from an inverter welding machine, watch this video.
Microwave spotter
Converting a spotter from a microwave with your own hands has its own characteristics. In general, the scheme and sequence of work does not differ from the process of assembling an inverter unit, however, we need to configure the device so as to achieve a pulsed operating mode. To do this, you will need a large capacitor with a control system. Let's briefly consider the stages of work.
| Illustration | Description of action |
| Let's prepare microwave transformers for work. | |
| We release the primary winding we need. | |
| We need to later lay the secondary winding cable in the vacated housing. | |
| This is what our assembled transformer looks like. | |
| And this is what the entire transformer network looks like. All that remains is to bring the necessary elements to the case and connect the power supply. |
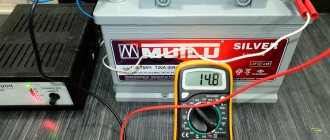
DIY spotter from an old battery
A battery-powered spotter is an excellent option for a hiking tool. You don't need a network connection to use it.
Spotter made from battery and retractor relay
The connection diagram is as follows: the relay body and welding wire are connected to the negative terminal. A contact is welded at the end of the wire, intended for attachment to the welding part that needs to be straightened.
Electrical circuit of a battery spotter
The positive terminal is connected to the relay using a bolt. The second bolt from the relay attaches a wire to it that goes to the recoil hammer or gun. In addition, a wire goes from the positive terminal to the control contact.
How to properly operate a homemade device
The work process involves a certain sequence of actions. Let's tell you more about them.
| Illustration | Description of action |
| The main condition for high-quality work of the spotter is the cleanliness of the surface being welded. Usually the surface is cleaned with a grinder with a rigid petal attachment. | |
| The next stage is to weld the mass. | |
| Using an attachment - a reverse hammer, we begin to straighten the metal: from the edges of the dent to the center. We carry out work at minimum current. | |
| Using a spotter, special fasteners are welded. These can be hooks, or, as in our case, ordinary chain links. | |
| This fastening is necessary in order to straighten deep longitudinal potholes in metal using a spotter comb or with your own hands. And then the maters clean the surface and there is no trace left of the deformation. |
At the end of the article, a little about safety precautions when working with equipment:
- It is very important to regularly inspect and clean all parts of the device.
- Pay attention to the correct connection and insulation of the wires. And also for grounding the device.
- If you plan to process a large surface, do not forget to wear special safety glasses.
We hope that the recommendations of the Seti.guru editors were useful to our readers
Possibilities of a homemade spotter
A homemade spotter for straightening has most of the functions of a professional device. With his help:
- spot welding is created to connect parts;
- working elements warm up;
- damaged areas of parts are cleaned;
- fasteners are captured;
- dents in the car body are pulled out;
- fastening elements are removed;
- The working surface is cleaned.
Using the device does not require professional skills to use, since the control scheme of the spotter is simple. The device operates in continuous and short-term mode. Using additional elements, a forced cooling system is provided.