Home / Welding technique
Back
Reading time: 2 min
0
870
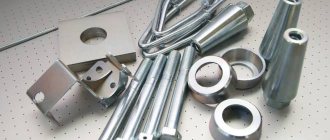
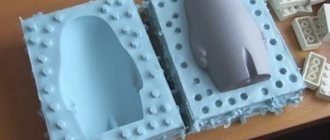
Today, silumin is used to produce all kinds of complex elements. Welders connect silumin parts using this welding method.
This method cannot be called complicated, but when it comes to practice, many beginning craftsmen encounter a lot of difficulties when working with the alloy.
Parts made of this metal are more difficult to connect, since during welding the alloy oxidizes and heats up. Given these features, argon is used for this welding method. This element prevents the oxidation process during welding.
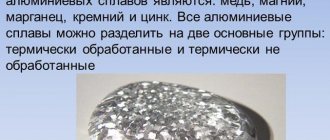
Note. Silumin is a silicon-containing alloy based on aluminum. Various products of intricate shapes are produced from it.
The physical properties of this alloy include wear resistance, high strength, corrosion resistance and low weight.
- Silumin welding using argon
- How to weld silumin correctly
- Welding silumin using the argon arc method: all the pros and cons
Technique
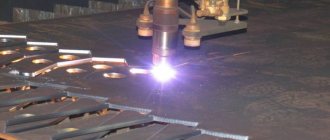
In production, in private workshops and car repair shops, craftsmen often wonder how to weld silumin. Argon arc welding is used to connect parts made of this material. The technology is welding with a non-consumable electrode. To make a reliable connection, a special silumin wire is used, which acts as a filler material.
Before using welding equipment, the part should be prepared. It is necessary to remove the oxide film that forms on the surface of the material. To do this, use sandpaper, a brush or a sandblaster. For chemical processing, a solvent is used.
What equipment is needed?
Before starting welding work, you should prepare the equipment. To connect silumin blanks, it is important to choose a high-quality device. A welding transformer is not suitable for this. You need an inverter device and a gas cylinder. In addition to them, they use: tungsten electrodes, a special torch and an oscillator.
You can weld silumin parts semi-automatically. The wire is fed under the protection of inert gases. When using a semi-automatic machine, it is important to consider some features:
- If the direct current has negative polarity on the electrode, it will not be possible to make a high-quality seam.
- To prevent the connecting wire from getting tangled when feeding, use a tool equipped with 4 rollers.
Advantages and disadvantages
Silumin welding has certain advantages and disadvantages.
Strengths:
- There is virtually no workpiece deformation due to the small processing area.
- Argon protects the treated surface from oxygen.
- High speed of work completion.
- Using this technology, it is possible to connect structures that are not amenable to other welding methods.
Weak sides:
- When working outside, strong winds will interfere with the work.
- If a powerful current is used to create an arc, an additional cooling system is required.
- The equipment used to connect silumin is very expensive.
- To work with tools and create a high-quality seam, you need to have practical skills.
Argon welding
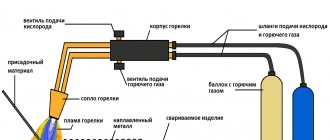
Tig welding technology is a process of working with a non-consumable electrode in a protective gas cloud. Argon itself is an inert gas; it does not react with air and other substances. Its main function in the welding process is to protect the metal from oxidation. Argon is heavier than air and easily displaces it from the working weld zone. Thanks to the argon cloud, the oxide film does not have time to form on the alloys and the seam is strong and neat.
Working with argon arc welding requires the necessary equipment:
- A gas cylinder, in this case argon.
- Inverter.
- Special torch for working with protective gases.
- Oscillator.
- Silumin wire as an additive.
Many inexperienced welders consider argon arc welding to be simple, but this is far from true. Welding with argon requires concentration and attention throughout the entire process. You should not neglect personal protective equipment to protect yourself from splashes of hot metal.
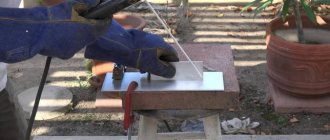
To create a high-quality welded joint, the prepared parts are welded as follows:
In order for the metal to melt more easily, welding work is carried out with reverse polarity of the current using a short arc. The additive is placed in the weld pool. There it melts and combines with the base metal, forming a homogeneous mass, which, when solidified, forms a strong connection. For high-quality heating of parts, argon supply begins 15 seconds after arc formation
It is important to prevent the gas from overheating, otherwise the metal will not be welded, but will be destroyed. The filler wire is fed into the welding zone at an angle and certainly in front of the torch. The feed must be precise, uniform and move strictly along the seam
Transverse or too fast feeding of the additive can cause metal spattering and deteriorate the final quality of the weld. After completing the welding work, argon is supplied for another 10 seconds, which allows the alloy to cool and avoid cracks and seals in the seam.
All movements of the welder, supply of additive, as well as advances of the torch must be smooth and measured.
Adjustment of welded joints of aluminum and its alloys is carried out by GOST 14806-80 dated July 1, 1981. All types of seams, their joints, lengths, etc. can be found in this GOST.
Those who are familiar with this method highlight such advantages as:
- low time investment;
- high quality of the obtained compounds;
- the ability to carry out repairs at home;
- variety of metal welding techniques.
In addition to the advantages, there are also disadvantages:
- high resource costs;
- inability to work outdoors;
- possible problems with setting the welding mode;
Requirements
You can weld a seam using welding equipment by observing certain requirements:
- Do not touch the electrode to the surface being processed when igniting the arc.
- Before supplying gas, the burner nozzle should be warmed up. After 15 seconds, you can open the gas valve.
- After stopping the supply of electricity to the electrode, wait 10 seconds and only then turn off the gas valve.
If the work is carried out at home, you can use a consumable electrode rather than a tungsten electrode.
How does the process work?
Silumin’s corrosion protection is provided by a durable oxide film. It also complicates the welding process, preventing the direct connection of atoms.
Welding of non-critical (lightly loaded) parts is carried out at direct current of reverse polarity, using coated electrodes, or at direct current using an infusible electrode, carbon or tungsten.
The required penetration is achieved by preheating. Parts with a thickness of less than 10 mm to be welded are heated with a gas burner to 250-300ºС, workpieces of greater thickness to 400ºС.
Particular attention is paid to the strength of the welding current. It is best to select it before starting to weld the parts, using waste pieces of silumin of similar thickness
For preliminary selection, use the following ratio: I≤60 A per 1 mm of electrode diameter, where I is the welding current.
Since the slag film after cooling will not make it possible to ignite an arc, work is carried out continuously with one electrode.
The melting rate of an aluminum electrode is higher than that of a steel electrode, so welding needs to be done faster and higher.
When using infusible electrode technology, filler rods made of aluminum alloys are used. Parts up to 2.5 mm thick can be welded without cutting the edges. More massive products require cutting or welding with a gap of about 0.5-1 mm.
Massive workpieces are welded in two passes. First, a warm-up pass is made from the middle to the edges of the seam, and only then the seam is made.
The filler rod is held in the left hand, moving behind the carbon electrode at a distance of 7-10 mm (depending on the arc strength).
The melting of the rod should not occur in drops, since each of them will end up in a kind of “bag” of oxides. In this case, silumin will be sprayed without forming a seam.
To prevent this from happening, the additive melts directly in the weld pool. To prevent silumin from flowing out of it, steel backing plates are used.
The finished seam should cool as slowly as possible.
It makes no sense to weld Chinese-made silumin products, since for the most part they are made on the basis of powder technologies. Even if you manage to select the appropriate mode and additive, the cost of such repairs will be more expensive than a new part.
Can this type of welding be done at home?
Sometimes it is necessary to weld silumin at home. Stages of implementation:
- Prepare the room, workplace and equipment. When welding with argon, you need to take care of a good ventilation system. A metal table is suitable for carrying out work.
- To connect silumin parts, you need to use consumable electrodes.
- The workpieces are heated to a temperature of 300 degrees. The electrodes need to be heated to 150 degrees.
The seam can be made with fusible electrodes. It is important that they consist of a silumin rod, which is coated with an alkaline saline solution. When carrying out welding work, a large amount of slag will be released. It should be quickly removed from the surface of the workpiece.
Features of silumin alloy
It is stronger than duralumin, resistant to corrosion, ductile - easily stamped, castable and forged.
It is valued for its decorativeness, wear resistance, and lightness (it has a low specific gravity). Silumin is used in many industries; parts for cars and motorcycles, overhead elements for plumbing, and interior decoration are made from it.
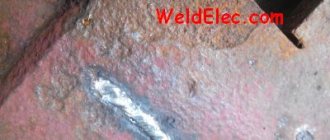
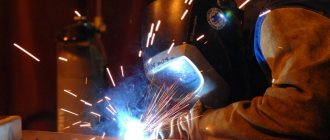
Due to oxidative activity, the aluminum-silicon alloy is difficult to weld. In general, alloys with a high zinc content are not welded; when heated, it burns out and the metal becomes brittle. Foundry silumin with a silicon content of 5 to 22% is hot joined. During heat treatment, inert gases are used, mainly argon; it is heavier than air, settles on the workpiece, and is held in a cloud.
Due to oxidative activity, the aluminum-silicon alloy is difficult to weld
Welding stages
To make a high-quality silumin connection, welding must be performed with strict adherence to technology. Stages:
- After the arc is ignited and the gas is turned on, the wire begins to flow into the working area. It melts and creates a high-quality connection of parts.
- When feeding the wire, it is held at an angle in front of the torch nozzle.
- The wire must be fed slowly. Otherwise, molten metal will splash around and the quality of the weld will deteriorate.
When using a filler rod, do not place it across or make large deviations to the sides.
Soldering silumin
Decorative parts and those that do not experience stress can be soldered with a gas torch, the metal is heated to 200°C. Soldering silumin with thin walls is done with a soldering iron with a powerful tip. Metal linings are used to protect against oxidation. Only the work area is left uncovered.
Solders used:
- ER4043 – additive for cast aluminum alloyed with silicon and magnesium grades AD31, AD33, AD35;
- Harris52 – solder for aluminum with flux additives;
- HTS2000 is a Chinese analogue of Harris52.
Safety precautions
Before you start welding silumin parts, you need to take care of safety. For this you will need:
- Protective equipment - gloves, mask, shoes, robe.
- Welding equipment must be in good working order. If it breaks down, you need to replace the device or have it repaired.
The room used for welding must be well ventilated.
Silumin welding is a technological process similar to joining aluminum parts. In this case, you need to choose the right equipment and consumables.
Application of a gas burner
If you decide to use refractory solders for soldering aluminum, then you cannot do without open fire
In this case, you will have to pay attention to the following nuances:
- The flame must be of high quality - not smoke, maintain a constant temperature and torch size.
- Open flame soldering requires considerable experience in maintaining the optimal heating temperature, since the “temperature corridor” for high-quality soldering is quite narrow. Overheated - the aluminum lost mechanical strength or even leaked. If not heated enough, the refractory solder does not melt.
In addition, you cannot take the gas burner in your hand, and therefore you will have to hold the soldered parts in your hands. If it's a massive object, you simply won't be able to hold it in the flame in constant motion to maintain the desired temperature while simultaneously trying to solder with your other hand. Well, since you will be heating from below, for normal soldering you will have to overheat the part (you need to solder from above), which means it can easily melt. Nevertheless, at the very least it is possible to solder aluminum over gas, but only at the very least.
The ideal option would be a gas burner. It is compact (in the sense of the burner itself, and not the cylinder attached to it), does not smoke, and weighs little. But unfortunately, it is not always possible to get it.
The easiest way out of the situation may be a small blowtorch. To make it easier, simply do not fill the device with gasoline “under the neck”. Before you start soldering, the lamp must be warmed up properly so that it does not smoke.
Aluminum can be soldered with a gas or gasoline torch.
We will assume that the burner is heated up, and the parts to be soldered are cleaned and pressed tightly against each other at the place of future soldering. Apply the appropriate flux to the parts (if you are using flux-free solder, then use transformer oil as the flux) and start heating. The heating temperature must be constantly monitored with a piece of solder, touching the place of future soldering.
Once the solder begins to melt, try to keep the temperature constant (this will come with practice) and rub a piece of solder onto the solder area, completely tinning it. Once the tinning is finished, you can solder with the same piece, using it as an electrode for welding. Often, when soldering couplings, electricians use refractory solder only to tin the cable sheath, and then solder the coupling with ordinary low-melting solder.
The fact is that the coupling is made of lead and simply cannot withstand the heat required to melt refractory aluminum solder. But if both parts are aluminum, of course, it is better to solder and tin with refractory solder - the junction of the parts will have high both electrical and mechanical strength.
Butt method
This technique is one of the most reliable in terms of cold welding of aluminum. Suitable for connecting parts through their ends. This way you can combine the plates into one large shield. The process of metal bonding occurs in several stages:
- First of all, the ends of the parts are cleaned. Paint, rust and dirt are removed from them. Next they are degreased.
- After cleaning, the parts are clamped in a special vice located opposite each other. Only the ends and 1 cm of metal should stick out.
- When the workpieces are securely fastened in a vice, end pressure is transmitted through them to the ends. With its help, a reliable connection is obtained.
Firstly, the size of the holding vice does not allow the use of large parts for joining. Secondly, part of the metal clamped in a vice is also subject to deformation. Thirdly, after cold butt welding is completed, it is difficult to remove the finished part from the clamps.