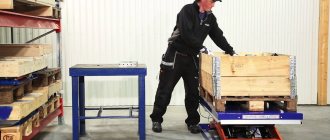
Nowadays you can buy almost all home craft products in stores. But sometimes you don’t have the money to buy it or you want to make something yourself. Recently, the variety of interiors has simply gone off scale. Designers often use antique items to create a unique and unique atmosphere in the home.
Many people cannot afford to hire a designer and purchase unusual decorative elements, so you can make such items yourself. For example, woven carpets will add color to the interior. And if they are made on their own, they will delight you every day. Moreover, with them your home will become cozy and warm. In addition to carpets, you can make napkins or lampshades. All these items are made using a loom.
Previously, with the help of a device such as a loom, towels with patterns, tablecloths, rugs, sundresses and shirts embroidered in different colors appeared in homes. Not a single holiday would be complete without patterned towels. They also decorated people's huts.
All these things were made using a handloom. The first looms were large wooden structures. There were weaving looms in almost every house. And they were taught to use them from childhood. The skills of patterned weaving were passed down to the younger generation. Ancient looms were mostly shuttleless.
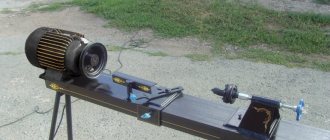
If you are interested in an activity such as weaving, then you can make a loom with your own hands at home. The loom is widely used in the modern world. The shuttleless table loom is also designated as STB. It is used in the processing of various fabrics to obtain finished products.
Making a simple loom with your own hands
Nowadays you can buy almost all home craft products in stores. But sometimes you don’t have the money to buy it or you want to make something yourself. Recently, the variety of interiors has simply gone off scale. Designers often use antique items to create a unique and unique atmosphere in the home.
Many people cannot afford to hire a designer and purchase unusual decorative elements, so you can make such items yourself. For example, woven carpets will add color to the interior. And if they are made on their own, they will delight you every day. Moreover, with them your home will become cozy and warm. In addition to carpets, you can make napkins or lampshades. All these items are made using a loom.
All these things were made using a handloom. The first looms were large wooden structures. There were weaving looms in almost every house. And they were taught to use them from childhood. The skills of patterned weaving were passed down to the younger generation. Ancient looms were mostly shuttleless.
If you are interested in an activity such as weaving, then you can make a loom with your own hands at home. The loom is widely used in the modern world. The shuttleless table loom is also designated as STB. It is used in the processing of various fabrics to obtain finished products.
- Working principle of table loom
- Self-production of the machine
- Making a simple weaving device
Factory machines
If you are wondering how to make a DIY loom, then you are one of those who want to create their own textile products from scratch. To do this, it is not necessary to make the machine yourself. You can buy it.
Read also: Resistance of the primary winding of a transformer is 220
There are hundreds of varieties of factory-made looms on sale. Domestic or European manufacturers provide a guarantee for their products, so you can buy machines without fear that they will not be able to work.
Judging by the reviews, among Russian manufacturers the best are looms and Pelsi. The latter specializes in the manufacture of wooden toys.
As for manufacturers from other countries, their products are many times more expensive.
Working principle of table loom
The design of the weaving machine involves laying threads using a special threader. The amount of yarn that enters the installation can reach 2-4 kg. Thus, you can work on the STB loom for a long time without stopping.
This installation is a combination of shafts. This is a roller-beam for winding thread on it and a roller for the finished fabric. The threads are made through holes - healds. The healds are connected to each other by a braid that is thrown over the heald rollers at the top and bottom. There are also two rollers, which are necessary when exiting the main part and the finished product, respectively.
The type of mechanism on the devices represents the formation of a pharynx. There are 3 types of mechanism:
- cam type;
- carriage;
- jacquard.
If simple patterns are intended to be produced, then the cam type is used. The cams also make it easy to move from pattern to pattern. The jacquard mechanism provides wide installation possibilities.
Depending on the filling width, the machines are divided into wide (from 25 m) and narrow (22 m). If there is a multi-color weft addition, it becomes possible to introduce threads of different textures and densities.
Main stages of work:
- Yawning.
- The process of inserting the weft into the shed.
- Surf the duck to the edge of the product.
- The mechanism of movement of the product.
- The process of lowering the web from the warp shaft.
Weaving technique
The operation of the machine is based on the fact that even warp threads are passed into the holes of the vertical frame. First, with the movement of the foot, this part is lowered down. As a result, a gap is formed between the warp threads, into which the shuttle is passed.
The next row is performed by moving the frame up. As a result, even-numbered threads rise, again forming a lumen. The weft thread passes through, and the material produces a “basket”, checkerboard weave.
Using reeds, the master compacts the rows, knocking them into a canvas. Some machines have mechanized devices for performing this action, which greatly facilitates the work.
It is important to consider the need to adjust the tension of the warp threads. For this, screws are used, which the master can unscrew or tighten at his discretion.
You also need to take into account the distance between the warp threads. The ability to adjust it will also expand the functionality of the device.
The manufacture of a weaving loom, which provides for mechanized weft insertion, will further facilitate the work and improve the quality of the products.
Self-production of the machine
Many people are faced with the task of how to make a loom? Moreover, to spend less materials. So how to make a loom with your own hands? First of all, you need to adhere to the manufacturing scheme, which contains successive steps:
- A quadrangular frame is selected.
- Round openings are made in two slats.
- Slats with the smallest circumference are placed in the openings made at the ends of the bar and secured with wedge parts.
- There are grooves in the middle part of the side bar to accommodate the comb.
- The equipment has a solid bottom for stable standing.
- Nails are driven into the nearest round block at a distance of 5 mm to tighten the threads.
- At the rear of the installation, a rail is used to wind excess fabric.
The comb can be made from thick plywood. Its height reaches 15 cm. The length of the comb should be greater than the distance between the frames, which are located on the side. The number of nails driven in must be divided by two to obtain the number of teeth. Select the height of the teeth to be approximately 70-100 mm, and the width 5-7 mm. The interdental space is 5 mm.
On the near shaft there are nails to which threads of equal length are tied. Then the threads are divided into even and odd. Behind the comb there is a moving shaft where the odd threads are attached. And the even threads are on the comb, namely, they are wrapped around the nails of the teeth. A homemade loom works according to the rule of winding the remaining amount of thread on a bar, and the base of the product is made.
Next comes the winding of the threads onto the wefts. The end of the thread is attached to the left side of the frame, which is located in front of the drive rack. When the bar is raised, the weft is pushed into the shed. Movement occurs from left to right. By alternating multi-colored threads, you can get designs on the product (checkered, striped).
Video: how to make a loom?
The design of the wooden loom was approximately the same in different areas. The main differences were in the choice of material, hence the approach to the layout of the loom.
In our area, the bed of the weaving loom was made from a solid block of half a log, in which the L-shaped upper part of the bed, which was usually sawn or hewn out from a whole piece of wood, was permanently fixed. To do this, they chose a bent part of a tree trunk or a part of a tree with roots. When assembling the machine, two such frames are placed parallel to each other and are not fastened with anything else. Due to their massiveness, they provide the required rigidity and stability of the machine. Additional rigidity of the machine design is provided by wooden shafts, which have restrictive disks on both sides of the frame. Drawings of an antique loom are presented in Figures 1-6. As options, types of wooden loom beds are presented. A type of frame with additional support for the beam is often used, both with a solid-bent one and with a composite one (Fig. 5b). There are designs of frames in which there are no lower massive blocks, and the frame stands on its own vertical supports. In this case, the design of the wooden loom includes transverse beams that fasten the frames together and provide the necessary rigidity.
The beams (Fig. 7) went with their ends into the hollowed-out holes of the frame and were usually secured with wooden wedges. The rear and front shafts of the machine (Fig. 2 and Fig. 3) were made from a round barrel. The beam or rear shaft has locking disks for fixing the beds along the width. This shape of the beam provides, in addition to the shaft fixation itself, additional structural rigidity when installing heavy frames without transverse fastening. One of the outer ends of the shaft is made in the form of a wide disk or head, in which square recesses are hollowed out. The clamp will be inserted into these recesses when the machine is operating. In the body of the shaft itself, along the length of the working part (along the width of the warp), there is a rectangular groove into which the rail with the warp threads tied to it will be inserted. The rail is fixed in the groove with ropes threaded through through holes made at the ends of the groove. The front shaft of a wooden loom has a slightly different shape. This shaft (prishvitsa) does not have locking discs. On one side of the shaft there is the same head with recesses for the clamp. In the cross section of the shaft there is also a through cut along the entire working length, through which the warp threads are threaded and tied to the shaft.
When equipping the machine, both shafts can be placed with a clamp on the left or right. True, if the warp is already wound on the beam, it can only be placed in one position - so that the threads go from above. The weaver himself decides how to install the shafts - he has to work.
In our grandmother’s house, the machine was always assembled so that the rear clamp was on the left, and the front one on the right, and the rear clamp was made in the form of a long handle, which was not tied with a rope to the bed, but simply rested on the floor near the workplace. The procedure for winding the shafts, after the edge of the rug rested against the reed, was as follows: - the grandmother leaned over in a chair, took the lower end of the rear harness with her left hand, took it out of the head of the beam, then with her right hand she wound the sewing rod by the front harness, inserted the left harness into the beam, put its end on the floor and pulled on the right harness, tying it with some kind of tricky quick knot. All this was done in a few seconds, without getting up from the chair.
The most basic component of the machine is the reed. It is a series of flat teeth made of wood or metal, fixed in two guides (upper and lower) at a certain distance from each other. This distance depends on what frequency the base will have. For weaving rugs, the warp is much thinner; for making fabric, the warp must be very thin. Therefore, the reed can change for one machine. The reed itself is inserted into a wooden frame - stuffing and suspended from the crossbars on ropes or rawhide. The size of the reed is usually calculated in skeins. A skein is thirty teeth of a reed. In the old days, reed teeth were made from flat wooden slats (like popsicle sticks) made from hardwood. The teeth were attached to wooden composite crossbars, tying them with a special thread. The distance between the teeth also depended on the number of threads.
It was a very complex design and making a reed was a whole science that was mastered by rare craftsmen. Now, probably, this skill has already been lost, wooden reeds have generally fallen into disrepair, and on old wooden looms, a metal reed, sawn off to the required size, is increasingly inserted into the stuffings. For weaving rugs, you can also use a reed with a high frequency of teeth; simply, when equipping the machine, the threads are pulled through a certain number of teeth. Threads for a wooden loom are prepared using the ancient method. The thread consists of two round crossbars with a diameter of 1.5 - 2 centimeters and a length equal to the working width of the machine. On each crossbar, thread loops are located close to each other, measuring 12-20 cm when stretched. Each loop of one crossbar captures the corresponding loop of the opposite crossbar. The number of loops on each crossbar must be no less than the number of paired threads. The ends of the upper crossbars of the two threads are connected with a rope through a wooden block - the eyelid. The eyelids are suspended on a crossbar, which lies in a nest under the sky. The lower crossbars in the middle are tied with ropes to the footrests. The diagram of the passage of warp threads through thread threads is shown in Fig. 8. Each odd thread passes through the inner loop of thread B and through the inter-loop space of thread A. Each even thread passes through the inter-loop space of thread B and through the internal loop of thread A. The result is a heald apparatus.
Now, if you press your foot on the left footrest (according to the diagram), then thread A will go down, and thread B will rise up due to the connection through the blocks. In this case, the even threads inside the loops in thread A will be pulled down, and the odd threads located inside the loops of thread B will rise up. Inside the inter-loop space, the threads will calmly move where they need to. Alternately working with the footrests, we open the jaw in one position or another. The design of the eyelid does not raise any questions. This is a hanging block made of wood, suspended by a rope on a crossbar. In the photograph of a wooden loom you can see two flat slats located in the warp layer immediately as they exit the beam. These are the so-called cenovnitsy. On one chantry, the odd numbered threads are on top and laid out in order, the even numbered threads are on the bottom. On the next chenovnitsa, the warp threads change places - the odd one goes down, the even one goes up. This is done so that if the thread breaks and any confusion occurs, the firmware of the machine can be easily restored. To prevent the released thread from running away, the edges of the chanter are grayed with a separate harsh thread. To fasten the thread, two holes are made at the ends of the chanel. After winding the shafts, the bowmen move closer to the beam.
Making a simple weaving device
You can also make a simple mini-device at home, which will serve as a play device for children, and also teach them how to weave. A children's loom will be useful for teaching children the ancient art of weaving. Using such a simple loom, you can make a compact rug that will be useful at home.
Moreover, this device does not require special devices. All you need is thick cardboard, scissors, a hook, a pencil, a fork and yarn. Instead of cardboard, you can use old plywood, chipboard or other rigid base.
The loom operates by threading threads into slits and then weaving. The yarn is made into a cut, and its end is located on the wrong side. Threading the yarn should be done in the form of a snake. The end result is tying the resulting cutouts. On the other side, stripes of threads are also made. One side will be the front side and the other side will be the back side. The front is a completed canvas.
You have to pull the threads smoothly so as not to bend the cardboard. You can use a larger needle for convenience. The number of threads must correspond to the edge being an edge and the transition from row to another row to be made. You can move the threads close to each other using a fork. So, such a loom for children will help you teach your child spinning skills without putting in a lot of effort.
You can tell children how the first looms were spun, and how a homemade device works. After all, getting into weaving is a very interesting activity.
The simplest weaving device
The easiest way is to make a frame on which you can easily make a small-format tapestry. In fact, this is a simple weaving loom, where the main work is done by the master himself. You can call the frame a hoop, which is convenient for the master to work on, since this device can be carried and installed in any convenient place.
It is enough to simply place two slats parallel to each other and put nails on them. The warp threads are pulled onto them. Weft - transverse threads - are pulled by hand using a shuttle.
You can use simple, regular weaving. Then the canvas turns out to be one color. To do this, the shuttle is pulled first under the even warp threads, then under the odd ones. By changing the color of the weft, you can make transverse stripes on the product.
To complete the ornament, more complex weaving is required. Then the shuttle is passed under the warp threads no longer in a checkerboard pattern, but depending on what pattern the master decided to use.
If you place a printout of the design under the stretched warp threads and use several different colors, then it is quite possible to create a real painting. These products are called tapestries and require patience, time, and skill from the manufacturer.
How to weave a masterpiece “on your knees”: unusual looms
Do you love to weave, and suddenly find yourself far from your favorite machine?
You can’t decide to buy a rather large and expensive machine?
Do you love learning new techniques but aren't sure you need a loom?
Maybe you like to do everything yourself, even if it’s easier to buy?
You don't know what else to do with your child?
Do you admire the ability to make anything out of anything?
Then this creative collection is for you!
The loom is simple, like everything ingenious. Here is the appearance and detailed drawing:
Does it look very archaic? Try to look at it through the eyes of a modern person! For example, like this:
You can make a fashionable modern frame from plastic pipes:
Here are more compact desktop machines for those who are not yet ready for big feats:
When you don’t have the strength to weave as much as you want, you can greatly simplify the design:
And if you are ready to start with something very small, then you can use ideas for bead weaving, because on all these “looms” you can also weave with threads:
I would also like to say something about weaving on cardboard. It is usually woven by stretching threads onto a rectangular piece of cardboard with slots.
But once you turn on your imagination, you begin to understand that the possibilities of the cardboard “machine” are almost limitless:
More creative ideas:
Or even like this (cheap, cheerful and develops fine motor skills for the child):
After practicing fine motor skills, you can move on to more serious physical activity:
Well, if you really don’t have anything at hand, then attach one end of the base to your belt, and the other to your own legs - a very ancient and respected method, by the way.
Do you think it’s impossible to do anything meaningful with things like this?
Yes, don't expect your first works to look like this:
But, with a little experience, you can do simple and stylish things:
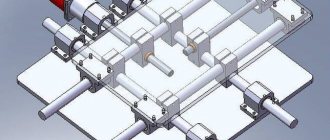
Construction. design. (or how else to say) loom from personal experience)
Materials: 3x4 beam, 4x5 beam, 8 school wooden rulers 50cm long, 3x1.5 strip, 4x0.5 strip, Moment-Crystal glue, long bolts with wings, wood screws, a piece of layer-by-layer plywood. Tools: Hacksaw, drill, jigsaw. Despite the apparent simplicity of the design, I had to tinker. and resort to the help of a young man I know) Since I cut 90 percent of the parts myself, the entire manufacturing process took me about two weeks. from time to time of course)
Let's start with the simplest thing - the shuttle. Rake 4 by 0.5. approximately 55cm long. The edges are cut into a V shape.
This is a reed. The removable design is a guide for threads. Made from school wooden rulers and 4 x 0.5 slats. I sawed the rulers in half lengthwise and in half crosswise. I also sawed the 4 by 0.5 rail lengthwise. The length of the top bar is about 70 cm, the bottom 50 cm.
The reed is completely glued with Moment-Crystal glue. Good glue. I like it. It just smells strong, but the tenacity is excellent! Don't forget to degrease the parts before applying glue. although I forgot somewhere. but it still holds up great!
This is a top view of the reed.
This is the same rail from which the shuttle and the retaining bars on the reed are made.
This is the cutting line. It turned out to be 2 cm.
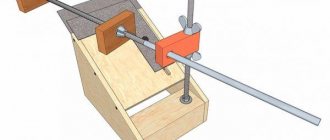
For the construction of the body itself, a 3 by 4 beam was used. The outermost cross member on the right is a rotating shaft on which threads are wound on one side and the finished product on the other side (the machine has two rotating shafts on both sides). The second cross member on the right is a stiffener. And you can use it to attach the machine to the edge of the table with clamps, moving it to the edge so much that the edge coincides with the edge of the table. Unfortunately, there are no clamps yet)
This was the most difficult thing for me. This is exactly what the assistant was called for, for which many, many thanks to him! Gears were cut out of a piece of layered plywood. The machine has a kind of mirror structure and therefore the shafts with gears rotate in different directions - away from each other. Also a blocking finger. let there be a finger)
This is the shaft itself. There is no need for it to be round. perhaps this is the world's first rectangular shaft)))))) It is attached: - a through hole, a wooden round bushing and a shaft (secured with a self-tapping screw) and a gear are mounted on it.
The distance between the extreme parts of the body is approximately 57cm. In this photo you can see the holes in the shaft and in them a ribbon to which a thin strip is tied (also from a ruler sawn into two parts lengthwise). This rack serves as a thread catcher)
Here it hangs this small, thin and very important strip. By catching the threads on this rack, you protect yourself from arbitrary rotation of the threads around the shaft and ensure your work with sufficient and comfortable thread tension. The hook-and-loop rack is present on both shafts!
This is the shaft. Beam 4 by 5. In general, I must say, I made it from what I had. in the shop. Unfortunately, there wasn't much choice. I could have avoided all these rip cuts and school rulers if our store had a decent selection of materials.
The body is a 3x4 beam. The length of the body up to the point where it is fastened with a bolt and a wing is 40 cm. The mirror part is also 40 cm.
Vertical part. The place where the reed is placed. The rake is 3 by 1.5. Here you can see how the two parts of the machine are fastened together.
I am complementing. I hope this is clearer)
It turned out to be difficult to describe. I’ll take a couple more general photos to put everything together in my head. I'll add it later.
The most labor-intensive process when working is threading (as it turned out) and the most enjoyable is the weaving itself))))
I'll probably add more.
Did you like the article? Subscribe to the channel to stay up to date with the most interesting materials
How to make a machine from plywood or wood
If you have enough space to accommodate a full-fledged weaving device, it is worth trying to make a more professional model. Most often they are made from plywood or wood.
There are many ways to make such a device with your own hands.
There should be two rollers at the very beginning and at the end. Threads are wound onto one, and finished fabric onto the other. The ideal option is to make them with bolts or handles with the possibility of fixation.
If your machine does not have a separator that facilitates the slipping of the shuttle, you should first attach not 1, but 2 rollers. One will place the even warp threads, and the other will place the odd warp threads.
The last required detail is the reed. It can be made from 2 wooden planks with nails often driven between them.
When threading the machine, the threads will need to be passed between these teeth.
If all this is done correctly, you can get to work.
History of the Slavic woven carpet
Among the Slavs, the creation of floor carpets, paths, and bedspreads is one of the “grassroots” techniques. At first, this craft was practiced only for the needs of ordinary people. These things did not require a serious level of skill, as required by weaving lace and weaving thin fabrics. And the tools used to create them were the simplest.
- In most cases, they wove ordinary paths from unnecessary fabric items that had served their purpose. Strong, dense threads were used as the base, but the transverse ones were strips of fabric. Homespun paths were popular in our country in the nineteenth century.
- Sometimes they took flax waste and straw to create rugs. Such things were usually laid out at the very entrance to the huts. To create both, in most cases an old loom made of wood was used.
- The workflow is quite easy. Transverse threads are pulled between the stretched threads of the base using the interlacing method. From time to time they will need to be compacted with some reeds, which are similar to combs. They used them to assemble transverse rows into a large canvas.
Types of machines
Rectangular
The easiest way is to create a frame on which you can quickly make a small-format tapestry. In fact, this is an ordinary weaving loom, where all the work is done by the master himself. You can call the frame a hoop , which is easy for the master to work with, since this tool can be carried and installed anywhere.
- It is enough just to lay out 2 slats parallel to each other, onto which you need to hammer nails. The warp threads are pulled over them. Weft - transverse threads - are pulled with your own hands using a shuttle.
- You can use simple, standard weaving. Then the canvas will turn out to be one color. To do this, we drag the shuttle first under the even threads of the base, then under the odd threads. By changing the color of the weft, you can make cross stripes on things. To create an ornament, you will need more complex weaving. Then the shuttle is passed under the base threads, no longer in a checkerboard arrangement, but depending on what pattern you decide to use.
- If you place a printed image under the stretched threads of the base and use several different colors, you can easily make a real picture. These products are called tapestries and require patience, time, and skills from the craftsman.
Round
Hoops for creating products do not always have to be rectangular. To make round carpets you will also need a frame of a suitable shape.
If you take a hoop and pull the base threads so that they intersect in the central zone, you can easily achieve this. In this case, weaving starts from the middle , and the rows will be arranged in a circle, “snail-like”. It is very easy to assemble such a loom yourself. You can even use a special hoop. The shuttle remains the same design.
Stationary
When creating huge canvases, working on a frame is very difficult. And it’s completely impossible to make long special paths. There is no way to work here without a stationary machine.
The drawing gives a simple diagram showing how to make a loom. It provides a horizontal frame onto which the base threads are pulled, and a vertical frame responsible for creating clearance for the passage of the shuttle with the weft thread and the shuttle. All elements are made of wood. Metal fasteners, nails, and rubber gaskets are also .
This special do-it-yourself loom helps create fabric by eliminating the need for the craftsman to pick out the warp threads with his own hands while pulling the cross threads through the weaving process.
Round machine for rugs
Many people like round floor mats rather than rectangular ones. To weave them, you need to use a round loom.
You can make it, for example, from an ordinary plastic hoop. Just make sure that it is not curved, as this will affect the quality of the finished product.
First, the edges are marked around the entire circle. Next, you can drill holes at the marks or drive in nails. Some people simply tie the threads to the rim itself. However, with this technique, the finished rug will not be of very high quality, since poorly secured threads can sag or move out.
If you were not lazy and made normal fasteners for the base, you can start working. To do this, the main threads are pulled radially. The machine begins to resemble a bicycle wheel. Now you can start weaving the rug from the very middle.
As a rule, this machine is operated by hand. Reviews advise using a miniature shuttle or a large needle only when making very thin fabric.
Read also: How to use soldering flux