Experienced motorists can give thousands of examples when mud, ice or deep snow prevent the successful completion of a trip. The power of the driving wheels is powerless in such situations - only a tug or a winch. After such unpleasant moments, some owners refuse to travel in bad weather, others install studded tires . However, there is another category of drivers who prefer to independently manufacture additional equipment to increase cross-country ability.
Alternative options
Automotive stores sell traction control bracelets - a worthy alternative to chain equipment.
They are distinguished by the possibility of quick installation and low price. But even here the engineering thought of our motorists does not stand still; they have skillfully learned to copy factory copies. Bracelets are the same homemade snow chains, but without longitudinal elements; their advantages are as follows:
- Ease of manufacture.
- Quick installation.
- High efficiency and reliability.
To make it you will need a modest kit:
- VAZ muffler mounting element made of rubber;
- bolts 40-60 mm long, washers and nuts;
- a tube with a diameter equal to the diameter of the bolt;
- steel chain with a diameter of at least 5-6 mm.
To equip wheels with standard sizes 195 and 205 mm, 4-5 meters of hardware products will be required. Stores also sell ready-made kits for self-assembly of bracelets, with the exception of Chinese kits, they are of fairly decent quality and inexpensive. It consists of:
- blanks;
- fastening accessories;
- sling;
- clamp lock.
The kit is easy to use, transported in a special case and does not take up much extra space. An important advantage of metal bracelets is the possibility of installation on wheels with disc brakes. And if you take into account the reviews, then owners of expensive foreign cars do not hesitate to use such devices, which also says a lot.
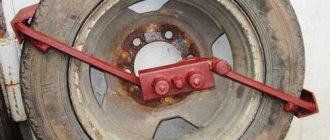
The second option based on Zhiguli wheels
A complete set of disks will be needed, since tires can be placed on one pair and used for transportation on asphalt roads, and the second pair can be used as traditional lugs.
Sequencing:
- cut a steel corner with a side of 5-6 cm into pieces wider than the existing disks;
- In the center of one side, use a grinder to cut out a triangular area. It is this part that they will touch on the lug;
- Heat the corner with a burner and bend it slightly. Additionally, we tack by welding to strengthen the workpiece;
- We weld the spikes from the corners along the outer rim of the machine disk at equal intervals (a step of 15 cm would be optimal, directing the pointed part as the walk-behind tractor moves).
Similar operations are repeated for the second disk, as shown in the video.
Using our recommendations, you can make homemade lugs for any brand and model of walk-behind tractors: Agat, Salyut or Neva. The dimensional differences between the models of these cultivators are insignificant, so the lugs from the Neva MB-1 series are also suitable for later versions - MB-2, MB-21, etc., expanding the scope of their application.
Where is a car lug used?
If your car gets into trouble on a long trip and gets stuck in mud or a hole, our car grouser clamp will immediately come to the rescue. It was designed for car tires, but will also fit any car model, provided the wheel height matches. And if your wheel diameter is different, we can make a clamp for you individually, for any size you ordered.
Just imagine with what ease and absolute ease you can pull your own car out of any mud.
The grouser clamp is very easily installed on the wheel rubber and simply snaps into place. After this simple procedure, you can simply step on the gas harder, and the car will easily get out of the captivity of the off-road. Car lugs will not only help you pull your car out of a hole or deep mud, but also drive it even on the most difficult road from 5 to 10 km.
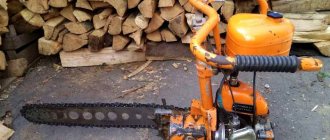
Do-it-yourself caterpillar for a motorized towing vehicle
A motorized towing vehicle, popularly called a “motor dog,” is ideally suited for use in northern latitudes with good snow cover. Using a walk-behind tractor, you can independently make an alternative to a dog sled, a high-speed tracked vehicle that can tow a sled with a person or a small load in the snow.
Making a caterpillar for a motorized dog with your own hands is not at all difficult.
You can use an old gooseneck from a Buran snowmobile. To increase the chassis, you should cut it in half and build it up using inserts. The tracks can be carriages from the old Buran. Three carriages with rollers are enough. They also need to be sawn and extended with inserts.
In the absence of old spare parts, a caterpillar for a motorized towing vehicle can be made from improvised materials using one of the methods described above. For example, from a conveyor belt.
For production you will need:
- conveyor belt with a width of 22 cm;
- metal bars for reinforcement;
- hardwood timber blocks for track tracks.
We bring to your attention a video showing the caterpillar manufacturing process.
Making tracks for a walk-behind tractor is a simple process, although it requires a sufficient amount of time. It is also necessary to make every effort and skill to ensure that all links of the goose are located at an equal distance from each other. This will help to avoid distortions and sliding of the caterpillar track from the load-bearing surfaces.
Combined holds
Such devices are needed not only for walk-behind tractors. Many are also interested in the question of how to make lugs for a cultivator with their own hands. For these purposes, you can use combined wheels, for example, using a tread from a tractor.
To implement such a project, halves of Zhiguli wheels should be prepared. It is also necessary to prepare tractor tires with strong tread. Then you need to cut the sides. This results in a rubber circle with excellent tread.
Read also: Do-it-yourself branch chopper from a planing machine
Such wheels can be used on hard dirt roads, as they will not loosen the ground. They will also perform well on soft ground, but the grip on the ground will be much less than with metal discs.
If you need a wheel option not only for good traction with the ground, but also for loosening, then you need to make knife lugs that will not drive on regular roads, but are only suitable for loosening. This way the land will be cultivated.
When cultivating the land in the spring, the width of the occupied area with the help of such wheels doubles, which is good news, as it saves a lot of time.
It doesn’t matter how to make lugs and what type, the main thing is that they are made independently - simply, from improvised means, and the budget for their production is simply ridiculous.
How to choose snow chains
Their assortment is very large. When choosing, you need to take into account first of all the tire sizes, tread width, wheel arch size, as well as the conditions under which they will be used in the future.
Dimensions of links in chains for driving in winter and summer
Designation: D - diameter of links, L - length, W - width.
| № | Car make | Size of links in longitudinal branches | Size of links in transverse branches | ||||
| D | Dl | Sh | D | Dl | Sh | ||
| 1 | VAZ `winter` | 3,5 | 26,5 | 13,2 | 3,8 | 19,0 | 15,0 |
| 2 | VAZ `summer` | 4,0 | 32,0 | 15,2 | 5,0 | 21,0 | 19,0 |
| 3 | VOLGA `winter` | 4,0 | 32,0 | 15,2 | 3,8 | 19,0 | 15,0 |
| 4 | VOLGA `summer` | 4,0 | 32,0 | 15,2 | 5,0 | 21,0 | 15,0 |
| 5 | NIVA `winter` | 4,0 | 32,0 | 15,2 | 5,0 | 21,0 | 19,0 |
| 6 | NIVA `summer` | 5,0 | 36,0 | 19,0 | 5,0 | 21,0 | 19,0 |
| 7 | GAZELLE `winter` | 5,0 | 36,0 | 19,0 | 5,0 | 21,0 | 19,0 |
| 8 | GAZELLE `summer` | 5,0 | 36,0 | 19,0 | 6,0 | 24,0 | 22,0 |
| 9 | UAZ `winter` | 5,0 | 36,0 | 15,0 | 5,0 | 24,0 | 19,0 |
| 10 | UAZ `summer` | 5,0 | 36,0 | 15,0 | 6,0 | 24,0 | 22,0 |
| 11 | JEEP `winter` | 5,0 | 36,0 | 15,0 | 5,0 | 21,0 | 19,0 |
| 12 | JEEP `summer` | 5,0 | 36,0 | 15,0 | 6,0 | 24,0 | 22,0 |
| 13 | MAZ, KAMAZ `winter` | 6,0 | 42,0 | 23,0 | 5,0 | 21,0 | 19,0 |
| 14 | MAZ, KAMAZ `summer` | 6,0 | 42,0 | 23,0 | 6,0 | 24,0 | 22,0 |
The advantage of rigid chains is their better adaptability to rough off-road conditions, however, their disadvantage is the speed limit (up to 40 km/h) and the possibility of damage to vehicle transmission elements.
Soft chains allow you to reach speeds of up to 80 km/h; they are more harmless to the treads and wear out the rubber much less. However, their disadvantage is that they cope with off-road conditions much worse.
The most reliable, high-quality and more expensive chains are those made of titanium or stainless steel.
How to make lugs with a more complex design?
The above methods for manufacturing lugs are very simple, but options with more complex designs can also be considered.
You need to acquire the following details:
- a steel sheet with a thickness of 3-5 millimeters, which will be used for a steel disk;
- a strip of steel with a thickness of 5 millimeters and a width of 50 millimeters; the outer hoop will be made from it. A total of six hoops are needed to make the wheel heavier and stronger;
- a steel strip with a thickness of 8-10 millimeters, it is needed for hooking;
- drill or drill;
- grinder;
- welding machine.
Arc welding is used to connect all the parts, since a gas torch cannot cope with such a thickness of metal.
The lugs are manufactured according to the following scheme:
- The axles are lengthened. This needs to be done because the size of the lugs requires more mounting space than standard wheels;
- It is necessary to be able to adjust the position of the track to process beds of different widths;
- Two central disks are made from profiled steel sheet;
- Three external hoops and hooks are welded to the end parts of the product;
- Steel plates are welded to the hoops. Their placement should be diagonal like a snake;
- Each plate is ground for optimal traction.
Rating of quality lugs in 2022
According to buyers, high-quality equipment should cope with the tasks assigned to it and be inexpensive. Below is a rating of high-quality models of lugs at an affordable price for the most common walk-behind tractors and cultivators of domestic and foreign production.
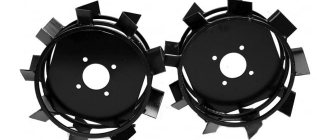
Produces lugs for walk-behind tractors "Neva", MB2, MB23, MultiAgro. Used for plowing. Promotes reliable lateral and longitudinal traction with the ground, reducing slippage. Suitable for compacted and loose soil. Clinging to the ground with their ridges, they provide stability and mobility of movement. The wheels consist of three rims. Diameter – 46 cm, width – 21.5. Design features prevent the sticking of wet and heavy soil. They are attached to the gearbox shaft instead of the original wheels.
- Universal;
- Can be used on all types of soil;
- Large weight - 16 kg increases functionality;
- Easy to assemble;
- Self-cleaning.
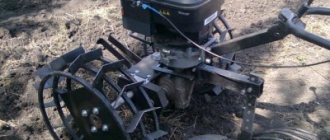
How to make lugs with your own hands
Homemade lugs for walk-behind tractors can be made from machine disks. If a farmer has an old car that is a pity to throw into a landfill, with whole disks and rims, then they can be used to make lugs for a walk-behind tractor from car disks.
For this you will need:
- rims;
- welding machine (or grinder);
- square plates;
- drawing or diagram of lugs for the walk-behind tractor (will make the work very easy).
So, to make lugs for a walk-behind tractor from machine disks, you need to weld an axle shaft to them, onto which bearings are then put. Square plates need to be welded to the car rims.
After the completed procedures, you need to make plates-teeth that will bite into the soil, providing the necessary adhesion to it. The teeth can be made from solid metal sheets by cutting the desired size with a welding machine or by welding small plates together.
The teeth are welded to square plates on disks at a distance of 15-16 cm from each other. A deviation of 2-3 cm is acceptable, but for better operation of the unit you must strictly follow the instructions in the drawings and diagrams.
If the old car is not available, but there is a used gas cylinder, then there is another way to make lugs for the walk-behind tractor with your own hands.
For this you will need:
- gas cylinder (used);
- grinder or welding machine;
- metal plates for teeth;
- drawings or lug diagrams of a walk-behind tractor of the required brand.
First you need to cut two disks from the cylinder, which will serve as rims for the wheels of the walk-behind tractor. Then, as in the first option, weld the square plates and the teeth to them.
Another option is to weld lugs from steel plates. For this you will need:
- steel layers 4-5 mm thick;
- steel layers 6-8 mm thick;
- welding machine or grinder;
- drill or hammer drill.
A thinner sheet must be cut into two disks, in the center of which holes must be made for the hub. Cut sawtooth waves along the outer edges, with a wave depth of 100 mm. Triangles with cut corners must be cut out of a denser steel layer and welded perpendicular to the waves. The design is ready for use.
Of course, such lugs differ in appearance from their counterparts, but they also have many advantages.
How to choose the right lugs for a walk-behind tractor?
The correct choice of lugs is the key to their successful operation and the functionality of the cultivator itself.
It should be based on several criteria:
- size - it is considered that the lugs on the walk-behind tractor are selected correctly if, after installation, they do not come into contact with the body part. It is important to take into account the power class of the cultivating device: for heavy series walk-behind tractors whose weight exceeds 200 kg, it is recommended to use wide lugs (d=0.7 m); medium and light cultivators function most reliably with smaller metal wheels - with a diameter of no more than 0.3-0.4 m;
- the nature of the lug surface and the type of soil (its moisture capacity, flowability, looseness) that is supposed to be processed. The outer side of the lugs can be made in the form of:
- spikes, which are evenly distributed plates of welded reinforcement of various heights. According to consumer reviews, lugs for walk-behind tractors with low spikes (about 2 cm) are difficult to use on wet, loose soils. Therefore, for black soils it is better to choose a large spike that will not clog and will not reduce the traction of the unit. On sandy areas in which moisture does not linger for a long time, this criterion can be slightly neglected and be guided only by your personal considerations and budget;
- arrow - their connecting part has an angular shape. Arrow-shaped lugs are the most popular equipment option, which is suitable for any type of soil and for any load;
- The brand and modification of a motor cultivator is the most reliable criterion, following which it is difficult to make a mistake. The lugs for a specific cultivator model are ideally adapted to its technical characteristics and are most often sold in pairs with hubs;
- price - depends on the manufacturer and versatility. When purchasing lugs for a light tillage machine, it is important to understand that you will have to fork out for auxiliary elements - weighting agents, without which the equipment will slip on heavy soils.
One of the ways to save on purchasing lugs and acquire faithful assistants for agricultural needs is to create metal wheels for a walk-behind tractor with your own hands.
Why do you need a soil cutter?
Of course, most often the quality of work will depend on the weight of the device. You can hang all the best awnings only on heavy walk-behind tractors and medium-heavy appliances. But the heaviness and professionalism of the unit is not everything . If you have an excellent walk-behind tractor , but you didn’t get the expected result, then you need to buy wheels with lugs for the device or a counterweight to make everything heavier. You can purchase or you can make lugs for the walk-behind tractor yourself. Everything will depend on the size of the wallet, strength and skillful hands.
How to install snow chains on a car with your own hands and video operation
Experts recommend installing traction control equipment on all wheels, and not just on the drive ones. Incorrect installation can lead to damage to ABS sensors, brake system components and wheel arch liners, as well as side tire cuts.
- With jacking.
- On a stationary car.
The essence of the question is not only how to properly make snow chains on a car with your own hands using a video - you should think about installation work even before entering the problem area. This is the only way to enjoy the operation, save your time and avoid annoying mistakes.
There is no point in describing the first method using a jack - the procedure is elementary and will not cause any difficulties even for a novice driver. The only recommendation is to reduce the tire pressure to make the work easier.
Another question is when this device is not at hand. In this case, you can install chains on snow wheels with your own hands using the following technology:
- place the product in front of the wheel pair, avoiding twisting of the links;
- run over the product with wheels;
- apply the handbrake;
- put on the device so that the hook and carabiner are on the outside of the wheel;
- connect the hook and the last link of the longitudinal part to the inside of the wheel;
- put the carabiner coupling on the tension system from the outside and fix the knot;
- distribute the transverse elements along the entire perimeter of the tire and tighten it.
Important! To ensure uniform distribution of equipment components, drive 20-30 meters and then make final adjustments. This event will guarantee maximum adherence of the product to the rubber.
Important to remember
Any traction control equipment adversely affects the safety of tires, as well as the condition of the chassis. You need to be especially careful when choosing locks for homemade chains on car wheels , since the trouble-free operation of the car depends on them.
Moving on hard surfaces is unacceptable. When driving on loose snow or mud, you should maintain a driving speed of 20-30 km/h; it is not recommended to allow wheels to slip. Experienced drivers advise periodically checking the tension of the equipment along the entire inner and outer perimeter of the tire while driving.
How to make your lugs heavier
As mentioned earlier, for uniform tillage of the soil with special attachments, appropriate weighting agents are used, which allows the mechanism used to remain at the required depth during movement. In this case, it is necessary to consider in more detail how to make the canopies used heavier, namely:
- for purchased equipment, special auxiliary weights can be used, which are hung together;
- if necessary, you can use hanging any heavy object for uniform plowing;
- in this case, it is possible to independently create a fairly heavy device that will loosen the soil evenly;
- Often, on manufactured versions, a corresponding center of gravity is specially provided, which is achieved by the presence of a certain design;
- weighting can be an additional adjustable insert that is present on the attachment.
There are quite a lot of options for increasing the mass of this device; here you just need to rationally use such weighting so that during operation the device does not fall deep enough into the ground. Otherwise, damage to the coupling mechanism or deformation of the tillage mechanism itself may occur.
Important. When working with such equipment, weather conditions should be taken into account, as well as the humidity and softness of the soil surface being treated.
What sizes should you take?
On the Internet you can find many drawings and diagrams for making lugs yourself. But what sizes correspond to which brand? Sometimes this is not indicated in the drawings.
So, the most common motorized cultivators are: Neva, Mole, Salyut, Oka, Bison, Centaur. Let's look at Neva walk-behind tractors.
The lug lugs for Neva walk-behind tractors are perfect for the Salyut and Favorit walk-behind cultivators. Dimensions for homemade tools for a walk-behind tractor: height - 34 cm, width - 11 cm. These dimensions are shown in the drawing, and all the small details that must be observed to work well with the ground are indicated.
Let's look at the main functions of lugs on the Neva walk-behind tractor:
- Better quality plowing of land.
- The installed tools make the walk-behind tractor heavier and easier to use, which improves soil work and allows you to work with heavy mounted structures.
- This product helps you climb uphill with a full trailer in a fairly short time.
- The teeth catch small and large plant roots, tearing them out.
Tips for choosing equipment
In order not to regret the purchase, you need to carefully consider the choice of lug. What to pay attention to when choosing:
- The structure must be made of heavy metal. Light alloys are not suitable, since in this case the main function of weighting is lost.
- Attachments should absolutely not touch the walk-behind tractor. It is advisable to purchase narrowly targeted models.
- The bends of the spikes should be arrow-shaped and directed in the direction of movement, sinking well into the ground for greater traction with the soil.
- An important indicator is the dimensions - the diameter and width of the rim. Each model of walk-behind tractor or cultivator has its own preferences in this matter. The general criteria will be: wheel diameter 70 cm for heavy models and about 32 cm for light ones.
- It is desirable to have the ability to use additional weights for the purchased attachments.
What third-party wheels are suitable for the Neva walk-behind tractor?
Wheels from Muscovites and Lada are best suited for installation on the Neva walk-behind tractor. There is no need to change anything in them, since their diameter is ideal for installation on a walk-behind tractor. They only need to be slightly modernized by welding.
Zhiguli wheels on a Neva walk-behind tractor
Factory options will cost much more.
The main task when modernizing Zhiguli wheels is to make them heavier, since in the factory configuration they are very light.
Listed below are the main stages of manufacturing wheels for a walk-behind tractor from car tires:
- An axle shaft is installed inside the wheels;
- To make it easier to change wheels, square plates are installed on the axle and holes are made in them. And then the wheels from Zhiguei are attached to these plates;
- A cap is placed on the outside to protect against external factors;
- The tubes should be removed, and only the tires should be left (to improve the quality of traction, winter tires should be used).
Using tires from other cars is problematic because they have a larger diameter or width, so they need to be additionally adjusted using an axle extension or some other method, and this is not always possible for everyone.
To improve the lug-holding properties, some people additionally cover the wheels with a chain. When driving, the chain digs into the ground and provides additional traction. The effect of it is especially noticeable when driving after rain or snow.
The video demonstrates how to install Zhiguli wheels on a Neva walk-behind tractor:
Required tools and equipment
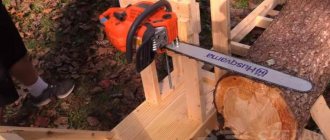
Before carrying out the relevant work, you must first make sure that you have the appropriate materials and tools. You can watch the process of making snow chains on video, but the disadvantage of videos is the lack of information about the necessary equipment.
To make a simple “Ladder” type chain, you will need the following materials:
- Steel chain. The thickness of the reinforcement must be at least 5 mm.
- Carabiners with a coupling and thread. Products with latches are not suitable for making lugs.
- Chain tension device.
- Bolts, nuts and washers.
- Hooks.
For the manufacture of snow chains, carabiners with a coupling and thread are required
The main material is a chain, the length of which for two middle wheels with a diameter of R15 must be at least 15 meters. Buying a chain separately and making a lug from it yourself is much cheaper than purchasing a finished product.
To make lugs, you will also need a set of tools:
- Vise;
- Grinder with a circle for metal;
- Roulette;
- Hammer;
- Wrenches for tightening bolts and nuts.
As you can see, the supply of materials and tools is insignificant, so after preparation, you can begin making snow chains.
Varieties of lugs according to geometric pattern
Depending on the geometry of the pattern, there are three types of snow chains:
Each option has its own advantages and disadvantages, so we will consider them in detail.
The “ladder” is a base in the form of longitudinally arranged branches. These branches are evenly distributed around the entire circumference of the wheel. To secure the chain on the wheel, the appropriate type of locks are used. Externally, this type of lug resembles a ladder, which is where the name comes from.
This lug option is one of the most popular, effective and in demand. Among the disadvantages of this type of chain it is worth noting:
- parallel arrangement of chains on the wheel, so the car will dig in when overcoming snowy or soil areas;
- low lateral stability, which is also due to the parallel arrangement of the chain branches;
Despite the high raking properties, ladder-type chains are practically useless on snowy ground
It is recommended to use chains of this type only when it is necessary to overcome a risky section of the route. This option is one of the cheapest, so when the need arises, most drivers prefer this option without delving into its features.
The diamond lug design is a modernized "Ladder" design. For this purpose, there are longitudinal branches that form a diamond-shaped pattern, eliminating all the negative factors that are characteristic of the “Ladder”.
The geometric shape in the form of a diamond is intended for the use of lugs when it is necessary to overcome a snowy or swampy area. The diamond shape is shown in the photo below.
Diamond-shaped chains have increased strength and high traction characteristics
The diamond-shaped shape of snow chains is popular among SUVs and crossovers, since this type of pattern on the lug increases the vehicle's cross-country ability several times. This is especially true for snow-covered and icy road sections.
An analogue of a rhombus are “honeycombs”, which have transverse branches similar to a rhombus, but are additionally connected by straight connectors. Diamond and honeycomb are improved types of lugs, in which the products are in constant contact with the road surface. This is a big plus for both rubber and transmission, so when making lugs it is recommended to pay attention to the last two models.
“Honeycombs” ensure constant contact with the road, therefore giving the car a high level of lateral stability
It is also worth noting that when purchasing snow chains, you need to consider their size. The lugs produced in production are divided not only by size for wheels, but also depending on the type of car.
general information
- By design, these devices are wheels with spikes. Today there are many different device transformations, and you should choose them wisely. To a large extent, the quality of work is determined by the weight of the unit. The most functional awnings can only be hung on heavy walk-behind tractors or medium-weight units. If the unit is of high quality and does not give the desired result, you need to additionally purchase wheels with lugs for it.
- Standard devices are metal wheels with spikes that dig into the ground and engage the walk-behind tractor with it. To make devices yourself, you will need to know their structure, which drawings and diagrams will greatly help with. You will need to determine the diameter of the canopy, select the material of manufacture, and, of course, select the necessary tools. The first thing you need is a welding machine and an angle grinder.
- First of all, we decide on the size of the devices. Their height and width depend on the tasks for which the hooks are mounted on the walk-behind tractor. You also need to take into account the requirements for the weight of the devices, because the wheels are put on with them to improve the traction of the walk-behind tractor with the ground. This requires wheels of considerable weight, which a walk-behind tractor may lack. The minimum weight of wheels is 20 kg. If necessary, weights are hung on the soil hooks. This is necessary to achieve better results, or is used when the weight does not reach the norm.
Description and sizes of hooks
Heavy walk-behind tractors are most suitable for working on heavy soils and, accordingly, hooks with a larger width and height are more suitable for coupling the unit with virgin soil or very neglected soil. For highly complex work, weights are attached to the wheels.
The dimensions of the hooks vary between 310-700mm in height and 100-200mm in width. The Salyut walk-behind tractor is suitable for lugs of 500×100 mm and 500×200 mm. The latter are functional together with the plow. You can buy the same size with a sand-filled weighting agent so that the mounted plow plows the soil deeper. If you have 500x200 hooks, you can make the weight yourself. Wheels with hooks measuring 700x130 mm are put on the walk-behind tractor to work with hillers, flat cutters and potato diggers.
Lugs for "Zubr"
In addition to those described above, the heavy Zubr JRQ78 and 79 walk-behind tractor can easily accommodate 700×100 mm hooks. Their width is smaller, and, in addition to heavy ones, they can be used with medium-heavy walk-behind tractors.
The hooks for the Zubr will fit the Neva. Hooks of this size are in great demand , precisely due to better compatibility. Wheels 700×200 can only be put on heavy units, and they are intended for processing virgin soil. Wheels 700×100 are suitable for the average needs of a farmer; they can be safely stored and mounted on another walk-behind tractor when the existing one becomes outdated, even one with weaker power. 700x100 lugs will cost about $70.
Homemade snow chains with quick installation
Winter is approaching, not to mention that there are already quite a lot of puddles and mud outside the city. To overcome such obstacles, you need a good SUV, or you can make snow chains for your car and carry them with you.
The main problem with such devices is that they are difficult to quickly install on a car, especially in winter, when you need to work in snow and cold. But having passed the problem area, the chains must also be removed, since driving on them for a long time is harmful to the tires, and driving on the highway is prohibited.
One author came up with the idea of attaching snow chains using rubber bands with hooks. Now you don't need wrenches or anything to install chains. For structural reliability, it is best to use springs instead of rubber.
Materials and tools for homemade work:
Materials: - steel chain (length and thickness will depend on the diameter of the wheels); - elastic bands with hooks or steel springs for fixing chains; - a pair of carabiners for quickly connecting chain links.
Snow chain manufacturing process:
Step one. We measure the circumference of the tire. First of all, you will need to make two rings from the chain; their diameter should be such that they lie approximately half the width of the tire, or further to the center. The author connects the rings using threaded carabiners.
These rings are needed to attach the transverse elements that engage the road.
Well, then you need to cut the required number of chains of the required length. The length should be such that the chains on the wheel are well tensioned, otherwise they will fly off. Here they are adjusted depending on the width of the tire and the location of the side rings.
Step three. Final assembly Now all the parts are connected to each other, forming solid tracks. Everything is connected using good strong carabiners. Well, after this, the tracks need to be installed on the wheel, and in order to tension the chains, you will need metal springs or, in extreme cases, rubber. For ease of fastening, the author installed hooks at the ends of the rubber strips.
Design solution with wheels
The easiest and cheapest way is to make and put the structure on a factory rubber wheel, like regular anti-slip chains.
First you need to take a metal sheet and cut out a strip slightly wider than the rubber profile. The tension on the wheel can be done by fastening the strip with two bolts and nuts. The edges around the entire circle must be folded to prevent slipping under lateral loads.
Then you need to take a thicker sheet of steel (3-5 millimeters) and cut transverse strips that will cling to the ground. They bend in the middle at an angle of 120 degrees. After this, the transverse strips are welded to the main part at the same distance. On average, from 10 to 15 such hooks should be welded, depending on the diameter of the wheel. In this regard, before starting work, you need to prepare a drawing yourself or download it on the Internet.
Such lugs for a motor cultivator can be made in a few days. In the case when an existing walk-behind tractor has ordinary metal and smooth wheels, such a device will turn it into a real SUV.
Track tracks
Tracks are the main part of any track. Fortunately, you don't have to buy them in specialty stores. They are quite easy to make yourself from various materials. The main thing that needs to be taken into account is the level of load that is planned to be placed on the walk-behind tractor. Tracks can be made from:
- plastic pipes;
- wooden blocks;
- metal tracks.
To make tracks from plastic pipes, you will need water pipe No. 40. It is cut into pieces the length of which is equal to the width of the track. After this, each such segment is cut lengthwise into two halves. A circular saw with a wood cutting disc will help with this.
When all the tracks are ready, they can be attached to the main structure. For this, furniture bolts No. 6 and large hemispherical heads are used. With these bolts, each segment is attached to the structure itself.
Thus, we get an excellent relief track for a walk-behind tractor, allowing it to pass through difficult places even in winter.
A caterpillar made of wooden blocks is suitable for light loads, since the structural strength is not so great. To make a track from this material, you will need birch blocks of the same size and length equal to the width of the tracks.
It is not surprising that the most common and reliable are metal tracks for tracks, because their level of strength is quite high. Most often, metal pipes or a profile are used, which is cut into pieces of suitable length and attached to the track in the same way as was done in previous methods.
The main disadvantage of this design is the large mass and difficulty of repair. If one of the tracks bends during operation, you will have to spend a lot of effort to replace it.
It is recommended to make tracks from iron only in cases where the walk-behind tractor operates under heavy loads. In other cases, it is better to resort to other methods.
It is not so difficult to make a caterpillar for a walk-behind tractor with your own hands, although it takes quite a lot of time. It is important to treat the process with the utmost care and perform all calculations correctly. Also, it is necessary to assess the degree of load with which the walk-behind tractor operates and select the most suitable materials for the product.