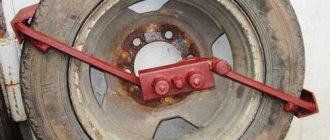
Lifting mechanism for impeller
The use of a lifting mechanism in the motor allows not only to control the movement of the boat, but also, if necessary, to raise the propeller above the surface of the water.
Ideally, such a device should provide rotation of the screw in both horizontal and vertical planes. The simplest and at the same time the most effective design could look like this: a motor is attached to the transom of the boat using clamps. The clamps are rigidly attached to a plate or square, and have rings into which a tube is threaded with a guide welded to the middle perpendicular to the axis, into which the motor shaft is threaded.
This hinged solution is quite simple and does not require additional, complex solutions.
Converting a screwdriver into a trimmer or lawn mower
To make an electric scythe with your own hands, you will need the following parts and materials:
- a piece of plastic pipe about 2 m long;
- soldering iron with soldering kit;
- fasteners: self-tapping screws, bolts with nuts;
- 45 degree plastic corner;
- pipe plug;
- 12 V motor from an electric screwdriver and a battery from it;
- the wire;
- adapter from 40 to 50 mm for plastic pipes;
- power button;
- plastic bucket;
- contact clips (crocodiles) – 2 pcs;
- blades from stationery knives.
The conversion process is carried out as follows:
- Having disassembled the electric screwdriver, take out the motor;
- attach it to the plug, having previously marked and drilled mounting holes in it;
attach the electric motor with 2 screws;
solder the output to the motor;
install the electric motor by inserting its wiring into the pipe;
mark the location of the future switch with a marker on the tube;
drill a hole;
connect to the wiring switch, mount it;
contact clamps are attached to the ends of the outgoing wires to allow quick connection to the battery;
a battery holder is made from the adapter;
connect the drive, connect the adapter to the tube;
make knives from blades;
using a conventional terminal clamp, the nozzle is connected to the motor shaft;
a protective casing is made from a plastic bucket;
glue the part to the pipe;
check the functionality of the structure.
The created device will allow you to mow only grass with soft stems.
There are many different options for lawn mowers based on networked models of drills and screwdrivers. The photographs below show two homemade products.
First, a base is created from metal, plywood or other materials, to which wheels are then attached, as well as a control handle. The electric screwdriver is secured with clamps or to the stand. A cutting attachment is inserted into the chuck. To protect the feet from flying grass, a cover is attached to the back of the base. Power is supplied via a button or directly from the network.
A cordless or corded model of an electric screwdriver can be turned into an engraver, which is also called a dremel, drill, mini-drill, or straight grinder. To do this, you just need to buy a nozzle in the store.
and grind any bat to fit it.
A homemade chuck will allow you to use a variety of accessories designed for Dremels.
The following video demonstrates the process of creating a flexible shaft engraver.
Complete analogue of the factory “Dremel”
The original housing is also made independently in such a way that the engine is tightly fixed inside, while leaving a gap or an open part in the heating area.
The body of the mini-drill can be any plastic tube.
There are models that used a tube of sealant, a syringe, a plastic tube of toothpaste or children's candy.
A piece of plumbing plastic pipe cut to the required length will also work, but in this case the open ends will need to be sealed with some kind of movable “plug”, for example, acrylic or cut out of plastic.
The resulting tool is a universal option; Depending on the type of repair, various attachments are fixed with such a clamping chuck: drills, cutters, discs with a cutting edge or screwdriver heads.
Wood lathe
Creating products from wooden blanks is impossible without a woodworking machine. As a working surface of the machine, you can use a workbench made of wood with a flat surface.
According to the dimensions of the tool, make a bed from a lath in which the screwdriver will be located and fixed. A regular clamp is used for fixation. The bed is attached to the base using self-tapping screws or a clamp.
A mandrel with teeth is placed in the screwdriver chuck. To make the tailstock, 2 bars with an adjustment screw, sharpened to the dimensions of the cone, are suitable. The headstock is attached opposite the screwdriver. In this case, its axis should be at the same level with the headstock adjusting screw.
Use a clamp to secure the back stop to the base of the future machine. A simple wood lathe is ready to use.
Carpentry workshop equipment
A few more interesting suggestions on how to make equipment for home carpentry using a regular screwdriver.
Wood lathe
When making wood products, it is difficult to do without a lathe. You can build it yourself. A flat wooden workbench is ideal for the bed. A screwdriver can be used as a headstock and rotation drive. You need to place the tool in a wooden bed made from a block in the shape of a screwdriver and secure it with a clamp. The block can be secured with a clamp, and if the machine is constantly used, screwed with self-tapping screws. A tooth mandrel must be inserted into the chuck. The tailstock is made of two bars with an adjusting screw, which is sharpened to a cone. It is installed opposite the fixed screwdriver so that the axis of the tool coincides with the axis of the tailstock adjusting screw. The back support structure is secured with a clamp. If you plan to process large parts, then the fastening should be more reliable. The tool rest can also be made from a block, securing it to the workbench with a clamp. A primitive lathe for the home workshop is ready.
Bench Drilling Machine
Another equally important piece of equipment is a drill. It can also be made from a screwdriver. To do this you will need a used screwdriver. From it you need to take a motor with a gearbox and a cartridge. Now you need to make two clamps from textolite, which will perform the function of fixing the drilling head of the machine. To achieve maximum alignment of all holes on the clamps, it is better to process them together, in one installation. Then you will be able to avoid distortions.
Bushings with internal threads are used as limiting posts. They must be the same size, corresponding to the distance between the clamps. After this, another clamp is made from textolite and two bosses from caprolon. They are drilled off-center, resulting in two eccentric bushings. The clamp is installed on the rod and the backlash is selected using eccentrics. After this, install a wooden lever on a spring so that the drilling head returns to its original position. To supply power, you must use a transformer with a power of more than 150 watts and an output voltage similar to the screwdriver you are using. After this, you need to install a diode bridge and a capacitor, and install the drilling head on the frame.
Manual router from a screwdriver: step-by-step instructions
It can be converted into a hand router. To do this, you do not need to purchase expensive materials. Everything you need can be found in the workshop or garage, practically under your feet. To make a manual router from a screwdriver, you will need pieces of thick plywood or chipboard, a clamp for attaching the tool, fasteners in the form of bolts and self-tapping screws, plumbing tools and a feather drill for wood. In the latter case, you can use a drill bit.
Assembling a homemade router is quite easy. To do this you need:
- From pieces of the selected material, cut out a base, a vertical stand on which a screwdriver will be attached using a clamp, a stop and a gusset to impart rigidity to the structure. The dimensions of the parts are chosen arbitrarily, in relation to the dimensions of the power tool.
- Using a pen drill, drill a Ø 40 mm hole in the base for free access of the cutting tool to the processing area.
- Make a clamp according to the diameter of the hand tool.
- Using a clamp, secure the screwdriver to a vertical stand so that its chuck is a few millimeters from the base.
- Install the stiffener.
- Secure the screwdriver with the stop on the vertical stand.
- Install the cutter into the tool chuck.
The screwdriver cutter is ready for use. Such a machine cannot become a full-fledged replacement for a manual milling cutter due to its low power and low spindle speed, but it will solve the problem of milling small parts in a home workshop.
Circular Saw
In addition, for your carpentry workshop you can make a circular saw from a screwdriver. To do this, you need to make a working surface using a sheet of chipboard or thick plywood. You need to make a cut in the tabletop to allow the circular saw to exit. The screwdriver must be securely fastened to the underside of the work surface using metal or wooden clamps. In the same way it is necessary to mount the shaft
It is important that the saw blade extends above the working surface of the table by no more than a third of its diameter
Bulgarian
If you don’t have a grinder, you can replace it with a homemade grinder made from an old screwdriver. To do this, use a nozzle or adapter equipped with a gearbox, which can be purchased ready-made. The possibility of making such devices with your own hands cannot be ruled out. For this, studs, nuts and washers are useful, the diameter of which is similar to the diameter of the screwdriver chuck.
After disassembling the tool body and dismantling its gearbox, insert the end of the nozzle or adapter into its chuck in place of the gearbox. Having assembled the body of the new tool, the homemade angle grinder is ready for use.
Flashlight
From an old broken cordless screwdriver you can make a powerful flashlight that runs on battery power. To create this homemade product you need:
- disassemble the drill body and remove the motor, gearbox and chuck from it;
- instead, an LED lamp of the appropriate size with a power of 5-12 W must be installed in the groove. For this you may need a G 5.3 cartridge.
Due to the battery capacity, such a flashlight can work for a long time and is well suited for those who experience frequent power outages.
Refinement of lawn mowers
The boat motor from the trimmer requires a little modification to get a workhorse for the watercraft. The advantage of gasoline trimmers is their low price and maintainability. Homemade motors for boats based on gas trimmers have a built-in tank, shaft and gearbox. You can look for a special conversion kit, which will contain a stainless steel propeller and drive, as well as a set of adapters for the trimmer shaft. Often there are kits with a clamp for installation on the transom, so there will be no problems with fastening to the boat. If you follow the included instructions, you can convert a boat motor from a lawn mower in 20-30 minutes.
More skills will be required from the angler if he decides to radically change the design of the trimmer. In this case, there is huge scope for imagination and ingenuity. One option involves making a vertical leg.
- To rotate the shaft 90 degrees relative to the engine, you will need a gearbox from an angle grinder.
- The existing trimmer tube must be shortened using a cutting machine. It is better to replace the bushings inside with bearings.
- A simple screw can be made from a strip of duralumin 10x30 cm, 2 mm thick. By attaching a stencil with a two-bladed screw to the workpiece, you need to make markings. You can cut the screw using a grinder and a chisel. The edges must be processed with a file. Place the plate on a flat surface and bend both blades to a height of 1 cm.
- A hole is drilled in the center to connect to the shaft. To prevent the blade from touching the watercraft's cylinder during rotation, it is better to make a ring attachment. The trimmer-based boat motor is ready, you can go to the pond.
Generator
Cordless screwdriver models are perfect for creating a homemade generator. By rotating its handle, the device will be able to supply electrical energy. Such a generator can be used during a camping trip or when there is a power outage in a country house. A homemade generator can be used to recharge batteries (6-12V).
A screwdriver with an operating voltage of 18 V or more is suitable for the job. Craftsmen advise following the following sequence of actions:
- Disassemble the screwdriver body.
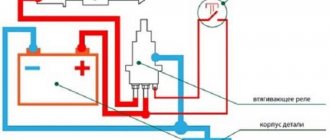
- Unsolder its electrical board.
- In place of the battery, install a diode bridge that is suitable in terms of technical parameters and characteristics.
- Make an easy-to-use handle by securing it in the screwdriver chuck.
Once these simple modifications are completed, all that remains is to assemble the body. The homemade generator is ready to work.
https://youtube.com/watch?v=3WVBIXq4LMc
Assembling a manual camping electric generator and a homemade wind generator
Using battery-powered models of the tool, it won’t be difficult to make a homemade generator that will produce electricity when you rotate the attached handle by hand. This device will come in handy when traveling. To make a dynamo, you do not need to radically modify the product. Everything necessary to create a camping generator is already included in the design of the device; only minor modifications will be needed.
Using the created equipment it will be possible to charge 6 or 12 V batteries.
For remodeling, a power tool with an operating voltage of 18V or higher is suitable. The modification is carried out in the following way:
disassemble the electric screwdriver;
- carefully unsolder the electronic board;
- instead of batteries, they install a diode bridge that is suitable in terms of parameters (dimensions, technical characteristics) inside the battery case;
- make a comfortable handle with a handle;
- the end without a handle is secured in the chuck.
The final design after the manipulations will look something like the photo below.
A diode bridge is necessary so that the handle of the electric generator can be turned in any direction. Instead of a handle, you can insert a nozzle with blades. Then you will get a simple wind generator.
An electric generator powered by wind power is also made in a different way, in the form of a weather vane. In this case, do the following with the battery device:
- disassemble the screwdriver;
- take out the electric motor by disconnecting its contacts;
- remove the cartridge with gearbox (rotor part);
- the electric motor shaft is inserted into the cartridge, clamping it;
- a round metal plate about 1 mm thick is bolted to the gearbox gear, which will serve as the basis for fixing blades made, for example, from plastic pipes;
- a clamp with a clamp is placed on the shaft between the chuck and the gear;
- cut out a rectangular base from plywood or thin metal;
- using a clamp with a clamp, attach the engine with the cartridge to it, drilling holes for the mount in the right places;
- they make a casing to protect the wind generator (from precipitation, dust and other unforeseen influences), for example, from under a coffee can;
- insert the base with the motor and cartridge inside, securing the elements with glue, and the cover with sealant;
- blades are made by attaching them to the round plate of the unit;
- make a weather vane;
- the assembled generator is mounted on one of its ends;
- connect the wiring to the motor outputs;
- use a multimeter to check the output voltage by rotating the blades by hand.
There are many options for wind generators. They even attach the entire screwdriver to the support, equipping it with an attachment with blades.
Types of battery cells
These devices use elements of different types and voltages, each of which has its own advantages and disadvantages.
The most common are nickel-cadmium (Ni – Cd) with a voltage of 1.2V.
Advantages:
- low price;
- stored in a discharged state.
Flaws:
- have a memory effect;
- high self-discharge;
- small capacity;
- small number of charge/discharge cycles.
More advanced nickel-metal hydride (Ni-MH) voltages are 1.2V.
Advantages:
- less memory effect and self-discharge;
- large capacity and number of charge/discharge cycles.
Flaws:
- higher price;
- do not tolerate low temperatures and storage in a discharged state.
The most advanced lithium-ion (Li-Ion) voltage 3.6V.
Advantages:
- no memory effect;
- very low self-discharge current;
- high specific capacity, allowing to reduce the weight and dimensions of the device;
- the number of charge/discharge cycles is many times higher than other types of batteries.
Flaws:
- high price;
- loss of capacity three years after manufacture.
Homemade boat motor from a walk-behind tractor
If the previous option is considered low-power, then the device from a walk-behind tractor is the opposite. Equipment for working with land, as a rule, has reliable four-stroke internal combustion engines. This DIY boat motor is capable of carrying passengers even against the current at an impressive speed.
True, a decent volume does not allow installing such structures on PVC boats. At least on small ones. The principle of how to make a boat motor from a walk-behind tractor is as follows.
- Together with the cutters, aluminum blades are placed in the same plane with the shaft.
- The blades must be perpendicular to the movement of the vessel. These look like rectangular plates, half hidden under water. The rest moves freely through the air.
- The device is attached to the hull of the craft and allows it to move easily even in shallow waters and bodies of water with rapid currents.
Use in the garden
We are part of nature. How harmoniously each of us feels in the garden, dacha or personal plot. An evenly mowed lawn and weeded beds delight our eyes. But it’s very difficult to achieve such a result manually. An aching back and grass-cut fingers can be eliminated from your life if you use ingenuity and, using the most primitive tools, construct a garden trimmer, or a lawn mower, as we are more accustomed to calling this tool.
Making such a trimmer is very easy. To do this you need:
- Screwdriver with battery;
- Body polishing disc;
- Two stationery blades;
- Two screws.
Creating a tool literally takes a couple of minutes. Two office blades are screwed onto the body polishing disc. Only they are not screwed tightly, but so that they “dangle” easily. This connection option allows the blades not to break, but to fold when they come into contact with an obstacle. The disk itself with the blades already attached is installed in the screwdriver, naturally with the cutting tool facing down. The tool is ready to use!
This amateur trimmer will allow you to mow grass in hard-to-reach, narrow places, between rows or where there are partitions. Of course, an undoubted “plus” is the saving of time and effort that you spend on weeding by hand. There seem to be only two disadvantages - you still have to bend down and cut the grass in this position, and then collect it manually.
It also has its own specifics. With such a tool you need to “fight” tall grass in a special way. Cut the top first and then the base, as long grass can get tangled at the base of the disc. Then it needs to be removed manually.
Cool ideas and lifehacks for using a screwdriver at home
In addition to the listed mechanisms, a screwdriver can also be used to implement other ideas on the farm. This hand-held power tool will help you automate the opening of an entrance gate, make a winch for a car, or make scissors for cutting metal. If you attach an attachment for cutting tin to it, you can turn an ordinary rubber boat into a motor boat, and modernize the process of drilling holes for ice fishing. In addition, everyone knows that a screwdriver is used as a drive for a mixer, meat grinder or juicer.
After reading the article, the reader gained knowledge about the unconventional use of a screwdriver. Now he can use this hand tool to create carpentry equipment, improve children's vehicles and other useful things in the home.
⚒ Do-it-yourself hand engraver from a drill: step-by-step instructions
Very often, a home craftsman is faced with the need to make a small notch on a metal or wooden part, engrave on a keychain, or polish a hard-to-reach place.
In such cases, bulky power tools cannot be used, so you have to turn to specialists and pay for their services.
Today we offer our respected reader a simpler solution to a similar problem, which the author of the “MAGYOM” channel describes in his article.
That's all you need to make a hand engraver PHOTO: .com
A little about the hand engraver: purpose, features of the tool, necessary materials
A hand engraver, popularly called a drill, is a universal power tool that can perform the tasks of an angle grinder, engraver, drill or even a milling cutter.
However, its peculiarity is that it makes it possible to work with very small parts and in hard-to-reach places. To make it in a garage or workshop you won’t need a lot of material, although you will have to purchase some parts.
But the final cost of the device will not exceed 200 rubles, which is good news.
Let's start with what is needed to make it.
- An old clutch or brake cable from a motorcycle (can be found in almost any garage).
- A used foam gun.
- Mayevsky's tap and a long screw that will be screwed into it.
- 2 bearings with an internal diameter slightly smaller than the screw.
- A copper or steel tube is a car brake line.
- Solder wire.
- Hacksaw for metal.
A conventional drill will be used as a drive. In addition to the above, you need to prepare a grinder, a blowtorch, a hammer and sandpaper.
Preparing parts for the future drill
You should start by making a tube from a long screw. To do this, you need to clamp the drill in a vice (this must be done by the handle; under no circumstances should you clamp it by the body).
A bolt without a head is fixed in the chuck, and a Mayevsky tap is screwed onto its threaded side - it will be used as a guide.
Afterwards, a drill is selected that fits the tap hole, the drill is turned on and the screw is drilled exactly in the center to the maximum possible length.
The screw must be drilled in the center for the entire length PHOTO: .com
Further work requires extreme care.
Using two needle files, between which the screw clamped in the drill chuck will rotate, you need to remove the thread so that bearings can be mounted on the resulting sleeve.
At the same time, about 6-8 cm of undamaged thread should remain on the side closest to the cartridge - this is very important.
Using needle files, the screw is ground to the required diameter PHOTO: .com
Assembling the internal part of the engraver mechanism
Having sawed off the screw along the edge of the thread, we screw the Mayevsky tap onto it and put on the first bearing almost all the way, holding the sleeve in a vice. Next, the tube is put on, and then the second bearing fixes it. The inside of the drill is ready.
We put bearings and a tube on the shaft PHOTO: .com
Working with a spray foam gun
This tool only requires an outer long tube. You need to cut off a section from it, the length of the finished inner part without the Mayevsky tap, adding 2 cm. This will be the shell, which will serve as the handle of the engraver.
The tube of the required size is measured and cut PHOTO: .com
Manufacturing a collet mechanism for clamping cutters
To make a mechanism capable of holding thin drills or cutters, you will need a hacksaw for metal. The finished shaft is secured in a vice and a cross-shaped notch is made on the side of the remaining thread, along its entire length. Now, if the Mayevsky tap is tightened, the resulting petals will shrink.
The Mayevsky tap itself is ground into a cone for ease of working with the engraver.
We grind the Mayevsky tap to a cone, after which it will be much more convenient to work with it PHOTO: .com
Flexible shaft manufacturing work
Here you must first free the cable from the sheath, but you cannot throw it away - it will be useful later.
The assembled internal part of the rotation mechanism is clamped in a vice, after which one edge of the cable is inserted into a sleeve made from a bolt.
Now you need to heat the resulting connection and fill the internal void with molten tin. A blowtorch will help with this work.
The sleeve with the cable warms up, after which molten solder begins to seep into it PHOTO: .com
All that remains is to tighten the bearings, make sure that the connection is good, after which you can continue assembly.
The connection is checked and the bearings are pressed as tightly as possible PHOTO: .com
Next, a piece of tube cut from a spray foam gun is placed over both bearings. In fact, the rotation mechanism itself can be considered complete. All that remains is to protect the operator.
The tube is placed over the bearings almost close to the tip PHOTO: .com
Protection of the master when working with a drill
Now you need to put the cable housing back in place, but this is not easy to do. After the tips are cut off, the cable begins to unravel. Here the same solder and blowtorch will come to the rescue.
The casing is put on the cable and pulled until it stops. Due to the fact that the outer tube is slightly longer than the inner one, the protection goes inside.
The reverse side of the cable is placed in the brake pipe and pressed in with a hammer.
Crimping the reverse edge, which will be clamped into the drill chuck PHOTO: .com
The final touch: groove for a wrench
In order to tighten a cutter or drill in a collet chuck, you will need to ensure that the wrench can work with both the shaft and the tip. If there were already edges on Mayevsky’s tap (they remained on the edge), then they need to be made on the bushing. This issue is easily resolved with a flat needle file.
Grooving edges for a wrench on a bushing PHOTO: .com
Briefly about the manufacture of cutting cutters
It is quite simple to make such consumables, and therefore it will be more convenient to show it exclusively with photographic examples.
On an old cutting disc from an angle grinder, a circle is drawn with a compass PHOTO: .com The circle is cut with metal scissors, and a hole is made in the center with an awl PHOTO: .
comA thin long screw is inserted into the hole, which is fixed on the reverse side with two nuts PHOTO: .comHolding the cutting cutter into a drill, it is centered using a sharpening stone PHOTO: .
comWhen the cutter is ready, it can be installed in the engraver by tightening the collet chuck with keys PHOTO: .com
Summarize
The work of making a hand-held electric engraver from a drill with your own hands is not too simple.
However, if a home master nevertheless decides to take it up and completes it, then he will receive a unique tool that will always be useful. It is unlikely that such a device will remain idle.
And if you compare the cost of such a factory-made product, then the importance of such an engraver in your eyes will increase significantly.
What can a boat motor be made from?
The motor can be made in various ways, the main thing is to choose a suitable base and additional parts. An engine from a trimmer or walk-behind tractor, as well as a screwdriver, can be used as a base. A boat motor made from a chainsaw has the best characteristics.
From the trimmer
The trimmer boat motor saves fuel and has a transparent tank. The propeller (homemade propeller) is made of duralumin. The propeller blades are bent up to 10 mm, the edges are carefully sharpened. It is put on in place of the trimmer head. To prevent the propeller blades from damaging the boat during operation, use a ring attachment. The motor shaft and propeller are connected by adapters. The starter is removed from the lawnmower. The motor from the trimmer is made according to a drawing prepared in advance.
From a screwdriver
If you use a cordless screwdriver, you will get a good homemade engine. For manufacturing, it is better to choose a device with a voltage of 12 V. The process of making an electric motor for a boat with your own hands using a screwdriver:
- The propeller must have a lifting mechanism, so it is attached to the engine transom and secured with frames and plates.
- Clamps are equipped with rings. A tube with a shaft is laid through them. The shaft is made of steel wire or rod.
- Bearings are pressed inside the tube. They will provide the steel shaft with easy sliding.
- To reduce the speed of the electric motor, install a gearbox from an angle grinder. The upper part of the shaft is clamped in the screwdriver chuck.
- The propeller is made of stainless steel, the thickness of the sheet is 2.5-3 mm.
From a walk-behind tractor
From a walk-behind tractor starter you can make a motor for an engine. To assemble a four-stroke model, a simple fuel system is used, but the water pump must be of high quality. The sternwood is removed from the old boat engine. The fuel pump is installed above the carburetor so that it does not come into contact with the rocker arm, and secured with clamps. The crankshaft is mounted above the top gear. A water pump is installed under the deadwood. If you install springs, the lower rod will work freely.
You will find many other interesting homemade products from scrap materials here.
Epilogue
This is how you can assemble an electric bicycle without any expense. Of course, additional work is needed here, but the foundation is already there. It's quite fun to see people's reactions when they see such an interesting vehicle. Of course, it’s unclear what’s moving along the road. In fact, if you work on the bike for a couple more days, it will not be inferior to expensive factory products in almost any way. Considering that all the work is done “on the knee” in one day, without financial investments, we can say with confidence that the idea is very good.
We hope that the material presented today will be useful to the dear reader. If you still have questions about what you read, you can ask them in the discussions below. The HouseChief editors will be happy to answer each of them as quickly as possible. There you can comment on the article and express your opinion about the rework. Tips for improvement, as well as pointing out the wizard's mistakes, are welcome. And we have one request. Please don't forget to rate what you read.
Every opinion, both positive and negative, is very important to us. Happy cycling!
Using the windshield washer motor
Some owners who decide to make their own electric motor for a boat use various 12V engines that are used on board the car.
Such engines are perfect for such functions, if only because they are designed to run on a car battery. Despite this, they require some improvement.
Boat owners are constantly experimenting and finding amazing solutions. The high cost of industrial designs forces them to do this. As a result, the idea of installing a lawn mower motor on a boat was born. These are engines with a power of about 6 hp, which are designed for long-term operation under load in various conditions. Such an engine can be adapted to a boat if you use various spare parts intended for repairing Soviet boat engines.
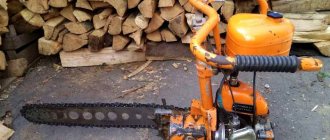
Motor from the Ural-2 chainsaw
Some craftsmen easily adapted motors from Soviet chainsaws as motors for boats. At one time, a huge number of chainsaws were produced, the quality of which needs to be discussed separately. Despite this, some motors installed on boats still serve today. The main thing is to calculate everything correctly.
Engraver
In order to make an engraver (drill) from a screwdriver without a battery or with a battery, you can use a special adapter, which is sold in a hardware store. You will also need a bit, the diameter of which must match the hole in the adapter.
To make an engraver from an old screwdriver with a working motor you will need:
- disassemble the screwdriver body and remove all the insides from it.
- remove the gearbox from the motor so as not to damage the shaft;
- attach the bit attachment to the shaft.
To protect your hand from the current that can “hit” the motor, you can wrap it with electrical tape or make a protective casing made of rubber (silicone).
Engraver from a motor from an old screwdriver
Electric car or children's catamaran
To create an electric car for children you need:
- make a frame (frame) from a metal profile or PVC pipes. They need to be assembled together so that you get a small car or a tricycle;
- as an axle for the wheels, you can use a metal pipe or rod, on which you need to attach a large sprocket;
- on the frame under the seat, make fastenings for a screwdriver with a battery and a shaft with a small gear;
- put the chain on the sprockets;
In order for a car to brake, you need to make a gas pedal or handle. The first part can be constructed from a rod with springs, to one end of which a pedal will be attached, and to the second a metal part that will press on the button. This design requires welding skills and a lot of time.
Car made from a screwdriver
To make the job easier, the throttle handle can be made from a set of bicycle rim brakes. To do this, you will need to take a part of a bicycle fork that has mounts for the brakes or make an analogue of them yourself from a metal rod of the required diameter.
A children's catamaran is made according to a similar principle, but its assembly requires PVC pipes. Since the movement of the gears is provided by the motor from the screwdriver or the tool itself, additional protection should be provided for it from water ingress. If the structure is made from a broken screwdriver, then the gas button can be removed with separate wires through pipes, and only its motor can be used as a motor.
An example of a catamaran design made from pipes for children
Important! The motor of a drill or screwdriver is not designed for heavy loads, so this electric vehicle is designed only for light passengers. Also, from prolonged use in this mode, the screwdriver can quickly break.
Making a garden shredder
A garden shredder for grass and thin twigs (less than 1 cm thick) can be made on the basis of a corded drill-driver.
Create an aggregate like this:
- choose a suitable container, for example, zinc boiler;
- a hole is drilled in the center of the bottom for the shaft on which a knife or several blades will be fixed;
- make a wooden or metal frame to install the container or place it on the edge of the table;
- a drill-driver is attached to the frame or bottom of the boiler, which is equipped with knives;
- install an on/off button;
- make a slot in the side of the container - cut out a rectangle 10 by 20 cm in front of the bottom;
- A sleeve is made from tin for disposing of crushed plants;
- attach it to the container;
- check the functionality of the unit.
The easiest way to make knives is from hacksaw blades
. They need to be installed with the point down. In this case, you can make several versions of blades for different grasses. If you make an attachment in the form of knives for a drill-driver, then you can simply chop the grass in a bucket or other suitable container.
Do-it-yourself drill: making a homemade drill for small jobs – Metal Profi
- AliExpress
- Screwdrivers
- Tools
Greetings. Today I want to tell you how I made a drill with my own hands for “three kopecks”, and at the same time it was effective and practical. I hope my solutions will be useful to someone else.
As a former builder and decorator, I have a lot of different power tools at home. However, when you do all sorts of desktop handmade things, sooner or later you realize that it’s time to buy something like a Dremel. And since I’ve already set out on the path of home-making, I decided to make the stray stuff myself.
In general, I purchased a cordless Dremel 1100-25 Stylus Hobby as a donor - without a charging station, without a cartridge, with half-dead batteries. But I liked it so much that it became a pity to ruin it, so I want to restore it (I’ll report on that later).
To solve the problem, the following was ordered from Ali: • a motor, • a cartridge for the shaft with a set of collets, • several connectors. The products arrived in Ukraine in 20 days with free delivery and were packaged in polyethylene foam. Everything else was scraped together.
I caught my eye on the 12 volt motor "high quality DC3-12V large torque motor super model high speed motor". Now this model is not available from the seller, but at the time of purchase the product cost me 197 rubles and kopecks.
A similar unit is installed on the original Dremel, only it is about a centimeter longer (it has an impeller installed in the body for cooling). In appearance, the motor is nice and of high quality. It is compact in size, here are its actual dimensions: length - about 40 mm, diameter - 27.4 mm, shaft diameter - 2.3 mm, length of the open part of the shaft - almost 13 mm.
Additional photos
Here are the performance specifications from the product page: • Voltage range: 3.0-12V • Rated voltage: 9V • No-load speed: 20160 • No-load current: 680mA • Maximum current: 3.8A • Rated torque: g.
cm • Rated power: 20 W • Starting torque: 1000 g. For cm Looking ahead, I will say that the motor turned out to be really playful and powerful.
I ordered a collet chuck from the same seller, fortunately, at that time he also had a quite humane price tag - 194 rubles (the link to the product now shows page 404).
For some reason, the cartridge did not indicate what shaft diameter it was suitable for, but after reading the comments, I realized that the product would fit well on a motor. The set arrived in a neat box and a spare parts bag, which, in addition to the cartridge, contained 5 collets with a working diameter of 0.5 to 3 mm, as well as an hex key.
Additional photos
Everything is of very high quality, the cartridge is attached with two barrels. The cartridge sat very tightly on the shaft, without any doping or play. Tests have shown that there are no beats at all, literally at all. By the way, the shaft is completely inserted into the chuck, so the lateral load is minimal. The cartridge also qualitatively clamped two collets from another manufacturer.
Since the voltage range is quite wide, I tried several options available. The power supply from the television antenna (12 volts, 100 mA) and from the telephone (5 volts, 800 mA) predictably did not start the motor. Also, the 9-volt transformer TP-30-2 from the VEGA radio (0.7 A) did not work.
But the computer power supply with its 16-20 amperes turns the motor with a bang. Lines tested at 3.3 volts, as well as 5 and 12 volts. Using these three outputs as needed, I resolved the issue regarding speed control, although I was thinking about more elegant solutions using special boards.
Also (for a crossword puzzle) the engine was powered by one 18650 battery and two - the flight is normal, you can safely make an autonomous model if you choose a suitable housing. My casing was only 12-15 mm too short to fit the battery inside without major modifications.
I was considering the case of a Rickson roll-on deodorant, but my neighbor promptly fitted a box that was ideal in size, which is a device for producing soap bubbles. The engine enters it with gaps, but closer to the bottom it literally becomes a surprise.
That’s why the motor was placed that way, and the “stiffening ribs” turned out to be very convenient for a reliable grip. I cut the hole for the shaft with a margin to get some ventilation from the front part. In addition, in order to somehow remove the heat, I used a six-piece drill to make holes in the body - a lot near the body of the motor and a few above.
Additional photos
I found a button in the garage and deliberately used a large one to make it more reliable and not miss the mark. I placed it at the end so it wouldn’t get in the way while working. Based on the 12-volt Proxxon Micromot 50/EF drill, I came up with the idea of installing a “spiral” power cable, which is less in the way and is more flexible.
I found one like this on the farm - from an old Philips electric razor. I didn’t make it removable, I soldered it directly to the engine, although for greater ergonomics it was possible to move the button a little to the side and attach a “female” type socket to the end. I chose the connectors based on reliability, but they also fit well into the green color ensemble. I recommend.
They are neat and practical, the contact is tight.
I bought it in real life, but there are also such products on Ali, they are inexpensive - as an option: aliexpress.com/item/10-Pcs-CCTV-Cameras-2-1mm-x-5-5mm-Male-DC-Power-Plug- Adapter-DC-Power/32598414355.html (1.7 USD for 10 pieces).
The entire assembly consisted of unsoldering the button, connecting the cord and installing the connectors. And from the inside, the motor in the housing was slightly fixed with hot-melt adhesive nozzles so that when drilling it would not go inside.
For hanging storage (it has now taken pride of place next to my work desk), I attached a bracket made of 2.5 mm hard copper wire to the Dremel through the ventilation holes, which, if necessary, can be easily detached from the case. The car turned out to be very compact, but powerful.
Additional photos
I tried to process a piece of thermoplastic polypropylene pipe. The machine performed excellently on this viscous material. Manipulations with metal and wood are no problem at all.
Additional photos
1. It took about an hour and a half to create the drill, including “design”, smoking breaks and photographing. 2. Only 400 Russian rubles were spent on the creation of the instrument itself.
A used computer power supply was purchased on the market of the city of Slavyansk, Donetsk region for 150 Ukrainian hryvnia; I will also use it to power LED strips and dead cordless screwdrivers. Plus I used a little small things. 3.
Torque and rotation speed (adjustable) are more than enough. 4. Ideal ergonomics “to suit you”. 5. Pleasure from the process of creation.
And who cares where the hands come from if they are golden!
Planning to buy +91 Add to favorites Liked review +87 +191
Do-it-yourself accessories for a hand drill, drawings. A simple homemade drill (from junk)
Many home craftsmen are interested in the question of whether a drill can be made with their own hands. Solving this problem is not difficult, and the finished home-made device, despite the simplicity of its design, will be distinguished by fairly high efficiency and functionality.
A homemade drill will not cost much and will not cause any problems during manufacture. It will be useful in many situations, including when performing such technological operations as:
- drilling;
- drilling holes;
- processing of grooves and recesses of various configurations;
- engraving;
- polishing;
- cutting of plastic products;
- cutting non-ferrous sheet metal (aluminum, brass, bronze, etc.) up to 1.5 mm thick.
The drill, made according to the instructions below, is distinguished by its compact dimensions, light weight and ease of use.
Such a device, made by hand at home, is equally successfully used to perform small and quite serious work with products made of various materials - metal, wood, plastic, bone, etc.
Such a drill is very useful in jewelry making, when repairing small items for various purposes, manufacturing and repairing electrical devices, and in many other situations.
What you will need
How to make a drill with your own hands? You can use various options for its design. As the main working element of such a device, it is very convenient to use attachments that were supplied with old-style dental drills.
Such an attachment, as a rule, is initially mounted on a flexible shaft, from which it must be removed by unscrewing its spring. From the bottom of the dismantled drill attachment, you need to cut off a not too wide ring, which will act as a nut used to fix the entire device on the plate.
In addition, by cutting off such a ring, you will free the end of the shaft on which the gear will be mounted.
On the engraver attachments, made by yourself in the proposed design, you can install various types of replaceable tool holders. Such holders, in particular, can be:
- straight;
- with a lateral arrangement of the tool;
- with a curved working head.
More universal are direct type holders, which are used in 90% of cases. In situations where the location of the element being processed does not allow the use of straight holders, they turn to curved type nozzles with a side-mounted tool.
When choosing working attachments from an old drill to equip your homemade engraver, keep in mind that they can only be used in conjunction with a tool whose shank diameter is 2.35 mm.
At the same time, tools intended for installation in straight-type holders are distinguished by an elongated shank.
The shanks of burs installed in corner holders are shorter and have a special groove (slot).
Using homemade attachments for an engraver from an old drill has a number of advantages. The main one is that you can purchase such a drill for very little money, since such devices are practically no longer used in modern dentistry. Finding and buying tools to equip such attachments is also not a problem.
Assembling a homemade device
In order to be able to use an attachment from an old drill to perform minor work on items made of metal, plastic, wood and bone, it is necessary to make a device with which such an attachment will be driven by a small electric motor of the required power. As a drive motor for a homemade drill, you can use a small, but resourceful and powerful motor from an ordinary hair dryer or an old VCR.
What are homemade boat motors made from?
Many fishermen have faulty electrical or gas equipment in their storage room or garage. If the motor in it is working properly, then such a device can be modified to fit an existing boat. In some cases, it is even cheaper to purchase a new screwdriver or brush cutter and modify the device than to buy a boat motor. It is the financial issue that pushes numerous “left-handed” and “home-made” people towards unique developments.
- To make a homemade electric boat motor, you will need a cordless drill or screwdriver. In this case, the fisherman will have to solve the following problems.
- Unfortunately, the capacity of the standard battery will not be enough for carefree sailing, so you will have to take a 12V car battery on board. Accordingly, the device must also operate at the same voltage. As for power, an electrical device that produces more than 300 W can handle a light rubber boat.
- The rotation speed of the screwdriver is quite high, so it is necessary to install a reduction gear.
- You also need to purchase or make your own drive shaft and propeller.
A homemade electric boat motor will operate silently, which is very important for good fishing. In addition, replacing a failed electric motor will be cheaper than repairing a boat engine
- Gasoline engines made for a boat with your own hands can significantly increase the fishing area. These can be power units from chainsaws, lawn mowers, walk-behind tractors, etc. The choice of installation depends on the size and design of the vessel, as well as which of the devices is available.
- Trimmers require the least modifications. They look like they were made to be installed on a fishing boat. It is enough just to install a propeller instead of a reel with fishing line and the boat motor from the trimmer can be tested on a nearby body of water.
- Engines from a chainsaw, motorcycle or walk-behind tractor will require more intervention by skilled hands. Requires a bevel gear from an angle grinder, a shaft and a propeller.
All homemade boat motors require a special device for attaching to the side of the boat. It's one thing when the boat has a transom to which you need to attach the engine. It is somewhat more difficult to secure the power unit on a regular elastic band with inflatable sides around the perimeter.
Economical option without housing
The most budget model of a mini-drill is a regular electric motor, to which a power unit is connected through wiring without a housing.
A 12-volt motor will require a power supply consisting of a 30-watt transformer and a rectifier bridge, for example, on a 1N1007 diode.
The inclusion of a simple capacitor in the circuit, up to 25 V with a capacitive characteristic of 1000 microfarads, will protect the motor from pulsating oscillations of the winding during voltage rectification.
The chain works reliably, but as the load increases, for example, when drilling dense material, the voltage will drop, which will lead to a stop in rotation. The voltage can be stabilized by adding stabilizers to the KR142EN8B or L7812CV circuit
After the drive unit is ready, a chuck is made or purchased - even a pen rod in which the drill is fixed with glue can be suitable for home drilling of miniature holes. The cartridge can also be replaced with the previously proposed collet or screw terminal.
Lathe
A lathe can be obtained if the screwdriver is fixed in a wooden stand and placed on a horizontal surface.
A hand generator is a device similar to a wind generator. The procedure for its manufacture is identical to the assembly of a wind generator. At the last stage of work, instead of an attachment with blades, a handle is attached to the screwdriver.
Making an electric bike is easy:
- Remove the motor from the screwdriver.
- By connecting it to a bicycle sprocket.
- Install the mechanism into the bicycle.
Such a device for a child can be made from plastic pipes, fastened together with plastic ties, and a motor from a screwdriver can be used as a motor for a catamaran.
This device is quite easy to assemble. To transform an old tool into a new one, you need to attach a metal cutting disk to a screwdriver instead of a drill.
Instead of the motor, you need to install LEDs, observing the current strength, the flashlight is ready.
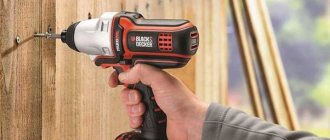
A screwdriver is widely used in various fields of activity to work with various types of fasteners: self-tapping screws, screws, bolts with nuts, furniture confirmations, screws and others. This power tool can also be used to drill holes in various materials, for example, in various metals, lumber, and concrete. In this case, the functionality of the model being used is determined by the magnitude of its power and torque, and the presence of a shock function.
From a screwdriver you can make a variety of equipment and tools for household use at home. In addition to the power tool itself, conversion in many cases will require additional parts and materials. But homemade devices will still cost less than their factory counterparts, making it possible to automate and make manual labor more efficient.
The entire range of screwdrivers is divided into corded and cordless models.
Both types of products operate using electrical energy, which drives an electric motor. Only the electric motor itself in network devices is designed for an alternating voltage of 220 V, while in battery-powered equipment it is designed for a constant voltage of different values, for example, 12 V, 14.4 V. These design features, together with the technical characteristics, largely determine what homemade products can be assembled from a screwdriver .
Electricity is one of the main types of energy used by humanity. Household appliances, industrial equipment, machine tools, and power tools operate using electricity. The work is performed by electric motors of different designs and power, which are powered by alternating or direct current. For this reason, the following technical devices can be assembled on the basis of a screwdriver or from its individual parts:
- garden grass and branches shredder;
- trimmer (electric scythe);
- camping manual generator;
- engraver (mini-drill, dremel, drill);
- wind generator;
- lawnmower;
- grinder;
- mini-machines: drilling, grinding, surface planer, lathe, sawing, sharpening;
- tool for tying reinforcement;
- gate opener drive;
- means of transportation for children: ATV, bicycle, scooter;
- a small ice auger, a hole drill, a construction or kitchen mixer.
The implementation of each option takes different times and requires additional (insignificant) costs, or is done without them at all.
Replacement for various household appliances
A screwdriver in the household can replace a large number of different devices:
- If you attach the mixer attachment to the chuck, you can beat the desired products (eggs, dough) at low speeds.
- There are special brushes made of metal or plastic on sale, which, when installed, can quickly clean surfaces from rust or old dirt.
- If you purchase a round Velcro attachment, you can glue an ordinary kitchen sponge onto it, which you can use to polish a bathroom or tile.
Velcro attachment with a set of sponges
- A special attachment will help you sharpen pencils quickly and on an industrial scale.
- When installing a small drill using a screwdriver or drill, you can make holes in the soil for garden plants.
- There are attachments on sale that make a construction mixer out of a regular drill. The power of this device will be noticeably less, but it is suitable for small jobs.
Mixer attachment for drill