Finishing work or repairs in premises is carried out to achieve certain results:
- elimination of defects that may arise during construction: cracks, irregularities, sinkholes, etc.;
- obtaining a horizontal ceiling and vertical walls;
- leveling the surface into a single plane;
- preparation for wallpapering or painting.
Modern methods provide two main methods of work:
- “wet”, with this method special solutions are prepared and applied to the surface to be treated. After hardening, the final appearance of the interior is formed;
- “dry”, most of the work is carried out without preparing wet solutions; they are needed only at the final stage to hide the joints between the facing panels.
There is no completely “dry” method. You will definitely need to work with mixtures of a certain humidity. The amount of work with mortars using the “dry” method is much less, which attracts many customers and contractors to use ready-made finishing panels.
With the “wet” method, walls and ceilings are monolithic structures, since when applying plaster solutions, they diffuse continuously into the base.
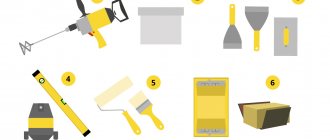
What tool is needed for puttying?
To putty the walls yourself, prepare a minimum set of tools. What tools can you not do without?
1. Drill equipped with a special attachment - a mixer. As a rule, putty is sold in the form of a dry mixture. Water is added to this mixture in a certain proportion. Only with a special mixer can you mix the putty mixture perfectly. The output should be a homogeneous putty without lumps.
2. Set of spatulas . Be sure to choose a spatula of different sizes. In your work you will have to use both large spatulas (40-50 cm) and very small ones. After all, in problem, hard-to-reach places, it will not be possible to properly putty the wall with a large spatula. This is exactly what small spatulas are used for.
3. Rollers and brushes for priming walls . It is not advisable to skip the priming stage. After priming, the wall is covered with a thin film. This not only further increases its strength, but also ensures excellent adhesion of the treated wall to any facing materials (adhesion).
4. Rule . It will be needed in case of uneven walls when you have to apply putty in a thick layer. To level thick layers of putty, it is convenient to use a long metal rule.
5. Alcohol or laser level . Often the wall surface is very uneven. Before starting the initial puttying, test beacons are installed using an alcohol or laser level to check.
6. Sandpaper . If you want to get a beautiful surface that is pleasant to look at, use fine sandpaper for rubbing. For example, grouting with 240-grit sandpaper will allow you to get the perfect result. Use the finest sandpaper only when performing finishing putty. And at the stage of the initial initial putty, it is correct to rub the wall with coarse coarse sandpaper.
7. Manual skinner . Sanding will become much more convenient if you use a manual sander. This is a tool with special clamps on the handle for securing the skin.
8. And, of course, you can’t do without a container in which the putty is mixed.
List of tools that you may need when plastering walls. Photo — srbu.ru
Selecting the right spatula or set
When planning to buy a spatula, take into account several varieties - for facade work and painting spatulas. It is not difficult to distinguish them; the latter have a thinner blade thickness and greater elasticity. The first ones are distinguished by their larger width, since they carry out a large scope of work.
Pay attention to the handle. To purchase high-quality tools, make sure that the blade is made of high-quality material, otherwise the tool is disposable and cannot be used in the future. It will simply get damaged during the first task. Choose a spatula with a comfortable rubberized handle with a comfortable surface that is tightly attached to the working part. In this case, it is guaranteed that it is convenient when applying the mixture to the walls.
Types of spatulas
When purchasing painting spatulas, keep in mind that due to their flexibility, these tools are not durable. Intensive use will quickly make them unsuitable for subsequent work.
Spatulas are also available with different working blade widths. Options for performing main work are offered with a width of 40-60 cm, and “auxiliary” ones, used for working in hard-to-reach places, offer a width of 6 to 15 cm.
When planning to purchase spatulas, buy a set. It is useful in the current situation and in the future. An excellent choice is to purchase tools with widths of 50, 150, 400 and 600 mm. As for wide spatulas, they are purchased when they are convenient for the room where the work is taking place. For a small room to putty its walls, a spatula with a working surface width of 40 cm is sufficient.
If you do not install special corners in the corners of the room, then purchase a corner spatula. Only a specialist can work with it. This tool creates even 90-degree angles, but since this requires experience and skills, it is better to make the angle using perforated elements, which are then puttied.
Which putty is better to putty on walls and how to choose it
Classification of putties by composition: gypsum, polymer (acrylic) and cement.
Let's consider their disadvantages and advantages.
1. Gypsum putties are attractive at an inexpensive price, are easy to level, and do not shrink. The only drawback is poor resistance to moisture. Only this limits the scope of their use.
2. Cement putties have excellent moisture resistance, but have a significant drawback - a high degree of shrinkage.
3. Polymer putties . Undoubted advantages: excellent moisture resistance, do not shrink at all. Using polymer putty, high quality treated wall surfaces are obtained. The only drawback is the high price.
According to their purpose, putties can be divided into starting (leveling), decorative (finishing) and universal.
1. Characteristics of leveling (starting) mixtures: high strength, excellent adhesion, large grain size. Recommended: for leveling walls after applying plaster. Application thickness: 3 -20 mm.
2. For high-quality decorative finishing, it is advisable to apply finishing putties to the surface to be treated. With their help, you can get a perfectly smooth, even surface, hiding small flaws. The strength of the finishing putty is less than the starting putty, its processing is not difficult. Apply in a small layer up to 4 mm.
3. Universal putties combine the properties of decorative and leveling mixtures. They cost more, although their properties are slightly inferior to finishing and starting coatings. We recommend using it when treating walls without large flaws.
The modern market offers dry and ready-to-use putties. The low cost of dry putty and the possibility of its long-term storage are attractive.
Dry in bags and ready to use in a bucket of putty.
Ready-made putties are convenient to use. You don't have to use a mixer to prepare a homogeneous putty mixture. This saves time and virtually eliminates dust. But ready-made putties are much more expensive than dry ones.
Please note: ready-made putties shrink significantly. If a layer less than 2 mm thick is applied, ready-made putties cannot be used. They also do not boast a long shelf life. It is significantly less than dry construction mixtures.
Price of quality.
Tools for finishing plaster of different brands, sizes and qualities vary in price. For example, the cost of a spatula varies from fifty to five hundred rubles. The price of a trowel is from one hundred thirty to one thousand rubles. The rule will cost from four hundred to two thousand rubles. A grater costs from one hundred to four hundred rubles. You can buy a tool for applying plaster at a finishing materials store or order it online. The costs for it are included in the costs that will have to be incurred for performing plastering work per square meter. However, according to professionals, it’s worth the investment. A good and correctly selected tool will allow you to do the job at the highest level.
Preparing the wall surface for putty
The main thing is to make sure that the surface of the walls is absolutely clean. Be sure to remove stains of grease, paint or soot. Of course, there should be no falling layers of plaster, residues of scale, wax or parts of the formwork. Don’t even start puttingty on frozen ceilings and walls. This is strictly not recommended.
Before applying putty, coat the walls with a primer. This will ensure good adhesion (connection) of the putty solution to the walls. Prime the surface using a special roller. Try to apply the primer solution evenly, avoiding gaps. One layer is enough.
There are the following types of putty: finishing, lighthouse, starting. Let's look at the properties and scope of application in detail.
The falcon that doesn't fly.
A very simple, but very useful tool for decorative plaster in the process of plastering ceilings and walls is the construction falcon. It is a shield with a handle in the center. Usually a falcon is made of light metal. Its size is 35 by 35 or 40 by 40 centimeters.
The purpose of such a device is to maintain the solution during application. The falcon is also used to apply plaster and level it over the surface. Technologically, the process looks like this: the mixture is placed on the shield, which is then applied to the surface to be finished using a plaster spatula.
The falcon can be replaced with a simple piece of plywood, making a tool for plastering walls with your own hands.
Starting surface putty
Putty is performed using coarse starting material. It's not difficult to find. When purchased, it is called “starting putty.” To remove large differences in walls, to hide grooves and holes, this putty is convenient to use. The thickness of a layer of such putty applied at a time can reach 1.5 cm. Allow the previous layers to dry completely. Only then proceed to applying the next layer of putty.
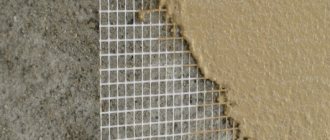
In order to obtain the highest possible quality of putty surfaces, a special painting mesh is installed on the wall, and the putty is distributed evenly over the entire surface. In this case, the walls are completely covered with putty.
The advantage of this technology is that when using a painting mesh, the putty fits perfectly onto the surface of the walls. And the surface itself becomes stronger and smoother. Moreover, the coarser the painting mesh, the smoother the treated wall surface.
Starting wall putty.
Features of carrying out work independently
Plastering walls is a complex process that is performed in several stages:
- Surface preparation. The old coating and significant defects are removed. Large potholes are filled with mortar, and bumps are removed.
- Primer. The surface is cleaned of dirt and carefully treated with a primer solution, which increases the adhesion of the wall.
- Marking and installation of beacons. Places for installing beacons are indicated on the wall. The first one is mounted at a distance of 30-50 cm from the corner. The next ones are installed after 100-150 cm. A level is used when working.
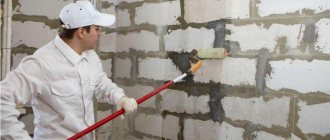
- Plastering. After mixing, the solution is applied between the beacons, after which it is tightened using a rule. When the plaster has set, the surface is treated with a trowel.
Having certain knowledge and skills, you can do the plastering of walls yourself. The main thing to remember is the rules for preparing the surface and applying the solution. The choice of working tool is also important.
Sources
- https://GidPoKraske.ru/oborudovanie/instrumenty/instrumenty-dlya-shtukaturnyh-rabot.html
- https://kraski-net.ru/oborudovanie/instrument/prisposobleniya-dlya-shtukaturnyh-rabot
- https://DekorShtukaturka.ru/instrumenty/instrumenty-dlya-shtukaturnyh-rabot
- https://gipsohouse.ru/decoration/plaster/6638-instrumenty-dlya-shpaklevki-sten.html
- https://stroykasm.ru/category/instrument-stroitelnyj/shtukaturnyj-instrument/
- https://otdelkasten.com/shtukaturka-sten/instrumenty-dlja-oshtukaturivanija-sten
Lighthouse wall putty
The materials are no different from the starting putty. The only difference is that beacons are used. A lighthouse is a wooden, plaster or metal strip that is set strictly vertically, checking the verticality with a level. The beacons are attached to the walls using some kind of gypsum mixture; it dries quickly, after which you can proceed directly to puttying.
The same applies to alignment along horizontal lines. In this case, a rule will come in handy for leveling the putty layer. By following these recommendations, after starting work, a flat surface is obtained. To ensure the quality of the work, you can check it with a level. This type of finishing is used quite rarely. Reason: its cost is significantly higher than the starting putty, although visually they are almost the same.
Puttying walls along beacons. Photo — vipconstruction.kiev.ua
Final wall putty
After completing the starting or lighthouse putty, proceed to the finishing putty. It is done with finishing putty mixtures. It is this putty that gives the wall surfaces perfect smoothness. The smallest cracks or pores are eliminated. It is important that the finishing putty completely coincides in plane with the previously prepared surface, so it must be applied in a very small layer.
If the starting or final putty is done poorly, you will not be able to correct the situation with the finishing putty. Therefore, first try to make the surfaces of the walls perfectly smooth. Only then proceed with the finishing putty. Its main goal is a beautiful smooth wall surface.
The finishing putty is carried out under special lighting, this allows you to see the smallest irregularities. Photo — vipconstruction.kiev.ua
Roller for its intended purpose.
Plastering work cannot be done without a roller. It is useful when preparing the surface when you need to prime the walls or ceiling. And then it can be used to apply the mixture. Rollers are made of rubber, film, fabric, polyurethane. Perhaps the most practical is a rubber roller. It is easy to clean and very durable.
There are special rollers - they are able to “draw” patterns on the plaster. Such rollers are called embossed: a certain pattern is carved on their surface. By pressing the roller onto the dried mortar, we get beautiful patterns on the wall.
You can make such a creative roller yourself. For example, wrap a rope or fabric around a regular smooth tool. This will give an original drawing.
If you use old rope, you will get a “grass” design. An ordinary plastic bag produces an intricate pattern. Taking a thick fabric, preferably waterproof, making a sleeve out of it and putting it on a roller, we get “crumpled paper”. You can cut out figures from a used car tire, stick them on a roller - you will have an absolutely exclusive pattern.
Puttying cracks in walls
To hide cracks in the walls, we recommend using gypsum mixtures for putty. The material santegypsum is much more elastic in work, but hardens much longer. Advice from competent specialists: at first it is recommended to slightly widen the crack, slightly increase its depth and thickness. To increase the roughness, you can scratch it with a knife or other sharp object along its entire length. Then carefully treat it with a primer. Only after this should you begin to putty.
Repairing cracks for putty.
How to apply putty on walls
1. If you use dry putty, you need to properly prepare the putty mixture.
Cooking sequence:
- pour a small amount of water into the container;
- add putty;
- mix with a simple spatula;
- To obtain a homogeneous mixture, use a drill with a mixer, gradually adding water if necessary.
Please note: the readiness of the putty should be determined by consistency. It should become elastic and stick slightly to the spatula. If the putty mixture flows, it means it is runny. Add dry mixture little by little to correct the situation. If there are clumps in the putty, it means the putty is too dry. Add water little by little, stirring thoroughly to achieve perfect homogeneity.
2. Apply starting putty. It is convenient to use a large spatula. Apply the putty in medium portions, spreading evenly over the surface. Hold the spatula at an angle of about 30 degrees. The putty is applied diagonally in one motion. Recommendation: to avoid transitions and bumps, each subsequent layer should be applied overlapping.
Attention: when making the starting layer, mix the putty in small portions. This will avoid the appearance of dried-out dry particles, which will reduce the quality of work. Don't be too alarmed by unsightly stripes from the spatula. The stripes are perfectly hidden with finishing putty.
3. To process smooth corners, we recommend using a corner spatula. Working technology: first, using a small spatula, apply a small layer of putty along the entire height of the corner or slope. Then carefully level the surface with an angle spatula. The putty layer should dry well within 24 hours.
To putty corners you will need a special corner spatula.
4. Once the starting putty has completely dried, proceed to the finishing putty. A large and a small spatula are used for work. Using a small spatula, apply putty in small portions onto a large spatula. Then apply the putty mixture evenly to the surface. The layer thickness is about 1.5 - 2 mm.
5. Before you putty on a wall for painting or wallpaper, wait until the previous layers have completely dried. The starting and first layers of finishing putty must be completely dry. This approximately takes about 12 hours. Then you can apply the finishing putty.
6. Once completely dry, proceed to final sanding with sandpaper.
Attention: before applying each next layer of putty, it is advisable to treat the previous one with a primer.
Corner processing
You need to start working on the walls with a distance of 5 - 10 cm from the corner. In order to properly cover the corner with putty, you need to first treat one plane, then let it dry and treat the second. The corner can be brought to its final state using an angle spatula.
How to putty walls for painting and wallpaper
The walls are first leveled using several layers of putty. If the wallpaper is thick, it is advisable to apply putty in two layers. When using thin wallpaper, we recommend applying three leveling layers of putty. This will allow you to paste the wallpaper on a flat surface without wrinkles or bubbles.
Video. Puttying walls under wallpaper
Painting walls requires more careful preparation. The paint does not hide even the slightest unevenness. Therefore, to level the walls, it is necessary to use finishing putty.
The puttying procedure is carried out in five stages:
- apply the first thin layer of leveling putty with a spatula;
- for large unevenness, use another 2-3 layers;
- allow the putty to dry;
- perform finishing putty to eliminate minor defects;
- After complete drying, rub the wall with sandpaper to obtain a perfectly smooth surface.
Features of plastering work
To plaster walls, cement-sand mortar is traditionally used, but you can purchase ready-made plaster mixtures. Special solutions differ in their component composition, purpose, and area of application. Whatever plastering option is chosen, you need to know the basic points of the work process:
- To prepare surfaces, special plastering tools are needed. A trowel and a floor trowel are not enough to level “complicated” walls or apply decorative plaster.
- Plastering is carried out in two stages: preparing the base and applying a leveling plaster mixture. Preparatory work includes improving adhesive properties and installing beacons.
- Plaster work is not limited to leveling walls (ceilings) for finishing. You can use protective, decorative (relief, Venetian) plastering.
- A layer of plaster helps to level the surface, hide existing defects (cracks, chips), and prepare the walls for subsequent wallpapering or painting.
- To simplify work on large areas, mechanized equipment is used - plastering machines mix the solution and deliver the finished mixture through hoses.
It is rational to plaster large objects (production workshops, warehouses, sales areas) using special equipment. Craftsmen use manual labor on small objects - residential buildings, apartments, office premises. The use of plastering equipment in the work requires the participation of at least three craftsmen in the process - filling the mixture, supplying the solution, leveling with the rule.