Whitewashing walls with lime and color
Lime is a natural material with unique qualities. Whitewashing walls with lime is one of the most common and affordable methods, with the help of which you can not only renovate any room, but also realize design ideas worthy of attention.
How to apply whitewash?
To apply whitewash to the wall, you can use a brush or spray gun. If a brush is used for application, the solution is first filtered and then rubbed well. It should be taken into account that working with a brush will lead to greater consumption of the mixture. When using a spray gun or sprayer, the composition is applied evenly to the surface, and the amount of mixture is saved.
Use of lime
To whitewash walls, slaked lime is used. This product has high disinfectant properties, as it has alkaline characteristics; lime prevents the appearance of fungus, mold, and insect pests.
No cracks, bubbles or peeling appear on the whitewash; this material is resistant to humidity and temperature changes. To apply whitewash, it is not necessary to remove the previous coating; you can whitewash the old surface if it is not too dirty. Whitewashing also strengthens surfaces on which small cracks appear.
The main advantage of the material is its cost; compared to other materials, it is the cheapest, this is due to the ease of its manufacture.
When the mixture is properly prepared, after its application, a homogeneous layer is obtained that does not peel off.
At what temperature can you whitewash walls with lime? Fluffy lime - properties and application
Lime is a popular material for wall finishing, which has disinfecting properties and is not susceptible to mold and mildew. This type of finish is mainly found in public places where a coating that is resistant to abrasion and mechanical stress is needed.
How to slak lime
To extinguish, take lime, water and a long object. The latter is necessary for mixing. Protect yourself with goggles, a respirator and a tarpaulin suit. It is highly undesirable for drops of the solution to come into contact with the skin!
- Take a clean container without signs of corrosion, based on the amount of lime.
- Pour the powder and add water in a 1:1 ratio. Carry out extinguishing work carefully, since during the process the component generates heat when it interacts with water. When slaking, the lime boils and splashes, but you need to stir constantly.
- After the described processes have stopped, the lime is extinguished. Cover the container in which the procedure took place with a lid, place it in a dark and cool place and leave for 2-4 weeks.
- Before using lime for whitewashing, dilute it with water. The proportion in this case is arbitrary, the main thing is to drink to the required consistency. The signal that lime is ready is the appearance of a dense white coating on the object with which the components were mixed.
One kilogram of lime produces 10 liters of whitewash, which is ready for use.
Which whitewash is better - lime or chalk?
First you need to decide on the material that will serve as the basis for making the bleach solution. Chalk or lime are the most widely used options. However, every decision to whitewash a house has a list of pros and cons.
Lime is a type of composition for which carbonate-based rocks are burned. This is a relevant solution not only for the construction industry, but also for the production of compounds with various chemical properties. Lime whitening should be done using a slaked type of solution. It is obtained by combining water and lime powder.
Let us list the positive characteristics of lime whitening:
- ability to adhere well to any type of surface;
- tightening of small cracks during application;
- moisture resistance;
- resistance to temperature fluctuations;
- presence of bactericidal properties;
- affordable cost of the material combined with low costs during painting.
There are also some negative aspects, although the lime mixture does not have many of them:
- the likelihood of burns for those who perform painting;
- possible appearance of defects in the form of stains and stripes on the surface.
Lime, in fact, is a sodium alkali, therefore precautions are required, otherwise health cannot be protected.
But chalk is a material of natural origin, known and familiar to many. This finish has its own advantages:
- simple, safe painting work;
- easy rinsing, removal of layers on the surface;
- deep whiteness, whitewash does not turn yellow over time;
- environmental friendliness;
- affordable price.
There are also a couple of disadvantages:
- the likelihood of defects occurring during subsequent coating of walls with lime;
- unsuitable for use in damp environments.
How to properly dilute lime for whitewashing walls?
How to extinguish lime yourself at home
For whitewashing, only slaked lime is used, which can be purchased in ready-made form or the slaking procedure can be carried out at home.
To do this, you need to take the material in the form of granules or lumps, place it in a clean metal container and fill it with cold water in a 1:1 ratio. In this case, a very active reaction occurs, so it is necessary to close the container with a lid.
After the reaction is completed, mix the solution using a wooden device, close and leave in a dark, cool place for 2-3 weeks to improve the quality.
After settling, mix the mixture thoroughly and dilute with cold water at the rate of 1 kg of lime per 10 liters of water. Strain through a mesh to remove lumps and other inclusions. The finished solution should have a homogeneous, dense consistency.
To obtain a particularly strong composition, it is recommended to add 5 drops of drying oil and a pinch of salt.
The preparation of lime paste is similar, only you need to reduce the amount of water. For one portion of dry lime you need to pour only 50% water. Moreover, pour it in small portions, stirring constantly and not allowing the reaction to stop.
How to buy lime correctly?
Before you start work, you need to calculate how much lime to purchase, what kind of lime it should be, slaked or unslaked, as well as what other components are needed to prepare the mixture. This will help you purchase the right amount of material at once in order to avoid repeated shopping trips if there is not enough solution. Slaked and quicklime differ not only in the presence of calcium. For ordinary household repairs, slaked lime is used. It can be purchased at hardware stores in powder form. If you already have a large amount of quicklime at home and it needs to be used, then you need to extinguish it and then get to work. To extinguish it yourself, you need to protect your eyes with goggles and wear special clothing; work is carried out in the open air, as harmful fumes are released into the air.
How to dilute slaked lime for whitewashing
In the process of preparing the solution, proportions play a huge role. If the amount of lime is insufficient, the coating will turn out translucent, but if this material in the solution exceeds the required norm, then after drying, bubbles will swell on the wall and the coating will fall off.
Proportions must be selected based on the area of the surface to be treated. For every 2.5 square meters of the same wall you will need approximately half a kilogram of lime and 0.75 liters of water. You can also add 5 grams of salt and a third of a tablespoon of drying oil to the solution. Such manipulations will help to obtain the most stable solution that will last for a long time.
You can cover more than just walls with lime. For example, fluff lime is used very widely for whitewashing rabbit enclosures. In this case, a 1 to 1 dilution is ideal to create an effective solution.
READ Stencils for walls to look like brick plaster
Slaked lime
Slaked lime
Preparing a whitewash solution from slaked lime is much simpler and safer. To get about 10 liters of the mixture, you will need 3 kg of lime dough, 100 grams of salt and a little blue (about 40 grams).
To begin with, the fluff (or lime dough) is diluted in about 5 liters of water. Then a pre-prepared hot salt solution (1 liter) is poured in and mixed. In order not to overdo it with blue, it also needs to be mixed in a separate container, and then little by little added to the general mixture. Before whitewashing, bring the solution to approximately 10-11 liters, mix and strain through gauze or stocking.
Before whitewashing the ceiling with lime, you need to remove the old coating. This must be done especially carefully if the surface was previously whitened with chalk solution. Surface defects are eliminated using putty, and then the ceiling is primed.
To prime the ceiling, instead of salt, grated laundry soap is used (1 bar per 10 liters of water) and 300 grams of wood glue, and the amount of lime remains the same. You can add a couple of tablespoons of drying oil. These additives contribute to better adhesion of the lime mortar to the surface. The same composition can be used to make the finishing coating.
Lime whitewash is applied using a brush or spray. Spraying will give the most uniform surface, so this method is preferable. You can purchase a special nozzle for spraying with a vacuum cleaner or an electric paint sprayer.
There are also hand-held whitewash spray guns available, which are convenient because they do not require an electrical connection and have a long spray nozzle.
Spray gun
In addition to the above methods, you can whitewash the ceiling with lime yourself using a regular garden sprayer. Here you just need to strain the lime mortar well and select the viscosity of the material.
Before applying lime whitewash, the ceiling must be moistened, and the second whitewash layer is also applied to the previous one that has not dried.
Whitewashing the ceiling with lime is done crosswise with a roller: the first layer is rolled parallel to the windows, the second - perpendicular. During the drying process, drafts should be avoided.
By following these simple tips, you can get inexpensive and high-quality ceiling coverings in your home.
Advantages of lime as a finishing material
First of all, simplicity attracts attention. The solution of this material is prepared very simply, and even a person who is very, very far from repairing can cope with its application. Indeed, the question
Lime is famous for its disinfecting properties, so that mold and mildew do not appear on the treated surface. In addition, the surface painted in this way is not subject to abrasion, so its repair can not be carried out for a long time. Finally, lime is very cheap, and finishing the same walls with it becomes a very budget-friendly way to update the interior.
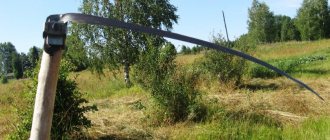
Whitewashing trees
We have already talked about the versatility of this material. Its properties make it possible to protect the bark from natural influences, protect it from pests, and even repel rodents if certain aromatic additives are added. And so the question
The proportions in the preparation of this solution are very different, but in general it is made quite unsaturated. So, for 6-10 liters of water use 2-2.5 kilograms of slaked lime. Ingredients such as chalk, copper sulfate, clay and even milk are also added to the solution. By the way, trees can also be whitewashed with slaked lime.
Why are the trunks of fruit-bearing trees whitened?
Whitewashing of trees is carried out in late autumn (November) and early spring (March). Gardeners do this not for beauty. Bark is a protective barrier for trees: it protects them from environmental influences. Therefore, it is the material that is primarily exposed to temperature changes: it dries out, flakes, cracks from the heat, freezes in the cold, and is damaged by bark beetles.
If it is not strengthened and taken care of, the wood becomes exposed and begins to deteriorate and rot. This greatly weakens the plants, which ultimately leads to their death. What does the whitewash layer protect against?
- White color has reflective properties, so it does not allow the sun's rays to overheat and burn the shell of the plant and its branches.
- Autumn whitewashing protects the trunk shell in winter from the formation of ice during the period of alternating thaws and frosts.
- The smell of lime repels animals gnawing on the bark of the trunk.
- A layer of white will protect the plant from insect pests crawling out of the soil and destroy those that have hidden in the cracks of the shell for the winter.
It is obvious that whitewashing plays the role of strong protection of the plant from external destructive factors.
It is necessary to whitewash trunks in spring and autumn in dry weather, otherwise the whitewash layer will be washed away by rain.
After drying, the lime layer will become more resistant to precipitation; some gardeners sometimes even add glue to the solution to make the paint more moisture-resistant.
Tips for working with lime
Lime is applied in a variety of ways. These can be rollers, brushes, or a spray device. The latter is especially effective if you need to cover a large surface. When working with the latter, you need to take care to protect your body and face, as you can get burns.
Before applying lime, the surface must be completely cleaned of old whitewash, grease, efflorescence, dirt and rust. If necessary, the surface is plastered and primed, cracks and irregularities are covered, and everything that should not be treated, for example, radiators, is covered.
Lime is usually applied in several layers. Moreover, it is much better to apply the next layer if the previous one has not yet completely dried - after one and a half to two hours. This will give you better grip. It is recommended to wet the surface itself before applying the first layer.
Secrets of uniform whitewashing
Preparatory work
Windows, furniture, doors and floors in the house should be covered with plastic film, you can also use old newspapers, then cleaning the room will not be so difficult. Prepare working tools, in case of whitewashing the ceiling - a stepladder.
The surface also requires preliminary preparation. Old chalk whitewash must be completely removed, the same goes for crumbling plaster. The surface is cleaned of stains and dirt.
How to apply lime mortar
There is nothing complicated in the application process. Simply dip a painting tool (a wide brush or roller) into a container with whitewash. The solution is then distributed over the surface only in a thin layer. It’s good if you can use devices with long handles. They are easy to make yourself. Then there will be no need to make additional efforts during processing, and the whitewash consumption will not increase.
Application is carried out in several layers, at least 2-3. Each layer is applied perpendicular to the previous ones, then thickening and streaks will not appear, and the coating will be uniform. It is important to maintain time intervals between applying layers. For old ones, complete drying is mandatory. If you make the layers thin, this process ends faster.
Often areas appear in the corners without proper treatment. It is recommended to simply go over them again using a whitewash brush.
How to dilute lime to whitewash basement walls?
I heard that lime is an anti-fungal coating. How to properly dilute lime to whitewash basement walls?
How to dilute lime to whitewash basement walls?
This may seem strange, but in order to dilute the lime correctly, we need a tape measure and a calculator.
At the first stage, we find out the total square footage of the walls in the basement; to do this, we multiply the perimeter by the height and subtract all the openings.
The amount of ingredients needed is calculated based on the square meters of the room.
I will calculate based on 5 squares, it’s more convenient (including for you).
For 5 square meters of area, you will need a kilogram of lime and one and a half liters of water.
If you are worried about the strength of the solution. you can add a tablespoon of drying oil and a teaspoon of salt to this solution, but this is not a mandatory procedure.
we have decided on the proportions, now we need to mix it all thoroughly, we need to mix it with gloves, conveniently with an ordinary stick in a bucket.
Although I often use a whisk (drill at low speeds).
Once mixed, the solution must be passed through a sieve, a fine mesh sieve.
Our task is to completely remove lumps; with lumps, high-quality whitewash will not work.
It probably makes sense to remind you that lime is not applied to lime; old lime is removed with a brush.
If there are cracks in the walls, we widen them, then clean them of dirt and dust, then apply a primer. then putty.
The surface before lime must be moistened very well.
And the last tip: Apply at least two layers. One layer will definitely not be enough.
It depends on what kind of lime you are going to dilute .
If you bought slaked lime fluff, you have already been given a good answer.
Slaked lime is also found on sale in the form of dough. Lime dough is more convenient to use - it is easier to dilute it to a homogeneous mass without lumps.
Take 3 liters of water, gradually add 1 kg of lime dough to the water, stirring constantly.
If you have quicklime lump lime, it must be quenched. Take equal quantities of lime and water. It is dangerous to pour quicklime into water. You must first pour lime , fill it with water and mix. Just don't lean too low over the container. Lime slaking is accompanied by the formation of steam due to the release of heat. Wear protective clothing to avoid burns.
The slaked lime should sit for 2 weeks. After it has settled, add more water and stir. You can add drying oil, blue and salt.
When using a spray bottle, make the solution thinner and strain through cheesecloth. You can use old tights for this purpose. If there are lumps in the solution, your sprayer or spray gun nozzle will become clogged. When whitewashing with a brush, a thicker solution is suitable.
How to prepare a lime solution for whitewashing the walls of a house
If the basement has brickwork, the consumption of lime is greater than on a smooth surface.
Features of preparing the solution and tools
- The approximate consumption of the solution is 0.5 liters per 1 m2. Based on this, the approximate volume of the finished mixture is calculated.
Remember! The consumption of lime mortar when painting a brick surface is much higher than on smooth plastered bases.
- As noted above, it is better to use slaked fluffed lime to prepare the solution. It is mixed with water in a ratio of 1:3.
- To improve the quality of application, it is worth pre-soaking the brushes in water. As noted above, it is better to use products with natural bristles.
Remember that the consistency of the solution may vary depending on the application method. When working with a brush, it should be thicker, and when using a spray gun, it should be more liquid. In addition, when using a sprayer, the composition should be filtered through gauze several times.
Preparing the mixture for whitewashing the cellar
The solution for whitewashing cellar walls is called lime milk. It is obtained from two main components - lime and water. You can use both quicklime and slaked lime
Manufacturers always indicate on the packaging how to dilute the building material. If for some reason such information is missing, you can prepare the mixture according to one of the recipes below:
READ How to glue mosaic tiles to a wall
| No. | Water | Lime | Copper sulfate | inkstone |
| 1 | 9 l | 3 kg | — | — |
| 2 | 10 l | 2.5-3 kg | 200 g | — |
| 3 | 10 l | 2.5-3 kg | 100 g | 30 g |
It is not recommended to change the amount of ingredients up or down, as this will lead to unfavorable consequences: it is difficult to paint the surface with liquid lime and give it a rich color, and a composition that is too thick will begin to bubble and fall off when it dries.
Experts recommend using a mixture with copper sulfate. This chemical compound has antifungal and antimicrobial properties and enhances the antiseptic effect of lime mortar.
- metal or enamel bucket (tub);
- a wide paint brush or a fur roller with large bristles;
- waterproof gloves;
- protective glasses;
- special clothing that completely covers the body and limbs.
Dry quicklime must be diluted in several stages:
- Pour the required amount of material into an empty bucket. Knead large lumps with your hands, after wearing protective gloves.
- Carefully pour in the water and leave the mixture for a while so that the lumps of lime are well saturated with water and break up into small grains.
- While the lime is slaking, it is not advisable to stay near the bucket for the first 15-20 minutes - when slaking, the lime releases heat and the mixture splashes in different directions.
- Leave for 6 hours to completely dissolve the lime.
- Add copper and iron sulfate (if desired).
- Stir the bleaching liquid until all components are completely dissolved.
The finished solution should be filtered through a sieve to remove small lumps, undissolved grains and foreign impurities.
Today's:
- How to properly fill a heated floor. Preparatory actions
- How to dilute lime for whitewashing walls in a cellar. How to whitewash walls with your own hands
- Whitewashing with lime and color. How to make (prepare) colored whitewash
- Whitewashing the cellar with lime and copper sulfate. Articles
- Secrets of whitewashing. What and how to make repairs? Chalk, slaked lime and water-based paint are what are used to whitewash the ceiling. Each of them has both advantages and disadvantages. But
- Water-based paint
- Whitewashing with lime roller. How can you whitewash the ceiling?
- The main advantages of whitewashing
- Video preparing whitewash for walls
- preliminary soaking of the brush in clean water for approximately 1-2 hours to ensure better adhesion of the bristles to the solution;
- lightly moistening wall surfaces by spraying water with a spray bottle;
- priming with lime milk areas with traces of rust, as well as mold and fungal formations;
- painting the surface in one layer, followed by applying (before drying) a bleach solution.
Main stages of work
Whitewashing basements must be carried out in a certain sequence. The list of main stages in this case looks like this:
Next, let the resulting coating dry thoroughly. After this, the room is ready for use for its intended purpose: shelving, equipment and food products placed for storage can be brought into it.
Nuances of preparing and applying lime mortar
Popular recipes are shown in the table:
| Type, optimal application | Component proportions |
| Universal milk | 1 part fluff, 3 parts clean water at room temperature, infused for at least 6 hours. When using quicklime, this period is increased to 2 weeks |
| Effective disinfectant solution | 2-2.5 kg of slaked lime, 10 liters of water, 30 g of iron sulfate |
| With increased antiseptic properties | 400 g of bleach per 10 liters of water, not used in basements intended for storing food. |
The lumps of fluff are pre-kneaded (but not to fine crumbs) and filled with water in a metal container. In the first 10-20 minutes, the main reactions take place; to avoid splashing, the bucket is covered with a lid during this time. Then the solution is mixed and infused for about 6 hours; before application, it is recommended to strain it through a sieve.
You can whitewash the basement manually; in this case, brushes or brushes should be soaked in water several hours before starting work. On large areas it is more convenient to use sprayers; for uniform distribution, the tool is kept at a distance of 30 cm from the surfaces. The direction of the strokes is from bottom to top; all surfaces are treated; on hard-to-reach surfaces, it is carried out using a pear. The walls of the cellar are dried for at least 1-2 days.
Consumption depends on the porosity of the base, minimum 0.5 l per 1 m2. The maximum effect is achieved with two-layer installation.
To strengthen and increase the decorative effect of the lime coating, dyes and simple but effective additives are added to the composition:
- To obtain a solution that does not leave marks and does not crumble, add 100 g of table salt per 10 liters.
- To increase whiteness, a few grams of blue are used, and to give a certain color, a small amount of bright paint is used.
- If there are high requirements for wear resistance and intensive use of the basement, it is recommended to treat its walls with milk with the addition of wallpaper glue or latex.
- To improve the antiseptic properties, fungicides are introduced; the best option for the underground is considered to be whitewashing with lime with the addition of copper sulfate, its share is 50-100 g per 10 liters.
Using lime to whitewash a cellar
The material in question has gained incredibly wide popularity for quite objective reasons: it is one of the most economically feasible ways to carry out the required cosmetic repairs. Moreover, lime mortar can be used to restore proper appearance not only to outbuildings, but also to various residential, work and public premises.
The list of other benefits is as follows:
- the presence of antimicrobial properties,
- resistance to high levels of humidity and significant temperature changes,
- preventing the appearance of fungal and mold formations,
- safety for human and animal health,
- no pungent odor,
- possibility of application both on a new base and on a previously bleached one,
- the formation of a protective film on the walls that prevents abrasion,
- excellent miscibility with dyes (thanks to this you can get absolutely any color and shade),
- availability (you can purchase such raw materials at any specialized point of sale).
All these positive characteristics allow lime to maintain a strong position in the industry market, despite the wide abundance of alternative solutions used in interior finishing.
Preparing walls for whitewashing
If whitewashing is applied for the first time
In order for whitewashed walls to look beautiful, the surface must be prepared for repair. If the walls are simply plastered and have never been whitewashed before (as, for example, in a new building), the work is simplified. True, under these circumstances it is necessary to whitewash the walls in three layers.
The first layer can be applied without using bluing. When the base layer has dried, you can apply subsequent ones, to which, if necessary, you will add ultramarine blue or a special dye of a suitable shade. As for the surface drying time, it is approximately five to six hours for each individual layer.
Removing rust and grease stains
Sanding the ceiling surface
In the same case, if the surface of the walls is not ideal, careful preparation should be made for applying a layer of lime whitewash. First of all, carefully wash off any stains on the walls, as well as rusty stains, with plain water. Then treat these areas well with a solution of copper sulfate. The proportions for preparing this solution are as follows: from fifty to one hundred grams of vitriol are diluted in one liter of boiling water.
What to do if there are greasy stains on the walls you plan to whitewash? In this case, soda ash will come to your aid, from which a two percent solution is prepared.
Dampen a clean white rag with this solution, and then blot the stain thoroughly. Hold the rag until the stain is completely gone. Next, the surface treated with soda ash solution should be thoroughly rinsed with water.
No soot, cracks or whitewashing at 100%
But if the walls are quite smoky, another recipe will help you. Take a solution of hydrochloric acid (two or three percent) and wipe the surfaces to be whitewashed with this solution.
If there are cracks and other defects on the walls, you will need to repair them before starting to whitewash the walls. This will require putty. You don't have to buy an expensive branded mixture.
You can easily make the solution yourself. To do this, take one part plaster, two parts chalk, and two parts wood glue (diluted). Keep in mind that when diluting wood glue, you also need to take into account the rules regarding proportions: for example, fifty grams of glue are required per liter of water. As a result, you will get a simple, but high-quality putty mixture.
There is another recipe for excellent putty. Take lime paste (that is, thick slaked lime) in the amount of two and a half kilograms. Add five liters of water to it. And finally, add one more component - one hundred grams of ordinary table salt (it must be diluted in hot water).
Then you need to add another five liters of water to the resulting solution and mix everything carefully and thoroughly. Then strain the mixture through a fine sieve. The last stage is the addition of wood glue diluted with water in a ratio of one to ten, as well as with chalk powder (about two hundred grams).
This amount of putty will require about one and a half liters of adhesive solution. So, as a result, you get an excellent consistency, which you can later also use for priming walls. This composition creates an even, smooth film and can easily replace an expensive branded primer. As for applying putty, you will need an ordinary spatula.
Quicklime
It is used as a binder for cement mortars and various types of plasters. It increases adhesion between coatings and the treated base, gives plasticity to the materials, but is absolutely not suitable for whitewashing wall surfaces. If for some reason there is no ready-made fluff in the form of dough or powder, the lime is slaked.
On an industrial scale, lime is slaked in large special pits, into which the mixture is poured and water is poured. You can carry out the extinguishing procedure at home. The amount of water is calculated depending on what consistency the material needs to be obtained - thick or milky. In both small and large quantities, the extinguishing process takes 36 hours. You can reduce it to a day, but this will affect the quality of the resulting whitewash.
READ How to tile a bathroom wall
During the slaking process, the lime boils and splashes in different directions, but requires constant stirring. The mixture exhibits activity from 5 to 30 minutes, during which it must be stirred. To prevent the caustic solution from getting on the skin and mucous membranes, it is necessary to use personal protective equipment and a long object for mixing.
Disadvantages of lime
The mixture has not only positive characteristics, but also disadvantages. Lime is a caustic material. This imposes certain requirements on safety measures both during the preparation and application processes. It is best to work in old clothes, which you can simply throw away later. It is necessary to protect the mucous membranes of the eyes, respiratory tract, skin of the face and hands - wear gloves, special glasses, and a respirator.
If you do not observe the proportions in preparing whitewash, or do the mixing incorrectly, then stripes, bubbles, and stains will appear on the surface being treated. A solution that is too thick will not only bubble during drying, but also fall off, while a solution that is too thin will not allow you to obtain the desired shade on the wall. To avoid poor-quality whitewashing, you need to dilute lime in strict proportions, follow the instructions and recommendations.
How to prepare the surface?
The main goal is to create a durable and uniform surface using whitewash. To make a high-quality surface, it is first cleaned of dirt and greasy stains. If the wall is too dirty, then the layer of material is cleaned off to the concrete base; this is the only way to ensure a reliable coating. You can remove greasy or yellowed stains from walls using bleach or bleach. There is no need to prime the surface; work is done in the evening or in cloudy weather to avoid exposure to the sun, otherwise the material may deteriorate.
How to slak lime correctly?
It is recommended to dilute the powder in a metal container. It must be clean and free of rust. Its dimensions depend on the volume of whitewashing required for the work. The amount of water and quicklime is taken in a ratio of 1 to 1, that is, a kilogram of powder is placed per liter of water. It should be taken into account that the heat generated during the extinguishing process reaches temperatures of up to 150 degrees Celsius.
Stop stirring the mixture when it stops boiling and splashing. But it is still impossible to work with such material. The container with slaked lime is covered and stored in a dark place for two or three weeks. If whitewashing is not urgently required, it is better to wait 28 days. The longer the exposure period, the better the solution adheres to the surface.
Unlike ready-made batter or powder, the recipe for making whitewash - diluting lime after slaking with water - is somewhat different. To be more precise, the proportions are chosen completely arbitrarily. Water is poured in until a white dense mark remains on the wooden stick used for mixing.
When using quicklime, it should be borne in mind that the approximate yield from one kilogram of the mixture is about ten liters of a solution ready for whitewashing.
It is very easy to prepare the whitening composition yourself.
Primer for whitewashing
First of all, prepare a primer for the ceiling. First, take slaked lime (ideally it should be quite thick) - this is the so-called lime paste. Of course, it must be diluted with warm water. For two and a half kilograms of lime you need approximately five liters of well warm or even hot water. After this, dissolve one hundred grams of ordinary table salt in the mixture.
Add more warm water to the resulting mixture so that you end up with about ten liters of primer. If at this stage there are small particles in the composition, strain the primer through a sieve.
Finally, mix two hundred grams of powdered chalk in wood glue (ten percent). After thorough mixing, when the mixture becomes homogeneous, add it to the primer composition.
When preparing the primer lime mortar, mix it thoroughly at each stage. All ingredients should be evenly distributed in the mixture.
As a result, you will get a primer with which you can prime almost any surface for whitewashing. The mixture is applied with a paint roller or brush.
Preparation of whitewash
There are several common recipes for making whitewash. Perhaps the most popular and simplest one is made from warm water, chalk and wood glue.
To begin, heat approximately five liters of water. The water should be well warm, but not too hot. The optimal water temperature is fifty degrees. Then little by little dissolve three kilograms of sifted chalk in water and add thirty grams of wood glue. This amount of whitewash should be enough to treat fifteen square meters of surface.
The following composition has not become as widespread as the previous one, but it provides the highest quality whitewash.
To prepare a whitening composition according to this recipe, dissolve sixty grams of laundry soap in four liters of hot water. Then add fifteen grams of blue or ultramarine and ninety grams of wood glue to the soap solution. Chalk should be added to the resulting mixture at the very end - approximately two and a half kilograms. This amount of whitewash is enough to treat ten square meters of ceiling or walls.
The third most popular whitewash recipe is called “lime whitewash.” Dissolve two to three kilograms of slaked lime in five liters of warm water. Then, add one hundred grams of ordinary table salt, half a kilogram of dyes to the mixture and bring the volume of the mixture to ten liters. It might not hurt to add a little blue to the whitewash.
By the way, experienced craftsmen claim that table salt for whitewashing can be replaced with potassium alum. True, salt is still simpler - it can be found in any kitchen.
Do it yourself
DIY swing for children Our children are always in active motion, so let's try to diversify their relaxation with the help of a swing. Let's start with a simple option. Children love swings, which...
How to make a bed. DIY laminated veneer lumber bed. The bed is a very important element of any room, be it the bedroom of adults or children. A large comfortable bed in your bedroom is the key to sound sleep and good mood throughout…
DIY wardrobe Today, many owners of both small apartments and large houses are thinking about purchasing a wardrobe. Unfortunately, it is not always possible...
Do-it-yourself corner sofa Of course, a sofa is considered one of the main elements of furniture in the house. This thing is extremely necessary and useful; in addition to a comfortable rest, you can hide a lot of household items in it,…
Do-it-yourself screen Some people think that screens are a thing of the past, not fashionable and worthless. Meanwhile, the screen is a very convenient and beautiful tool for zoning a room. There is a screen in the living room...
Benefits of lime
The material is not highly decorative, but it has many positive qualities that have contributed to its widespread use:
- Hygiene. Any microorganisms that enter the lime die. No other type of finish can boast of this property. Fungal and moldy formations do not appear on lime-coated surfaces.
- Moisture resistance and high strength. When the whitened surface dries, a special film is formed on it, which is resistant to mechanical damage and abrasion.
- Cheapness. Unlike other materials, lime is one of the most cost-effective finishing methods.
All these advantages are the main reason that lime has not lost its relevance with the advent of more modern finishes.
Where is lime whitening used?
The antiseptic properties of the material made it most popular for use in kindergartens and medical institutions, and its strength - in public buildings with high traffic. The moisture resistance of lime allows the mixture to be used for finishing walls in swimming pools, baths, and showers. Low cost makes lime a profitable solution for areas such as garages, closets, basements and so on.
Whitewashing remains relevant not only for public places. It is actively used to carry out inexpensive cosmetic repairs in office premises, commercial facilities, city apartments, private houses and country houses. It is used wherever inexpensive and high-quality wall decoration is needed.
Lime consumption and proportions
The slaked mixture is diluted in proportions of 1 to 3. Take 1 kilogram of powder or batter for 3 liters of water. The solution mixed in this way allows you to get approximately 8 kilograms of whitewash. This amount is enough to cover an area of 12 square meters.
There is an alternative way to calculate the original proportion. It depends on the quadrature. The wall is calmed down, divided into “sections” of 2.5 square meters, for each of which 750 ml of water and 500 grams of lime are taken.
Lime consumption depends on the material from which the surface is made. If brickwork is whitewashed, then a similar volume of solution will be enough for no more than 10 square meters. How much material will be spent depends on the quality of surface preparation, as well as the tools used to apply whitewash.
Do not use a roller for application. It is recommended to apply the solution with a special brush. When whitewashing is carried out on a brick surface, the bristles of the tool should be natural. The spray gun allows you to achieve maximum savings on the mixture. It is more convenient to use hand-held devices with a long hose rather than electric ones.
How to prepare a lime solution?
First you need to purchase lime powder at a hardware store. Fluffed lime is usually used; it is already slaked. To whitewash a room of about 15 square meters, you will need one package of material. Concrete walls with a smooth surface require less mortar than brick walls. In the second option, the material actively absorbs liquid, and the mixture consumption increases. More composition is lost when applying several layers, so the material is purchased with a reserve. For convenient application, it is necessary to properly prepare the mixture; if the material is in the form of a paste, then diluting with water will be easier. To treat one square meter you will need approximately 0.5 liters of mixture.
To prepare the mixture, you need to prepare 1 kilogram of dry lime and three liters of water. To prepare the paste, dilute the dough with water in a ratio of 1 to 3. You can use quicklime, it comes in clumps to make a mixture, pour the material with water, maintaining a ratio of 1 to 3, and cover the container. After the reaction is completed, the paste will be ready; it must be left for two weeks for a high-quality infusion. The paste is then diluted with water to obtain the required consistency. When water hits dry material, the mixture heats up and a reaction begins, so the container must be covered to avoid the release of harmful fumes. It is necessary to add blue to the composition to give a beautiful color, half a glass of salt, and 20 grams of drying oil, this contributes to high-quality adhesion of the mixture to the surface. About four liters of the composition are prepared from one kilogram of lime. The solution is consumed depending on the type of surface, the maximum amount is about one liter per square. Also, the consumption of material depends on the tool with which the work is performed; thin brushes or brushes leave smudges, and the material is applied in thick layers. You can reduce consumption by using a spray gun; sometimes a garden sprayer is used.
How to dilute lime for whitewashing walls
Lime is a material widely used for whitewashing wall surfaces with disinfecting properties and is resistant to the formation of mold and mildew. It is a mixture, the components of which are obtained by burning limestone rocks.
As a rule, there are two types of lime on sale: slaked fluff and quicklime lump mixture. To whitewash with lime, it is necessary not only to properly prepare the base, but also to dilute the mixture. Otherwise, the work done will not bring the desired result, and all efforts will be reduced to zero.
Is it possible to change colors, how to choose the right one
It is mistakenly believed that surfaces treated with lime can only be white. This is because of the colloquial name for the material - “whitewash”. But that's not true. Color variety can be achieved by using appropriate pigments. The main thing is to choose the right element correctly and determine its quantity correctly. And the resulting whitewashing of walls and ceilings will pleasantly please you.
Water-based pigment must not be mixed with lime.
Since slaked lime is alkali, it can only be tinted with dry alkali-resistant pigments. Information on how to properly dilute lime for whitewashing walls should be indicated on the packaging of the painting material. There are several types of suitable compositions:
- Chromium oxide – gives green color;
- Iron minium – colors reddish-brown;
- Ocher - makes the mixture yellow;
- Ultramarine - to create a blue tint;
- Umbra – brown tones;
- Soot – classic black.
An excess of pigment can affect the strength and durability of whitewash, significantly reducing it.
Color variety can be achieved by using appropriate pigments.
How to dilute slaked lime correctly?
The process of preparing whitewash is not complicated, but requires following certain recommendations:
- You need to mix the lime in small portions. At a time, you need to dilute no more than 2 kg of powder or batter per 1 liter of water.
- It is better to pour the mixture with cold water, since as a result of the chemical reaction that occurs, heat is released during mixing.
- The first portion is thoroughly mixed, poured with a liter of water, and stirred again. Repeat this step until the required amount of water has been used.
- The resulting solution is left for a day.
After 24 hours, the whitewash is completely ready for application.
Sources:
https://bricknews.ru/article/2248 https://td-te.ru/pogreb/chem-i-kak-razvesti-izvest-dlya-pobelki-sten-v-pogrebe.html https://superarch. ru/materialy/kak-razvesti-izvest-dlya-pobelki-sten