Replacing a fender is an action that any car owner may need, no matter how much they want it. This is one of the most vulnerable parts of a car, which is most often subjected to mechanical stress. Often the wing becomes a victim of accidents, careless overtaking or improper parking.
Sometimes, the damage is so minor that it is almost impossible to notice it the first time. This kind of damage poses a great danger, as it can entail large expenses if everything is not corrected in time. This applies to dents and scratches that damage the paintwork. Under the influence of an aggressive environment, the metal succumbs to corrosion and gradually begins to rot. Having delayed repairs, replacing the wing will be the only solution.
Not only rotten metal, but also severe dents may be the reason for replacement. Thus, dents that cannot be leveled or straightened are easier to replace than to repair. It should be borne in mind that the new wing will already be primed, and all that needs to be done is to install it, paint it and varnish it well. The whole procedure is quite simple, so there shouldn't be any serious problems with installing the wing. For quality work, you need to follow the instructions exactly, taking precautions.
DIY wing replacement
So, how to replace a wing, and can you handle the whole job alone? This question can be answered in three words: “difficult, but possible.” To work, you need basic car repair skills (know which way to turn the bolts and which way to turn the nuts), as well as at least one assistant.
The work involves a large part, and it is almost impossible to cope with the work alone. For an assistant, in-depth knowledge of automotive repair is not needed; he will be required to hold or help install the wing itself, and, if necessary, provide the necessary tool.
Replacing a wing takes place in several stages, each of which needs to be thoroughly understood before starting work. The article will describe how to replace a wing with your own hands, namely:
Removing the old wing Painting Installing a new one
Each stage must be performed carefully and consistently. You also need to remember that if the work is beyond your capabilities, then it is better to contact a car service. Service work will be cheaper than expensive repairs after unsuccessful DIY projects.
Removing the old wing
Although the old wing will not be needed in the future, the work must be done carefully. Careless actions can damage the car body, and then not only the wing will have to be repaired. All work must be carried out on a platform, lift or using a jack. When using a jack, be sure to have supports under the car!
Before removing the front or rear wing, it is necessary to remove the bumper, as well as the car wheel. First of all, you need to disconnect the wires leading to the turn signal; if there are fog lights, we also remove the wires leading to them. Once you have made sure that nothing is connected to the bumper and fender, you can proceed to the next step.
After removing the wheel and bumper, you need to remove the fender liner, which is held on by metal bolts.
Underneath there are mounting pins that hold the wing itself. In some models, instead of pistons, bolts or screws may also be used. The pistons are plastic, which means they are quite fragile, and you need to be careful when dismantling them. And although the caps themselves are cheap and fairly easy to find, a complete replacement can be expensive, since you need to buy quite a large number.
After unscrewing the bolts that are attached to the radiator, body and rack, you can carefully remove the wing. Here you will need the help of a partner. Attention, if the wing is sitting tight and removing it is quite problematic, you need to check all the fastening points again and make sure that all the bolts are unscrewed and the pistons are removed.
If the wing is new, it is not painted and only has primer. In many ways, this solution saves a lot of time and money. If the damage to the wing is severe and it needs to be re-primed, leveled and painted, it is easier and much cheaper to buy a new primed wing. This way you don’t need to waste money and effort on cleaning and priming.
In order to keep body parts clean and undamaged, it is best to paint the fender before installing it. The most difficult thing in this work is choosing the right color. Usually at home, it is impossible to do an ideal job. To get quality service, you need to contact a car service center.
Before starting work, you need to prepare the room. It must be clean and free of dust. It is also worth paying attention to clothing; it should be made of synthetics. Any, even a small particle of dust or lint, can damage the paint or varnish during drying.
The paint should be applied using a spray gun connected to a compressor; this method will help avoid smudges. After applying a layer of paint, you need to give it time to dry. It is better to apply paint in 2-3 layers. After which you can apply several layers of protective varnish. The painting is finished, you can start installing the wing.
Installation of a new wing
Before installation, you need to install a turn signal on the wing, which has dried from paint and varnish. During installation, you need to carefully remove the wiring so that you can connect it later. Installing a new wing is an important part of the whole job; it is important to complete it without damaging the new part or the body itself. To complete the installation, you need a partner who will hold the wing and prevent it from falling. All work must be done smoothly, especially when tightening the bolts, as there is a danger that the key will slip, leaving a scratch on the body or fender.
First you need to put the wing in place of the old part. Then you need to tighten the bolts around the perimeter, but without tightening them all the way. It is important that the wing does not protrude and is flush with the body. You also need to install it evenly, and without distortions. This effect can be achieved by tightening the bolts using a cross pattern.
To begin with, the upper corner on the body side is not tightened all the way, then the lower corner on the bumper side. Then vice versa, the top one is from the bumper side, and the bottom one is from the body side. At the end, the bolts in the middle are tightened. You need to go through it several times until everything drags on. When pulling the bolts, you need to monitor the level of the wing in relation to the body. The bolts must not be overtightened; hand force is sufficient.
Read also: How to read single line electrical diagrams
The wing is installed, all that remains is to connect the wiring. Ready! A new wing is on the car and the overall appearance is much improved.
The whole work has a simple process, but the parts are quite expensive. If you fail, you can lose a lot of money. Therefore, if you are not sure, it is better to contact a car service. Finding quality service will not be difficult if you use the services on the Uremont.com website. Repair your car efficiently, quickly and inexpensively with our service!
Special bit or extractor
The modern auto repair market offers devices with which you can unscrew licked bolts and screws. One of them is a specially designed bat.
Before work, you just need to insert this tool into a screwdriver or screwdriver. The remaining sharp edges will engage firmly with the bat, and the screw will begin to rotate.
Another effective tool that has proven itself in practice is called an extractor.
Its operating principle is similar to a bat, but with some differences. This nozzle differs in diameter.
You need to work with it according to the following algorithm:
- Using a thin drill, make a small hole in the surface of the bolt head or screw.
- Drive or screw an extractor of a suitable diameter inside it.
- Unscrew the licked fastener.
Thus, the extractor is first inserted inside the damaged screw, which is then unscrewed without applying excessive force.
Break on the surface
Usually this is the simplest type of breakdown and can be fixed without radical measures, which can sometimes harm your car or other unit. However, before unscrewing the broken bolt, you need to treat the breakage area with kerosene. This will help eliminate waste and reduce surface contact. Next you need to follow the following recommendations:
- If the protrusion is large enough, it is best to use simple tools such as clamps, pliers or pliers. With their help, it is easy to grab and turn the part along the thread without applying much effort;
- Some craftsmen, when answering the question of how to unscrew a broken bolt, advise using a welding unit. It will allow you to weld a lever to the hardware, which will help you unscrew or unscrew the connection by creating a rotational movement with the required pressure;
- There is also an option in which you can use a drill with a diameter slightly smaller than the bolt itself. A hole is made in the center of the bolt axis to the full depth. Then the remaining fasteners are removed using a hook, unscrewing the thread from the very bottom.
These are the most general recommendations; a combined use of these methods is possible. These breakdowns are the simplest, they require only minor processing and the use of simple tools.
Hammer
To unscrew licked bolts and screws, a hammer can only be used in combination with other tools.
For example, if you need to unscrew a large screw, you can take a chisel or chisel, rest it on one side of the head and turn it with gentle blows of the hammer.
This method is not suitable for small parts. The main thing is to move the stuck bolt and make it move along the thread.
To make the process easier, it is recommended to use universal high-penetrating lubricant WD-40, diesel fuel or kerosene.
Cold welding or epoxy resin
This technology consists of tightly attaching a nut of the appropriate size to the licked head. It can be welded using a welding machine.
An easier way is to use “cold welding” or epoxy glue. To solve the problem, two surfaces are glued together, and after complete drying, the complex connection is unscrewed.
Thus, damage to the edges or screw slots can occur when using worn tools or poor-quality fasteners. In addition, improper use of a wrench or screwdriver can also lead to adverse consequences.
If such a problem arises, then do not despair. Using the right materials, tools and technologies, you can easily solve this problem.
How to unscrew a licked screw?
Unfortunately, there is no almost universal solution. And each method presented is good for its own situation. Therefore, everything is learned by comparison and applied to a specific individual situation and one’s own situation.
First method: use a tourniquet
You will need a piece of thick rubber. This could be a piece of a medical tourniquet, a piece of an inner tube from a bicycle, or the like. The denser and stiffer the material, the greater the twisting force that can be created. Berm a screwdriver that is as similar as possible to the groove of the screw.
We place a tourniquet under a screwdriver or a bit and insert it all into the licked head. Next, with simultaneous pressure and a rotational movement, we try to unscrew the screw.
With the right amount of force, you can unscrew the screw with a significant screw-in force.
Method two: how to remove a screw using an impact screwdriver
If you have an impact driver (or ask a friend), you can use it.
Of course, the screw cannot be completely unscrewed, but the connection can be loosened significantly, and then we use a regular screwdriver.
Third method: use a special bit for bolts with ground crosses
Since the problem of slick edges is not new, ready-made solutions have been sold on the market for a long time. For example, a special bit for unscrewing licked bolts.
We insert it into a screwdriver or screwdriver and unscrew it. Sharp edges at the right angle engage perfectly and the screw can be rotated.
Fourth method: extractor
Special tools designed for repairing broken screws, studs, bolts and the like include an extractor. It works the same as the bit in the example above, but with a slight difference. Insert the bit into the screwdriver and unscrew it. You may first need to select an extractor based on the recess, since the diameters of the heads vary.
Fifth method: unscrew with the left drill
On sale, in addition to the drills we are all familiar with, there are also drills with a left-handed spiral. Such a drill can be used as a tool for unscrewing a broken screw.
Sixth method: use core
This method is well suited for removing small screws. We take the core, rest it against the edge of the cap at an angle of approximately 45 degrees and gently hit it with a hammer in the direction of rotation of the cap.
The core, due to its sharpness, has good engagement, which means that the screw is more likely to be unscrewed.
Seventh method: take a hammer and chisel
The method has become classic, but using it for small screws is problematic. We take a chisel or chisel, place the tip into the side of the head and gently hit it and turn the screw. The main thing here is to move the cap out of place, and once it appears, unscrewing can be continued with pliers.
Friends, it will be very cool if you share your ways to get out of such a life situation. Thank you for your attention!
Basics of Proper Drilling
Drilling is usually used as a last resort, when no other tools can help in the situation that has arisen. The main condition for using a drill is that the bolt should not be hardened. Before attempting to drill out a broken piece of hardware, it is worth trying other extraction methods.
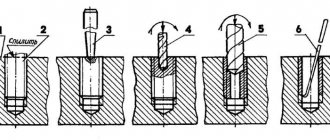
A stud with a small diameter is drilled out with a very narrow drill. Two opposite holes are made on the fragment to a depth of 10 mm. Then they try to unscrew the bolt using narrow-nose pliers or two nails. Nails need to be inserted into the holes, clamped with pliers and twisted.
The solid metal reverse thread cone drill bit is also suitable for efficient and correct drilling. The extractor is screwed into the center of the hardware and the fragment is removed.
Drilling directly with a drill is a difficult option that requires utmost attention. You will need several sharp drills of different sizes. It is important to accurately determine the center. A core will help with this. Use the smallest drill to drill the bolt. You need to drill evenly along the entire length of the fragment. The narrow hole is re-passed with a thicker drill. The closer the edge of the hole is to the walls, the better. Using a screwdriver or chisel, scrape off the residue inward and then remove it outward.
It is important to stop in time so as not to damage the thread.
A broken bolt stuck in a structure has long ceased to be a problem. There are many effective and proven ways to remove fasteners. First of all, you need to assess the nature of the breakdown, its cause, and then select the appropriate method. For such a case, you may need a variety of tools - from a simple adjustable wrench to solid metal drills.
Did you manage to solve your problem using the recommendations from the article?
Yes!
46.39%
No. More answers required. I'll ask in the comments now.
38.56%
Partially. There are still questions. I'll write in the comments now.
15.05%
Voted: 804
Watch the video
For more information, watch the video.
INTERESTING IDEA: Folding table for wine
Next post
Simple table with benches for garden
Comments
Site headings
- Aviation
- Auto and motorcycle
- Army and Navy
- Archeology
- Animals
- Health
- Celebrities
- Games
- Interesting
- Internet and computers
- Story
- Space
- Crime
- Cooking
- Culture and art
- Fashion & Style
- Music
- Science and technology
- News
- Society
- Hunting and fishing
- Policy
- Nature
- Psychology
- Travel and leisure
- Entertainment
- Religion
- Rodnoverie
- Needlework
- Garden
- Homemade products
- Sport
- Construction and design
- Secrets and myths
- Economy
- Humor, jokes
- Sandbox
Preparatory activities
It is better to prevent any problem than to solve it. Therefore, if you have applied sufficient force and the fastener has not moved, you do not need to continue until you completely damage it. Better do the following:
- First you need to remove the layer of rust and other contaminants. If the threaded part protrudes above the parts being fastened, clean it with a wire brush.
- Take a hammer and tap the head. The blows should be quite strong. It's okay if you make small dents in the metal, but you shouldn't allow the fastener itself to bend. This procedure helps to disrupt the integrity of the oxides, so the positive effect will only be at the initial stage, when the head is pressed against the part. Once you have removed the bolt from its place, it is not recommended to knock on it, since there is a high probability that you will damage the threads, thereby complicating the situation even more.
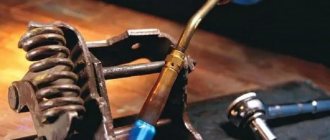
- Heating the attachment point gives very good results. All you need to do is heat the fastener and wait for it to cool. In this case, some of the substances burn out, the rust is destroyed, and the bolt is unscrewed with less effort. The heat must be strong. This can be done with a blowtorch, gas torch or acetylene torch. All use an open flame, so first ensure that you do not damage surrounding elements. Don't forget to follow safety regulations!
- Lubricate the hardware with any easily flowing liquid. This can be a special composition such as WD 40, kerosene or brake fluid. Their peculiarity is that they penetrate into all pores and crevices, lubricate the threads, and some destroy rust. It takes some time for a positive effect to occur. It is usually recommended to wait about an hour and get to work. In difficult cases, you will need to wait 10-12 hours.
The above steps will not be superfluous in the case when you decide how to unscrew a bolt with torn edges.
Flush break
This type of failure is considered the most difficult to repair, since it is very difficult to determine the diameter of the hole, especially when cutting fasteners. Therefore, in order to drill out a broken bolt of a certain type, it is necessary to clean the surface. This will allow us to determine the gaps we need.
The following unpleasant situation often occurs: the breakage site has curved shapes that are very difficult to process and straighten. And it is categorically not recommended to drill a product in such a state, because there is a risk of completely ruining the structure. Therefore, you first need to use a core, which is used to prepare a place in the center of the drill.
Methods for removing a bolt
Below are the most effective ways to remove damaged bolts and screws.
With damaged edges
When deciding how to unscrew a bolt with stripped edges, you need to consider whether there is access to it, its location, and what tool you can use. Based on these factors, you can use one of the following methods:
- Using a chisel. The method is suitable for large bolts that have easy access. All you need is a hammer and chisel. The chisel is applied tangentially to the head and sharp blows are applied to it. The method is simple, but it rarely achieves the desired result. It should only be used when there is no other tool at hand.
- If there is free access to the location of the fastener, you can use a universal adjustable wrench. This tool allows you to securely clamp even a round head. If you use small adjustable cobra-type wrenches, which have sharp notches on the working surfaces, you can unscrew the smallest bolts. Such a tool can help out in many cases, but it must be new. In a worn tool, the notches can no longer provide reliable adhesion to the metal, and the key will slip.
If the edges are not severely damaged, then socket wrench heads can help out. For these purposes, the ring wrench profile must have 12 edges (there is an asterisk inside the head, not a hexagon). Unscrewing is done as follows. Select a head one size smaller than the size of the bolt, and use a hammer to press it onto the torn edges, then unscrew it in the usual way.- This method involves using a hacksaw for metal, with which a cut is made on the head of the bolt for a flat screwdriver. The depth of the cut should not be more than 75% of the height of the bolt head; with a greater depth, one of the halves may break off.
- If you have a file or grinder at your disposal, you can restore smaller turnkey edges. If you have an open-end wrench, it is not necessary to cut out a hexagon; it is enough to make two parallel edges.
- If you can use welding at the location of the fastening, this will greatly facilitate the task. In this case, you can put a nut of a suitable diameter on the head and weld them together, and then use regular wrenches.
In difficult cases, in order to achieve the desired result, you need to combine several methods. Therefore, first assess the situation, decide how you can unscrew the bolt, and only then get to work.
With the head torn off
Very often, when disassembling old threaded connections, you can not only damage the edges of the bolt, but also tear off the head. Then the question arises: how to unscrew the broken bolt. If you have separated parts and the broken bolt protrudes from the body of the part, then you can use all of the above methods.
Unscrewing methods
The damaged bolt must be prepared before unscrewing. Preliminary procedures will help preserve the adjacent surface and parts, as well as prevent the destruction of the structure as a whole. Apply a liquid to the surface with the stuck screw to minimize friction. Kerosene, brake fluid or a specialized composition are suitable for these purposes.
To move the bolt from its place, you can hit it several times with a hammer. Do not use all your force, otherwise the fastener will break and the extraction process will take a long time. Then they begin to select the appropriate tool.
Torn Edges
Before unscrewing a bolt with torn edges, you need to determine the extent of the damage and only then select the most convenient tool:
- If there are no other elements around the bolt, it is recommended to use a gas wrench. Moreover, you need to take into account the dimensions of the fastening itself - it is unlikely that you will be able to unscrew a small bolt with a large tool.
- You can also hook the part with pliers. They are suitable for unscrewing small and medium sized fasteners.
- Sets of special heads are an equally effective method. The heads have different diameters, but the internal hole is not made in the shape of a hexagon, but in the form of specially processed edges. The appropriate diameter of the head is selected, which must be hammered onto the licked head and the bolt must be unscrewed.
- The rolled bolt is removed using a chisel and hammer. This method requires care and precision. Excessive force will distort the stud threads. The chisel is placed at an angle to the bolt head or nut and the chisel is struck with a hammer. As soon as the bolt begins to rotate in the threaded funnel, it is removed.
- Many craftsmen know how to unscrew a bolt if it does not come off, using their own ingenuity. To do this you will need a fastening with a nut. The nut is screwed into the end of the screw. The head of the torn fastener is placed between the nut and the second screw and clamped tightly. The part is easily removed.
A grinder is suitable for unscrewing small diameter studs. Using a narrow disk, you need to make a slot for a flat or Phillips screwdriver. Next, you will need an appropriate screwdriver to remove the bolt. Instead of a grinder, you can take a hacksaw for iron.
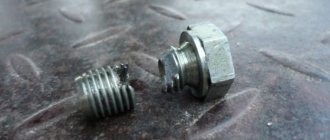
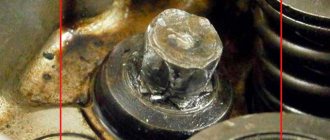
Broken bolt
You can unscrew a hairpin with a broken head in several ways, depending on where the break occurred.
Break above the surface
This situation is considered the simplest and most convenient for easily unscrewing the part. If a bolt fragment protrudes above the surface, it is advisable to resort to the following techniques:
- Using pliers, pliers or a clamp, grab the screw leg and unscrew it along the thread without much effort. The method is effective if the fragment protrudes above the surface to a height sufficient to be grasped.
- A welding unit is a rather radical, but effective method. A kind of lever is welded to the hardware, with the help of which the connection is turned out, applying the required force. This way you can remove the fastener if you cannot drill out the hardened bolt.
- The stuck bolt is removed with a drilling tool. You will need a drill of a smaller diameter than the fastener. A hole is made in the center and deep into the part and the pin is removed.
These are general recommendations. Based on the situation, it is permissible to use several methods simultaneously.
Flush break
A breakdown of this nature is the most difficult, since difficulties arise in determining the diameter of the fastening leg. Before removal, the surface must be cleaned to identify the necessary gaps.
Sometimes a curved break occurs, which is difficult to process and correct. It is not recommended to drill out such bolts, as this can completely damage the structure. A core should be used to determine the drilling center. Then they proceed according to the already known scenario: they drill a thin hole with a drill, and remove the remains of the part with a hook.
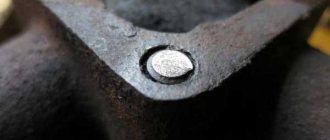
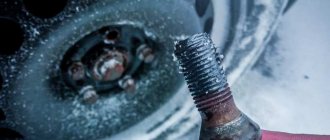
Broken below surface
The situation is especially difficult if the bolt is made of aluminum. Such a connection should be unscrewed carefully in order to preserve the thread in the hole, since it is difficult to drill out a bolt without damaging the thread. The operating principle is as follows:
- The center of the fastening is marked with a core. It is better to take a thin and durable tool. This way you can avoid damage to the product.
- Next, use a reverse thread tap. The diameter of the bolt must be larger than the diameter of the tool.
- For the tap you need to drill a shallow hole.
- A tap is inserted into the resulting recess and rotated in a circle until the hardware is completely removed. He will drill out the remaining bolt.
The most professional and effective way to unscrew a bolt is an extractor. Its use always ends in achieving the desired result. An extractor is a tool that is designed to perform just such tasks. In appearance it is very similar to a tap, but has longitudinal slots and a conical notch.
The extractor is used in conjunction with drilling. It is inserted into the drilled hole and turned until it stops. Then, continuing to tighten it in the same direction, completely unscrew the stuck bolt.
Broken thread
It is difficult to unscrew a bolt with a broken thread, since it simply rotates in the threaded funnel. An ordinary nail puller can help out here. You need to fix it between the surface and the cap and try to unscrew it under tension.
Small bolts are removed using a screwdriver, which is used as a lever. You can use wire cutters or side cutters. They unscrew the caps using a little force.
Removing Hex or Star Fasteners
Hardware for hex keys is mostly used in the automotive industry and instrument making. In such structures, broken bolts are a common occurrence, especially during repair activities. You can unscrew complex fasteners using the following methods:
- Use a file or grinder to make a notch on the end and use a screwdriver.
- Craftsmen often use a specialized Torx key, made in the shape of an asterisk. The tool is driven into the head and twisted out together with the pin. The Torx bit should be slightly larger than the bolt head. This way, the tool and fasteners will be firmly attached.
- Special extractors sold in hardware stores can also really solve the problem. It is important to first drill a hole in the body of the bolt. The extractor is inserted there and, using pliers or a clamp, it is unscrewed along with the fastener.
- An effective but risky method is a drill with a left-hand thread. The risk is possible damage to the thread.
Removing the screw
Screws with torn edges cause a lot of trouble. Unscrewing such screws is not easy, but there are several ways to solve this problem. To make it easier to unscrew them, you need to do the same preparatory measures as for the bolts.
In the simplest case, when the screw protrudes above the surface, you can try to grab it with pliers, wire cutters or another similar tool and unscrew it in this way. But most often there is nothing to grab onto. Then you can try the following methods:
- Sometimes it helps to use thin rubber, for example, from a balloon. A piece of such rubber is placed on top of the screw and unscrewed, pressing the screwdriver through it. This increases friction and prevents the screwdriver from slipping.
- A screw with a curly head can be converted into a flat-head screwdriver by sawing through the groove with a hacksaw.
- In order to solve the problem of a screwdriver slipping, you can use cyanoacrylic-based glue; this glue dries quickly and holds metal surfaces together efficiently. The procedure is simple: the screw and screwdriver are degreased, glue is applied to the head of the screw and the screwdriver is pressed against it, maintaining alignment. To speed up the setting of the glue, you can sprinkle it with soda. Wait until the glue has completely hardened and try to unscrew the screw.
In order to avoid such problems in the future, renew all threaded connections with taps or taps before assembly. Replace any damaged fasteners. Be sure to lubricate the threads and fasteners in general. It is best to use graphite lubricant for these purposes.
How to unscrew a bolt or nut with broken edges
Surprises are inevitable during renovations. Equipment may fail, a seemingly strong part may break in the most unnecessary place, and bolts and nuts may resist unscrewing. And then the repair drags on, taking extra time, nerves and money.
Nowadays you can find many videos on the Internet with guidance on carrying out any repair work. They say that based on videos from the Internet, you can build a house from scratch and reassemble a car, piece by piece.
But with such a huge number of tips and recommendations, it is difficult to choose the right course of action for you. In this article we will try to collect all available experience and systematize it for ease of use.
Saw
Sometimes it is simply impossible to unscrew it without destroying the bolt. | Photo: ngo.tech-obzor.com.
When repairing a car, it often happens that the use of non-destructive methods does not give results. In this case, there is only one thing left to do: remove the problematic nut or bolt. There are many different methods here: from a chisel and a hacksaw to a grinder and a special tool - a “nut splitter”. In any case, no matter what is done, part of the fasteners will be hopelessly damaged.
Unscrewing a rusty bolt or nut can be quite nerve-wracking.
Read also: Platohoning of the cylinder block - what is it?
A person who has never faced the problem of how to unscrew a rusty, soured bolt or a tightly stuck nut cannot even convey how much time, effort and nerves this sometimes seemingly futile task can take. Sometimes you just give up, and the only way out seems to be the “grinder”, which allows you to resolve the issue, albeit radically, but quickly. But often even she is not able to help and threatens only to aggravate the situation, creating problems of a different kind.
So is it possible to unscrew a problematic bolt or rusty nut without resorting to emergency measures? Car enthusiasts know this issue best. They are the ones who most often encounter similar situations and can give practical advice by sharing successful experiences and recipes from their own arsenal of remedies. Let's look at the available options.
Bolt with torn edges
Now we will figure out how to unscrew a bolt with torn edges . As a rule, the reasons for this problem lie in the following:
- The parts held by the bolt were misaligned in an unnatural way. This leads to pinching and damage.
- The bolt itself was very tight when tightening.
- The tool used to tighten it was the wrong size and improvised means were used (screwdrivers or chisels are often placed in larger keys when there are no suitable small ones).
Before unscrewing a broken bolt or nut, you need to do some preparation. This will allow you to spend less time and effort, and sometimes save expensive equipment.
Sequencing
- Coat the joint with liquid to aid unscrewing. Such a liquid can be the famous WD-40, brake fluid or kerosene. Take your time and let the liquid do its job. As practice shows, you can safely leave the part alone for thirty minutes, or even an hour.
- Take any available tool and lightly, not forcefully, tap the hardware from all accessible sides. Your goal, in this case, is not to launch the bolt like a golf ball, but just to slightly loosen it at the place where it is attached. While performing this activity, there is a danger of damaging the thread, so balance the strength and swing.
- If you have the opportunity and space, try heating the bolt. A gas burner is suitable for this. Make sure there are no flammable liquids or objects near the workplace. Also, before you start warming up, make sure that in case of an emergency you have somewhere to retreat. Do not heat the part with an open flame in enclosed spaces. It is better to open the gate or move the bolt to the air. Rust and grease scorched in this way will turn into ash and will no longer prevent the bolt from being unscrewed.
Why doesn't he spin?
From the above it follows that to tighten or unscrew a bolt you need to apply a certain force. This is called the tightening torque. This value is very important for the normal functioning of products. And strictly speaking, the assembly instructions always indicate the recommended tightening torque for bolts (as well as nuts and studs, if any). Which must be observed when using a torque wrench!
When tightening, torque is applied to the bolt through its hex head. Therefore, both for tightening and unscrewing, the head must be in good working order (in fact, present - after all, there are bolts with a broken head!), have smooth, not torn edges, and be suitable in size for the existing tool (although, of course, this tool is chosen suitable for the bolt, and not vice versa).
Logically, when unscrewing a bolt, you need to apply the same force as when tightening it? But no! During operation, the bolted connection is prone to self-tightening (although spontaneous loosening also occurs, but this is a separate topic!). And rust and dirt that gets on the threads lead to souring of the connection. So unscrewing an old bolt is much more difficult than screwing in a new one!
This is where the extra torque is needed. However, it is not always possible to transfer it to the rod and successfully unscrew the bolt. How to unscrew a bolt for various defects is indicated below.
Hex bolt
The edges of the axis are convenient for both tightening and unscrewing. Clear and even, they provide a reliable support for the key. If the bolt is suitable for your hand and of the appropriate size, at first you can comfortably twist it by hand, later tightening it with the help of a tool. However, there are often cases when, due to excessive use of the screw itself, or heavy loads on the connection, the edges are torn off and the fastener remains sticking out in the joint. It is uncomfortable to handle; it slips out of your hands and tools. Let's look at several options for solving this problem, with corresponding solutions.
- Make a notch on the head of the bolt using any available method. However, there is one important point when making this notch. The walls of this notch must be vertical, without slope. Otherwise, the tool that you then press into the recess will simply slide along the head. And in this case, there is a great danger of damaging not only the tools, but also the master’s hands.
- Use special so-called extractors for screws with torn edges. Extractors have threads cut in the direction that is directly opposite to the threads of the bolt itself. Thus, when a hole is drilled in a bolt and an extractor is inserted, it is fixed in the bolt tightly and does not turn when the bolt is unscrewed with pliers.
- Use a reverse left rotation drill and a reverse drill. The idea is to make a hole in the fastener with a regular drill, insert the left drill into it and, using the reverse of the drill, unscrew the stuck bolt.
- Find a suitable TORX sprocket. An ideal sprocket should not fit into the hole of the hexagon with splines, but at the same time not be too large for it. The TORX sprocket will cut through the head of the bolt with its slots, locking tightly onto the head. Now you can unscrew the screw with a strong movement. Proceed with caution, as in this case there is a great danger of tearing off the splines on the TORX sprocket.
A screw with a hexagon hole can be unscrewed in the following way:
- You need to take a file and make it the size for a hex key. By making such a cut, you will save significantly, since you will be able to use this fastener more than once in the future.
- Make a notch on the cap with a grinder or any other convenient method, for example, with a hacksaw. And use a flat-head screwdriver, resting on its handle as if it were a rotation arm.
- You can also use one of the appropriately sized TORX sprockets to unscrew the screw.
For connecting rod bolts made of steel, there are only two methods:
- Use an extractor. A properly selected extractor and your careful actions will help not only unscrew the screw, but also do it without significant damage to the tool.
- Call in electric welding for help. Using electric welding, you can attach any hexagonal element that you no longer need to the torn fastener. Welded in this way, it will become the new head for the screw. It will be convenient to rest against it and unscrew it. But unfortunately, this method can only be used for parts made of steel. Unfortunately, this convenient method cannot be used with bolts made of other materials.