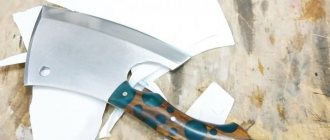
Lately there has been a real boom in blacksmithing. Young people are becoming blacksmiths. The knives and axes made by their hands are real works of art.
Active advertising on social networks, photos of how to make a beautiful ax, fuels not only the desire to own such a thing, but also to try to make it with your own hands.
Nothing is impossible
Looking at the work of blacksmiths, the thought comes to mind that there is nothing difficult in making an ax. But in practice, this turns out to be much more difficult.
In addition to a piece of metal for forging an ax, you need: a forge, an anvil, holes for the eye. Not everyone has such a set of tools. Of course, you can make a forge and punches, but you can also try to make an ax in a different way.
Features of a homemade ax
An ax is a simple and common tool that is difficult to surprise anyone with. However, thanks to it you can cope with many complex jobs and ultimately get an excellent result. On sale you can find both simple versions of axes, as well as more interesting and original ones, for example, with decorative inclusions. If you don’t want to spend money on a ready-made option or you couldn’t find a suitable one among those, you can make it yourself.
Many home craftsmen, not finding the right tool on sale, decide to make it themselves. Such work cannot be called impossible or extremely difficult, but even here it is very important to act according to all the rules in order to get a good result. It should be borne in mind that there are several types of axes that you can build on your own.
For example, there are special cleavers that are very popular today:
- mechanical;
- with electric drive.
Of course, the mechanical option is the simplest and easiest to implement. It is equipped with a manual drive. Making such a model with your own hands is not difficult. The drawings of mechanical tools are quite simple and understandable, and the principle of their operation lies in simple mechanical manipulations. This device consists of the following basic elements:
- metal wedge;
- spring mechanism.
When working with such a tool, the master spends a minimum of effort and time, especially if you compare this cleaver with a standard simple ax. As for the even more advanced electric cleaver, it contains one main part, which, after activating the engine, begins its movement - constantly rotating. The master only needs to add a new batch of firewood for splitting.
You should also know about other options for axes, which many craftsmen can make on their own.
- Carpentry. This tool is light in weight and size, and has a sharp blade. It is used in cases where the most precise and accurate work with wood is needed.
- Taiga. This ax can also be made with your own hands. It is perfect for cutting down trees, removing knots and bark.
- Tsalda. This tool is made to clear an area of bushes.
- Kitchen. Such tools are made exclusively for chopping bones. A kitchen ax is a small device with a short handle and a large blade.
- Lumberjack. Suitable for cutting down trees only. Made from a long ax and a sharpened wide blade. It also has other names, for example, felling.
Read also: DIY rail cleaver
The taiga types of axes are recognized as the most popular and practical. They are distinguished by the following features:
- little weight;
- small area of the stabbing area;
- unusual sharpening of the blade (the edge at the back is several times smaller and thinner than the front).
Certain tree species are ideal for making a home ax. It must be taken into account that materials suitable for such purposes can easily withstand significant vibration loads that occur at the moment of impact of the tool.
Any homemade ax is distinguished by the fact that it is ideal for the master who works with it. By making this instrument with your own hands, you have the opportunity to adjust it to suit yourself, to suit your hand. The result is the most convenient, practical and easy-to-use devices.
Making an ax using the metalwork method
Ideas on how to make an ax outside the forge lead to the metalworking method. The ax consists of three parts:
- ax blade
- ax handle
- wedge
If everything is clear with the materials for making an ax and a wedge, then the question of what, and most importantly how, to make a canvas is puzzling. Knowing that the blade consists of a blade and a butt, you understand what is needed to make an ax:
- metal strip for blade
- piece of pipe for butt
Working with metal parts
The photos you look at can certainly attract attention, but sometimes you want to come up with something of your own. For this, a sketch, diagram or drawing will be useful.
First of all, the shape of the outline of the metal part is developed. For example, semi-oval on one side and in the form of a wide spline, a curved line, on the butt side.
A hole or recess can be made on the blade, and the eye that grips the ax handle can be placed either in the middle or moved away from the semi-oval.
Next, the process of forming the blade begins. Options for how to make an ax involve using the piercing-cutting part of an angle grinder, a grinding machine, or a file in the finishing process. A special marker is used for marks.
Actions are carried out in the following order:
Use a marker to mark the notch on the blade area.
To remove excess parts of metal, you need to use a grinder, using it to make several rough cuts and cut off unnecessary pieces.
After obtaining a rough shape that is already close to the desired option, a grinding machine with a flap disk is connected to the work. Additional grinding is carried out with a semicircular file.
Thus, the descent is carried out, that is, the working blade is sharpened and the second metal side is turned. During the process you need to be extremely careful and do everything carefully. Sanding takes a long time. The part is brought to a mirror shine.
At the very end, the sharpness of the sharpening is checked.
Blade
The full size drawing will show the amount of material needed. The blade requires a hard metal, such as a car spring.
We transfer the outline of the drawing to the spring and saw off all the excess. We also make descents using a grinder. It is important here not to overheat the metal so that the edge remains hard and holds an edge well.
Piercing attachment for an ax
When choosing a piercing part, you must definitely find out what steel it is cast from. Our country has adopted GOST 18578-89. It defines the grades of steel from which it is permissible to make the blade parts of an ax. These are steels - 8ХФ, 9ХФ, 9ХС, ХВГ, У7А, У8, У8А, У8Га, У9, У9А and many others similar in properties to the named grades.
Piercing attachment for an ax
Assembly of the canvas
The blade and butt are connected by welding. It is important to weld the metal thoroughly so that the ax does not crack during operation.
Then we grind the seam with a grinder, if necessary, boil the shells, and grind again. For additional strength, you can rivet the butt and blade with strips of metal.
Characteristics of the taiga ax and what it should be like
Since the parameters of the ax and blade are very different from the usual sizes of “household” axes and will seem unusual to many, you first need to decide what problems can be solved with this miracle device:
- Tree cutting. Felling in a sawmill, sanitary felling or preparing firewood for a log house - this is exactly what this ax was made for.
- Rough work with logs (that's right, rough!). Suitable for removing branches, making grooves, removing thick bark and similar work.
- Ax for survival. A lightweight hunting tool, suitable for quickly creating bags and animal traps.
- Construction of huts, decking, wooden “instant” houses. A hut will not be built without an axe, but with its help you can do it 4 times faster than when working with a carpenter's ax blade.
- Working with firewood. If accuracy is a secondary concern, then this tool is perfect for the job.
If you want to make a tool for precision work, then it would be better to consider forged axes with a straight, long blade. They are of little use when cutting down trees, but the accuracy is very high. In addition to the quality of the “cut,” there are many differences between a taiga ax and a regular one.
Rounded blade of shorter length . The ax is much lighter than a regular ax, and the small working surface area allows it to be buried much deeper into the wood; it is suitable for cutting wood across the grain. The tool is much easier to carry (the ax and head together weigh no more than 1400 grams).
Presence of a long beard . Its main task is to protect the wooden part from breaking under strong impacts. Up to 60% of the impact force is absorbed. But it does not protect against impacts against logs - this is a misconception, since the special shape of the blade already performs this function.
Special ax sharpening . The rear edge of the blade is almost 2 times thinner than the front. This is done for the purpose of using the ax as a cleaver (if struck correctly). In a conventional tool, the edge has the same thickness for high precision work.
Special angle of inclination of the axe . The head of the taiga ax forms a much smaller angle with the ax handle. This allows you to increase work efficiency, relieve hand fatigue and increase productivity when cutting trees. The impact becomes much stronger than that of a carpenter's axe, where the head and blade are placed at an angle of 90 degrees. They try to make all handmade taiga axes with an angle of 75-65 degrees - this is their main difference.
They use ordinary sharpening wheels, since they can be very diverse. The main thing is to observe the difference in the thickness of the leading and trailing edges, since it is this that affects the productivity of the forester.
Toporische
A good ax requires the presence of a properly made ax handle. To the question - what can an ax handle be made from, there is a simple answer - from hardwood.
The most common wood for making ax handles is birch. But, if you make an ax not only for chopping wood, but for the soul, then you should look for a type of wood with a more expressive texture.
Tools and materials
When the material has dried, you need to inspect the workpiece for the presence of knots or cracks - such areas cannot be used. If the cut is large enough, they can be cut off and removed during processing. Otherwise, the wooden blank is simply replaced. To complete the work of making an ax handle from harvested and dried wood with your own hands, you must first prepare the following set of tools:
- carpenter's axe;
- oblique carpenter's knife;
- chisels of different sizes and shapes;
- a set of files and needle files;
- wood hacksaw;
- drawing supplies;
- sandpaper or sandpaper;
- calipers;
- hammers of different sizes;
- square;
- centimeter.
Attention!
If immediately after installing the ax in place it is planned to apply a protective coating or anti-corrosion impregnation, a brush or sponge is included in the tool kit. You also need to supplement the materials with the selected composition.
Wood for an ax
An ax handle made of ash, elm, or hornbeam will look very beautiful. It’s just difficult to buy boards made from such types of wood in some regions, especially in the outback. Of course, you can use online trading.
The wood for the ax must be well dried and free of knots. At home, the wooden board is dried at room temperature for six months
The longer the wood dries, the stronger the ax handle will be. According to custom, wooden blanks were dried for years in the attics of houses.
What types of axes are there?
First, let's look at the types of axes. It may seem like they are all the same, but they are not. The location of the center of gravity and sharpening depend on the shape. Some species are better suited for cutting wood, while others are better suited for splitting firewood. Therefore, we will consider them separately.
Lumberjack
Good for cutting down trees. Its center of gravity is strongly shifted towards the blade, so the main blow is concentrated at the beginning. For this reason, it is held with both hands. The ax is relatively long to increase the swing and force of the blow.
Cleaver
It has a wide, short and narrow blade. From the name it is clear that it is designed for chopping wood. The butt of the ax is thick to effectively penetrate the fire. Medium length handle. A photo of the ax can be seen below.
Plotnitsky
A carpenter's ax has a relatively short shaft to make it easy to use with one hand. The blade, on the contrary, is wide. Indispensable for preparing logs for building a house.
Srednerus
Also called taiga axe. It is considered a universal-purpose tool, as it was often taken along on expeditions. They can chop firewood and butcher an animal carcass.
Combat
These include Viking axes, axes and other tools related to edged weapons. It is worth noting that the production and sale of such products is controlled by government agencies, so it is not worth doing. Or you will have to register with an examination.
Sturdy
A beautiful ax with a short handle and a large blade. It makes no sense to buy it for home, as it is inconvenient, but is indispensable for hiking. It weighs almost nothing, is compact, but is not suitable for regular chopping of firewood and felling of wood. For hiking, such an ax is often made from rebar.
Action plan
Drawing up instructions on how to make an ax handle with your own hands allows you to break the process into elementary steps. A compiled list of actions will help you avoid mistakes and improve the quality of the result. This is especially important if you are doing something for the first time.
Note!
- Garden furniture - the best ideas and detailed instructions on how to choose garden furniture
- How to deal with ants in the countryside
- We ensure constant availability of hot water. Water heater.
The step-by-step process on how to make a pen at home will look like this:
- drawing up a sketch of an ax and a template
- wood processing
- ax attachment
- finishing coating.
Sequential creation of the wooden part of the ax
All work on turning the ax is carried out starting from the stage of making the template. It is created on paper (cardboard). As an auxiliary part, a ready-made ax handle is often used, which is placed on a sheet of cardboard and the desired contours are obtained by tracing the laid part with a pencil.
The resulting template is cut out and placed on the beam, again tracing with a pencil. A centimeter is left at the front, and nine centimeters are added to the back.
When cutting out an ax from a block, make sure that the section parameters of the part of the workpiece that is machined for the eye are exceeded by two or three millimeters.
Fitting a metal part onto a wooden part is done with a mallet. The metal is clamped in a vice to perform a rigid joining with greater comfort.
When there is no doubt that the wood will fall out or crack, carefully sand the surface of the ax with sandpaper.
The final stage is to bring the product to perfect condition. The smoothness and strength are checked, all unnecessary roughness and sagging are eliminated.
To give the ax a beautiful appearance, the handle is covered with stain and varnish.
If desired and if there are available means, anyone can make an ax on their own. For an experienced craftsman, creating such a tool is not a question.
For a beginner, we can recommend turning to video materials with the appropriate titles for help. Such as “making an ax handle at home step by step” or “how to make a new one from an old blade.”
Roughing
Using the template, we outline the outline of the handle on the wood and cut out the blank. Give the handle a more rounded shape. For these purposes, you can use a plane, chisels or a small hatchet.
Work on cutting out an ax handle
This tool is used in almost any household. It is in demand for housework, construction and many other tasks. But, you need to understand that not all tools of this type that are in use have decent reliability. And therefore, some craftsmen make an ax handle with their own hands.
Making an ax is a very responsible task. The comfort of performing work, and most importantly the safety of the worker and the people around him, depends on the parameters of this part.
A stick with a section of a certain shape is far from the best option. When using such a handle, a person quickly gets tired, and work can become unsafe. Therefore, a curved handle with an oval cross-section is used for the tool. The tail part must be widened and bent down. Such an ax handle holds it securely in the hand, even when delivering a sharp blow.
Fit
The next stage in making an ax handle is adjusting the shape and ergonomics. We grind the wood to give it the correct shape and comfortable grip.
A large rasp, as well as a power grinding tool, are perfect for these purposes. The main thing here is not to loosen the place where the ax fits on the ax handle.
Note!
- Setting up a table for Easter
- Why do people consider healing fasting?
- Required distance of the septic tank to the well
Sharpening an ax blade
When the butt is already mounted on the ax handle, you can start sharpening the tool. The procedure is not necessary for a new head, but over time the factory sharpness decreases. In order not to miss when sharpening, you need to choose an angle and create a template from thin sheet metal. This blank is applied to the edge and a mark is made with a thin marker directly on the blade.
Finishing
The assembled ax is carefully polished with fine sandpaper. The wood can be covered with stain or left as is. The protective layer is applied with oil or varnish.
For greater exclusivity, the ax handle can be decorated with carvings, inlays or wire notches. A pattern etched in a saline solution will look beautiful on the ax blade.
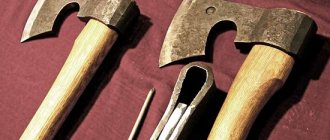
How to make a battle ax
Not all axes can be purchased in the store; for example, it is impossible to buy a battle axe. And therefore, if you want to get such a product, it’s easier to make an ax with your own hands.
You can take an ordinary construction tool as a basis, see Fig. 2, and use it to make a combat blade.
It has certain disadvantages:
- It has an irrational form.
- It has excess mass, which will interfere with manipulations during the battle.
Viking battle ax
It should also be noted that the upper ledge will create difficulties during chopping and striking. That is, it gives the ax an unnecessary torque directed counterclockwise, thus causing increased wear on the ax handle. It won't hurt to grind off the protrusion located below. In addition, straight sharpening is not entirely suitable for a battle axe.
Making an ax handle step by step
The process of creating an ax with your own hands always takes place in strict sequence. First, the handle of the tool, called the ax handle, is made. When the length and shape of the handle are chosen correctly, the tool literally “burns”, demonstrating high performance and ease of use.
Try taking a stick with a regular round cross-section and attaching an iron base. You will quickly get tired, because holding such a tool for a long time puts a lot of stress on your hand. It’s another matter when the ax handle has a curved shape, the tail part is widened and slightly bent down. Thanks to this design, the axes are firmly held in the hands even with strong blows.
A traditional ax tool consists of wedges (2 and 9), a blade (3) and a butt (1), a toe (4), a chamfer (5) and a heel on the blade (6), a beard (7), and the ax itself (8). The number 10 indicates sharpening.
Prepare the material and cut out the first template
Since you and I need to make an ax handle from wood, we will take this material as a basis. The best proven structures are those made from birch and oak, ash and maple.
A wooden ax can be made at any time of the year, but it is better to prepare the material for it in the fall, even before frost sets in. The blanks are stored in the attic for at least a year; some experts advise drying them for five or even more years.
It is clear that if the taiga ax given by your grandfather was broken with your own hands on an impenetrable log, you can take fresh wood. This option will still be temporary, because after drying the volume of wood decreases. The ax head will begin to wobble and hold less tightly.
To prepare a good template, drawings of the future product are desirable.
When you have a cardboard template, it is much easier to transfer the contours of the designed product onto wood. The basis is a ready-made ax handle that you feel comfortable working with. It is traced with a simple pencil on cardboard and cut out.
Preparing timber for work
From the blank block to the careful hewing of the ax
- Before making an axe, you need to cut a block out of dried wood. Keep in mind that the length of the piece of wood should exceed the planned size of the finished product by about 10 cm. As for the width in front (placed on the canvas), ideally it exceeds the diameter of the metal eye by 2-3 mm.
- Place the finished template on the block and transfer its contours. Leave an allowance of 1 cm in front, and 9 cm in the tail part of the workpiece. Before you place the ax on the ax handle, you will strike more than a dozen blows on the handle. An allowance in the “tail” is needed to avoid splitting. Once the final assembly is complete, you can cut it off without any problem.
- Let's begin the main part of the work with the ax handle. In the upper and lower parts of the block, transverse cuts are made with a depth not reaching 0.2 cm from the contours. A chisel is used to chip away excess wood along the cuts; the final cut is made with a rasp.
- Use a regular file or rasp to round corners and create smooth curves and transitions. Sandpaper will help with the final sanding.
- It is too early to install the steel sheet - the wood is impregnated with a good waterproof compound. Flaxseed oil is suitable; drying oil has excellent properties. Apply a small amount of the substance to the ax handle and let it dry. Then the next layer is applied. The procedure is repeated until the instrument you personally made no longer absorbs it.
- The biggest mistake is to coat a wooden base with varnish or oil paint. However, nothing prevents you from adding a little dye to the drying oil (red, yellow). A bright instrument will never get lost in thick grass.
We also recommend reading
- DIY gazebo made of wood step by step
- How to make a dog house with your own hands
How did our ancestors choose the canvas for the ax?
Several hundred years have passed, but the method of buying good linen has not changed. Our ancestors knew how to make an ax out of wood and what kind of metal base to use. They always paid attention to:
- Steel quality. By the way, today this issue is resolved simply. Look for the GOST badge on the product - this will be an indicator of excellent quality. No OST and TU!
- Blade. An ideal blade has no cracks or dents, and is very smooth.
- Butt ends. They are strictly perpendicular to the blade.
- Eyelet shape. It is better when it is made in the form of a cone.
How to place an ax on an ax handle (video)
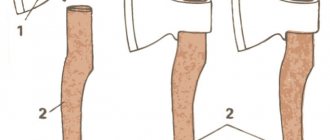
When the blade has been chosen, a completely logical question arises: how to properly place an ax on an ax handle and achieve a “dead” fastening? Start by drawing center lines at the end. There will be two of them, perpendicular and longitudinal. The groove to the depth of the eye must be cut exactly along the contour of the longitudinal line. The cut will be useful for wedging the ax handle.
Having placed the butt to the end, outline the contours of the eye on it - the center lines will be a guide. To trim the landing part of the ax, use a knife or plane. It is important that the ax handle does not protrude beyond the edges of the eye by more than 1 cm.
It is convenient to install the blade using hammer blows. Do this accurately, with effort, but without unnecessary pressure. You don't want your blows to crack the wood, right? As soon as the end goes beyond the boundaries, we check the strength of the fit and see how the canvas sits. It shouldn't slide off.
Knock out a wedge with a wedge or wedging method
You can strengthen the fastening of the metal part if you wedge it. To do this, a small wedge made of hard wood, such as oak, is driven into the end. Because of this, the dimensions of the landing part increase, and it is fixed “tightly”.
Some craftsmen use not one, but two or even five wedges. But as practice shows, even one additional fixation is quite enough.
Wedging an ax. Drawing