Among other things, I produce various wooden products and sell them online. At the beginning of my journey as a mini-entrepreneur, I really needed a thickness planer, but I couldn’t afford to buy it, the budget at that time was already small, and the idea was risky. I had to think about how to make a thickness planer myself from an electric planer. I found a solution, and I must admit, it turned out well. This homemade machine still serves me today. So, I recently remembered it and decided to share with you the experience of making it, maybe it will be useful to someone.
Source pinimg.com
Options for making an electric plane
There are many ways to make a thickness planer using an electric planer. All of them are easy to manufacture and do not require the use of special tools. The most practical of them are:
- side planing thicknesser. Suitable for processing small planks and bars. This installation is easy to manufacture, and if necessary, the plane can be quickly dismantled and used for its intended purpose. The disadvantage is the need to constantly monitor the thickness of the treatment, since there are no pressure rollers;
- manual thickness planer. It has a more complex design and requires more time to manufacture. With its help, you can process boards and bars of greater length. In addition, the design uses pressure rollers, which minimize processing errors.
Assembling a jointing machine based on a jigsaw
A jointer is designed to remove existing irregularities from the surface of wood. The work process consists of one-sided planing of lumber along a plane. You can also shoot at different bevel angles. Thanks to processing on this equipment, beams or boards become smooth.
The design of the jointing unit is simpler than that of its thicknesser counterpart. This allows you to assemble the installation yourself using available materials.
The procedure for making a jointer
To make a planer for processing small-sized workpieces, you will need an electric plane that can be fixed in a stationary position. The base of the created unit can be a fragment of plywood, MDF or chipboard. A piece measuring 50 by 35 cm is sufficient. The thickness of the sheet material used should be more than 2 cm.
Assemble the jointing tool by performing the steps in the following sequence:
- cut out the base for the machine from the existing sheet material;
- a stop for the workpiece is attached to it using self-tapping screws or screws at an angle strictly of ninety degrees (a square is used to set it);
- install ribs that will ensure rigidity of the stop;
- An electric plane is attached to the base using M8 bolts and nuts.
Before fixing the stop, a hole is cut out in it for the pipe and for cooling the electric motor of the tool.
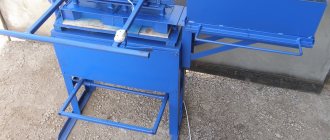
If you need to plan large workpieces, then it is enough to increase the size of the unit being created. This will result in a design as in the photographs below.
In addition to the considered option from an electric planer, jointing equipment can be assembled in another design. The practical implementation of such designs depends on the materials and creativity available to the home craftsman. How to make homemade jointing units of other designs is shown in the following videos:
How to make a thickness planer for wood at home
If necessary, such a machine can be made at home. This does not require the use of special equipment or special technical skills.
The simplest machine can be made by fixing the plane on the table in a sideways or upside-down position. More advanced models require more time and effort.
What is needed for making
To make a homemade thicknesser, you need a minimum set of materials and tools, which are often in the arsenal of every owner. It includes:
- electric plane;
- jigsaw;
- metal sheet 0.5 mm thick;
- laminated chipboard sheet;
- metal pipe;
- hand drill;
- set of drills for wood and metal;
- fastening hardware;
- set of wrenches.
Which plane to choose for this purpose?
The electric plane is the main working part of the machine. Therefore, before starting assembly, it is necessary to select a tool with optimal parameters. The main technical characteristics that should be taken into account when choosing a plane are:
- planing width. Most modern electric planers are equipped with a support sole and blades 82 mm wide. This is quite enough for household work;
- electric motor power. To carry out high-quality planing of workpieces, it is best to use planes with an electric motor power of 800 W or more. This will allow for high-quality planing;
- blade rotation speed . There is a direct relationship between the number of revolutions of the knife block and the quality of planing. In other words, the more revolutions the blades make, the cleaner the processed surface is.
The best choice for making a thickness planer would be the following tools:
- RESANTA P82/800;
- DIOLD RE-1100-01;
- INTERSKOL R82/710.
Preparing the necessary accessories for work
In order to make a jointing machine yourself, you need a certain set of tools and materials. An example would be:
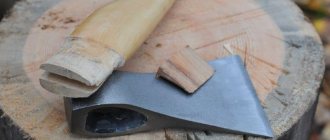
Manual electric planer. It is this tool that is used today as the basis
It is recommended to pay attention to products from Bosh and Makita - the products are of very high quality and can last for a long period. You will need a drill press with a variety of drill bits or an electric drill. They are used to make holes. Wood screws are fasteners that are very widespread today. Plywood is used as a common material in a wide variety of jobs.
In this case, chipboard can be called an undesirable option, since it is not suitable for such work. Solid wood is also required, which is used to create a side support. The thickness of the timber used varies within 15-20 mm.
This set can be called recommended, as it may differ significantly depending on the specific case.
Step-by-step manufacturing instructions
To make a household thicknessing machine, you need to prepare a workplace and perform the following steps:
- Attach a sheet of plywood to the side edges of the plane. Mark along the contour of the protective casing and cut out a template. It should go around the electric motor casing without gaps.
- Make a template of another shape in the same way.
- Transfer the contours of the templates onto 10 mm thick plywood sheets and cut them out. Then you need to make two strips 10x10 mm thick, which will subsequently serve as guides.
- Make holding crossbars from a block. They should fit as tightly as possible to the front and back parts of the electric planer handle.
- Using a milling machine or jigsaw, cut out longitudinal grooves according to the previously applied markings. In the future, they will be necessary to adjust the thickness of the planing.
- By passing the crossbar under the back of the electric planer handle, connect the cut out parts. To fix the jumper, it is better to use screws with a countersunk head.
- Attach the slats prepared in advance to the back side of the workpiece and apply markings on them. Then you need to trim them according to the applied markings.
- For further fastening of the workpieces to each other, a through hole for bolts is drilled in the upper part. In the same place, using a cutter, a hole 4 mm deep is made. Then the fastening nuts are hammered into it with a hammer.
- Having combined both blanks, they must be fastened using bolts with pressed wooden washers. As an alternative, wing bolts can be used.
- Make a hole in a wooden block to install a guide pin into it. For secure fixation, it is better to use a lock nut.
- Install a block with a guide pin in the front part of the future machine. Secure it with countersunk screws.
- Assemble the outer frame in the same way as the inner one. Place a wing nut on the guide pin to adjust the position.
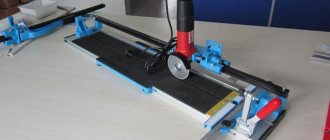
- Make a guide sheet. To do this, use a chisel or milling machine to make rounded grooves in wooden blocks, the diameter of which will correspond to the diameter of the guide pipes, and install them as shown in the picture below.
- Prepare your desktop. It consists of a sheet of plywood 10 mm thick. Stoppers are installed along the edges, on which the guide rails will subsequently be fixed.
- The guide pipes must be connected to each other using plywood strips and the vacuum cleaner pipe must be connected. After this you can start working.
After watching the video, you can get acquainted with the nuances of manufacturing a thickness planer, as well as see its practical application.
Drawings and diagrams
Before assembling the benchtop jointer, it is necessary to develop drawings. In the process of creating them, you should take into account the elements that will be part of the diagram. Standard jointers without additional features include:
- bed;
- shaft equipped with blades;
- rotating roller;
- engine;
- three tabletops;
- emphasis
In the process of developing drawings, the master must indicate the main distances between the key elements of the stationary structure. To do this, you will need to take into account the location of the motor, roller and shaft with blades. The circuit will allow you to determine how much the number of output rotor rotations will decrease if there is an increase in power, and vice versa.
Pros and cons of a homemade machine compared to a factory-made machine
The cost of a professional thickness planer is several times higher than the price of a homemade one. Its purchase will be beneficial only if it is used regularly, for example, in the manufacture of furniture. In the case of infrequent household use, it is much more profitable to make such a machine yourself.
The advantages of a homemade machine include:
- low cost;
- relative ease of manufacture;
- the ability to use the plane separately from the machine.
Despite all its advantages, this machine is not without some disadvantages. Among them, it is worth highlighting the short operating time, since the motor of the electric planer is designed for continuous operation for 20 -25 minutes.
In addition, it is limited in the planing width per pass. Professional machines have the ability to process workpieces from 100 mm in one pass, while for homemade machines this parameter is limited to 82 mm.
Security measures
To protect yourself from injury when working with power tools, it doesn’t hurt to familiarize yourself with some rules for safe operation. Among other things, taking precautions will help extend the life of your homemade machine.
- Before you turn on the tool again, you need to make sure that its wiring is not exposed and that all elements are properly secured.
- When cutting workpieces, be sure to use safety glasses.
- When handling rough parts, hands must be gloved.
- Do not allow any defects or damage to the surface of the pins and knives. Otherwise, they must be immediately replaced with new ones.
- Do not allow metal components to come into contact with the surfaces of the workpieces. These are nails, screws and self-tapping screws. There is a risk of injury when working with the tool, and you can also permanently remove it from working condition.
Factory equipment for converting a plane into a machine
You can find special beds for sale on the domestic tool market. By attaching an electric planer to it, you can make a simple thickness planer. It is included in the delivery set with some models of planes.
A thickness planer allows you to plan wooden blanks much faster and more accurately. That is why it should be in the arsenal of every owner. We hope that after reading the article, everyone will be able to make such a machine on their own.
Types of surface planers
Thicknesser setting machines differ in several characteristics, the first is the number of knives used, mounted on the cutting module.
Unilateral
It has one knife, costs less, but is mainly used in small home workshops. In one stroke, he is able to process the product on one side.
Double sided
Consists of two shafts with knives parallel to each other. It has high productivity and is also equipped with automatic wood feeding.
Double sided thickness planer
Professional
Designed using three or more cutting modules. Used for professional processing, can produce workpieces in large quantities.
The second criterion for distinguishing thicknessing machines is the scope of application:
- Household - allows you to achieve the required performance, has low weight and an affordable price. It will become indispensable when building a house.
- Combined - inexpensive, has low productivity. Purpose: domestic and household use.
- Semi-professional - used in carpentry workshops.
- Professional – produces large volumes of blanks, used in wood processing factories.
- Industrial – used in sawmills, sawmills, woodworking enterprises. It has impressive size and power.
Construction drawings
Drawings of the frame to which all the parts of the structure being created will be attached are given below.
The part being processed will rest on the surface of the plate, secured with 10 bolts to a frame welded from steel angles. There is a groove cut in it for a drum with knives. To guide the workpieces and prevent their lateral movement, a square is also attached to the base plate with M8 screws.
The shaft with knives (working drum) will be attached under the table top with M6 screws. To do this, bearings will be placed at its ends, which will be fixed to the plate with special fasteners. The movement from the electric motor to the working drum will be carried out due to a belt drive.
The motor is installed inside the frame on a shelf made of two steel strips, with holes drilled in them of the appropriate diameter for the frame mounting bolts.
It should be taken into account that the slots for the engine mounts (mounting grooves) need to be made several centimeters wide (2-3) in order to be able to tension the transmission belt.
The casing, fixed with M6 screws with spring washers to the corner, covers the belt drive. The power button is installed in a convenient place on the body of the electric plane.
When working with an angle grinder and drilling, you must wear glasses - they will protect your eyes from metal shavings. In general, when working with any tool, you should follow safety rules and use personal protective equipment.
The process of assembling a circular saw table
First, adjust the base to the optimal size. The wooden countertop is treated and left to soak in the antiseptic composition for a day. The metal base is sanded along the edges to avoid nicks.
Wood antiseptic is a modern building material that protects wood of any species in structures.
Electric saw
Electric saw table assembly process:
- First, prepare the beams, which are trimmed using a plane. A strong frame is assembled from them. Holes with a diameter of 5 mm should be drilled on each side of the base.
- Holes of the same diameter are also made in the drawers.
- Legs and drawers are installed on the tabletop. To ensure fixation, it is recommended to use clamps. They will help secure the legs while the glue dries. They are additionally fixed with metal corners and tightened with self-tapping screws.
- Fastening the saw with M4 bolts. The process is performed from the reverse side.
- To make a parallel stop, two strips are sawn off from plywood. Their width should be similar to the width of the tabletop. The average size is 10 cm. The corners must be rounded and polished.
The key property of the created table should be convenience
Important! When installing an electric saw, you need to fix the start button
For this purpose, a wire is suitable, which is threaded through the hole in the handle and twisted in the desired position.
Hand saw
For a hand saw you will need a 20mm sheet of plywood. The tabletop blank is made according to the selected size. The markings are made with a pencil, and the cutting is done with an electric jigsaw. Finally, the edge is milled. The workpiece must be sanded with sandpaper.
Care should be taken to ensure its stability. No loosening is allowed, otherwise it will negatively affect safety.
Subsequent assembly technology:
- The header is turned over, and markings are made on the bottom side for a hand saw. You need to attach a saw without a disc to the base and mark the dimensions of the sole.
- Using a hand router, a 10 mm recess is made.
- Next, the saw is tried on and the markings are adjusted.
- Markings are made on the bottom side, which are intended for stiffening ribs. For them, blanks are prepared from boards measuring 50x100 mm. The optimal location is up to 10 cm from the edge of the table.
- The longitudinal stiffening ribs are sawn and attached to the tabletop using wood glue. Clamps are used for fixation. Using a similar principle, side stiffening ribs are attached from beams.
- After the glue has dried, holes are drilled in the stiffeners and tightened with self-tapping screws.
- For table legs, boards measuring 50x100mm are used. The average optimal height is up to 110 cm. The legs are attached to the outside of the stiffeners with strong bolts. To improve stability, you can use ties made of beams measuring 50x50 mm.
The tabletop should have as smooth a surface as possible. This will reduce the likelihood of injury while working. The hand-held circular saw is installed in the finished groove from the bottom side, the sole is fixed with bolts. A toothed disk is inserted into the slot. By following the technology and completing all the steps, you can make a homemade table at minimal cost to suit your height.
Regularly check the position of the table and its strength. The structure must be stable, without loosening.
How to extend the life of an electric planer
An electric plane is one of the main tools for woodworking. Properly configured, it is an indispensable assistant in the hands of a carpenter. If, over time, the tool settings have gone wrong, or you don’t know how to prepare the electric planer for work, then it is advisable to get specialized advice, which we are ready to offer in this material. Otherwise, all the work when working with an unregulated plane will go down the drain, and there will be little pleasure from such miserable work.
Like any tool, the plane must be properly adjusted before work. And an electric plane imposes even more stringent adjustment requirements than hand tools. Therefore, the following steps should be carried out before each work with such equipment.
The only warning before inspecting the tool is to follow the safety tips. So the cutting parts of the plane must be treated very carefully. After all, due to the fact that the cutters of this tool are extremely sharp, you can cut yourself on them even when the equipment is turned off, not to mention when the equipment is running. Otherwise, such equipment should be treated like any other power tool.