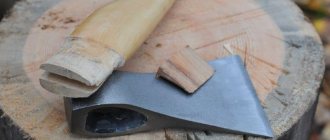
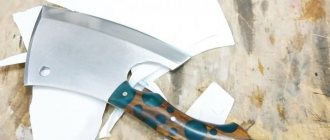
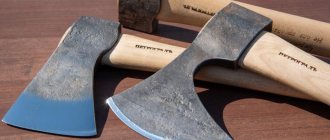
An indispensable tool on a hike, a useful tool in your home, a unique assistant for your household - meet the axe. From the simplest to the ergonomic and with a memorable blade shape, only made of wood and steel or decorated with leather and patterns - there are all sorts of axes. And what’s interesting is that everyone is capable of making a homemade ax, even in the form of a Viking military weapon.
Making an ax is a pleasure.
Peculiarities
A good strong knife is an indispensable companion for any hunter, huntsman, hiker or forester. But in some cases, its power and size in the forest, and especially in the Taiga, are not enough, or it is not very convenient to use. In this case, an ax comes to the rescue. Here are a few examples of actions where it can definitely come in handy:
- Tree and firewood cutting;
- Processing logs, such as peeling bark. An ax is not suitable for fine woodwork;
- Making hunting traps from wood;
- Installation of huts or simple wooden structures.
As you can see, all rough work with wood can easily be done with a taiga ax. With it you can arrange shelter, light a fire, and get loot.
A good taiga ax should be light enough so that its use brings results and not fatigue.
Typically the weight of the weapon does not exceed 1400 grams. The bulk, of course, is contained in the metal part.
Work process
Materials and tools for work
Handmade axes require at least basic plumbing and carpentry skills. We will make a DIY Viking ax from a simple ax that can still be used to chop wood. For this we need:
- A block of wood. No, regular pine or spruce will not work. Below is a list of acceptable breeds. There is one requirement for all of them - there must be longitudinal fibers, not transverse ones.
- Paper with pencil for sketch.
- Wedges.
- Varnish or oil (linseed, tung, teak).
- A small piece of leather or leather substitute.
- Ax blade. Any one will do, even one that is corroded.
From the tools:
- Angle grinder.
- Welding machine. Regular MMA welding is sufficient.
- Grinding machine.
- Bormashinka.
Separately, we need to talk about the tree. We will need a little bit - a 40x40 block. But what breed? There is a choice:
- Beech. In principle, inexpensive and beautiful material. Of all hardwoods, it is the cheapest. The only thing that needs to be taken into account is the intensity of moisture absorption. It needs to be covered with a thick layer of oil.
- Oak. Probably the best material for a handle. Strong, durable, reliable.
- Maple. Its advantage is elasticity. Where oak cracks under stress, maple will remain intact. By the way, one of the most beautiful types of wood.
- Ash. The hardest rock of the list, and inexpensive.
Now we can make a Viking ax with our own hands.
Cleaning corrosion
It will also need to be divided into several stages. And the first of them is cleaning:
- Before you make an ax handle with your own hands, you need to remove the old one. The easiest way is to knock it out. We cut straight along the beard of the blade and knock it out using a chisel or drift.
- Now let's move on to processing the blade. You need to remove the rust from it using a grinder. For this, a regular petal circle is enough. We'll do the polishing later.
- Now we look for cracks and grooves on the blade. If there are any, we simply brew them and clean them with a grinder. There is nothing complicated here.
Components of an ax
It is better to consider the features of the taiga ax in more detail by familiarizing yourself with the characteristics of its components. These include: a metal head and an ax handle.
Metal head
The first striking difference between the metal part of the taiga ax and an ordinary carpentry tool is the absence of an upper part. The blade also has a rounded shape rather than a standard straight one. This helps it penetrate deeper into the wood. And also, if you have such a blade, you can use the tool to chop logs not along, but across the fibers.
Ax is a universal weapon
In addition to the fact that the ax can be used for various purposes, which were described above, this tool is a melee weapon.
There is a known case when a soldier with one ax in his hands dispersed a large number of opponents. This incident occurred during the Second World War. Therefore, the ax also performs a protective function; it can be used if there is any danger to a person’s life.
How to make a taiga ax
Unfortunately, not everyone can forge a new ax from steel. But if the desire to own a real taiga ax is great, and the prices in stores seem too high, you can try making it from ordinary carpentry tools.
Making the tool head
Before you start working with the metal head of a conventional axe, it should be inspected for corrosion. If it is available, then it is better to soak this part of the tool in a container with vinegar. This will take at least a day. Remaining substances are removed using a regular brush.
A semicircle is cut out on the inside of the metal head, this allows you to make the girth comfortable
The rest of the procedure proceeds as follows:
- The front protrusion of the metal part is cut off. This must be done flush with the butt. If there is a protrusion of 5-7 degrees left, then it’s okay, but ideally it’s better to remove it;
- Using a Bulgarian saw or an emery wheel, cut off the back of the blade, giving it a rounded shape;
- A semicircle is cut out on the inner or, one might say, lower part of the head. This will not only make the grip of the instrument comfortable, but also significantly reduce its initial weight;
- You can skip this step, but if you want to comply with all the conditions for the construction of a taiga ax, then it is better to comply with it. Both corners of the butt are cut off. This step increases the maneuverability of the gun;
Adviсe
There are quite a few subtleties in the process of performing each operation. You should pay attention to the main ones:
- cutting metal will take a long time due to its thickness;
- be sure to wear personal protective equipment; Viking battle axe.
- when shaping the ax handle, you should perform cutting movements away from you;
- work with paint and other toxic substances should be done outside or in a well-ventilated room;
- It is advisable to use a welding machine that is in working order;
- Applying patterns requires considerable perseverance and time.
The rest will become clear as we work.
Sharpening rules
A good hunter or forester always has a sharp ax, because there is nothing worse than being in the forest with a blunt weapon. As mentioned above, the blade sharpening of the taiga species is distinguished by its rounded, steep shape. This allows the blade not only to work on wood more efficiently, but also to become dull less often.
Manual method
It’s a rather labor-intensive process, but for those who like to take care of their tools, it may, on the contrary, come to their liking. To begin with, a special template is made according to the dimensions of the tool. It is made from a piece of tin, having determined the correct sharpening angle. The ax is applied to the finished template. And if there is a deviation angle, then they mark it and process it.
For manual sharpening, they often take a wooden block and cover it with sandpaper. It must be coarse and fine-grained. Sharpening is done with the blade facing away from you. It is noted that one such timber can be enough for the entire season.
Making a form
Now we must give the desired shape, also according to the instructions:
- On the blade we draw a contour according to this template. If there is no printer and there is no way to transfer the form, then you will have to work according to calculations. We retreat a centimeter from the top of the butt and put a dot. Now we draw a straight line from the selected place to the toe. We also step back a centimeter from the heel and make a mark. We apply any round object so that it simultaneously touches the selected point and the beard. Let's circle.
- How to make a Viking ax straight? Is it not so easy to cut a circle by hand? We draw rays along the inner circle and cut along them. Now we cut out the circle.
- All that remains is to polish it. We take special grinding attachments for the grinder and polishing pastes. Cheap ones include GOI or diamond pastes.
Hardening
A handmade ax must be hardened and this is best done using technology. The metal can be burned, causing it to become brittle due to carbon burnout. In general, everything consists of 3 stages:
- Annealing. It is necessary to remove the tension from the steel, which is there in any case. This is easy to do - heat it to 760-800 degrees. The metal will be red-burgundy. Then we put it on a brick and let it cool. Next we remove the scale.
- Hardening. A much more complex process. Initially, prepare 2 buckets of water. One contains water, the other contains oil. Anything will do, including working off. Heat the blade to 830 degrees and lower it 4 centimeters into the water for 5 seconds. Then completely lower it into the oil. Don't forget to make circular movements to knock down air bubbles.
- Vacation. After hardening, the steel is hard but brittle, like glass. If it falls, it will simply break and need to be released. You need to heat it to 200 degrees and let it cool slowly with the oven for an hour. Even a regular oven will do.
By the way, you can harden an ax from rails or reinforcement in the same way.
Now the blade can be sharpened. There is no point in doing this in advance, since heat treatment will remove the cut anyway. Moreover, the blade can also lead.
Sharpening an ax is a simple matter. We take a grinder with an abrasive disc and try to maintain an angle of 20 degrees.
Making an ax handle
How to make an ax handle with your own hands? Very simple, you only need a block, a marker or pencil, a bow saw, chisels and sandpaper.
We take the sketch of the ax handle and apply it to the block. Cut out the handle along the contour. We remove sharp corners with chisels and round them with sandpaper.
Now you can decorate it. We apply the design to the ax and cut it out in any convenient way. This could be wood carving or engraving.
Adjusting the ax handle to the blade
There is only one thing left - to connect the handle and blade. How to place an ax on an ax handle correctly? According to the instructions:
- The head of the ax is adjusted to the size of the hole in the blade. To do this you will need a saw and sandpaper. There is nothing complicated about this.
- After fitting, if it fits correctly, it's time to wedge. If we make an ax from reinforcement, the hole is made at our own discretion.
- We make cuts at the end of the planting. A simple option: 1 longitudinal cut and 1 wedge. But it's not that effective. The optimum is a cross. 1 longitudinal and 1 transverse cut. Wedges are cut into them according to size and driven in with a hammer. Professionals say that it is better to make wedges from the same wood.
- We saw off the excess with a saw.
Materials and tools for work
To create an ax similar to the one used by real Vikings, you will need the following materials:
- block (approximately 4x4 cm);
- paper;
- pencil;
- brush;
- wooden wedges;
- varnish (can be replaced with flax oil);
- a small piece of leather material or leatherette (for braiding);
- an ordinary ax (it’s okay if it’s rusty).
A properly selected handle should not subsequently become loose during the drying process if the degree of humidity in the environment changes. If such a need arises, the workpiece must be dried in warm and dry conditions.
The following breeds are best suited for making an ax handle:
- beech - has all the necessary qualities, but also has a disadvantage - it absorbs moisture from the air. Therefore, before you start making the handle, you need to further process it;
- oak is a hard, durable and very durable species;
- maple is a very elastic and durable material. The finished handle will have a beautiful texture;
- ash is the best option, since this particular species is known for its strength, durability, and most importantly, affordability. The handle will turn out very beautiful.
The following tools will be required for the job:
- welding machine;
- drill;
- Bulgarian;
- grinding machine.
Having decided on the materials and prepared the tools, you can begin to create a Viking ax.
Types of axes and their characteristics
There are many types of axes - some of them are more of a universal tool, and some are used only for certain purposes. According to their purpose, they are divided into splitting axes, construction tools, universal tools, fire tools, or those intended for felling forests. The instruments differ among themselves in the length of the handle, the features of the butt and the width of the blade. Ax handles are made of metal, plastic, wood. Wood is the easiest option to process - it can be formed and also easily dampens vibrations. The most common types of axes:
- A fire ax is a long handle, a wide blade and a pick for dragging burning objects.
- Tourist - a small butt and not a long axe. It is designed to perform simple work - chopping wood, making rafts and ladders.
- A hunting ax is similar to a tourist ax, but with a sharper blade it can be used for cutting up carcasses.
- A sledgehammer is a heavy, thick butt with a long handle, which can be used to split logs of any size.
- The Scandinavian ax is intended for professional felling of trees - it weighs about 1200 g, with an ax handle of 64 cm.
When buying an ax, you need to pay attention not to the handle, since its quality is often not sufficient for long-term use. The butt must be marked in accordance with the document GOST 18578-89. The characteristics of the product are indicated there by the quality of the metal, features of the cutting part, and dimensions. Visually, there should be no chips or dark spots on the blade.
On a note! A normal ax head should be made of tool steel. In this case, the hardening of the blade and the butt must be different - the attachment point may burst if it is highly rigid.
How to select and prepare wood
The choice of material and the features of its preparation affect the final strength of the ax made by hand. Only hardwood is suitable for the handle. It must first be dried in a special chamber or left in a dry place for a long period. Carpenters place the preform material in the attic, where it sits for many years. If the wood was purchased at a building materials warehouse, then the cut prepared for the ax handle must be dried at home or in an apartment for 2 months on a radiator or near a stove - the humidity inside should not exceed 8%. The best types of wood for making an ax:
- ash;
- hickory;
- beech;
- oak;
- Jatoba;
- birch;
- maple.
How to protect against rotting
Any wood that can be used to make an ax handle can rot if exposed to moisture. To reduce the risk of destruction of the ax or to extend its service life, you can use anti-corrosion compounds.
Might be interesting Planting a pine tree: planting time, time and place, further care, photos Is it possible to plant tomatoes, peppers and eggplants in one greenhouse? How to make a potato planter with your own hands: drawings, principle of operation
You should not use varnishes or paints for such protection - the surface will become slippery and uncomfortable. Recognized means for protective impregnation of the handle - oils:
- linen;
- sunflower;
- drying oil
In some cases, before working with the material, it is soaked in kerosene and then additionally dried. When using oils, you need to remember the need for periodic application - to renew the impregnation and restore the protective film.
Some craftsmen add red, yellow or orange pigment to the composition of such a product.
This component will not only make the ax beautiful, but will also increase its visibility in the snow or grass.
Landing the ax on the handle
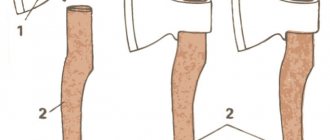
Before planting the butt on the ax handle, you need to remember that the exit side of the hole is wider. This feature is needed so that after wedging, the head does not fly off during cutting. When adjusting the dimensions of the handle to the butt, you need to place it on paper with the output side and trace the inner diameter. It should be smaller than the size of the head of the axe. Further work on making a wooden ax handle consists of the following steps:
- We adjust the dimensions of the end part of the handle to the output side of the butt along the entire length.
- We determine the difference between the input and output parts of the head and make a cut closer to the handle in size.
- We give the attachment part of the ax the shape of a champagne cork - widening towards the edge.
- We process the end of the handle with a rasp, chamfering it - you need the ax handle to fit into the butt.
- We make cuts - crosswise. They are needed to adjust the wedges when fixing the head.
- We drill out the bottom part of the cuts so that the handle does not split - the diameter of the drill is 1 mm larger than the width of the cut.
Additionally, you need to prepare wooden wedges and epoxy glue. The head of the ax should be planted with light blows, leaning the head against the ax handle with the entrance side. When it takes the correct position and does not dangle, the edges protruding beyond the limits are cut off, and then the wedges are driven in with a hammer. They must first be coated with adhesive.
Attention!
When attaching the butt of a homemade ax, you should not hit it with hammers - the metal may weaken and crack. For this purpose, place a small block or use a mallet.
