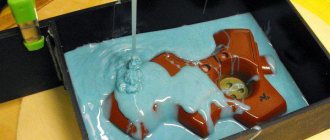
Very often, when producing certain parts, an exact cast replica is required. This problem can be solved in several ways, one of which is the use of special forms.
They come in several types, as they are customized for a specific type of workpiece. Today, making molds for casting is a very complex procedure that must be carried out by specialists.
Components of the mold
- The matrix is a static element of the mold, responsible for the design of the outer surface of the product. The matrix is connected to a channel, where the material is supplied under pressure.
- The punch is a moving part of the device that is responsible for the internal surface of the product and pressure. It is from the punch that the finished model of the product is removed.
- The forming cavity is an empty space inside the mold itself, exactly repeating the geometry of the device; this is the part of the device into which material is supplied under pressure.
- Parting line is the area where the punch and die are connected. The parting line can be represented by one plane. In more complex molds, the plane may be divided into several parts, depending on the complexity of the punch and die configuration.
Basic Concepts
The mold is a special blank, which is a kind of mock-up of the future part. Such mechanisms are used for casting products from various materials, such as:
- plastic;
- metal, etc.
They often consist of 2 main parts:
- The punch, which is a moving part.
- A matrix in which the shape and dimensions of the future part are formed.
Very often they can be supplemented with other components that make it possible to create very complex products. Such designs are found only in production and cannot be made at home.
Types of molds
Depending on the purpose of the mold, they are divided into:
- For mass production . Such forms are made from very durable metals, and therefore retain their properties for a long time during mass production. They are quite expensive. Metal molds are suitable for high pressure casting.
- For small-scale production . If the mold is planned to be used for small-scale production, then the material for its manufacture can be silicone, wood, polyurethane, plastic, aluminum, acrylic, etc. It all depends on the type of product for the production of which the mold will be used.
Depending on the material from which the products will be cast, the following types of molds are distinguished: molds for casting glass, plastics, metals, rubber, polymers, silicone molds.
How to make a mold
Mini-TPA does not require a full-fledged mold for casting plastic parts.
It is enough to make a form-building part that is part of any mold.
The form may consist of one, two, three, and so on parts. The main thing is that they must be tightly connected and kept assembled at the moment of plastic injection. Then, after injection, the mold should be easily disassembled into its components, and the part itself should be easily removed after casting.
Making a mold will be shown using the example of the task of casting a cord clip . This example is for a machine with an automatic clamping unit; modifications for a manual machine are also described below.
1. Draw the product.
2. Since the part is small, several such parts can be cast at a time. It was decided to cast 2 pieces at a time, since a small number of products are required.
A computer model of half the mold containing 2 parts is drawn. The injection is planned in the middle between the products. Since the requirements for the product are not high, it is customary to make the casting channels wide for easier casting.
There are threaded holes in the corners.
You can download a zip archive with files of this plate in stp and iges format from this link.
3. The front plate (the second half of the mold) is a smooth surface with a hole in the middle for the MiniTPA nozzle and also four threaded holes for fastening.
4. For ourselves, we have developed a set of frames for attaching various-sized forms with many through holes and with large holes in the corners for mounting on guides.
Subsequently, we abandoned the frames in their original form, leaving only vertical parts with bronze bushings.
Forms are attached to the holes; the hole dimensions for our case are indicated on the “Drawings” page. You have the right to choose them and arrange them as your detail requires.
5. We assemble the entire structure on the machine and make a test casting. All is ready.
6. In our case, we modified the mold, equipping it with pushers for automatic operation.
An example of work is shown in the video below:
Youtube link https://youtu.be/U-Puu40pGjw
Manual casting mold on the desktop
A mold for manual casting will have a minimum of differences: there is no need to make a hole in a flat plate - injection will occur along the line of closure of two plates (half-molds).
The form will need to be pinned to your desktop. The top lever will keep the mold from opening, the second will move the entire work table towards the injection nozzle.
We hope this information will be useful to you when designing and making your mold.
- one more example -
Making double dowels for installing heated floors
According to the above algorithm, a casting mold was designed and tested
double dowel for installing heated floors.
Form
The mold was made of aluminum for two reasons. The first is to test one hypothesis (technical solution), the second is to minimize risks in case of failure and at the same time save money in case of success. Everything worked out.
It was decided to make the mold in two places to fit within the 120 mm dimensions. The mold was designed for automatic casting and is equipped with pushers. Channels were made for cooling, since the thickness of one plate (half-mold) was more than 20 mm.
Below are photos of a mold consisting of two halves, photos of pushers and a plate for attaching pushers.
The parts are not cast in half in half-molds; in the half-mold with pushers, the part is immersed a little deeper, about 2 mm, to the depth of the side hooks. This is done so that after casting the parts remain in it.
It made sense. At the very beginning, when the injection dose was still being selected, with a small dose the part remained on the half-mold, which is closer to the spout. With the right dose, it stayed where the pushers were.
Taking measurements
A photo of the original from which the dimensions were taken is shown below. Dowel for pipe 25 mm white.
Dowel castings
The customer brought with him several polymers for testing. The weight of the casting was 21 grams, that is, a little more than 10 grams is the weight of one double dowel.
The first material is our standard polypropylene (orange dowel). It flows normally, no surprises or peculiarities. The shrinkage is almost invisible. We didn’t measure or remember the parameters because the material was expensive. They simply expelled the material and at the same time spilled it in test mode. Plus we warmed up the uniform.
A small dent at the top of the dowel is an unused injection dose, not a defect or shrinkage.
The second material is low-density polyethylene (gray-blue color). The processing temperature at the maximum point is 240 degrees Celsius. It pours well, but due to the high temperature, the cycle, even with cooling, was almost 100 seconds, this was categorically not satisfactory for the customer. In terms of tactile sensations, it is a very pleasant detail, rather heavy, and fits well in the hand.
A defect appeared due to poor cooling at the edges of the mold - shrinkage above the radius. This can easily be eliminated by drilling additional cooling channels in the required parts.
The third material is secondary (I don’t remember the name), under the code number “109” from the supplier (I find out the name and correct the test [O.N. Parfenov]), the color is also unclear. Low processing temperature, pours wonderfully, immediately reached a cycle of 57 seconds. The maximum melt temperature was in the range of 180-190 degrees Celsius.
The customer wished to further reduce the cycle. We made recommendations: add external air cooling, make additional channels for water cooling, reduce the stroke of the movable half-mold. The cycle time for such a casting of 40 seconds seems absolutely realistic.
Since this set of activities is not included in the regulations for testing Foma, the customer will do this independently at his own production site.
But the main advantage of this material is the price of 60 rubles per kilogram, that is, the price of casting 21 grams is 1 ruble 26 kopecks, or the price of material for casting one double dowel is 63 kopecks . In the store, such a dowel costs 5 rubles.
The appearance of the dowel did not bother the customer at all; it is smooth to the touch, although it seems that the entire surface is dotted with ditches, scratches, and dents. The material in the granules looked exactly the same as the product itself.
The fourth material required an increase in temperature, which entailed an increase in the cycle, so testing of the fourth material was stopped before it had really begun.
Form in action
Photo of the form in use. Cooling pipes are visible. The pushers begin to push the casting out.
Financial part
The direct costs for obtaining the result in the form of a suitable casting of a double dowel for a heated floor were (all prices according to the price list):
- Removing sizes - 5000 rubles.
- Design - 35,000 rub.
- Manufacturing - 30,000 rubles.
- Testing - 15,000 rubles. The price for testing is indicated taking into account the subsequent discount when purchasing equipment.
- Material testing 4 pcs. - for free.
Total: 85,000 rubles.
We continue our cooperation - we started designing a mold (first taking dimensions) for the next product on the list: brackets for attaching a pipe to polystyrene foam.
Photo of the original part is below.
Latest news from the client
We managed to reduce the cycle to 24 (!!!) seconds.
Our congratulations!
Stages of creating a mold
Stage 1 – construction of a 3D model of the product based on such graphic products as 3DMAX, ProEngineering, SolidWork. Stage 2 – 3D visualization – creation of a 3D render to coordinate the shape, material, color of the future product; Stage 3 – prototype production – creation of a 3D model of the product to make final corrections to the mold; Stage 4 – production of a mold by 3D printing, 3D milling or engraving; Stage 5 – adjustment of the manufactured form using a CNC milling machine. Stage 6 – serial production of products and quality control of the created mold.
Advantages of using molds
The main advantages of using molds include:
- Waste-free production . Waste of consumables is reduced to zero. When producing products using molds, the product material is carefully poured into it to fill the mold. At the end of the polymerization process, the finished product is removed from the mold.
- High performance . The process of manufacturing a new product takes significantly less time than traditional processing of materials using grinding and cutting tools.
- No need for processing equipment . Finished products obtained using molds do not require post-processing of the surface, edges and edges.
The main disadvantages of the production and use of molds are the high cost of manufacturing the mold and the long time it takes to create it. These shortcomings often call into question the advisability of using molds for the production of small batches of products. However, for the mass production of specific and complex parts, where the main production factor is time, molds are simply irreplaceable.
The KLONA company is designing molds and manufacturing molds in Kharkov, setting up your small-scale production. Our specialists will select for you the most profitable option for implementing the project, regardless of whether it is the creation of a single copy or the production of an entire batch of products.
Product range
The business idea is suitable for investors with a significant amount of capital. To meet the needs of plastic and aluminum manufacturers, a wide range of molds is required. These are molds for the manufacture of household and household products, PET containers, electronics, sewer and water fittings, etc. If you have the appropriate equipment, you can meet the demand for the following types of molds:
- Single and multi-seat. Used for casting one or several parts per cycle;
- Family. The matrix and punch represent inserts, due to which you can diversify the scope of application of one form;
- Cold duct. Cheaper to manufacture, but finished products are more expensive;
- Hot runners. More difficult to manufacture, but saves raw materials for manufacturers of plastic products;
- With embedded elements;
- With hydraulic movable signs;
- With air pushers;
- Two-component, etc.
You can start a business by manufacturing the most popular molds in the region, gradually expanding the range taking into account the requests of regular and new customers.
