Forged metal products add color to any interior and look very aesthetically pleasing. But not every home or dacha owner wants to have the standard solutions that the market offers. In addition, forged decorative elements are very expensive.
Homemade device for cold forging
Hot forging requires serious skills, equipment and work space. The ideal solution for realizing your design fantasies are cold forging devices. Not everyone can afford to buy such machines, but making the device yourself is not so difficult.
Types of machines
Basically, all devices that are intended for the manufacture of metal parts using cold forging are characterized by a manual drive. Few of them operate on the electric drive principle, although such a structure can be built with each of the devices. The only question regarding the drive is its feasibility, because the cost of the energy resource that powers the unit and the complexity of the installation process of the mechanism may not be justified if they are correlated with the amount of work performed and its regularity.
The table shows all the devices that operate using a manual drive and are related to the cold forging process.
| Device | Short description |
| Twister | With the help of such a device, the metal is twisted, spirals and curls with a narrow core are formed. |
| Torsion bar machines | With the help of such a machine, screw-type rods are twisted, and it is also possible to produce large spirals and filaments (baskets, lanterns and bulbs). |
| Inertial stamping machines | They are intended for making connecting parts with decorative components, making patterned tips and various small patterns and reliefs. |
| Bending machines | There are several types of such machines: push, broach and combined types. The first variety is needed in order to obtain wavy bends or to bend a rod in a zigzag manner. The extended variety is in demand when it is necessary to make a ring, curl or spiral with a wide core. Using the combined variety, you can build any of the listed elements. |
Help: very often in some sources you can find the name of machines designed for torsion as well as for machines that do winding - twisters. However, this is not entirely true; machines that twist metal are torsion bar machines.
Video on how to make a cold forging machine with your own hands.
Differences of cold forging
There is such a thing as “stamping”, which is sometimes confused with the cold type of forging. Cold forging itself has 2 principles according to which this process can occur. The table shows the differences between the processes.
| Process | Description |
| Stamping | The stamping process can be described as the extrusion of certain shapes using a punch that operates at a high level of pressure. An example of the stamping process is an aluminum can. Heating of the metal is not used in this case. The ability to apply such technology at home is hardly possible, since it is impossible to create the necessary conditions for this. |
| Cold forging type (riveting) | This type of cold forging, in essence, is cold hardening, namely, a certain number of blows of very high force are carried out in the process, which allows the structure of the metal to change and become the required parameters in size and shape. This manipulation is carried out using a hammer, which you can also build with your own hands. |
| Cold forging type (bending) | Another type is bending. With this technology, the metal structure remains the same without changing its characteristics. This type of forging can be used at home; all you need to do is create a cold forging machine with your own hands. |
Cold forging, which is carried out on the principle of bending, is quite simple to do, especially if you have special stationary equipment that significantly facilitates the process. The advantage of this variety is that you can assemble almost any cold forging machine with your own hands without much expense.
Video review of a manual machine for forging metal
Making street lamps
Most often, home craftsmen initially take on simple street lanterns. Usually small wall lamps, such as sconces, are made (they just need much less metal), and less often - pompous street lamps on a massive vertical leg.
However, street or wall lamps, which are simple at first glance - with 4 or more sides of shades, require particularly labor-intensive design. Here you will have to work hard on an unusual frame, observing the correct geometry of the individual parts
They must be well fitted to protect the internal electrical components - this is especially important for installation in outdoor conditions, where rain, snow and wind are not uncommon
For effective ventilation and heat removal from the hot lamp, slots are provided in the housing at the top and bottom. They need to be equipped with protective visors to help remove moisture. Then you should carefully weld all the elements at the desired angle, providing grooves for the glass partitions, install them on the base, and glaze them.
Street lamp
When installing a forged chandelier (sconce) or street lights in your home, you can be sure that there are no exactly the same ones anywhere else. It is impossible to create two absolutely identical models; each is unique in its own way. The warmth that the craftsman brings into the product with his own hands makes the light of such lamps even more pleasant, cozy, and fabulous. Treat yourself to such a purchase or make it yourself.
Construction of cold forging machines
Each device for cold forging has its own characteristics and parameters. In order to easily make a cold forging machine with your own hands, you need to understand what each of them is.
| Machine | Device | |
| Bending machines | The design of this device is such that by changing the rollers and wedges, the size of the waves and bends changes. They can bend rods up to 16 mm. The only caveat of this device is that it cannot be made independently, because it requires processing and turning many parts of the exact size. The cost of such a device is low. | |
| Twister | The unit works by equipping it with a special template, onto which the piece of metal being processed is pressed. The pressure must be very high, so those who work on the twister must have sufficient strength to do this. In addition, the safety of the template itself is ensured by the presence of a persistent horn (end). As for the middle horn, which is otherwise called the encircling horn, it should be made in such a way that it can change its position and be fixed in it. The efficiency of work depends on this, especially for those who are starting the process for the first time. | |
| Base with spacers | This unit will allow you to make patterns of absolutely any variation. The design itself is very simple and consists of a plate made of durable and reliable material into which spacers are screwed at a certain distance. For such purposes, you can use bolts with sizes from m8 to m24. The thickness of the metal depends only on the skill of the person working on the machine. Basically, this device is well suited for metal with a thickness of 6 mm. | |
| Snails Twister machine | With collar | This installation consists of a base plate on which a special coil is located. This coil is used as a template for the future product. The peculiarity of the machine is that the “snail” template is divided into several parts, which are secured to each other using special connecting elements, which allows the template to vary in shape during operation, which creates various kinds of waves and bends. There are also disadvantages to this design, since in order to make such a machine for cold forging with your own hands, you need to select a very durable material that will not bend over time. Also think over the connecting loops, which are quite vulnerable, given the amount of force with which the entire process of bending the metal occurs. |
| Lever type | In this type of snail machine, the template is attached very firmly to the base. Due to this fact, its productivity is lower, however, its reliability is greater. Using a special lever, the metal plate is pressed against the template; at the same time, the movable roller must be moved during the process. To make such a machine for cold forging with your own hands, you can use steel material, which is distinguished by its strength, and the roller can be made from a regular roller bearing. In general, the design is similar to a pipe bender. | |
| Torsion bar machine | Such a device will be good for screw twisting rods. Such a machine is made from a cylindrical metal base and two fastening and simultaneously twisting elements. It is advisable to equip such a structure with a special pair of paws that will not allow the metal being processed to bend in ways that are not necessary. The principle of operation of the machine is such that the rod is placed in the elements holding it, clamped at one end, and at the other end, using a rotating spindle, it is twisted to the desired size of the helical wave. | |
Read also: Bit for a screwdriver for heads
Advantages and disadvantages of forged lamps
Forged lamps, like other lighting products, have certain advantages and disadvantages:
Advantages :
- versatility of use;
- practicality - forged products are easy to wash and clean from dirt;
- strength and resistance to external mechanical influences;
- stylish - they are decorative elements and are used for zoning space both indoors and in the local area.
Flaws:
- significant weight, requiring the strength of the building structures on which the products are mounted and the reliability of their fastening;
- to ensure long-term operation, metal elements must be treated with anti-corrosion compounds (painting, galvanizing, etc.);
- high cost of finished products.
Street lanterns will decorate the landscape and provide illumination of pedestrian paths
In conclusion, I would like to draw attention to a number of nuances that you will encounter if you have forged products on your farm or want to make them yourself:
- Products made by forging require special care, especially if they are installed outdoors (cleaning from dirt, painting).
- Before painting - this applies to products made by hand - it is necessary to apply a layer of primer to the elements of the lamp.
- The manufacture of forged products should be started only after drawing up a drawing or sketch indicating all dimensions.
- The shape of a finished forged product cannot be changed; it remains unchanged, but the decorative elements can be changed.
- The cost of a finished forged lamp is quite high, it depends on the size of the structure and its complexity.
Forged lanterns are not only light in your home, but also beauty and style, confirming the status of the owner of the house.
Equipping a torsion bar cold forging machine with an electric drive
In order to increase not only the efficiency of work on a cold forging unit, twisting rods into a helical wave, but also to increase the speed, as well as ensure stability and not be subject to overfatigue, you can install an electric type drive.
Working by hand, it is quite difficult to make all the decorative elements made of metal rods the same, since the uniformity of the rotational moment in such a situation will vary greatly. In order to avoid errors in the manufacture of products, you can use:
- axle shaft from the car, which is installed on the drive axle;
- you will also need a differential gear pair;
- For protection it is worth using a casing.
From the listed devices you can build an electric drive for a torsion bar machine. It is better for such an engine not to exceed power ratings of 900 rpm and 3 kW.
Building a curl for the machine with your own hands
Before you start creating a cold forging machine with your own hands, you need to be able to calculate the parameters of a template spiral, because there are practically no special programs for such purposes. Such a template should not only be technically competent, but also have an attractive appearance.
The calculations for this pattern are based on a logarithmic spiral. Some nuances during construction can be highlighted in the following list:
- the beginning of the construction is taken at point R0;
- the turning radius will be equal to a fixed angle;
- the length of such an angle must be multiplied by the divergence of the coil;
- the discrepancy in the standard version is generally taken to be 1.2;
- for simplicity of calculations, as well as maintaining accuracy, the bending angle is best taken at an angle of 45 degrees;
- if there is a need to build a template that will have a denser spiral, then the 8th part (s) of the unit distance from the spiral should be added to the radius;
- As for r0, it must be equal in cross-sectional size to the diameter size of the workpiece for the spiral.
Important: r0 can take any value, it all depends on what characteristics the metal is used for the workpiece, namely its density.
Taking into account all the nuances, you can start making a “snail” template; for this, it is best to be able to solve equations that have a cubic degree and higher. There is no exact formula for calculating such a device, but there is one that allows you to achieve the optimal result. The sequence when constructing a spiral template can be like this:
- the initial point r0 is determined first;
- the turns that the template will have are taken arbitrarily, their number can be any;
- using tabular data, you should calculate the diameter (b), while ensuring that it is smaller in width in the opening for the template;
- using the formula, the radius R is calculated;
- the last step is to transfer all the obtained points in accordance with the scale, after which you can proceed directly to construction. In the process, let’s adjust the radius R in the final version using a similar formula.
Help: if it becomes necessary to calculate intermediate values, then this is done in accordance with the geometric proportion.
Construction of a cold forging machine
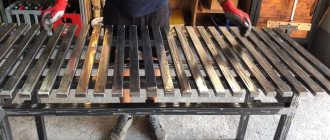
When drawing up a drawing to further create a template for the machine, it is best to make sure that it has the maximum number of different variations regarding bends and waves. Having such blanks, you can create a cold forging machine with many interchangeable attachments, which will make it possible to produce various patterns and monograms.
Sequence of actions when creating a device:
- Initially, you will need a metal sheet, the size of which will depend on the number of patterns placed on it. The templates themselves should be placed in such a way that there is room for the manufacture of products, because during the process the material from the nozzles may shift due to lack of space. Also, if the templates are not sufficiently spaced from each other, complications may arise in the work.
- As for the variations of the templates themselves, they can be either simple or contain more than one turn of the monogram. You can make a similar ploughshare-type snail and think through the design of the bends in the disassembled and assembled state. At the same time, you should be careful when selecting the material for fixing the sliding parts - it should be as durable as possible.
- The change of nozzles can be ensured by making a rectangular slot; replaceable templates for forging can be inserted into it. They should all be attached to metal plates shaped like a rectangle. Fastening of such nozzles will be ensured using bolts.
Video instruction
Forged lantern design
Several elements should be highlighted in the design of the lantern:
Sketch of a forged lantern.
- side frames;
- top cover;
- base;
- mounting bracket.
In accordance with their geometric shapes, forged lanterns can be assembled from 4 or more side frames of square, rectangular or trapezoidal shapes. Connected by the sides, these frames create a three-dimensional shape of the lantern. The lantern cap is installed on top of the finished frame.
In the case when a forged lantern is suspended at the entrance to the house or in the entrance portal, the upper cap must have a connecting element (for example, a ring) with the suspension bracket and a hidden insulated entrance for electrical wiring.
When creating lanterns that should illuminate an alley or courtyard and be mounted on poles, the main load will fall on the base (bottom) of the lantern, and the electrical cable is also supplied through it.
All structural elements of such a light can be assembled yourself if you master the basics of cold forging.
Assembling the device
This version of the machine is used as an example because of its simplicity. Knowing the basic principles and sequence of equipment design, you can upgrade it at will. To assemble all parts of the equipment into a single whole, you will need to use:
- drill with carbide type drills;
- welding machine;
- a saw cutting metal or a hacksaw;
- metal sheet of the selected size;
- round metal pipe;
- metal rod;
- bearings of different sizes;
- bolts size M8.
To assemble a cold forging machine with your own hands, you need to use a proven sequence of actions:
- Initially, you need to assemble a stand that will serve as a support. To do this, all its components (pipe sections of the same size and the joints between them at the top and bottom edges) must be connected into a single whole. The design may resemble a stool in appearance. The connection is made using a welding machine, and the sections are cut with a saw.
- The next step is cutting the metal sheets. You should get circles of equal diameters and four triangles with equal sides. Triangular-shaped elements must be welded to the bottom of the connected pipe structure in such a way that something similar to a pyramid is formed. The base, which has a wider area, must be welded at the central point of the cut circle.
- Four strips that are located horizontally must be attached to a circle with an already welded element. This should be done using bolts; for this you will need a drill to make the holes.
- The next step is the construction of the handle. To do this you need to use two rods of different lengths. Their sizes can be determined by correlating them with the diameter of the circle. One rod should be commensurate with the diameter, the other should slightly exceed its size. When bending the first rod, you should maintain an angle of 30 degrees. Then weld both rods to each other, and then weld another rod into the lower part. There should also be a jumper between the first two sections, to which a lever is attached by welding, which should maintain the direction towards the structure made of rods.
A bearing for future directional variability in the device must be attached to the end of the attached lever, as well as to the segment located at the bottom of the structure. The upper section serves as a mount for a metal coil, which must be installed horizontally - it makes it possible to bend the metal. On the lower side of the segment, where there is a free end, a hole should be made equal in diameter to the size of the pipe section.
Read also: The diode on the switch does not light up
- The last step in the algorithm of actions when constructing a machine for cold forging with your own hands will be the connection of the designed handle with a part of the device similar to a “pyramid”. These elements are fixed after putting on the handle with a wide-diameter nut, to which it is first necessary to weld a metal circle, which will allow the template itself to be attached to the machine. Next, the “snail” template is attached by welding.
Anyone who decides to take up forging seriously and make a cold forging machine with their own hands should be very scrupulous at the stage of creating drawings and calculations. Otherwise, the creation process is quite simple, and once you understand the principle of equipment design, you can come up with various variations of it that will help improve the product.
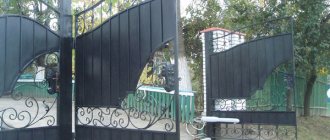
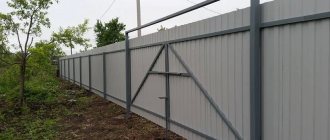
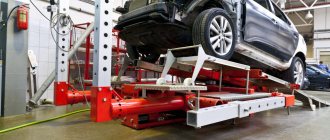
One way to decorate areas is to use forged items. Fences, benches, gazebos, stair railings and other similar structures look very decorative. Moreover, in most cases, these products are not forging in its traditional sense. Most often, this is done not in a forge or with a hammer and anvil, but with the help of some devices that allow you to create a wide variety of patterns and products from metal strips and square rods. To make such products you will need cold forging machines. Some of them you can make with your own hands, others are easier to buy.
What kind of devices are used?
Cold forging is characterized by various curls, bends, twisted rods, etc. Almost every type is made on a separate device - a specific machine. They can be driven manually or electrically. For small volumes “for yourself”, manual cold forging machines are used. Although they are not particularly productive, they are much easier to manufacture. If it is necessary to put production on stream, similar devices are made, but with electric motors. In this case, there is almost no need to physically work, but the complexity of making the device increases significantly. In our material we will talk about manual machines for cold forging.
What devices are used:
Torsion bars. With their help, tetrahedral rods or strips of metal are twisted in the longitudinal direction. The result is twisted columns, which are also called torsion bars.
This is what a torsion bar and the machine of the same name look like
This is how they make a flashlight
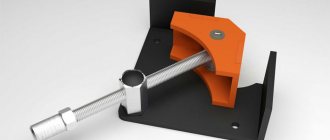
Device for cold forging snail - for forming curls
For bending anywhere and at any angle - bending machines (bending machines)
Machine "Volna" - for the formation of the appropriate relief
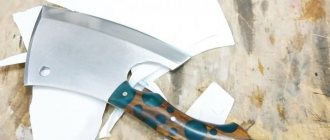
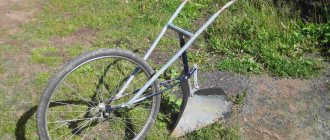
Machines for shaping the ends of rods. In this case - crow's foot
For a beginning craftsman, the most relevant machine for cold forging is a snail. Only with its help you can make many interesting things - from a fence and gate to a bench and other similar products. In second place in terms of necessity is a torsion bar machine. It adds variety to the details. All the rest can be purchased or made as you improve and gain skill.
Light sources for outdoor lighting
A wide variety of light sources can be used to organize street lighting:
Solar panels. Lamps with them can be mounted even in places where there is no provision for laying an electrical network. Such batteries operate on batteries with energy stored from sunlight. On its charge, the flashlight can last up to 12 hours.
- Halogen lamps. This light source is one of the most economical and durable, second only to the previous option. Compared to classic incandescent lamps, they offer reasonable light intensity. The main disadvantages of such lighting are that the lamps are afraid of dirt on the bulbs, they are sensitive to temperature changes and get very hot during operation.
- Classic incandescent lamps. The most budget option, however, making a street lamp out of them is not the best solution: after all, the lighting from them is too strong, and you will go broke on your electricity bills!
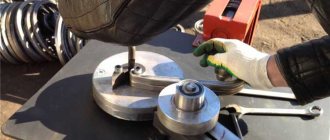
Homemade “Snails”
In essence, this is a modernized bending machine (pipe bender), but these improvements make it possible to easily make curls from fairly thick rods (up to 10-12 mm cross-section) and repeat them with a high degree of accuracy.
One of the homemade cold forging machines
These cold forging machines have several designs, but the easiest to implement is the one with a round table with a central leg. A lever with rollers on bearings at the end is movably attached to the leg. They make the bending process easier.
The table surface can be made of steel sheet with a thickness of 10 mm or more. For the leg, you can use any thick-walled round pipe. It is important to make the structure stable, since lateral forces will be applied, so side posts, spacers, and a stable base are needed.
Drawing of a cold forging machine “Snail”
It is easier to make a lever from a square pipe with a thick wall - at least 2-3 mm. The cross-section of the pipe is 25*40 mm or so. Attaching the lever to the leg can be done on a bearing, or you can simply take a small piece of thick-walled pipe of a larger diameter, put it on the leg, and weld a stop strip on the bottom so that the lever does not fall down. The option with a bearing gives easier movement, but if there is lubrication, the second option also works.
Lever mounting option
The shape of the lever is also important. The lever is double, the upper part is working, the lower part is supporting. Wherever there are connections, it is advisable to add reinforcement, since the efforts are significant.
The lever must be reliable, with reinforcement
A mandrel or jig is fixed on the table - the shape along which the curls are bent. They are made in different diameters so that you can make curls of different diameters. Such mandrels can be prefabricated to form a larger number of bends. Each such sample must have rods that are installed in holes in the table. This is how this template is fixed. Also, its shape must be designed in such a way that the end of the rod is well fixed in it.
Variant of conductors for the snail
Often, mandrels are machined from a metal circle of a suitable diameter using a grinder, but there are options made of metal with steel plates welded onto it, curved accordingly.
How to make a similar machine for cold forging is in the next video. There is also a good description of how to bring the ends of the workpiece to a decent state - ordinary raw edges look very rough. There is special equipment for processing them, but, as it turns out, you can do it without it.
Features of connecting the flashlight to the network
When you make lanterns for a summer cottage, you need to pay due attention to the wiring connection procedure. To connect the lamp to the network, we need:
- electric cable VVG;
- terminal blocks for fixing connections;
- metal hose or corrugated pipe for protection.
For homemade devices, a cable with two cores 1.5 mm thick is most often used. It is better to immediately purchase a bay where the length of the wire will be equal to 100 meters. And the diameter of the corrugated pipe should be from 18 to 25 mm. It will be needed to protect the cable from rodents or damage when digging in the soil.
The holes in the terminal blocks should have a diameter of 2.5 to 4 mm and consist of one or two strips, it all depends on the number of connections and lampshades. The pads must be selected based on the current strength from 5 to 10 A.
Installation involves the following steps:
- we dig a trench for laying the cable with a depth of about 80 cm and a distance from the ditch to the house of a maximum of 60 cm;
- When installing floor lamps, you first need to install metal knives and then pull the cable through them one by one. Where it is placed in the trench, we place it in a corrugated sleeve. After passing through all the devices, the cable is cut so that the length of its tail is a maximum of 15 cm;
- we prepare the second piece of wire and also pass it through the pipe and at the top of the device we connect the two cables with terminals;
- if the lights are placed on a wall or facade, you need to reliably insulate the junction boxes. It is best to connect the wires in the boxes with clamping nuts; you can also use pliers, but then each connection must be soldered. Wrap the twisted areas with electrical tape;
- installing the electrical circuit. Since it has two wires, one “zero” and the other “phase”, you need to make sure that the switch can open the phase wire. Then, in the off position when changing a burnt-out lamp, there will be no risk of electric shock. The phase wire is determined using a special indicator;
- A simple socket will also work as a connection point, then you can turn off the power to the entire system quickly by just pulling out the plug. The cables can also be connected directly to the terminals on the switchboard, which is equipped with an automatic fuse that cuts off the voltage in case of an emergency;
- when installing the switch, you need to check whether its specified power corresponds to the load in this network;
- Before digging a trench, make sure all lights are working and reinforce the posts by tamping around the clay or small crushed stone. If the soil is light, then it is better to fill the supports for the devices with concrete.
Torsion bar machine
As already mentioned, these cold forging machines allow you to make longitudinal bends on the rod. This is a relatively simple design. The main task is to fix one end of the rod motionless, attach a lever to the second, with which you can twist the workpiece.
A piece of profiled pipe with a thick wall (at least 3 mm) is suitable as a base. The retainer can be welded from the same rods, leaving a square gap of the required diameter. You can use a properly sized cable clamp (available at a rigging store). Any of these stops is welded to the base.
Cable holder - great for holding rods
Next, you need to somehow ensure grip and torsion of the second part of the workpiece. This can be done using two bearing units. A pipe of a suitable diameter is inserted inside, and a handle is welded to it on one side - the design resembles the letter “T”. On the other hand, a clamp is made in the pipe: four holes are drilled, nuts for 12 or 14 bolts are welded into them. The result is a good clamp - the bolts are tightened after the rod has been inserted.
Next - a matter of technique - use a lever to screw in the required number of turns. This is not to say that this work is for weaklings, but with a lot of leverage, everything is not so difficult.
An even simpler machine for making torsion bars using cold forging is in the next video.