I work as a welder, I used to work at a metallurgical plant, but now it has become more profitable to work for myself. I fulfill various orders, I earn little, but it’s enough to live on. Recently we received an order for one large object. I came to the place, examined everything, assessed it, and noticed for myself that the crocodile’s mass would not clamp down on this huge pipe that needed to be welded. I remembered about magnetic mass, which was advised to me so long ago. Various craftsmen say that with its help it is convenient to weld not only large objects, but also small ones. After this order I'm going to check it out. I thought about getting one from a colleague, but I thought that such a thing wouldn’t hurt me myself. I didn’t want to buy it, I decided to make the magnetic mass with my own hands, because making it yourself is much more interesting than just buying it. This is what came out of it.
Source ad-cd.net
What's happened?
This device is mounted on the working plane of the workpiece.
Thanks to the active magnetic field, a strong fastening is achieved, creating a closed electrical circuit - the main condition for the formation of an electric welding arc. The tool is especially popular among novice welders - it will take a few minutes to familiarize yourself with the principles of the work. Experienced specialists use magnetic mass for welding machines for critical work - welding large-diameter pipes or connecting load-bearing units made of profile materials.
Magnetic mass for welding
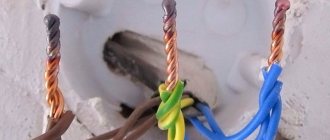
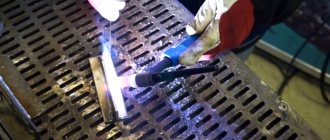
What is remarkable about such a homemade product for a welder is that it is very useful and effective in work. For example, very often, in addition to poor contact, there is simply nothing to catch on with the mass of the cable, well, there are no protrusions or edges. The magnetic mass will allow you to do this with ease, even to a flat metal surface.
To make such a device, you will need to prepare:
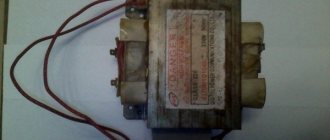
- A round magnet from a large speaker. It is very important that the magnet has metal coins. Such magnets are found in speakers, old TVs and other radio equipment;
- Long bolt, three washers and two nuts. Everything should be the same diameter;
- You will also need such running tools as: a grinder, a screwdriver, pliers, possibly a drill to drill a hole in a metal coin.
So, let's look at the process of manufacturing magnetic mass for a welding machine along with the website.
Do I need to purchase?
Everyone can answer the question about the advisability of purchasing magnetic mass for themselves, since this can only be determined by taking into account the specifics of welding work. Initially, the consumer must evaluate the materials with which he usually deals. For example, for a beginner who works with non-ferrous metal products, terminals are perfect.
The cost of magnetic masses for the welding process cannot be called low, but the product fully justifies its price. Craftsmen who want to save money can make this device themselves.
If you want to become the owner of a magnetic terminal, you should think about how to make the right choice. Initially, attention should be paid to the manufacturing quality of the device. It is worth making sure that the clamp can support the weight of the cable that will be used.
In addition, you should trust only a trusted manufacturer that has proven itself well.
The ground clamp must be selected in such a way that it can withstand the maximum voltage generated by the unit. High-quality welding equipment is produced by companies such as Skrab, Quattro Elementi, and Kord.
Design of magnetic contact and its characteristics
Consists of two nodes:
- Cable holder. The ground cable of the welding equipment is attached to it using a bolted connection.
- Magnetic node. The size of the magnet depends on the design features. Some models are equipped with a mechanism that regulates the pressure of the magnet on the working plane. Professional devices have switches.
The parts are connected to each other by a rigid fastening. The main characteristics of the devices are:
- Dimensions and weight. Depends on the manufacturer and specific model. The average weight is 1-1.2 kg.
- The force of attraction to the surface. Varies in the range from 2 to 50 kg.
- Welding current strength. The maximum value of the parameter is measured in amperes. For entry-level models, it does not exceed 200 A. An advanced tool is capable of operating at 400-500 A.
- Execution type. They produce special clamps for corners with gap adjustment.
Safety regulations prohibit connecting a cable without a special lug, which is clamped with bolts.
Magnetic contact design
The device itself consists of two parts.
- Contact. This is the point where the ground cable is secured to the holder.
- Magnet. Can be of various shapes and sizes.
These two parts are connected to each other by a fastener. The weight of the magnetic mass for welding will depend on its size. For example, a magnetic welding clamp from ESAB weighs about 850 grams.
The main thing in this design is simplicity, which ensures reliable operation and uninterrupted operation.
Making a holder for a welding machine
Despite the high reliability of the design, the proprietary holder for the welding machine may fail at some point in time. At the same time, there are often situations when no spare parts help to fully restore its functionality.
Taking into account the fact that welding operations do not tolerate any delays or stops, you should always have another holder at hand. Professional welders prefer to make a spare electrode holder themselves.
What is needed for production
The manufacturing process begins with preparation. For work you need to prepare the following materials:
- Magnet. With its help, the mass will be securely attached to the part being welded. There is no need to buy a magnet. You can use a magnet from an old car speaker.
- Washers (2 pcs.). Their diameter must match the size of the magnet. Some craftsmen practice making washers from sheet metal.
- Nut, bolt. Through them, the cable of the welding machine is securely fastened.
In addition to materials for work, you will also need the following tools: a drill, a file (sandpaper) and a welding machine.
Advantages and disadvantages
Electric welding is the most common method of joining metal products. The quality of the future connection depends on the integrity of the electrical circuit.
That is why the invention of the device in question aroused serious interest among specialists.
The popularity of magnetic mass for welding is due to the following advantages:
- Reliable fixation will allow the welder to concentrate on work without being distracted by adjusting the clamp.
- The working mechanism is a permanent or switchable magnet. Subject to compliance with operating conditions, it can serve for an unlimited period.
- You do not need any consumables to use the holder.
- Even compact models have a contact patch sufficient for reliable closure.
- The device is resistant to sudden voltage changes or temperature changes.
- The magnet can be attached to any place to create comfortable conditions for making the connection.
Despite the large number of advantages, there are a number of disadvantages:
- Before use, it is necessary to prepare the surface. The procedure involves removing dirt and foreign particles.
- There is no possibility of attaching to small parts, for example, a circle with a small cross-section.
- It is impossible to work with non-ferrous metals because they are not magnetic.
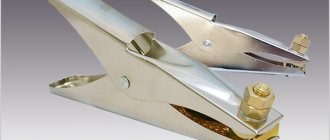
Factory-made products
Domestic manufacturers produce several varieties of products of the class we are considering, among which the following names stand out:
- welding holder made according to the principle of collet fastening;
- “clothespin” type fastener;
- fastening shaped like a trident (fork).
Let's consider each of these options for their implementation in more detail.
The collet holder for welding equipment allows you to easily change electrodes and fully meets the requirements for operator protection.
In addition, it is very convenient to use and looks quite aesthetically pleasing. However, all these advantages are quite expensive for the consumer, since at the retail price such a holder is superior to all other models.
The special collet grip has another significant drawback associated with the limitation of the permissible current through it.
The “clothespin” type welding holder belongs to the category of the most popular products, manufactured with a wide variety of sizes and diameters of rods inserted into it.
In accordance with these indicators, such holders are designed for different strengths of welding currents. They are not always convenient to use, but they provide reliable contact with the rod, have no restrictions on the maximum current and do not require additional devices.
The disadvantage of this type of welding holder is the difficulty of replacing the used electrode and its considerable size.
But welding holders of the “trident” or “fork” type are time-tested and reliable designs, so they will be considered as an example of assembling a product with your own hands.
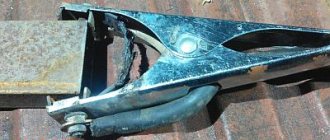
How to improve the ground terminal?
This problem is usually encountered by novice welders. Purchase a budget manual arc welding inverter for welding at home: for a fence, gate, canopy, etc. Such an inverter, costing 6-10 thousand rubles and more, is equipped with a “Crocodile” clothespin. In addition to other negative aspects of such a clothespin, which were already mentioned above, it most likely has steel jaws coated with a thin layer of galvanic copper (to give the impression that they are copper). It’s very easy to check whether it’s copper or steel; you just need to hold a magnet. If it is magnetic, it means it is steel. Usually, food-grade stainless steel in an unhardened state is not yet magnetic, but that’s a completely different story.
What are the dangers of steel jaws? They will get hot - steel is a much worse conductor than copper or brass. To prevent this from happening, you can remake a cheap clothespin that costs 40-50 rubles. (if, of course, you have some copper or brass in your household, for example, a plate or tube, a busbar).
What should be done? You need to unscrew the original jaws, which are held on by bolts, and use them, like a template, to make other jaws. It is enough that in cross-section they represent the Russian letter “P”. Without much effort you will get a good contact on a low-quality clothespin!
How to use?
The technology for using the device is not complicated. First of all, the welding cable is connected, after which installation begins.
Most units are equipped with switches that activate a magnetic field. At rest, the magnet will not be attracted to the surface.
One person is required for commissioning. After contact with the working plane, the device must be activated. Upon completion of these steps, the clamp is in operating mode.
After completing the work, perform the above steps in reverse order. Do not try to separate the switched-on device from the part - many models have quite high tear strength. In addition, this may damage the latch.
Upon completion of work, you should immediately clean the contact surface of the magnet from metal shavings, since they negatively affect the force of attraction.
Introduction
First, let’s define what a magnetic welding cable contact is. This is a kind of auxiliary device.
It is attached to the required area of metal to be joined, based on its magnetizing properties. This contributes to the formation of a closed electrical circuit, without which manual electric arc welding cannot be performed.
Magnetic welding clamps are used by welders with any experience. Some craftsmen make a special magnetic mass with their own hands. For more details, see our video at the end of the article.
Dimensions
Magnetic devices are small in size, which makes them so popular. The length, width and height parameters of equipment with magnets may vary, but regardless of the model and manufacturer, they are all compact and easy to use. The average weight of the product is about 1 kg.
The most important indicator is the force of attraction (holding or pressing) of the magnetic corners. Manufacturers and suppliers may specify this parameter in pounds (LBS or lbs) or kilograms (kgf). The maximum value of this indicator is 34 kgf or 75 lbs. You can also find the following values: 11; 13; 22; 23; 24 kgf and others.
Important! The higher this parameter, the heavier the parts the magnet can “hold” and the better the fixation. To make a purchasing decision, you should not take into account dimensions in centimeters; it is better to look at the force of attraction.
How to make a magnetic mass holder
The main advantages of a magnetic holder were described above. First of all, this is the ability to fasten the cable in the most inaccessible places, those that are simply impossible to crawl into with an ordinary crocodile.
A magnetic ground holder is a magnet to which a cable with ground is connected. There is a contact inside the magnet. Therefore, when it is fixed to the metal, the welding current is transferred to the workpiece, which is welded.
To make a magnetic terminal you will need the following materials:
- Sheet steel. Steel thickness no more than 2 mm;
- Non-working speaker from a Soviet receiver or tape recorder;
- A long bolt, washers and nuts for connecting the ground cable from the welding machine.
The manufacturing process of a magnetic holder is as follows. First you need to cut two circles from thin steel, exactly the same in diameter as the magnet.
Then, in the center, you need to drill a hole for a bolt, which could be used to fix the ground cable coming from the welding machine, and also tighten the two circles. For reliable fixation, it is recommended to use several washers as pads.
After fixing the ground cable to the magnet, you can check all the advantages of such a homemade product. The magnet will reliably hold the mass of the welding machine anywhere on the workpiece, while it is easy to create reliable contact, which will improve welding work.
Pros of magnetic mass
The first plus: when working with large workpieces, when the crocodile cannot catch on, such a magnetic mass helps out.
The second plus: when working with metal drilling, a heap of metal shavings remains, which is very convenient to collect with such a magnetic mass (so that after assembling the shavings do not bother with them on the magnet, before collecting them, attach a small sheet of paper to the magnet, removing the magnet, the shavings will remain on paper).
Well, let's immediately start making a homemade magnetic mass from old speakers.
Features of using magnetic mass
Before using the device, you must connect the cable to it in accordance with safety regulations. It is prohibited to connect a mass without a tip with a hole for bolting. This requirement also applies to the welding machine.
Factory models are available with a knob for turning the magnetic field on/off. In the default position, the mass will not be attracted to the metal. In advanced models, the same knob is used to adjust the clamping force.
To activate the magnetic field, the mass is applied to the workpiece and the handle is turned. When disconnecting, perform the steps in reverse order. Attempts to quickly transfer the device to another place in an active state usually end in its breakdown.
You cannot install the terminal close to the welding site, as when overheated the magnet loses its properties.
Immediately after completion of welding, it is necessary to remove adhering metal particles from the contact surface, which reduce the clamping force.
About magnetic mass
Magnetic mass is a kind of clamp used when working with a welding machine with large objects; it is widely used in welding.
It consists of the magnet itself, a metal plate that is in contact with the metal, a bolt or other place where the welding mass was attached and a handle.
The principle of operation is simple: from welding it is fed to a wire, which transfers it to the nozzle through a bolt to the plate, which comes into contact with the welding object and transmits current to it, and the magnet holds the entire nozzle.
With your own hands
Some craftsmen like to create devices themselves rather than buy an industrial version. For such performers, below are instructions for making all types of accessories with magnets. We do not encourage you to copy the instructions and videos below, but rather consider them as suggestions for ideas.
Square - holder
Magnetic corners for welding work have a fairly simple design, so making such a product with your own hands is easy. The master will need a metal sheet 2-3 mm thick; magnet; fasteners: screws and nuts.
Manufacturing algorithm:
1. On a metal sheet, using a ruler and a felt-tip pen, you need to draw the outline of the future product. The shape can be different, but the most optimal configuration is triangle and trapezoid.
Important! The corners should be as straight as possible.
2. Using a grinder, you need to cut out two blanks of the same size and shape, then sand them on the end and front sides.
Important! The angles of both plates must match.
3. The magnet is fixed between the workpieces and assembly is performed.
4. For assembly, you need to drill holes: for a triangular shape - three, for a trapezoid - five. Using bolts and nuts you need to assemble the product. The nuts must be screwed not only onto the end of the bolt, but also between the metal plates to prevent the product from bending when screwing in the bolts.
5. Bolt tails extending beyond the nuts should be cut off.
Important! Non-magnetic bolts or nuts should be selected. If these are not available, then you can use aluminum or copper tubes as end caps. This will eliminate the possibility of contamination of the magnet and its demagnetization.
6. It is recommended to check the distance between the corners again.
7. The magnetic corner is ready for use.
Torch holders
The burner holder has a more complex design, so it will be necessary to put more effort into making it yourself. The performer will need a magnet, fasteners: a non-magnetic bolt and nut, a 3-4 mm metal sheet.
The holder support can be of various shapes. The welder can cut a workpiece, the template of which will be similar to industrial models, and also develop an individual shape. It all depends on the ability to use the grinder, the assigned tasks and the imagination of the welder.
- It is necessary to cut a blank of the desired configuration from sheet metal and polish it from the end and front sides.
- At a distance of 20-30 mm. Bend the workpiece at a right angle from the bottom edge, then screw the product to the magnetic base.
- The tail of the bolt extending beyond the nut should be cut off.
- The device is ready for use.
Mass holders
The manufacturing process of the mass holder is simple. The welder will need a minimum of tools. The necessary parts may be at hand. Detailed and understandable instructions for any master are presented in a separate article. The video will help you visually study the process.
Welding mirror
Focusing on the purchased one, a DIY craftsman will be able to make a homemade magnetic welder mirror
To make a magnetic mirror for welding, the contractor will not need to cut metal. A magnet, a brass bendable rod 400-500 mm long, and a mirror whose dimensions do not exceed 100 mm must be available. On the one side; fasteners; hinged holder.
Using a hinged holder, the mirror is attached to a flexible rod, which is then attached to a magnet using bolts and nuts.
Is it worth buying?
The answer to this question can only be given by the master performing the work. For a novice welder who has just started his professional career, this device can make life significantly easier.
If a specialist works primarily with non-ferrous metals, a magnetic clamp will most likely not be useful.
Experienced workers have a set of various clamps for all occasions, including this device.
The cost of the device is quite high. If you have knowledge in the field of electrical engineering, you can try to make it yourself. The technology and manufacturing process will be discussed below.
Advantages and disadvantages
If we compare the magnetic terminal and standard clamps, we can highlight the following advantages:
- Reliability of fixation allows welding to be performed without distraction by adjusting the weight;
- Magnetic grounding tolerates voltage and temperature changes without consequences.
- The design has no moving parts that can break. Therefore, with proper use, the service life is unlimited.
- The magnetic terminal is convenient for working in hard-to-reach places and on curved surfaces on which it is impossible to attach a clothespin. For example, welding of large diameter pipelines. Even in compact models, the contact area with the metal is sufficient to create reliable electrical contact.
Advantages
Magnetic mass has many advantages. It can quickly be attached to any surface, even curved.
Its design is very simple. It does not deform, so it can be used for years without losing its properties. After all, in essence it is a simple magnet that works thanks to its magnetic field.
Such a terminal does not contain any other devices or parts, and therefore cannot break.
Changes in temperature conditions and voltage surges do not negatively affect the functioning of magnetic clamps. They rarely burn out and can be used in combination with different metals.
They will be especially convenient for cooking in hard-to-reach places or on curved surfaces. The magnetized mass provides a tight fit due to its coverage of a wide surface area.
How to improve mass clamping
A conventional mass clamp has a spring in its design. It allows the clothespin to perform its main function. But most often the spring fails. To extend the service life of such a clamp, it is only necessary to promptly monitor the condition of the current-transmitting contact on the clamp.
This contact is made of copper or brass. You always need to clean it of carbon deposits and also monitor the condition of the strip. In no case should it intersect with the metal to which the clamp is connected.
Also, to improve the clamping of the mass, it is enough to replace cheap jaws with expensive ones, which are made of copper, and not of copper-plated steel. To check whether it is really copper and not some alloy, you just need to use a magnet.
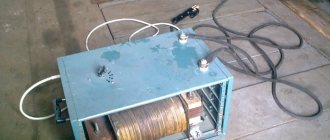
Secondary winding
For the secondary winding you can use copper or aluminum. The wire can be either single-core or consisting of several conductors. Section from 10 to 24 square millimeters.
It is very convenient to wind the coil separately from the core, for example, on a wooden blank, and then assemble transformer steel plates into a finished, reliably insulated winding.
General recommendations for selection
Consider the following nuances when choosing a mass clamp:
- Optimal weight of the connected wire. Otherwise, the welding work clamp may slip at the most inopportune moment.
- The maximum current supplied by the welder. If the terminal is designed for a lower amperage than the welding machine produces, burnout of the contact zone is guaranteed.
- Clamp opening angle. The larger it is, the wider the range of application, since thanks to it it will be possible to attach the mass to products of various sizes.
- Spring reliability. If compression is provided by a spring, the properties of this element must ensure reliable fixation on the working part.
Also pay attention to the popularity of the brand. Buy products only from reputable manufacturers to avoid counterfeit products.
DIY mass
Build the mass clamp yourself. To do this, take a magnet, two washers the size of the magnet, a bolt and a nut. Next, follow these steps: 1) drill a hole in the washer with a diameter similar to the size of the bolt head - this will be the contact washer; 2) grind off the top of the bolt to the thickness of the washer; 3) boil and clean what happened; 4) pass the bolt through the magnet and cover the latter with the remaining washer; 5) secure the end of the cable to the rod; 6) tighten it all with a nut. Spending a little time on a homemade terminal can save you a lot of money.
Weight per welding machine plus or minus
There are welders that operate on alternating current, and there are inverter machines that operate exclusively on direct current. Inverters have two output connectors: “plus” and “minus”. A wire with a holder is connected to one, and a ground cable with a clamp is connected to the other. In this case, the connection order can be changed to achieve different results during the welding process.
Straight polarity
To work in this mode, you need to connect the wire with the holder and the electrode to the “minus”, and the ground to the “plus”. With direct polarity, the part being welded receives a higher temperature, and not the electrode itself. Thanks to this, it is possible to weld the very root of the seam. Welding of thick metal also results in better quality.
Reverse polarity
To weld using this method, the cable with the electric holder and electrode is connected to the “plus”, and the ground for the welding machine is connected to the “minus”. In this mode, the highest temperature will occur on the electrode, and not on the product. Moreover, in this case the temperature at the tip of the electrode will be almost a thousand degrees less than when welding in direct polarity mode. This makes it possible to weld thin metals with minimal risk of burn-through.
Manufacturing
To make the simplest homemade magnetic mass you will need:
- Magnet from an old speaker (choose a medium-sized magnet, large ones are inconvenient, small ones do not hold well)
- Drilling machine or drill
- Furniture bolt and tap for it
- Hammer, chisel
To begin, take your already disassembled speaker and use a hammer and chisel to remove the magnet.
Source notperfect.ru
After tearing off the magnet, do not rush to disassemble it into its components.
As a rule, it is located in a special case, in which it is protected from impact and, by inserting a bolt, it easily turns into a convenient magnetic mass with something like a handle (bolt thread).
Attach a wire from the welding mass to the bolt, in this case the current passes through the magnet, and when working for such a long time, the magnet begins to heat up. When heated, it begins to burst.
To prevent this, take a magnet and use a drilling machine to drill a through hole in a plate with a diameter of 7 millimeters, pouring oil and removing chips from the hole.
Next, use a tap to tap the threads under the bolt.
Having done this, it turns out that the ground wire is connected to the bolt, current passes through it and is transmitted directly to the plate, bypassing the magnet. In this case, the magnet will not heat up and, accordingly, will not burst.
As you can see, the manufacturing process is very simple.
Next, simply clamp the bolt from the ground wire with a crocodile or attach the wire to the bolt itself and test your homemade magnetic ground from an old speaker.
Source notperfect.ru
The magnetic mass is ready with your own hands.
I recommend the following video, where the author clearly shows how to assemble a homemade magnetic mass:
Magnetic mass for welding. Advantages and disadvantages
Like everything else in the world, this device has both positive and negative sides. Let's look at the pros and cons of magnetic mass for welding. Some of the points below will only make sense in comparison to the clothespin.
Just a second, attention! Have you ever wondered why a semi-automatic welding machine fires? We answered this question to one of our colleagues...
Pros:
- Easy to use
- Can be used in places where there is nothing to attach a clothespin to
- Reliability of the hook - no need to be distracted, the mass is firmly fixed on the surface
- Unlimited use
- When securely fixed, the mass does not heat up
Minuses:
- Constant contamination of the magnetic surface with metal shavings and scale. Requires regular cleaning with a wire brush.
- The need for preliminary cleaning of the junction of the mass with the metal for tight fastening and to eliminate the possibility of heating the mass.
- A magnetic field. It is impossible to perform high-quality welding in close proximity to the magnetic mass. It's all about the magnetic fields that every now and then set the welding arc in motion...
- A serious drawback is that it is impossible to fully use the magnetic mass when working with non-ferrous metals. You understand why. Of course it can be used, but if you just put the mass on the welding surface.
As you can see, there are both pros and cons. But it normal! Many will find significant positive aspects for themselves that will cover the negative ones.
Magnet or clip
Typically, welding machines are equipped with a ground cable with a clamp-type holder. At first glance, it is convenient; such a device can be securely attached to almost any surface (sheets, rolled metal, etc.).
But there are situations when it is not possible to install such a mass on the workpiece or, even more often, it burns out. A good alternative would be the magnetic contact of the welding cable.
What are its advantages over a standard clothespin clip?
- This is an opportunity to attach the contact to almost any surface without much hassle.
- The simple design is almost forever in use and will not break, since there are no springs or mechanisms.
- Such a mass perfectly withstands voltage surges and loads, as a result of which it does not burn out.
- The large contact area ensures reliable closure.
But this type of contact fastening also has its drawbacks. The main disadvantage is that the magnetic mass for welding will not be installed well on small parts, for example, a rod or fittings. The second negative property will be the impossibility of attaching to welded parts made of non-ferrous metals: aluminum, copper and others. Also, over time, the magnet will become contaminated with metal shavings and will need to be cleaned periodically.
Without taking into account the last two factors, this is a rather convenient device that you can even make with your own hands at no extra cost.