When it comes to converting a battery to 18650 (for a screwdriver with Ni-Cd/Ni-MH or a household drive like a Tesla Powerwall), many manuals and instructions are silent about how to connect the batteries: soldering, welding or something else?
Not all connection options are suitable for durability and even safety. 18650.
Updated 02/04/2021. We propose to consider the correct and acceptable 18650 connection options with an emphasis on real-world consequences and engineering understanding of the processes. Thank you for your feedback in the comments here and on Ya.Zen—we have updated the article to reflect your experiences.
Is it possible to solder 18650 batteries?
It is forbidden ! This is the wrong approach. “ But if you’re very careful, it’s possible ,” is the approach in DIY communities. What is the catch, what should you be wary of?
When connecting 18650 batteries into a large battery (from laptops to vehicles), the task is to ensure reliable contact without losses, resistant to external influences (shock, temperature, and so on - depending on the purpose of application). Many lovers of DIY crafts consider soldering as one of the options.
Lithium-ion batteries (18650 and any other Li-Ion) when heated from a soldering station (or even a low-power soldering iron) are destroyed in their structure and irreversibly lose capacity!
That is, solder 18650 batteries unless absolutely necessary. Or you will have to put up with a change in chemical composition and deterioration in performance.
In addition, the solder connection is unreliable if the battery overheats. The method is also impractical for compact assembly due to random solder shapes and vulnerability to external influences.
Stripping terminals and wires
Both the alkaline or lithium battery itself and the connecting conductor soldered to it need preparation.
These procedures also include the preparation of the necessary consumables, including such important components as solder, rosin and flux mixture.
The most difficult and crucial moment of the upcoming work is stripping the battery terminal to which the connecting wire is supposed to be soldered. This procedure may seem simple only to those who have never tried to do this.
The problem in this case is that the aluminum contacts of power supplies (finger or other type - it doesn’t matter) are susceptible to oxidation and are constantly covered with a coating that interferes with soldering.
To clean them and subsequently isolate them from air you will need:
- sandpaper;
- medical scalpel or well-sharpened knife;
- low-melting solder and neutral flux additive;
- not a very “powerful” soldering iron (no more than 25 watts).
After all the specified components are prepared, the following operations must be performed. First, you need to carefully clean the area of the intended soldering, using first a scalpel or knife, and then fine emery cloth (this will ensure better removal of the oxide film from the contact area).
At the same time, the bare part of the soldered wire should undergo the same stripping.
Immediately after preparation, you should proceed to protective treatment of the terminals of a finger-type or any other battery.
What do professionals use to properly connect 18650?
You can achieve reliability and safety in assembling a battery from several batteries using professional methods. There are also unpopular approaches that have also proven to be practical and safe. Here's a complete list.
How to properly connect 18650 batteries:
- • resistance welding (spot);
- • using factory holders (holders - see below);
- • neodymium magnets (powerful eternal magnets);
- • gluing;
- • liquid plastic.
Professionals use the single most trouble-free method of 18650 spot welding - this method is recommended for industrial assembly of products, amateur DIY, and service repairs of consumer products. An example of budget spot welding for home use was discussed in detail on Geektimes.
Popular in the DIY community are rare earth neodymium magnets For long-term, compact projects, liquid plastic or even glue is best.
To quickly assemble a battery pack from several 18650 batteries, you can buy holders with a plastic case on Aliexpress . They cost only 60 rubles to connect a pair of 18650 , they are already equipped with factory pressure contacts that do not heat up in the connections. For manual soldering without fear of overheating, lithium-ion batteries are very convenient and compact for crafts.
Flux treatment
To prevent subsequent oxidation of the contact, the surface of the battery, cleared of plaque, should be immediately treated with a flux mixture made from ordinary rosin.
If, for example, there are no greasy stains from oils on the phone battery contacts, just wipe them with a soft flannel soaked in ammonia.
After this, you will need to warm up the soldering iron well and solder the contact area with a few quick touches. At this point, preparation for soldering can be considered complete.
Rechargeable batteries
It is better not to solder batteries, but to make a special container for them, in which the contacts of the elements will be in close contact with the polar contacts of the container. The material of the batteries consists of alloys that are even worse for soldering than conventional lithium ones. But if you really need it, then soldering is carried out as in the case of a regular 1.5 V battery, just use flux and not rosin. Plus, soldering should be done as quickly as possible, keeping the contact of the soldering iron to the poles to a minimum, since such batteries are afraid of overheating.
How to solder a wire to a battery: necessary tools and procedure
- In the case of flux, we treat the Krona contacts on opposite sides with acid. There we will solder the wires.
- In the case of rosin, you will need to tin the Krona contacts, also on opposite sides. Why from the opposite ones? Because in this case the risk of a short circuit between the wires is practically reduced to zero.
- The 9V Krona battery has very inconvenient contacts (poles) for soldering. At the top they open wider, and therefore for high-quality tinning and soldering from the side of such a contact, it is necessary for the soldering iron tip to be narrower or pointed.
What is needed for soldering
To reliably solder the wires to the batteries, you will need to stock up on some tools.
The task of soldering batteries to the poles will be somewhat more complicated than simply soldering two wires together, so you need to follow the recommendations described below. In the meantime, let's collect everything we need:
- Soldering iron. Its tip must be clean, and to clean it, you need a file or sandpaper.
- A sharpened knife. To rid the wires of the braid.
- Flux or rosin. In order not to think too much, we use soldering acid as a flux.
- Brush. For convenient application of flux.
- Solder.
Briefly about the main thing
Most modern models of screwdrivers are equipped with 3 types of batteries:
- Nickel-cadmium.
- Lithium-ion.
- Metal hydride.
Each of them has individual pros, cons and application features. All of them are a chain of cans connected in series. The failure of one of them leads to the inoperability of the entire battery. To identify the weak link, you need to perform a charge-discharge cycle and measure the voltage of each element.
The most common nickel-cadmium batteries are reconditioned by flashing and compression-compaction of the electrolyte. Lithium-ion ones can only be changed. In this case, replacing the batteries in the screwdriver battery is carried out by cutting out the old ones and soldering new ones into a common chain, followed by equalizing the potential through a series of “charging-discharging” cycles.
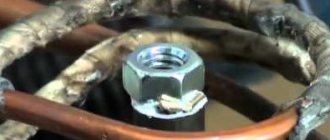
Solder the batteries
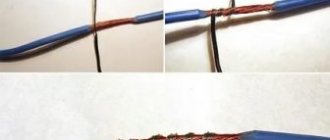
It can be done in different ways, for example with thick wires. I decided to solder some torn metal strip taken from old cans. First, I tinned the tapes in the places of future contacts on both sides. Then, using a well-heated soldering iron with a drop of solder, I tinned the battery contacts. But so that they do not heat up too much - let them cool. Then I pressed the tape to the contacts of the cans and soldered the tape, again without severe overheating.
The most difficult thing to solder is the negative terminals, but it goes very quickly. True, it is better to wash the flux later to clean the insides of the battery.
Now the most important thing. What batteries were used when repairing the battery of the Interskol DA-10/10.8 ER screwdriver, you ask? Well, I won’t hide it. These were the most Chinese of the cheap cans that the owner of the device honestly bought in the store. from Bailong with a fictitious capacity of 8800 mAh. This is of course a laugh and God forbid they have 2200 mAh. Judging by how long the screwdriver worked after the repair on a full charge. I would reduce this figure by half. But nevertheless, the screwdriver was urgently repaired and it makes the owner happy.
When assembling, do not forget to return the cardboard spacer between the cans and the board. This is so that fresh soldering does not short-circuit anything on the board.
This completes the repair and restoration of the lithium-ion battery of the Interskol DA-10/10.8 ER screwdriver. Almost all batteries from popular screwdriver manufacturers are repaired in approximately the same way :. This concludes my story about repairing a screwdriver battery. Ask questions in the comments. Better yet, in the corresponding thread on our forum or write to the Soldering Master personally by email.
Sincerely, Master Pike. Happy renovations!
Design and types of batteries for screwdrivers
Almost all manufacturers in all countries of the world produce batteries for screwdrivers that are identical in design and principle of operation. Many manufacturers produce batteries for several manufacturers of screwdrivers at once. The battery is removable and looks like this.
Battery from Bosch PSR 14.4 V screwdriver
Disassembling the battery is easy. The cover is held on by four screws. We unscrew them, disassemble the case and inside we see a garland of batteries connected in series.
In our case, this is a battery for a Bosch PSR 14.4 V screwdriver. It initially contains one self-tapping screw covered with plastic. If opened, the warranty will be void.
Battery assembly
"Garland"
Single cell
Since the batteries are connected in series, the total voltage of the battery is the sum of their voltages.
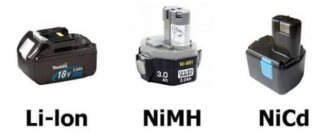
On each such element the values of the rated voltage and capacity, as well as the type of battery, are indicated. Ni─Cd batteries are most often used for screwdrivers, but there are other varieties. Below are the types of cells used in screwdriver batteries:
- Ni─Cd. Nickel-cadmium batteries. The nominal voltage of one element is 1.2 volts;
- Ni─MH. Nickel metal hydride. The nominal voltage of one element is 1.2 volts;
- Li─Ion. Lithium-ion. Nominal voltage 3.6 volts.
Types of elements for a screwdriver battery
Ni─Cd
Nickel-cadmium batteries for screwdrivers are the most common today. They have an affordable price, remain operational at low temperatures, and can be stored in a discharged state without losing their characteristics. At the same time, cadmium batteries for screwdrivers also have their disadvantages. These are the toxicity of cadmium (harmful production and difficult disposal), the “memory effect”, fairly high self-discharge and small capacity, a small number of charge-discharge cycles. Recycling car batteries is much easier than cadmium batteries.
Ni─MH
Nickel-metal hydride batteries are less common than nickel-cadmium batteries for screwdrivers. Their advantages include the absence of toxic components, environmentally friendly production, a slight “memory effect” and lower self-discharge than nickel-cadmium batteries. In addition, when compared with Ni-Cd batteries, Nickel-Metal Hydride batteries have a larger capacity and can withstand a greater number of charge-discharge cycles.
Additionally, we recommend reading about how to charge Ni─MH batteries. Disadvantages include high cost and sensitivity to negative temperatures. In addition, Ni─MH batteries lose some of their characteristics when stored in a discharged state.
Li─Ion
Lithium-ion batteries are less common in screwdrivers.
Among the advantages, it is worth noting the absence of a “memory effect” and self-discharge. The capacity of lithium-ion batteries is higher and the number of charge-discharge cycles is many times greater than that of nickel oxide batteries. In addition, the element has a higher rated voltage. Therefore, a smaller number of cells is required, which means that such batteries have less weight and size. Among the disadvantages, the high cost should be noted. When compared with Ni─Cd batteries for screwdrivers, the price of Li─Ion is almost three times higher. It is worth noting that over 2-3 years of intensive use of a Li-Ion battery, the battery significantly loses capacity due to the decomposition of lithium.
Battery design for a screwdriver
There is nothing complicated in the design of the battery. Its analysis was shown above. You just need to add information about the contacts on the case. The battery for the screwdriver has four of them (the Bosch PSR 14.4 V model is being considered).
Screwdriver battery contacts
The following contacts are marked in the image:
- 1 – plus;
- 2 – minus;
- 3 ─ thermistor contact (temperature sensor). A thermistor is needed to limit or turn off the charging current. It is triggered when the temperature of the battery cells increases to a certain value. During accelerated charging, a large current flows through the element and it heats up, and the thermistor prevents its failure;
- 4 ─ this contact is connected through a resistance and is called service. It is used by complex chargers designed to equalize the charge on battery cells.
Repair and replacement of battery components
When carrying out the procedure, another, more effective way to restore the performance of the battery is to replace the failed elements with serviceable ones. However, for this purpose you will need to purchase new banks or take them from another working battery. In this case, it is extremely important that the dimensions, as well as the electrical characteristics and type of elements being installed, coincide with those originally installed.
The procedure is carried out by cutting out old and soldering new elements into the chain. To do this you will need the following basic set of necessary consumables and tools:
- Wire cutters.
- Soldering iron.
- Solder or tin.
- A flux that does not give rise to a subsequent oxidation reaction.