Repairing a bumper is in many cases several times cheaper than buying a new one.
Almost any damaged plastic bumper can be repaired, although in some cases it is easier and cheaper to buy and install a new one. The bumper is the most damaged part of the car body. Most often, bumper damage is caused by parking errors, when the driver did not notice an obstacle or did not calculate the size of the free space. The bumper was originally conceived as a buffer to protect the car body from damage. Over time, the main function of the bumper began to provide the car with an attractive appearance. In our article we will talk about the types of damage to plastic bumpers, what materials bumpers are made from, the properties of these materials, we will describe all the main methods of repairing plastic bumpers, and we will provide step-by-step instructions for performing repair work.
Types of damage to plastic bumpers
Scratches
Scratches are non-through damage to the bumper surface in the form of grooves. Bumper scratches are divided into two types:
- superficial scratches
- only the paintwork of the bumper up to the primer layer is damaged. - Deep scratches
- damage grooves have a significant depth, and not only the paint layer and primer layer are damaged, but also the plastic of the bumper itself.
Don't take too long to remove scratches on the bumper; over time, they can turn into cracks.
Scratches on the bumper can be removed by sanding with sandpaper or a sanding machine. The surface of the bumper is sanded until smooth, then the surface of the bumper is puttied, primed and painted.
Dents
Dents are deformations of the surface of a plastic bumper due to local stretching of the plastic. Dents are formed due to strong mechanical impact on the bumper. Dents are often accompanied by scratches and cracks.
To remove the dent, the deformed part of the bumper is heated using a hair dryer or a gas burner. When the deformed section of the bumper softens, the dent is straightened, returning the bumper to its correct shape.
Cracks
Cracks are called through damage to the bumper, having different lengths and shapes. Cracks are the most common type of bumper damage. Cracks that are not repaired in time increase in length over time due to vibration. There are different ways to repair bumper cracks: welding with a hot air gun, gluing with fiberglass and liquid polymer, soldering in a metal mesh or metal brackets with a soldering iron. The choice of repair method depends on the material from which the bumper is made and the size and appearance of the damage.
Chips
Chips are end-to-end damage to the bumper with separation of individual fragments from the bumper. Chips most often appear along the edges of the bumper after a car collides with obstacles. The methods for repairing bumper chips are similar to the methods for repairing cracks.
What's the result?
Plastic is a universal material that is often used in everyday life. And although many people believe that it is better to throw away cracked plastic than to repair it, I disagree with this.
It all depends on what exactly is broken. If a small part has fallen off and will not be touched later, it is easier to glue it back on. If the damage is large (for example, a bucket, container, part of a motorcycle or car), it is better to solder it. In general, any soldering consists of three steps: melt the plastic, connect the parts and allow to cool. If necessary, use an additional plastic rod or reinforce with mesh.
Question
Write in the comments if you have ever had to repair plastic at home? What was used in the repair, how did it behave in the future?
Types of bumper materials
The bumpers of modern cars can be made of different types of plastic. Before starting repairs, to choose the correct repair method, you should determine the type of plastic. The easiest way to do this is by looking at the inside of the bumper, where the type of plastic used to make the bumper should be indicated with a letter code. In the absence of markings on the back of the bumper, the type of plastic can be determined by indirect evidence by testing a broken piece of the bumper. Experienced craftsmen determine the type of plastic by appearance alone.
The main types of plastics used to make plastic bumpers are:
- PP - polypropylene
, flexible and tear-resistant, softens when heated, burns with a clear flame, blue at the base and yellow at the top, does not form soot when burning, forms drops during combustion, when burning it emits an odor reminiscent of oil or wax, does not extinguish itself, does not dissolve in acetone. It can be welded well with a hairdryer, soldered with a soldering iron, the use of reinforcing material is not necessary. When welding and soldering, it is important to observe the temperature regime. Melting temperature 300℃, welding temperature 300-340℃, destruction temperature 350-370℃. - ABS - acrylonitrile butadiene styrene
, fragile, when bent the bend turns white, burns with flashes, an orange flame, smokes heavily, quickly passes from solid to liquid, very fluid, bubbles when overheated, smells like rubber when burning, does not extinguish itself, easily dissolves in acetone. It is welded with a hairdryer, soldered with a powerful soldering iron, gas torch, and glued together. Melting temperature 350℃, welding temperature 350-370℃, destruction temperature 380-400℃. - PA - polyamide,
when bent the bend turns white, burns poorly, with a yellow flame with a blue base, melts when burning, foams, emits a pungent odor of formic acid, extinguishes itself, does not dissolve in acetone. It is welded with a hairdryer, soldered with a powerful soldering iron, gas torch, and glued together. Melting temperature 400℃, welding temperature 400-440℃, destruction temperature 450-470℃. - PUR - polyurethane,
difficult to weld and solder, requires good reinforcement. It is welded with a hairdryer and soldered with a soldering iron with precise temperature control. It is important not to overheat the part. The melting point of polyurethane is 200℃. - PC - polycarbonate
, burns with a yellow flame, with flashes and flaming ash, emits a caramel smell when burning, and partially extinguishes itself. Melting temperature 350℃, welding temperature 350-370℃, destruction temperature 380-400℃. - PE - polyethylene
, burns with a clear flame, with a yellow top and blue base, forms drops during combustion and emits a smell reminiscent of stearin, does not extinguish itself. Melting point 270-300℃. - PVC - polyvinyl chloride
. It is welded with a hairdryer and soldered with a soldering iron. The seam must be reinforced due to the low strength of PVC. Melting point 300-400℃. - Fiberglass
- does not have any special markings; it is repaired by laying several layers of fiberglass cloth and impregnating it with polyester or epoxy resin.
Alloy Rose
To reduce the risk of overheating, Rose alloy can be used. It will help reduce heat to 120 °C. In this way, you can remove the part from dangerous and sensitive areas. Just add a couple of solder granules and a little flux.
After tinning the contacts, the part is easily desoldered. You need to carefully desolder the contacts; they can easily be damaged due to sudden movement.
The resulting solder must be removed from the board. It is very fragile and not suitable for use.
Methods for repairing plastic bumpers
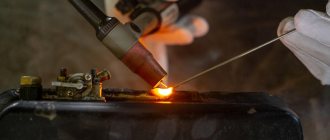
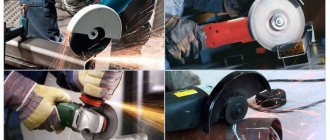
Welding a bumper with filler rods and a hair dryer
Welding a bumper using filler rods and a heat gun is the most durable way to repair plastic bumpers. During the welding process, when the filler rod and the bumper melt, a monolithic connection is obtained that is not inferior in strength to a whole bumper that has not been repaired. Welding the bumper with a hairdryer allows you to repair cracks and chips in the bumper.
For high-quality bumper welding, it is advisable to use a hair dryer (heat blower) with smooth temperature control and air supply control. For a hair dryer you will need a set of welding attachments. A welding nozzle with a nozzle with a diameter of 5-7 mm is best suited for welding plastic bumpers.
For welding plastic bumpers, special filler rods are used. Filler rods can be flat, triangular, or round in shape. The rods must be made of the same type of plastic as the bumper. If there are no rods, you can replace them with thin strips cut from another bumper, which should be made of the same plastic as the bumper of the car being repaired.
When repairing large cracks and holes, it may be necessary to use reinforcing material, which can be metal mesh or staples from a construction stapler. The mesh and staples are heated with a hairdryer and pressed into the plastic from the inside of the bumper.
When repairing a plastic bumper, heating to the required temperature is important. When heated to the plasticity temperature, the plastic can be given a certain shape and bent in the desired direction. When heated to the melting point, the plastic can be welded, connecting the parts together. When heated to the destruction temperature, the plastic hardens, but the weld contains plastic decomposition products and does not have the necessary strength.
Welding of a plastic bumper is carried out in the following order:
- the bumper is cleaned on both sides of the future weld to a width of 15 mm. The ends of the cracks are drilled to prevent their further growth. Using a Dremel with a cone attachment or a grinder, chamfer both sides of the future seam, so that a recess is formed in the form of a groove, into which the molten filler rod can then be placed.
- The crack or parts of the broken bumper are connected and fixed with special clamps, clothespin clamps or metal tape.
- Set the temperature on the hairdryer to about 300-350 degrees and warm it up for 5-10 minutes to stabilize the temperature of the hot air. At first it is better to set a lower temperature on the hair dryer, then if the rod does not melt, it is gradually increased.
- To facilitate the start of the welding process, the end of the rod must be sharpened. When welding, the rod is held at an angle of 45 degrees, pressing with force towards the seam. The hot air flow must be directed in such a way that not only the rod melts, but also the thin edges of the bumper at the seam site. The rod is melted and, under pressure, placed in the prepared groove.
- If necessary, welding can be done in two stages: first, the edges of the damaged section of the bumper are fastened using short seams (tack welds) along the entire length, then final welding is performed.
- To strengthen the weld without using reinforcing material, some craftsmen make transverse bridges from a filler rod on the inside of the bumper every 3–5 cm.
- The resulting seam should be smooth and rise above the surface to be welded. First, the bumper is welded from the inside, then from the front side.
- After welding, the bumper should cool down for 5-10 minutes; during this time, you should not check the weld for strength or make sudden movements with the bumper, all this can lead to damage to the integrity of the seam.
- After the plastic of the bumper has completely cooled, you should cut off any protruding bumps, and then sand the bumper using sandpaper.
Extruder Application
An extruder is a device for supplying filler material to the welding area. Its use greatly simplifies the welding process.
A manual plastic extruder looks like a gun combined with a heat gun. An filler rod is continuously fed through it, surrounded by a stream of hot air.
Extruders are divided into 2 types - non-contact and contact. In the first case, the nozzle is not immersed in the weld, and the pressure is provided by the pressure roller.
In the second case, the nozzle of the apparatus passes directly inside the weld, and this applies the necessary pressure. The extrusion method of welding plastic is the simplest, fastest and most reliable among all types of manual welding; it is second only to automatic and semi-automatic methods.
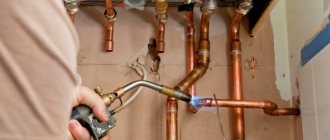
Soldering the bumper with a soldering iron
Using a soldering iron, you can repair cracks and chips on plastic bumpers. It is best to solder bumpers made of polyamide with a soldering iron; worse, those made of polypropylene; it is better not to repair bumpers made of ABS plastic with a soldering iron.
The soldering iron does not have the ability to adjust the power, so it is very difficult to maintain the desired temperature, which leads to overheating. It is very difficult to heat the plastic to the required depth and temperature with a soldering iron, which makes it impossible to obtain a homogeneous monolithic connection.
To solder bumpers made of polyurethane, polypropylene, polyvinyl chloride (PVC), use an 80-watt soldering iron. To solder bumpers made of polyamide and ABS plastic, use a 100-watt soldering iron.
When repairing a bumper made of thin plastic, if the damage site has uneven edges or is located at the edge of the bumper or has a difficult shape, then a metal reinforcing mesh is used for soldering. When repairing minor damage, instead of metal reinforcing mesh, you can use metal staples for a construction stapler, which are soldered in 2 cm along the entire length of the crack. Minor damage can be sealed without reinforcement at all.
Soldering a plastic bumper using a soldering iron is carried out in the following order:
- A patch is cut out of a metal reinforcing mesh, slightly larger in size than the damage on the bumper.
- The reinforcing mesh is soldered with a soldering iron into the inner surface of the bumper, connecting the torn edges of the crack. You should try to bury the mesh as deeply as possible into the plastic, but without damaging the front side of the bumper.
- Use a soldering iron to solder the seam on the outside of the bumper, covering the reinforcing mesh with molten plastic.
When repairing minor damage, when reinforcing mesh is not used, use a sharp soldering iron tip to make transverse notches every 1–2 cm on the inside of the bumper to preliminarily fix the edges of the damage, then use the flat side of the soldering iron tip to fill the remaining gaps and level the surface. Then do the same on the front side of the bumper.
Selection of welding rods
These elements play the role of electrodes. They are used for soldering sheet plastic, pipes, and polyethylene objects. The size of the rods varies, as does their shape. The diameter of round bars is 3-7 mm. Rods with a square cross-section are large in size.
Plastic welding rods can be made from a wide variety of materials.
To connect polymer products, 2 types of consumables are used:
- Polyethylene rods. They have a fairly low melting point. Used for welding products made of the appropriate material using a hair dryer.
- Polypropylene rods. The elements do not deform and do not lose their working properties during long-term storage. The products are used in the assembly and repair of structures made of sheet polypropylene. Electrodes made of this material are used in conjunction with extruders that melt them to a liquid state.
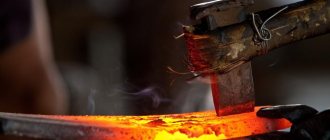
Soldering a bumper using a gas torch
Soldering a plastic bumper with a gas torch will not work because the temperature is too high, which can reach 1000 degrees. To use a gas torch for soldering, you must purchase a special flame arrester attachment, or use a Dremel gas soldering iron, where such an attachment is included in the kit.
Soldering with a gas torch is no different from welding with a hair dryer:
- a chamfer is removed from the edges of the future seam.
- A gas burner with a nozzle is brought to the weld area, the burner flame melts the filler rod and the edges of the crack, and the rod is pressed into the seam groove.
- After cooling, the seam area is cleaned and sanded.
Most craftsmen who repair plastic bumpers use a gas torch not for soldering, but as an additional tool for other methods of bumper repair, for example, for heating reinforcing mesh or staplers.
Educational program for beginners
To desolder a part from a board, you need to make sure that the contacts are heated until the solder melts (approximately 230 °C). The main mistake beginners make is to immediately heat the place where they are soldering to 300 - 350 °C.
For example, you need to desolder a microcircuit from a board using a Lukey 702 soldering station.
Many radio amateurs and electronics engineers set heating parameters above 300 °C.
At the first moment, the part is exposed to about 200 °C. The contacts and the surrounding area of soldering work are at room temperature.
The heating of the part reaches 300 °C, but the contacts have not yet reached 200 °C.
The microcircuit experiences a critical temperature of 350 °C. Meanwhile, the surrounding soldering area is heated unevenly, even if the hair dryer is evenly moved across the soldering area. A noticeable temperature difference appears at the contacts of the part.
400 °C and the microcircuit begins to fry.
A little more, and it will unsolder due to the fact that the contacts have practically heated up until the solder melts. But this happens because the board has warmed up. And in this case, it happened unevenly. High temperatures lead to thermal breakdown of the microcircuit and it fails. The board bends, turns black, and bubbles appear due to boiled PCB and its components.
This soldering method is very dangerous and ineffective.
How do you solder parts without damage?
It is necessary to analyze the soldering area and equipment:
- Estimate the thickness of the board. The thicker the board, the more difficult and longer it takes to warm it up. The board consists of layers of tracks, masks, pads and many metal parts that are very heat-intensive.
- What's nearby? To avoid damaging surrounding components, they must be protected from temperature. The following will cope with this task: thermal tape, aluminum tape, radiators and coins.
- What is the ambient temperature ? If the air is cold, the board will have to be heated a little longer. Of particular importance is what is located under the board. No need to solder on a metal plate or on an empty bench. A wooden board or a set of napkins works best. And at the same time, the board must be in the same plane, without distortions.
- Equipment. Many soldering stations are sold without calibration. The difference between the temperature shown on the indicator and the actual temperature can reach either 10 °C or 50 °C.
Gluing
Bonding with fiberglass and epoxy or polyester resin is used to repair fiberglass bumpers, and in some cases, to repair bumpers made of hard, refractory plastics. The disadvantage of repairing a bumper in this way is the low strength and fragility of the repair site.
The bumper is glued using fiberglass and epoxy or polyester resin in the following order:
- Clean the front and back sides of the bumper at the point of damage using fine-grained sandpaper 5 cm from the edge of the crack, chip or hole.
- Cover the damaged area with tape on the front side of the bumper.
- Degrease the edges of the damage on the back of the bumper.
- Cut several patches from fiberglass measuring 5 cm larger than the damaged area.
- In a plastic container, mix the resin and hardener in the proportions specified by the manufacturer, mix thoroughly.
- Apply resin to the damaged area on the inside of the bumper with a brush.
- Place a fiberglass patch over the damaged area and smooth it out.
- Apply resin and apply the next fiberglass patch, repeat until the thickness of the layer reaches the approximate thickness of the bumper.
- After the resin has dried on the inside of the bumper, remove the tape from the front side, smooth the edges around the damage and form a depression.
- Degrease the surface of the repair area on the front side of the bumper.
- Apply the resin with a brush, apply a fiberglass patch, and smooth it out.
- Repeat brushing the resin and applying fiberglass patches until you are level with the bumper surface.
- Dry the bumper completely.
- Thoroughly sand the surface of the bumper with fine-grit sandpaper.
Additional training
For additional training, you can try soldering various unnecessary boards from computers and smartphones. There are many SMD and DIP components on motherboards. Only long and hard hours of practice will help you develop your soldering skills.
Net
As an exercise, you can try soldering a grid of wires. The quality of soldering is assessed by the load on this soldered wire mesh. If the solder joints do not break under load, then the soldering is excellent.
Constructors
Radio designers are also a great help.
They teach you to understand electrical circuits and the intricacies of soldering. You should start with simple constructors, such as flashing lights or door locks. As your skill increases, you can increase the level of difficulty, reaching complex LED cubes.
Soldering with acid
Acid is used only as a last resort, when a heavily oxidized surface cannot be tinning. All parts, wires and connectors can be perfectly soldered without acid. More about soldering acid
putty
Puttying a plastic bumper is done to restore the geometry of the bumper and level its surface. The putty is applied to the area of the bumper where the damage is located, smoothed out, allowed to dry, then sanded using sandpaper. In most cases, putty is applied in several layers.
Colors
The popularity of silicone sealant has necessitated the expansion of its types and the emergence of a wide variety of variations in both composition and color.
Based on external characteristics, several can be distinguished.
- Colorless. Most often used in plumbing work, if you need to remove seams or connect elements. You can use it when installing new furniture in the kitchen, treating unprotected surfaces where moisture can get in.
- Colored silicone. It has a characteristic composition, thanks to which it does not stain later, therefore it is necessary to buy a product with a certain pigment. Most often you can find white, gray, beige, brown and other options on store shelves.
In addition, depending on the scope of use, there are a number of other sealant options.
Bituminous. With its help, you can cope with cracks in the base and foundation, eradicate damage to tiles and slate. Can be used on a wide variety of surfaces. This is a moisture-resistant option that is not afraid of temperature changes and has good adhesion.
- Sanitary. Used in rooms where there is a high level of humidity. A distinctive property is the presence of antifungal and antibacterial components.
- Heat resistant. Used in industry. The main purpose is the assembly of pumps, motors, furnaces, sealing heating pipes, and during electrical installation work.
Primer
Before covering the bumper with primer, it is thoroughly washed with water and allowed to dry. Then apply the primer, let it dry, sand the primer with 800 grit sandpaper. Wash the bumper again with water and then apply a second coat of primer. When the primer is completely dry, the bumper is inspected using a lamp; the bumper should have a perfectly flat surface.
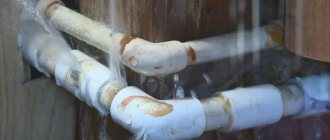
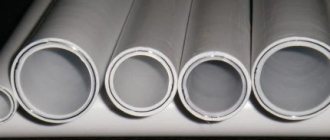
Installation of PVC pipes
Installation and connection of plastic pipes is much simpler than metal pipeline products and takes a minimum of time. PVC pipes can be joined by soldering using a PVC pipe soldering iron. This method does not require preliminary, special preparatory work.
Device for welding products
The welding machine for PVC pipes is designed for joining products to each other. It has a heating element into which special sleeves of the required diameter are installed. Thanks to the built-in indicator of the device, the heating temperature is controlled. The iron for PVC pipes operates from an industrial AC network.
Welding machine (iron) for PVC pipes
Warming heat is transferred to the pipes from pre-heated sleeves. They provide melting of the outer surface of the pipe to achieve the effect of molecular diffusion of the joined surfaces. The sleeves are coated with a special material (Teflon), thanks to which the molten pipe material does not stick to them. Work with the device is carried out only with special gloves to prevent burns.
Before the PVC material hardens after soldering, it is necessary to clean the surfaces from reflow residues with a rag or wooden spatula. After the connection has cooled, it will be problematic to perform this operation without damaging the surface of the pipe.
The connection of products can be carried out using one of the following welding technologies:
- Coupled, when the ends of the pipes for connection enter into an additional coupling.
- Bell-shaped, when one end of the pipe has a special extension for the end of another product to enter into it.
- Butt. This method is used to connect pipeline products with a diameter of more than 63.0 mm. Butt welding is considered the most effective and reliable. This joining method is also the most durable.
It is also worth noting the method of adhesive joining or cold welding of PVC pipes.
Equipment for butt brazing of large diameter pipes
Connecting PVC products using socket technology
Let's take a closer look at how PVC pipes are soldered using socket technology. For this method, when installing products up to 40.0 mm in diameter, it is enough to use a hand-held special device for welding products. If large-diameter products are to be connected, it is necessary to use stationary equipment for PVC pipes, which ensures their precise preliminary alignment.
To solder pipes you need:
- Securely install the welding machine on a horizontal surface. Ensure complete immobility of the device.
- The connected ends of the pipes must be cut with a sharp knife or special scissors strictly at right angles.
- Turn on the device and wait a while until the nozzles heat up to a high temperature (about 260ºC).
It should be remembered that at a lower heating temperature the strength and tightness of the connection is not guaranteed. If the couplings overheat, the structure of the pipe material will be destroyed, which will lead to a loss of its strength.
- Next, it is necessary to place the tubular products on the heated nozzles for a short time, until the end of the pipe, which is inserted into the socket, begins to melt. When connecting, it is necessary to monitor so that distortions do not occur.
The end of the pipe and the fitting are placed on the heated nozzles
- After soldering, ensure that the connected elements remain motionless for several minutes until the joint is completely solidified.
Thus, using a special tool, you can independently connect PVC products in a short time. The resulting connections are characterized by tightness and strength over a long period of operation.
Painting
Painting a plastic bumper is done in 2-3 layers, with drying between layers for 5-10 minutes. After the paint has completely dried, varnish is applied to the bumper in two layers. Intermediate drying is also done between two layers of varnish. After painting is completed, the surface is inspected; if paint smudges are detected, light sanding and polishing is performed.
Adhesive for polypropylene pipes
Polypropylene pipelines are easy to install, but only if the work technique is followed. In properly installed systems, the connections in which are created using an adhesive component, leaks do not occur for 30 years or more.
Transparent glue
However, some compositions are designed for communication with cold water, because high temperature affects their properties.
Characteristics
The adhesive for polypropylene and the plastic parts to be joined are similar in composition. The connecting substance is used in the installation and repair of water supply networks and sewerage systems. The connection of plastic parts occurs at the molecular level. This allows for sealed seams.
To improve performance, the following is added to polypropylene pipe adhesive:
methacrylate, which provides temperature stability; a special attachment that increases the strength and density of connections, which is important for systems operating under high pressure and in which there is a risk of water hammer; styrene butadiene rubber, which increases flexibility.
Adhesive substances differ in composition and interaction with plastic. Manufacturers produce thermosetting adhesives. They are based on epoxy, polyester or oligomeric resins. They begin to harden when exposed to temperature or thanks to a special hardener.
Adhesive sealant
Thermoplastic compounds are also produced. They are based on rubber resins. When heated, they become liquid, which allows them to fill all the voids. However, they cannot be used for gluing pipelines that move high-temperature environments.
Manufacturers produce single-component and multi-component polypropylene adhesives. The first type of substances are ready-made compounds. The second option is kits consisting of resin and hardener.
They may also contain filler. All components must be mixed immediately before use.
Manufacturers
Adhesives for polypropylene pipes are available in thick, liquid and semi-liquid states. Domestic and foreign products available:
- Liquid Nails LN 915 is a light semi-liquid adhesive for special purposes. The main component is synthetic rubber. The composition can withstand temperatures from -30°C to +60°C and is used together with a gun, as it is produced in cartridges.
- Moment is a multifunctional one-component adhesive-sealant. The basis of the elastic substance is rubber polymer. The semi-liquid composition hardens at room temperature and is sold in tubes.
- Dow Corning 7091 is a sealant for creating durable joints. The temperature for use of the one-component substance is from -55°C to +180°C. The composition can withstand exposure to aggressive environments.
- Cosmoplast 500 is a popular one-component adhesive. The liquid substance dries quickly and has a transparent structure.
- WEICON Easy-Mix PE-PP is a two-component adhesive. The basis of the universal connector is methyl acrylate. The composition has good adhesion.
During use and preparation of products, you must strictly follow the recommendations from the instructions. Any substance eliminates the need to use special welding equipment. Therefore, it is possible to reduce energy consumption when installing communications.
Main types of adhesives
If you need glue for plastic, you should know that it has two varieties: thermosetting and thermoplastic composition. The first one is based on epoxy, thermosetting and polyester resins. The second category of adhesives can be divided into two directions, the first is made on the basis of rubbers, while the second is based on resins.
Thermoplastic compounds soften materials and dissolve under the influence of temperature. If we compare them with thermosetting ones, they do not change their chemical structure when gluing, which is a significant advantage. Polypropylene adhesive can also be divided according to the number of components; such mixtures can be one- or two-component. The first ones are presented ready-made in one package. This includes “Moment” adhesive for polypropylene. And the latter are packaged in two packages, each of which contains ingredients for mixing. As an example of a one-component composition, we can consider Cosmoplast 500, which is used to connect profiles in window production. If you need a two-component composition, then you can use epoxy adhesive for plastic, which is made on the basis of a hardener and epoxy resin. Two-component adhesive has the advantage of a long shelf life. The reason is that before joining, the ingredients do not come into contact and no curing occurs.
Is it possible to solder plastic? What kind of “solder” is needed for this?
If you have studied chemistry, then remember that plastic can be thermosetting and thermoplastic... thermoplastic will be easy to solder, because when heated it softens, and when cooled it hardens, acquiring a given shape... for thermosetting it is necessary to select solvents...
you can use a simple soldering iron using a piece of the same plastic
Plastic is different from plastic. Which one and with what?
try dichloroethane!!!
Which one? Are there any symbols or letters on the sample? Different plastics are glued with different glues.
You take a construction hairdryer, heat it up and everything is soldered perfectly, the plastic melts and seizes to death.
Thermoplastics can be soldered and the joint can be well reinforced with iron wire for strength