Sometimes at home you need to make holes in blanks made of wood, metal, chipboard or other material.
And the presence of a screwdriver does not help and does not allow making holes strictly at an angle of 90, we are not talking about oblique holes at different angles.
To facilitate the processing of materials, a drilling jig is used.
These devices are widely used in the furniture industry.
[contents]
What is a hole jig?
In the article below we will talk about a hole drilling jig - a simple tool that will help you easily and accurately drill the desired hole in parts (or products) of both wood and metal.
What is it? This drilling device looks like an ordinary strip, in which holes of different diameters are made, and at different angles. It's easy to work with. All that is needed is to position the jig at the required angle to the surface to be processed, and it will serve as a kind of “guide” for the drill. As you might guess, such a device for drilling at an angle is simply irreplaceable in any furniture production workshop, but it can also be used at home.
Features of self-production
When designing a conductor for confirmation, it is necessary to correctly calculate what functions it will have to perform in the future. It should be done for the most commonly used fasteners in the house. If such a device is required by furniture makers for constant work, then it is better to buy a factory model, which is distinguished by great precision. In addition, manufacturers often include additional fasteners, stops and templates in the kit.
Design and types
So, we figured out that a jig is a template strip, the main purpose of which is to ensure accuracy when drilling holes in a variety of materials.
There are two types of conductors:
- A jig designed for drilling holes located perpendicular to the surface of the product.
- A jig made for drilling holes at an angle. It allows you to make a hole at the desired angle.
But this is a very rough and generalized classification. In fact, there are more types of conductors, differing in their design and purpose. In particular, the following types of these devices are distinguished.
Invoices
As you can easily guess from their name, such jigs are applied to the surface of the part or workpiece to be processed. They can be secured with special clamps or simply held with your hand while working.
Rotary
These are specially made templates that are intended for processing cylindrical workpieces. With the help of such jigs, it becomes possible to make not only perpendicular holes, but also to drill holes at different angles, since the rotating devices are equipped with special bushings that allow the jig to be installed at different tilt axes.
Universal
Here too the name literally speaks for itself. These drilling jigs are suitable for most types of work (except for specialized ones), so they are loved by workers in small industries, and even by those who do work at home.
Sliding
This type of jigs does not require their attachment to the surface in which the hole needs to be drilled. You just need to hold them with your hand (which can often not be very convenient).
Pinned
Unlike the previous type, such jigs are rigidly attached to the workpiece being processed. Although it is more convenient to work with, this type of device limits freedom of action.
Tiltable
And the last type of conductors is quite similar to the universal type. They are used when it is necessary to drill in different planes or at an angle.
A small device that solves a big problem. Conductor for furniture
Precise drilling. Even without markings. Even with the wrong drill. And even a drill with chuck beating. And all this quickly. I drilled about 200 holes, and not one of them turned out to be a hole. How is this possible? I'll tell you now.
I once bought a cabinet from Ikea. As the Swedes love, it was sold in a cardboard box, in the form of a stack of boards and a bag of accessories. Having quickly assembled it, I decided that these boards were not much different from furniture panels from Leroy Merlin, only they were cut to the required size and holes were drilled for fasteners - and the price was several times higher. At the same time, you can cut sheet material in the same Leroy, almost thank you.
Then we made repairs and for a long time could not decide where to install the washing machine. She didn’t have enough space in the bathroom, she wanted to free up the kitchen for more important things, she didn’t look right in the hallway... Now, if I hid it in a cabinet, that would solve the problem. But where can I get a cabinet with an internal size of 60 cm? It’s not sold ready-made anywhere, so I decided to make it myself. That first experience was not entirely successful. The cabinet was assembled using eccentric ties and confirmats (these are screws for chipboard). For an eccentric coupler, you need to drill two holes in perpendicular planes with intersecting axes. I missed the drilling a couple of times, the holes had to be drilled out so that everything would line up, and therefore there were backlashes. One hole came out completely through, almost drilling through the floor. Of course, I assembled the cabinet, but I realized that not everything is so simple. And when the machine spins, the cabinet bounces and rattles.
And then a new renovation broke out. This time it was necessary to build a mega-cabinet. It should be wide (more than 2 m), deep (76 cm deep), made of 21mm birch plywood, and most importantly, the lower part should not have a base. The idea is to roll cabinets on wheels into the bottom section of the cabinet. This greatly simplifies loading things into such a deep closet. Allows you to quickly roll out, say, a cabinet with tools and roll it to the repair site. Or a cabinet with books for a desk. And don’t run to the closet for every little thing. This is roughly what it should look like:
(doors and drawers/shelves are not drawn, but they will be there)
Of course, such legs will instantly move apart without being attached to a single base, and the cabinet will collapse. To prevent this from happening, the cabinet is mounted on the load-bearing wall of the house, and it bears the entire load. This removes the issue of the back wall. This will allow you to replace the flooring if necessary without removing the cabinet from the room. We simply roll out the cabinets, remove the lower part of the partitions, and the rest of the cabinet continues to hang on the wall.
All these wishes of mine, all together and each separately, scared off potential cabinet manufacturers. There are plenty of companies that make furniture, but almost all of them make cabinets from 16 mm chipboard, 600 deep, all according to more or less standard drawings, and the customer is only allowed to choose the color of the chipboard and the pattern on the door. So it became clear that I had to do all the work myself. But the old injury with the washing machine was making itself felt, and this time I decided not to leave myself any chance of making a mistake. The basic fastening elements of the entire structure are a double eccentric coupler and a screw with a barrel-shaped nut. This means that you will have to drill a lot and you need to drill accurately. Therefore, the hero of my review was purchased: a jig for drilling for an eccentric coupler.
There are many jigs for drilling the end of a board. There is a parallelogram type, there is a slingshot type (it takes a long time to explain, I don’t have my own photo, and they don’t allow someone else to attach it to the review, so you can find it on the Internet if necessary), in general there is a large choice. But I found only this jig that would allow me to drill two holes at once specifically for the screed. Let's see what they sent me:
Hard plastic case, foam lining inside and tools in bags.
Two wood drills for 8 and 10 mm, one forstner drill for 15 mm, limit sleeves for them, several dowels, a wrench for nuts, a hex key for fixing the limit sleeves, and the device itself.
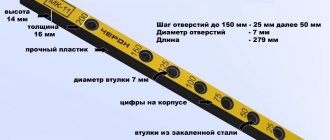
Here he is. The thing is quite weighty, made of cast metal, most likely cast iron. Fixed on the board with a screw clamp. With cheap clamps, the plate is held in place by the flaring of the screw; over time, it falls off or is pressed through, and the screw begins to scratch the board. That won't happen here. The plate is made of thick steel, it is smooth and even, and is fixed with a screw. Time has shown that it can even clamp a painted soft wood board without leaving any marks.
The maximum thickness of the clamped board is about 50 mm.
Two bushings are moved in the slots of the housing and secured with nuts. One for drilling 8 mm, from the end of the board.
The minimum distance between the axis of the drilled hole and the surface of the board is 5 mm.
Maximum - 37 mm.
The scale on the frame is engraved, i.e. will not be erased over time.
The end of the bushings is slightly recessed into the conductor body, literally by a fraction of a millimeter. This makes it possible to move the sleeve even when the clamp is clamping the board. Of course, to do this you need to loosen the fixing nut.
On the other plane of the jig there is exactly the same slot for a bushing for drilling 15 mm.
The minimum distance from the end of the board to the drilling axis is 21 mm. You can do less by simply installing the clamp not close to the edge of the board.
The maximum distance is 39 mm.
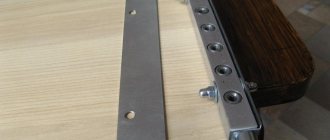
Well, let's start testing the device. First of all, let's try installing a double eccentric coupler. It allows you to join plywood almost imperceptibly. In addition, you can use them to make cross-shaped joints of plywood sheets. This is what the screed looks like:
We insert the eccentrics into the holes on the surface of the board, insert the pin into the hole at the end, connect end to end, turn the eccentrics so that they capture the ends of the pins, tighten, done!
Barrel screws - for T-joints. We drill 10 mm on one board, 7 mm from its end and on the surface of the other, insert a barrel into one hole, a screw into the other, connect, tighten, that’s all.
Yes, but how to drill 7mm? The sleeve fits perfectly with the 8mm drill, the 7mm drill hangs in it. I had an adapter for cutters from 1/4 inch to 8 mm on hand. And 1/4 inch is 6.35 mm. Already something. This is the adapter.
Adapter 6.35 - 8 mm for Ali.
Costs 100-something rubles.
It is made of hardened steel, fits tightly into an 8 mm sleeve and a 6.45 mm drill fits into it with virtually no gap. This is a drill bit for drilling holes for M8 threads.
Well, then drilling out 6.45 to 7 is a matter of technique. If you don’t lean on the drill at all, the hole will be drilled exactly along the axis of the previous one.
This is the combination I started using. Of course, it would have been easier to drill at 8. But I didn’t want to add extra play. For the sake of ease of partial disassembly of the cabinet, I had to abandon the dowels, and these pins, which, generally speaking, should only work in tension, will also be loaded with shear.
To get the hang of it, I started with scraps of plywood. I tried to connect three pieces with the letter T.
First, we drill with a forstner drill from the surface, so that later it is easier to remove chips from the deeper end hole.
Then we drill from the end.
We repeat the same thing with the second plank.
Here's what happened:
Quite coaxial.
Finally, we drill through the central plank. We collect:
As you can see, I only succeeded the second time. From the first I made a mistake with the size and drilled the holes for the eccentrics too close. Even when tightened the tightest, they did not provide sufficient compression of the boards.
The edges of all holes are neat. Now I have already made more than 60 holes with this forstner drill.
The drill is worn out, of course, but even now it doesn’t tear the wood fibers.
Here is one of the last holes:
I also drilled into already painted plywood, the edges were smooth.
The holes at the end are also excellent. Here you can see the installed eccentric in the depths.
The most important thing is that the holes are always coaxial. I inserted the drill and attached the GOST corner:
On another plane:
And this is what happened as a result:
I think this is the most critical jig for cabinet making. It will help not only make holes for eccentric fasteners, but also for barrels, confirmations, dowels, i.e. all the work for which, generally speaking, a self-centering jig is intended. But this one has more functionality due to drilling a second hole. So if you are not a professional and do not work in production line, this conductor is for you. Everything else that I need - cutting out holes for hinges and handles - can, in principle, be done without a jig at all.
Link to conductor
Now it costs something like 2000.
Materials from which conductors are made
There are many conductors that are made from completely different materials. There are even plastic and glass conductors.
However, the generally accepted opinion is that the best devices are made of metal (the best option is stainless steel).
This is not surprising, because a metal drilling jig can provide a number of advantages. Mainly among them, it is worth highlighting the clearest directionality of the drill, virtually no deformation, and also the fact that metal conductors do not heat up during operation.
Double-column conductors with mechanical clamp
Installation and securing of workpieces are similar to the previous one. The workpiece is clamped by lowering the top cover 1 using handle 2, locking in the lowered position with a cone lock.
| A | A1 | B | IN 1 | N | H1 | H2 min | WITH | C1 | C2 | d (additional deflection according to C) | |
| min | max | ||||||||||
| 75 | 170 | 120 | 155 | 60 | 90 | 40 | 145 | 75 | 125 | 38 | 13 |
| 105 | 215 | 170 | 215 | 90 | 130 | 55 | 200 | 110 | 180 | 58 | 16 |
| 140 | 120 | 240 | 290 | 125 | 175 | 70 | 265 | 150 | 250 | 70 | 20 |
| 185 | 350 | 320 | 380 | 170 | 230 | 80 | 330 | 200 | 335 | 85 | 24 |
Up
Advantages and disadvantages
The main advantage of conductors is that not even highly qualified specialists, but “ordinary” people at home can work with them. And they will produce clear and precise holes (both perpendicular and inclined).
You will not need to perform any calculations and markings, and this reduces how
labor intensity and work time.
The following advantages of using this type of device can be highlighted:
- The drilling jig is capable of providing perfect accuracy for both straight and inclined drilling.
- To use them, markings and preliminary scrupulous calculations are not required.
- Speeding up the assembly of furniture parts and other structures.
- The ability to drill several holes at a time without making preliminary markings.
disadvantages of drilling jigs ; to be more specific, there is only one: the rather high price of this device. That is why some carpenters make their own jigs.
Stands for overhead conductor with hand fastening
The workpiece can be installed directly on stand 1 or on an intermediate spacer. The overhead jig is centered along the mounting diameter dC3 of pin 2 and is held in place by a quick-release washer when fastened. The jig and the workpiece are secured simultaneously by lowering a finger connected through a helical clutch to the roller carrying the handle 3 .
Locking with a cone lock.
Dimensions in mm
| D | H | h | d (additional deactivation according to C) | d1 | b | |
| min | max | |||||
| 125 | 75 | 20 | 75 | 20 | 12 | 21 |
| 200 | 90 | 20 | 85 | 25 | 16 | 21 |
| 300 | 105 | 25 | 120 | 28 | 20 | 25 |
Up
Scope of application
Jigs designed for drilling holes are widely used in furniture manufacturing, but their use is by no means limited to this industry.
Let's take a closer look at where this useful device is used.
Furniture manufacture
When making furniture, it is constantly necessary to drill holes for accessories, fasteners, and fittings. After all, it’s enough to make a mistake with the hole by literally a couple of millimeters, and the cabinet or bedside table will turn out skewed during assembly. The finished product will have to be thrown away or it is unlikely to be sold.
Therefore, jigs are simply necessary in the production of furniture, because they “correct” the incorrect angle of the drill entering the part. Also, when assembling furniture, a jig for drilling holes for dowels or a template for drilling holes for confirmation has proven itself to be excellent.
Mechanical engineering
Here, jigs are used for drilling holes in a variety of workpieces made of various materials. Since everything is standardized in this industry, the slightest discrepancy in dimensions leads to rejection of the part. Therefore, there is simply no way to do without conductors in this area.
Construction
During any construction work, you always have to make holes in walls, ceilings, and fasten various parts. If you do not use templates, the drilling process will be delayed, since it is much more difficult to make holes in the walls or ceiling at exactly the right angle. Therefore, builders often use a jig to drill holes at an angle.
Serial or mass production
Mass production requires unification of components. Accordingly, conductors will come in handy here too. When using these tools, you are confident that all holes will be the same.
Household use
Every home needs repairs from time to time. In this case, you often have to pick up a drill and make holes in walls or furniture, and here, just like air, conductors will be needed.
Rock jig with mechanical clamp for drilling holes in cylindrical workpieces
The workpiece is mounted on prisms 1 and 2 . Supporting prism 1 is movable. To adjust to a given distance from the mounting end to the drilling center, use stop 3 .
- The workpiece is clamped by lowering the conductor plate.
- Locking with a cone.
- Dimensions of blanks: diameter 12-30 mm.
- The shortest length is 15 mm.
Up
Homemade conductors
Since drilling templates aren't exactly cheap, many people make their own. Yes, a jig for drilling holes with your own hands is not a fantasy, but a reality.
In order to make a conductor, you will need:
- drawing or diagram of the device;
- drill;
- welding machine;
- Bulgarian;
- locksmith tools;
- “blank” for the future conductor (reinforcement with a square section of 10x10 millimeters is good).
First, we cut the reinforcement with a grinder (a hacksaw is also suitable) into pieces of the required length, which are cleaned with sandpaper. Then marking of future template holes is done and their subsequent drilling. There are some nuances here. The centers of the holes should be marked 8 millimeters from the edge, the distance between the holes should be (according to generally accepted standards) 32 millimeters, and the diameter of the holes should be 5 millimeters.
At the end, we add a stop made of a metal plate (25 millimeters wide and 1 millimeter thick), bent at a right angle. We fasten all parts of the contraction together - and the jig for drilling with your own hands is ready.
Jig conductor with pneumatic clamp
Installation and securing of the workpiece is the same as in the previous jig. Pneumatic piston drive 1, together with the distribution valve, is moved to the side. Lifting and lowering of the cover 4 is carried out through the gearing of the column 3 with the roller 2 .
The clamping force at air pressure in the network piz=4 kgf/cm2 is 550 kgf.
Up
Stand for overhead conductor with pneumatic mounting
Installation of blanks is similar to the previous one.
Fastening the overhead jig - from a pneumatic drive.
The axial force on the pneumatic actuator rod at an air pressure in the riz network of 4 kgf/cm2 for a stand D = 190 mm is ~260 kgf, for a stand D = 315 mm — ~400 kgf.
Chapter 6. INSTALLATION OF REINFORCED CONCRETE STRUCTURES
The structures of frame-panel buildings have a relatively small installation weight.
Some of the internal walls act as stiffening diaphragms. The sequence of installation of the components of each tier (floor) and their final fastening should ensure the rigidity of the frame in any direction and the stability of all elements.
Each subsequent tier is installed after the load-bearing elements of the previous one are finally secured.
Columns one or two floors high are trussed with friction or frame grips, and frames with pins.
To temporarily secure columns whose joints are located above the floor level, conductors are used. These devices can be single - for securing one column, group - for four columns, and in the form of a set of group conductors, ensuring the installation of tier elements on a significant part of the building.
A single conductor is a spatial structure with three rows of cages. The lower collar wraps around the part of the column of the previous tier protruding above the ceiling, and the other two secure the column being installed. Using the adjusting screws of the upper cages, the column is brought to the design position during alignment. After the column is finally secured, the single conductor is separated into two parts and moved by crane to the installation site of the next column.
Group conductors, depending on the type of mounted columns, can be single- or two-tiered. They, like single conductors, have three to four rows of clips at each joint. The clips are mounted on a rigid spatial frame, equipped with a working floor for each tier and a railing. There is a staircase between the decks.
After final fastening of all elements in the conductor area, the clips are removed from the columns, and the conductor is rolled using a winch along special rails to a new section of the building. The conductor is lifted to the upper tier by a crane.
To increase the efficiency of installation of structures of frame-panel buildings, sets of group conductors are used - frame-hinged indicators (RSI)
). Each indicator consists of a floating hinged indicator frame with rotary and folding clips mounted on it for temporary fastening of the installed columns. Longitudinal and transverse rods with clamps fix the relative position of the set of frame-hinged indicators in plan. The spatial frame of the conductor rests on the ceiling or on the upper edges of the foundations when installing the columns of the first tier. The floating frame is the main working body of the RSH. Thanks to it, the indicator can be installed with a deviation in plan of up to 100. . 200 mm from the design position, and then align and fix only the indicator frame.
After installation, fastening and alignment of the RSH set, columns are mounted, the position of which in plan and vertically is fixed with a given accuracy by rotary and folding clamps of the floating frame. During installation, the column is brought by a crane to the corner stops of the RSHI and lowered onto the head of the column of the lower tier. The bottom of the column is checked according to the risks. To bring the top of the column into the design position and temporarily secure it, the edges of the column are pressed against the fixing edges of the corner stop using a steel rope and a tension device. After temporary fastening, the joints are welded. To make it easier for installers to work, rotating cradles are mounted on the spatial scaffolding of the RSHI, from which the joints of the frame are processed. The RSIs are rearranged after final processing of the butt joints of the columns, installation and fastening of other prefabricated structures that ensure the stability of the frame.
For temporary fastening and alignment of columns connected at the floor level, rigid struts or flexible connections with turnbuckles are used. The struts are installed in two mutually perpendicular directions, and flexible connections - in at least three.
The crossbars are mounted using cable slings with local or remote bridging. Due to their high stability on the supports, they are not temporarily fixed. The embedded parts are welded and the joints are finally sealed.
The slabs are lifted with four-legged slings, immediately aligned and welded to the crossbars.
In beamless floors, axial slabs are laid on the capitals, and liner slabs are laid on them.
For the installation of crossbars, capitals and first slabs, adjustable, mobile scaffolds or conductor scaffolds are used.
Wall panels of multi-storey frame-panel buildings are mounted with the same cranes as the frame elements.
For the installation of structures of high-rise buildings, attached tower or self-climbing cranes and frame-articulated indicators are used. Lightweight hinged fencing panels are installed using lightweight roof cranes.