Metal can be different. For example, copper is much more ductile than steel, and cast iron, although strong, is brittle. Therefore, drilling metal in each case requires an individual approach. Let's look at how to properly make holes in steel parts, including large diameter ones. And also how to expand an already made passage with a drill.
Drilling a hole in metal Source kovkingorod.ru
Tools required for work
On an industrial scale, special machines are used for drilling metal parts. In everyday life, a drill is used, both manual and electric. Moreover, the first is irrevocably a thing of the past, since such a tool is already inconvenient and unproductive.
Many home workshops are equipped with compact drilling machines. They differ from industrial designs not only in size, but also in performance. And the most practical option for the home is a special device in which an electric drill is attached.
Previously, such a stand could only be seen among folk craftsmen. Now it is sold in any hardware store. The convenience of the device is that it has a vice. The part is fixed motionless, and the cutting tool, clamped in the drill chuck, is fed to it strictly vertically.
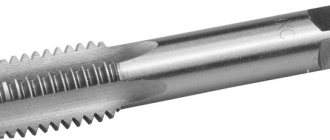
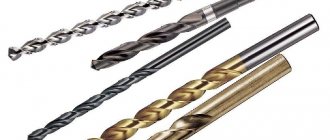
They make holes in the metal using special drills. And most often they are called drills. They have a cutting part, a shank and a working surface that removes chips from the hole. Cutting tools differ from each other primarily in diameter, length and shape.
Metal drills Source skladom.ru
Types of drills for metal:
- Spiral, as a rule, have a cylindrical shape. Their diameter can reach up to 80 mm, and the cutting edge is sharpened at an angle of 118 degrees.
- Conical ones are made in the form of a cone with a stepped surface. In addition to drilling holes, they are good at correcting defective passes that have already been made.
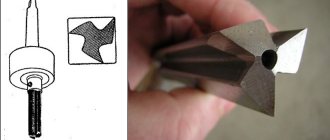
- Crowns are often called annular cutters. A hollow serrated drill can make a neat hole in the thinnest metal. The cavity in the bit also helps with deep drilling by allowing chips to pass through.
- The feather ones have replaceable working plates. With their help you can get the perfect hole by penetrating to great depth. Moreover, in metals of any strength.
Good drills are made either from cobalt or high-strength alloys. Typically, tool steel is selected for the base, and the cutting edge is either alloyed with cobalt, or carbide alloy plates are fixed to it. Cobalt drills are not afraid of high temperatures and can drill metal with the highest viscosity. Carbide tools are capable of self-sharpening during operation.
Drill with cobalt coating Source zakaz64.ru
How to drill in the right place?
If you think about this question a little, the answer should come to your mind even without a hint. Well, at least it seems so to me. But if you don’t want to think, then read.
For this case you will need a core. This is a tool made of durable steel, having a cylindrical shape and a point at the end.
We place the tip at the desired drilling location and hit the roll on the other side with a hammer several times.
Now that you have finished drilling, place a drill on the surface of the roughness and start drilling - the tip will not run away anywhere.
Drilling mode
To drill metal correctly, you need to select the desired rotation speed of the drill. The force applied to the drill also plays an important role. It is guided along its axis and ensures the depth of the cutting tool with each revolution. The correctly selected mode is easily determined by the chips. If the effort and speed are not exceeded, then it is long and beautiful.
There are simple rules for correctly selecting a drilling mode. The harder the metal that needs to be processed, the lower the number of revolutions the drill should have. This principle also works when selecting the diameter of the drill. The thicker the drill, the lower the cutting speed.
Dependence of drill rotation speed on its diameter:
- 5 mm – from 1200 to 1500 rpm;
- 10 mm – 700 rpm;
- 15 mm – no more than 400 rpm.
You also need to monitor the force applied to the drill. The deeper the immersion into the metal, the less pressure on the tool is necessary. Ideally, the pressure on the drill should gradually decrease during the drilling process.
Adjusting the speed of a drill Source ytimg.com
See also: Catalog of companies that specialize in the reconstruction and rebuilding of houses
How “depth” affects the choice of method
Most tool manufacturers consider any depth that is more than 3 to 4 times the diameter of the twist drill to be a deep hole. There are various fancy geometric shapes, such as parabolic flute drills, that will help you go deeper, but they also have a limit.
Here is a chart to help you choose the most suitable technique for drilling deep holes:
Hole depth
How to make the right hole
To drill a hole in metal, you first need to securely secure the workpiece. If the part has good mass, it is often enough to simply place it on a flat surface. Its own weight will not allow it to “slither” from side to side.
Parts of small dimensions and light mass must be clamped in a vice. If you first mark the future center of the hole according to the applied markings, then this notch will allow you to confidently start when working. The drill installed in it will no longer move to the side.
Through hole
From the lips of some masters you can hear the word “passage”. Because the drill completely penetrates the workpiece in its movement. In fact, this is the easiest operation. But special attention needs to be paid to the final stage.
When leaving the workpiece, the drill can not only damage the surface of the workbench, but also break itself from the impact. To avoid this, you need to do the following. Either place the part above the through hole in the workbench, or place a wooden spacer under it.
Through hole in a metal workpiece Source onarzedziach.pl
Also, a sharp exit from the part creates a hart (burr) on its reverse side. To prevent this from happening, it is necessary to reduce the drill speed at the final stage to the very minimum. This technique will help if you need to make a through hole in the metal, when the part cannot be dismantled and clamped in a vice. That is, drilling occurs at its location.
Blind hole
To ensure that the drill does not go right through the part, but stops at the required depth, two methods are used. A special stop is attached to the drill, positioning it at a given distance from the cutting edge. The device usually has the form of a sleeve.
Or the drill has a movable pin in the chuck area. It is clamped with a screw so that its end creates an emphasis on the workpiece. Not allowing the drill to penetrate deeper than the measured distance.
Drill with stop Source icover.ru
If a machine is used to drill a blind hole in metal, it usually has a ruler. Knowing the required depth, the operator stops the mechanism at the right moment. There are machines in which such an operation is fully automated. And the most serious inconvenience in such work is that it is periodically necessary to remove chips from the hole.
Working with some types of metal
- When drilling into thick aluminum pieces, chips often clog the drill channels, making it more difficult to rotate. Therefore, when working with such material, remove the drill from the recess more often and remove the chips. Well, don’t forget to pour plenty of oil on it.
- If you need to drill black cast iron, then you do not need to add any lubricating and cooling substances, since it drills very well even dry
- Unlike black cast iron, white cast iron has increased strength, which means strong drills and lubricants are required to process it.
These are the basic rules for drilling metal with a drill. I hope I was able to bridge this gap in your knowledge. Good luck with your homework and see you soon!
Safety and tips
Before drilling a hole in metal, it is necessary to ensure safety measures. First of all, you need to pay attention to work clothes. It should not contain elements that could get under the rotating parts of the tool.
During operation, chips can fly in different directions. It is necessary to protect your eyes from it by wearing safety glasses. Before drilling itself, check how securely the part is secured in a vice or how tightly it fits to the surface of the workbench.
The drill, approaching the surface of the metal, should already be rotating. This avoids premature dulling. Also, do not stop the drill while removing the drill from the hole. You just need to slow down. Otherwise, the tool will either jam or break.
When the cutting edge penetrates into the metal with great difficulty despite the applied efforts, this indicates that the hardness of the machined surface is much greater than that of the tool. You need to take a drill with a carbide tip. And set the drill to the lowest speed.
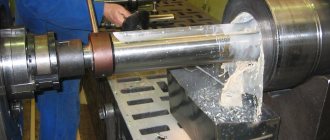
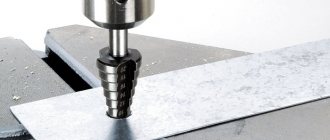
Features of large diameter holes
This procedure is more complex than deep drilling. Cutting work is carried out either using a crown or using a cone drill. Crowns for metal are similar to products for concrete and drywall. The only difference is the material used to create the cutting edge.
Drilling can also be carried out with standard products in several stages. To do this, first use a nozzle of small diameter. Then a larger tool is selected.
The most convenient way is to use cone drills. Such devices allow you to drill a large hole in one go. To do this, the tool is simply recessed into the material.
Read also: Sanding wood with sandpaper
Application of lubricants
When drilling holes in hardened metal, it is imperative to use a lubricant. It partially cools the work area, preventing the equipment from quickly breaking down. As a lubricant, you can use regular machine oil or special mastics for drilling. Proper lubrication treatment is as follows:
- The drilling area on hardened metal is marked with a core. Apply a small amount of lubricant to this point. If it is liquid, then squeeze out a drop of oil so that it does not spread.
- The cutting area of the tool is dipped into the lubricant and placed at the previously marked point.
- When drilling hardened metal, monitor the amount of lubricant and add it as it is used up.
- Monitor the heating status of the instrument, preventing it from overheating. Intensive smoke emission from burning lubricant indicates the need to stop work and cool the equipment and metal.
Introduction to Custom Deep Hole Drilling Cycles
Unfortunately, standard drilling cycles often have limitations when it comes to drilling very deep holes. It is often necessary to have an individual drilling cycle for deep holes.
How does a custom cycle differ from a regular standard drilling cycle?
First, there is the deepening strategy. It is important to be able to start with small steps and move to larger ones as the hole gets deeper. Making a full exit before the hole is deep is a futile movement. Ideally you should get down to a couple of diameters or so and then start biting. The penetration frequency should increase the deeper the hole is drilled. The nature of the movement should also change depending on the depth of the hole. We start with a small short step - just enough to break the chips. But as we get deeper, longer and longer runs are needed because we need to not only break the chips, but also make them easier to remove. Lastly, we want to make sure the twist drill doesn't come completely out of the hole so that the chips don't wash back into the hole.
Secondly, our serves and speeds. As the hole gets deeper, we benefit by reducing the feed rate and spindle speed. There is no need to do this until the hole reaches the threshold depth, but once we are at that depth it helps a lot.
Finally, while we are programming the custom cycle, we want to decide whether to use fast speeds or feed speeds for the peck and pull out of the hole. This is a reverse motion that doesn't cut anything, and we have the potential to save time compared to constant drilling cycles that keep all motions at feedrate.
By using custom g-code to implement all of these considerations, we spend as little time as possible going deep, ensuring that when the going gets tough, we've done enough to keep our tool intact. Although canned loops vary from controller to controller, very few offer the flexibility to manage all of these variables.
How to quickly drill through metal - Metalworker's Handbook
In the repair industry, the ability to drill correctly is one of the basic skills. In addition to the general rules, it is important to take into account all the nuances when working with a specific material: concrete, tile, metal, etc. All issues related to drilling will be covered in this article.
- Choosing an electric drill: which one is better?
- How to remove a drill from a hammer drill
As already mentioned, drilling is the most common activity for a repairman, and therefore it is important to immediately learn a few basic rules associated with this activity.
- Use of suitable tools. There are many drills, each of which is designed for a specific type of material. Therefore, you should not try to drill concrete with a wood drill and vice versa. It is also important to consider the conditions in which the tool will be used. For example, industrial drills cannot be used for interior repairs (this is simply unsafe). It is also important to take into account resistance to moisture: for outdoor work you will need a tool of class IP34 if the climate in the area is humid and IP32 if you have to work in good weather. IPX2/ can be used indoors
- Correct markup. Before starting any work, it is important to carefully and accurately mark the drilling locations with a marker. You can also put paper tape under the marker to prevent the drill from slipping on the material.
- Selecting the required drilling speed. Here everything depends equally on both the material and the diameter of the blade. If we are talking about very thin drills (with a diameter of less than 3 mm), then you need to work at low speeds, less than four hundred per minute. For other drills, the following rule applies: the thinner the drill, the higher the drilling speed required.
It is also important to ensure that the handle is securely attached to the shaft of the hand drill. The drill must also not be allowed to skew.
How to drill metal correctly + ()
The first thing to start with is the selection of drills. They are distinguished by a sharp edge designed to allow the drill to easily penetrate the metal. Regular metal drills are good for not too hard metals like copper or aluminum, but for something harder (for example, stainless steel) you need to take products made of titanium carbide or chrome-vanadium alloy.
We should also talk about optimal speeds. A common mistake beginners make is using too many turns. In fact, for hard metals, medium speeds are used: for example, brass one centimeter thick will be optimally drilled at a speed of 2000-2500 rpm.
There are a few more points to cover. So:
- If a thin iron plate needs to be drilled, it must be secured between two pieces of wood. This is done so that the sheet of metal does not tear off.
- It is necessary to use lubricating oil from time to time to cool the drill and facilitate the drilling process.
- If you need to make a hole in the pipe, it must be securely fastened. To prevent the pipe from being flattened by the drill, a piece of hard wood should be placed inside.
If you follow these simple rules, then even a beginner will be able to perform high-quality drilling.
How to drill concrete walls + ()
In everyday life, you have to drill into walls most often, because without this it is impossible to hang a shelf, a cabinet, or install a cornice. Of course, it is better to use a hammer drill or impact drill for this purpose.
These tools are powerful enough to handle hard materials like concrete or brick. However, if the wall thickness does not exceed 10-12 cm, then you can get by with a regular drill.
https://www.youtube.com/watch?v=ZjueKzIhTVs
But you shouldn’t take risks if you only have a low-power tool at your disposal - if it comes into contact with concrete, it can simply break. If the drill is selected correctly, then the following tips will be useful:
- Before starting work, you should make sure that there are no pipes or other communication systems in the drilling area.
- The drills used for such work must be made of hard metals or alloys. The best option would be diamond-coated drills.
- If during drilling you come across too dense areas of concrete, they need to be punched out using a small hammer and a pin (punch).
Although it is generally possible to drill through a concrete wall with a drill, it should still be done with caution. Otherwise, the damage can be quite serious. It is better to use specialized tools for this.
How to work with tiles using a drill + ()
Often people who do not have extensive experience in the field of repairs are afraid to drill into such a fragile material as tiles. However, this can become an urgent necessity, because you need something to attach various cabinets and shelves in the kitchen, bathroom or toilet.
Alas, in many respects the condition of the tile after drilling is determined not by the master who takes up the drill, but by the one who laid the tile. A competent tiler lays the tiles so that no voids form between the tiles and the wall. In this case, careful drilling will not harm the tile in any way.
If there are “air pockets” between the wall and the tile, then most likely the tile will crack.
In order to properly drill through the tiles, you need to take a drill, masking tape, or a hammer drill (or a powerful drill with drill bits for concrete). Next you will need to perform the following steps:
- The drilling location is marked with a piece of masking tape and a marker. The tape is here to prevent the nail from sliding on the surface of the tile.
- Drilling is carried out strictly perpendicular to the material. The number of revolutions should increase gradually: from the minimum possible to 150-200 revolutions per minute. This way you can avoid damage to both the material and the tool.
- It is important to ensure that the drill does not overheat. If smoke starts coming out, the drill needs to be cooled down immediately.
Once the holes are made, you can insert dowels into them. This is done with a hammer.
Drilling cast iron - how to do it correctly + ()
Cast iron is a fairly hard material, so drilling it is very, very difficult. In addition, cast iron products are fragile, so it is important not to crumble them. Like other materials, cast iron has its own subtleties when it comes to drilling.
- There's no rush. This is perhaps the most important rule when working with cast iron. Everything must be done slowly, with extreme care and attention.
- The drill must be made of a very hard and durable alloy, in addition, it must be perfectly sharpened. To prevent cast iron from crumbling, you need to take drills with an angle of 114-119 degrees.
- It is unacceptable for the drill to overheat. Sometimes they don’t pay attention to the fact that the instrument is overheated. And this can lead to poor quality work or even breakdown.
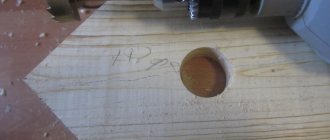
How to carefully drill through wood + ()
Wood is one of the “easiest” materials when working with a drill. However, there are some subtleties here too.
- The drilling speed directly depends on the type of wood. Loose, not too hard types of wood will be suitable even for a low-power device. Of course, the expected diameter of the hole also plays a role - the larger it is, the more powerful the drill is needed.
- In order to make large holes, you need to use special core drills. Their diameter can exceed 120 mm. As for depth, on average crowns are suitable for materials up to 20-22 mm thick, but there are also special models that can cope with thicknesses of more than 60 mm.
- If you need to make a blind hole rather than a through hole, then Forstner drills, which are available in diameters from 1 to 5 cm, are perfect for this.
We should also talk about drilling timber. Although it is convenient to fix it for further drilling, the large thickness of the material creates certain difficulties. Drilling timber for further fastening in the dowel holes. For a standard beam 18 cm thick, it would be best to take a drill with a diameter of 25 mm and a length of 36 cm.
You will need to drill slowly, at low speeds. In terms of power, a 1300-1500 W drill is perfect. If the beam is not very long, then two holes on each side will be enough. If the length of the beam for the dowels is long enough, then it will be necessary to make an additional hole in the center.
After the holes are made, you can drive the dowels into them using a hammer or small sledgehammer.
At what speed should you drill?
One of the important parameters when drilling is the number of revolutions per minute. The speed at which you need to drill depends on the type of material and the type of drill. There is a general rule: the harder the material and the thicker the joint, the lower the number of revolutions per minute should be. As for the specific numbers, they can be seen in the table below.
| drill diameter, mm | soft wood | solid wood | plastic (acrylic) | copper | aluminum | steel | Notes |
| 1.5-4.8 | 3000 | 3000 | 2500 | 3000 | 3000 | 3000 | When drilling metal thicker than 3 cm, lubricate the drill thoroughly with oil. |
| 6.4-9.5 | 3000 | 1500 | 2000 | 120 | 2500 | 1000 | |
| 11.1-15.9 | 1500 | 750 | 1500 | 750 | 1500 | 600 |
How to drill concrete, metal, tile and wood
Drilling a hole in the wall may seem like a piece of cake.
However, if you choose the wrong tool for a particular surface material, the drill may become dull or even break, and scratches and cracks may appear on the surface.
To prevent this from happening, you need to know certain nuances of doing the work. How to drill, how to properly prepare the surface and select a drill, we will consider further.