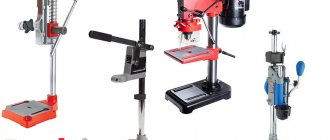
We'll tell you how to make your own budget drill stand for a drill at home. We offer 3 different options.
This device will be useful for home craftsmen who cannot afford to purchase a drilling machine.
At the same time, in some cases the stand benefits from its compactness and mobility.
If you make a small rack that does not require installation on a desktop, then it can be easily transported by car (take it with you to field work).
Unlike the same drilling machine, it will allow you to drill holes in both vertical and horizontal planes (for example, if you need to drill a hole in the wall).
To make a stand for a drill with your own hands, we will use inexpensive and accessible materials. Moreover, the stand can be used not only for a drill, but also for a screwdriver.
The purpose of a homemade stand is the same as that of a drilling machine - vertical drilling of holes at an angle of 90 degrees relative to the workpiece.
Using an electric drill or screwdriver it is not always possible to drill perfectly straight holes. A homemade stand (even of the simplest design) can easily solve this problem.
Of course, you can buy a stand for an electric drill at a hardware store or order it online. But if your goal is to save money, it will be more profitable to make it yourself.
Manufacturing instructions
In principle, the assembly of almost any drill stand follows the same pattern.
After the frame has been selected and the corners have been attached to it, if necessary, the support for the rack is fixed to it. At the next stage, the stand itself is connected to the base using screw connections. Then each guide must be mounted on a stand, which is convenient to do using furniture fasteners. It is important to mention that the guides must have no lateral play
The dimensions of the carriage depend on the size of the drill. The drilling device can be secured using two methods. Firstly, these can be clamps that will pass through specially drilled holes in the carriage. To securely fasten them you will have to tighten them very tightly.
Secondly, the device is secured using a special block - a bracket.
It is usually made from a wooden plate, attached to the base carriage at an angle of ninety degrees and reinforced with metal corners. In the block itself it will be necessary to make a circular cutout for the drill, the diameter of which is half a millimeter smaller than the diameter of the drill, as well as a slot to secure the drill in the hole. The hole is created either with a cylindrical nozzle or by following simple instructions. First, the diameter of the drill is measured and a circle is drawn on a wooden plate. Next, several holes are made along the circumference from the inside. The gaps between the small holes are cut off with a file or a special tool, and the resulting hole is processed with a file.
The latter can either be docked with the handle, or placed separately at the bottom of the carriage using special grooves. In the second case, when the handle is pressed, the carriage with the fixed device moves down, and the workpiece, accordingly, is drilled. At this time, the springs store energy, and when the handle is released, the carriage will return to the top.
Practical advice
Since drilling is often carried out at the edge, the frame should be fixed with a clamp on the workpiece being processed.
When working with soft materials, they must be protected from damage. To do this, the base of the frame is covered with self-adhesive felt or soft crepe tape.
Round parts, especially small ones, often go sideways during initial drilling; this is no longer possible when using an attachment. A plastic insert with a saddle or a profiled sight on the frame reliably holds the workpiece exactly in the center of the drill.
Finished surfaces or soft materials must be protected before working with the attachment, otherwise scratches will remain. To do this, we recommend using self-adhesive felt to cover the working surface of the bed. It is also easy to remove.
These articles may also be of interest to you:
- Lathe attachment - a lathe made from a drill
- Attachments, nozzles and accessories for drills
- Drill - more than drilling
- Ways to Prevent Through Drilling
Manufacturing algorithm
Considering that home machines will be interchangeable in terms of the type of processing, and the decisive role will be played by the attachment installed in the drill, we will consider two main options for home-made units - horizontal and vertical.
The procedure for assembling a vertical machine is as follows.
- Cut a square base 50 by 50 cm from a piece of metal or wood, with a thickness of 10 to 20 mm.
- Drill a hole in it exactly in the center at a distance of 1-2 cm from the edge for mounting the stand. The diameter of the stand must be at least 5 cm.
- Install the stand, center it using a level and weld it with a welding electrode. If you are making a wooden machine and the stand will be wooden, then firmly fix it with self-tapping screws.
- Using metal clamps, secure the drill to a movable element that will be put on the stand, forming a lowering/raising spindle.
Place the spring on the strut. Its length must be at least 2/3 of the rack. Having placed the drill on the stand, mark the place where the drill will hit when lowering the spindle. According to this place, cut two through hollows in the frame crosswise. A table is installed in the groove on the threaded pin on which the workpiece will be mounted. A nut is screwed onto the pin from the bottom side; it will fix the table in the desired position.
You can also attach the table to the pin from the outside with a nut, recessing it into the surface of the table so that it does not interfere with the placement of workpieces. It is important that after securing with a nut, the length of the outer part of the pin is flush with the top surface of the table.
The assembly algorithm for a horizontal machine looks like this.
- Cut a rectangular frame - dimensions are determined individually.
- At one edge, secure a seat for a drill with a hollow in the upper part corresponding to the size of the tool.
- Secure the drill to it with a clamp.
- Cut a through groove for the pin along the frame, and install two metal corners along the edges along which the pressure sleeve will move.
- The width of the pressure sleeve must exactly match the distance between the guide angles (runners). A threaded pin is screwed into it from below, which will move in the hollow.
- By moving the sleeve close to the drill chuck, determine the place where the special headstock will be installed for fixing the workpieces.
- Attach the headstock to the bushing with a metal cone-shaped pin placed in the center.
- The sleeve is fixed in the desired position (for clamping the workpiece) with a nut screwed onto the pin from below.
In both options, it is necessary to provide special adjustable legs for the frame.
If the bed rests flat on a workbench or table, it will become impossible to adjust and fix the clamping sleeve on a horizontal machine or the workpiece table on a vertical one.
Review of the best models
Rating of the TOP 5 best stands for drills for vertical drilling in terms of price and quality ratio.
Stand CALIBR 96202
If you are thinking about a rack, we advise you to take a closer look at the CALIBER 96202 rack. You will have to look for such a compact, light and cheap model.
Of course, it cannot replace a full-fledged drilling machine, but it can help in solving some problems. The diameter of the pipe is 25 mm.
There are no rollers in the design, but there are 3 holes for the size of the pipe in a pair of parts.
The manufacturer strongly recommends lubricating all rubbing parts and threads of the clamps with oil - the design will work without jamming.
The clamp on the pipe should be tightened a little, then no traces (let alone deformations) will remain.
The drilling accuracy is decent, the guide is of high quality, and the clamping insert is made of silumin. The country of origin is China, while the homeland of the brand is Russia.
Specifications:
- stand height: 400 mm;
- weight: 2.05 kg;
- pipe wall thickness 2 mm;
- clamping hole diameter: 43 mm;
- drilling depth: 60 mm.
Advantages
- budget;
- assembly is simple;
- practical;
- quality materials;
- acceptable stand height.
Flaws
- a little loose;
- configuration required;
- silumin in the composition.
Stand DIOLD SMS-43
A convenient and durable stand for drilling machines can be used both as a mobile and as a stationary device for fastening hand-held structures with a mounting neck diameter of 43 mm.
Thanks to it, you can do drilling work on plastic, metal, wood and other materials, namely, make both through and blind holes of high precision in workpieces.
The maximum depth of such a hole will be 85 mm. The vice is made of aluminum.
A metal holder with a screw makes it possible to fix the desired workpiece in a convenient position.
The stand can be adjusted in height using a lever that allows you to lower and raise the tool. The spring ensures easy return of the tool to its original position.
It is allowed to use a drill with a sleeve diameter of 43 mm. The user manual is clear. The stand weighs a little. Production - Russia.
Specifications:
- weight: 2.5 kg;
- bed surface dimensions: 150×170 mm;
- stand height: 550 mm
- maximum size from the frame to the journal mounting diameter: 250 mm;
- Maximum spread of vise jaws: 65 mm.
Advantages
- equipment;
- Ease of use;
- simple assembly;
- light weight;
- metal holder.
Flaws
- not suitable for professional work;
- guide play;
- high price for such quality.
Stand Wolfcraft 4522000
Inexpensive, but needs an addition for the drill. Helps you drill precise point and corner holes in almost all positions (on the wall, overhead, on inclined planes and round materials, baseboards and various types of profiles).
If you connect a construction vacuum cleaner, there will be no dust flying around you at all. A straight stop is provided for serial drilling along one line.
An additional handle helps to point the drill more accurately and also avoid slipping when drilling.
There are 4 holes at the base of the plates, there is a V-shaped groove for fixing round parts.
The drill can be stored in the handle, which is very convenient. The depth limit stop is continuously adjustable.
There is a rotating guide of 2 posts with a scale for precise drilling up to +/- 45°. The bore diameter fits most standard drills.
Country of manufacture: - Germany, warranty is given for 10 years.
Specifications:
- clamping device: Ø 43 mm;
- maximum strut travel: 150 mm;
- landing diameter: 43 mm;
- height: 295 mm;
- diameter: 140 mm;
- weight: 1.55 kg.
Advantages
- rubber buffers for stable fixation on smooth surfaces;
- device for connecting a vacuum cleaner included;
- no slipping when drilling;
- depth limiter;
- groove for fixing round parts.
Flaws
- cannot be used as a cutter with an overhead spindle;
- backlash;
- price.
Stand Wolfcraft 5019000
The stand for angle machines with disc diameters of 115 mm and 125 mm is the ideal solution for stationary work with your tool.
The platform is not large in size, but massive and convenient to cut on.
As a result, the user receives high-quality perpendicular cuts of the profile pipe with minimal effort.
The box contains detailed instructions in Russian with step-by-step pictures and diagrams. The platform is made of cast iron.
Keep in mind that the plastic casing does not fit together with the original casing from the angle grinder and you need to choose one thing. And instead of the standard handle for lowering, it is better to install a handle from an angle grinder.
The kit includes 3 types of screws for securing the angle grinder into the standard holes for the handles: M6, M8, M10.
Specifications:
- pharynx width 100 mm;
- overall dimensions (LxHxW): 240x260x190 mm.
- table area: 203x307 mm;
- working height: 330 mm.
Advantages
- disk saving;
- compact dimensions;
- price;
- metal;
- detailed instructions.
Flaws
- curved plastic casing;
- inconvenient adjustment and lack of a protractor;
- play at some connection points.
Dremel 220 stand
A mobile and compact stand that copes with its task - accurately drilling holes - without any complaints. You can safely buy it for homework.
It assembles quickly, but you need to take into account that during the first assembly the plugs from the rack are not immediately removed.
The machine moves in two planes, down and up, and rotates 90 degrees to the right and left. Some parts of the clamp are made of plastic, the silumin frame is thin.
The machine is ideal for drilling printed circuit boards.
Depth markings for easy selection and fixation of depth, ruler in centimeters and inches, storage of attachments - directly on the tool.
Specifications:
- Max. stroke: 50 mm;
- length: 15.2 cm;
- width: 15.2 cm;
- depth: 30.48 cm.
Advantages
- convenient shaft lock button for unwinding the chuck;
- miniature;
- affordable;
- Possibility of vertical drilling or drilling at an angle;
- step adjustment of 15 degrees.
Flaws
- small backlash of fastening screws;
- sticky fastening of the guide in the frame;
- fragile plastic construction.
Main elements of the rack
A stand for a drill, which is not at all difficult to make with your own hands, allows you to use this hand tool to perform various technological operations. The functionality that such a drill machine has is limited only by the power of the hand tools used to equip it.
Diagram of one of the options for drilling stand design
If a homemade stand for a drill is made only in order to perform only drilling operations with its help, then its structural elements can be made from wooden blocks. If you are interested in a mobile drill stand, which is highly versatile, then for its manufacture you must use structural elements made of steel. Such drill stands consist of the following structural parts:
- a supporting frame on which all the necessary elements of the machine are mounted;
- racks are a guide for the drill, on which it is fixed and moves together with the carriage in the vertical direction; This movement is controlled by a special handle and a number of additional elements;
- handle - an element that controls the vertical movement (feed) of the drill and the tool fixed in it;
- additional components designed to make the drill attachment more functional.
According to the drawings below, you can assemble a rack like this:
Drawings of rack parts (click to enlarge)
A homemade drill holder is an easy-to-install device, and equipping it with additional components allows you to turn such a drill holder into universal equipment with which you can perform various technological operations. Before you start making such a holder for a drill with your own hands, you need to understand its design features.
Advantages and disadvantages
Regardless of brand or price range, all stands are designed to simplify the drilling process, so their main advantages include some specific characteristics.
- Significant expansion of the range of capabilities of the operated tool. A high-quality stand, for example, allows you to mill surfaces.
- Increasing the accuracy of operations performed by positioning the drill and cutter strictly perpendicular or at a fixed angle in relation to the material being processed.
- The ability to work with hard materials, in which one of the important points is to prevent the drill from sliding along the surface being processed at the initial stage.
- The ability to drill holes not only perpendicularly, but also at different angles. Modern models allow drilling at an angle of up to 70 degrees.
Often even expensive devices do not meet the requirements. This applies both to the quality of the materials used and to the assembly.
Many users in their reviews draw attention to the lack of universal fixing devices that would allow the use of different brands of drilling tools. However, the unification of such elements is impossible in practice.
What features of drill stands should you pay attention to when choosing?
On the modern market there are a great variety of racks for sale, to suit every taste and budget, as they say. However, it is worth choosing a convenient model, taking into account some nuances:
- If possible, choose a model made of cast iron : it is more practical and durable.
- It should be possible to adjust the drilling depth : this option is important in cases where you need to make several identical holes.
- If the movement mechanism is powered by springs, the holder will automatically return to its original position as soon as the pressure on the lever is reduced.
- The necessary parts must include a frame (responsible for the stability of the structure), a guide post, an equipment holder and a travel mechanism.
- The landing collar is another required element of the rack. Standard diameter is 4.3 cm.
Important! The more massive the holder, the more stable it will be.
Preparing for work
Before starting work, you need to think through the sequence of all technological operations in the manufacture of a homemade machine, plan the manufacturing technology, decide on future materials and tools that will be needed during the work process.
Tool
To make a machine from a drill or screwdriver, you will need the following tool:
- Circular saw or sawing machine.
- Jigsaw.
- Angle grinder (angle grinder or simply “grinder”).
- Drill or screwdriver.
- Grinding machine.
- Various hand tools: hammer, screwdriver, clamps, wood core drill (or simply “crown”), square, marking pencil, etc.
Material and components
To make a machine with your own hands, you will need the following materials and components:
- Plywood 15 mm.
- Pine board, solid;
- Furniture drawer guides;
- Sleeve;
- Furniture footwear;
- Wing nut;
- Fastening: M6 bolt, self-tapping screws of various lengths.
Main structural elements
The design of a drilling machine made from a screwdriver consists of the following main elements:
- Base:
- Vertical frame;
- Spindle box;
- Platform (horizontal support);
- Drilling table;
- Fastening a drill (screwdriver) used as an electric motor and spindle;
- Drill (screwdriver);
- Spring-loading mechanism and drill feed handle.

