This page is dedicated to homemade forged hangers. Next, we give the necessary theory, after which instructions and videos will be reviewed.
Special attention should be paid to the arrangement of the hallway (or corridor) , because this small room is the “face” of the house. Regardless of the design and style of the surrounding interior, forged hangers (link to section) perfectly complement the decor. In addition, metal products are reliable, safe to use, long service life, durable, environmentally friendly, original and beautiful design.
General characteristics of hanger designs
The traditional and almost the only option forty years ago for a hanger in the corridor was a wooden board with screwed aluminum hooks. In those days, the industry was solving problems with fulfilling production volume plans; minimal attention was paid to design and quality.
Over time, the designs became more complex, with separate sections for different types of clothing, shelves for hats and shoes. There were options with small cabinets and bedside tables, wall-mounted and built-in, free-standing and combined, portable and stationary. Currently, the range of hangers has expanded to several hundred models; most large and small manufacturing companies produce their own original products.
Modern hangers are very diverse
Craftsmen make even more options on their own. Moreover, now various hand-held and stationary woodworking tools and equipment are available to them, and restrictions on the complexity of the technology for manufacturing hanger structures have been completely removed. From a technical point of view, the capabilities of individual craftsmen are almost no different from industrial companies, the only difference is in productivity.
Floor hangers
A separate category of special furniture for hallways has special hooks for storing not only clothes, but also hats, umbrellas, handbags and other personal items. Such hangers can be made of wood or metal; there are no restrictions on the shape. Floor models are made in styles from retro to high-tech, designed for several guests or a large company.
This hanger can hold a lot of things.
The advantages of floor hangers for the hallway include the following qualities.
- Mobility. It can be moved to another place at any time, and not only in the hallway. There are types of interiors in which simple floor hangers are used instead of conventional cabinets. They store both outerwear and for constant wear.
- Most modern models have adjustable parameters. The height and width of the racks can be changed at will, making it possible to store items of different lengths.
- Wide selection of design solutions. Each owner selects furniture for himself, taking into account the existing situation in the living rooms.
An example of a designer floor hanger
The cost of products varies widely; such hangers are found both in prestigious buildings and in half-empty apartments of young people just starting their adult life. Unfortunately, for self-production you need to choose only the simplest models, since many hangers have rather complex engineering solutions. Only experienced professionals can perform them at home.
Wall hangers
Wall-mounted models are the most popular and are even more diverse than floor-mounted designs.
A stylish wall hanger will decorate the hallway
They are most often made of wood and metal; there are many combined models; factory-made hangers can also be made of plastic (the most budget option). Wall hangers take up less space, which is very important for small spaces; they are much easier to make with your own hands.
One of the simplest options for a homemade hanger
Examples of homemade hangers
Let's give a brief overview of the most common hangers, both traditional and made in a modern style, with a very non-standard design.
Table. Popular options for clothes hangers.
Material of manufacture Brief description of performance characteristics
| Metal forks and spoons, wood | Only steel cutlery is suitable; aluminum cutlery does not have sufficient mechanical strength. Forks and spoons are aligned, geometry can be changed. The handle bends and serves as a hook; the elements are fixed to boards or furniture boards. Such hangers are often installed by creative people who prefer everything unusual. The main thing here is not the functionality of the hanger, but the opportunity to surprise your friends. |
| Pallets | Quite a fashionable material for making furniture today. Pallets are used not only for simple hangers, but also for quite complex sofas and beds, dining tables and work tables, etc. In this way, designers are trying to create unusual interiors, pay attention to the recycling of production waste, and environmental protection. |
| Tree branch cuttings | Branches and trunks of small diameter are selected, from which pieces up to 30 cm long are cut, the protruding parts serve as hooks. Clothes are hung on thin ones, hats are hung on large ones. Such a hanger looks great not only in a country house or in a country house - in city apartments it can be used to create unique hallway interiors. You just need to think through everything and supplement it with the same crafts from natural untreated wood. |
| Metal and wood | Combinations of very different and widely used individual materials make it possible to end up with beautiful, cheap and durable hangers. As for design and decor, most models have a traditional look, implying a familiar classic shape and a minimum of decorative elements. The simplest versions of hangers also have their connoisseurs and are quite often found in hallways. |
| Solid wood | The structure is entirely wooden, even the hooks are cut from boards. Surfaces can be scorched with a blowtorch to age and highlight the beauty of the texture. If you don’t have a blowtorch, soak it in stain; if you have time and money, buy and work with several types of special paints. Such hangers have many design solutions, from the simplest to the very complex. |
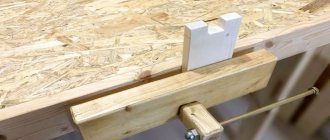
| OSB, fiberboard, boards | Such designs provide the opportunity to show maximum imagination. Various plants and figures are cut out of the sheet, and clothes hooks are attached to them. The hanger is quite simple to make and at the same time looks very prestigious. |
| Plywood | With the help of such products, it is much easier to teach children to dress/undress independently. Children's hangers should be beautiful and cheerful, reminiscent of fairy tale or cartoon characters, and attract attention with bright multi-colored colors. They are usually small in size and are attached at a child-friendly distance from the floor. |
It is impossible to list all the models, because each craftsman may have his own version of the hanger.
Forged clothes hangers
One of the advantages of making hangers yourself is the ability to create a completely unique design. We have given only examples of design ideas, and you can further develop them taking into account your own concepts of beauty, attractiveness and efficiency. At the same time, you must constantly keep in mind the features of the hallway.
The design and color scheme of the hanger must match the interior of the room
A selection of interesting ideas
To make a luxurious hanger for a corridor or hallway, just find a slab of the appropriate size and coat it with varnish. The more textured the cut edges are, the more beautiful and rich the final result looks. To create a wall hanger, you will also need hooks: they are attached in one row at the same distance from each other.
A hanger made from rebar looks even more unusual. To weld the structure, you will need special tools and skills. The brutal design of the product will organically fit into a loft-style interior.
The photo shows a hanger made by yourself, the service life of which is close to eternity.
An even more crude, but original version of a hanger for a “man’s den” is a structure made of a metal pipe, mounted on the wall. Large construction hooks serve as clothing holders. Such a designer item costs several thousand rubles, but you can make it yourself.
Adherents of eco-style will appreciate this floor hanger made from real branched wood. To turn waste material into a useful and beautiful piece of furniture, you need to select a dry tree trunk of a suitable size and trim off excess branches. Small knots are useful for hanging light items. The bark can be peeled or left, depending on the artist. You can secure the trunk using self-tapping screws, branches, a round piece of wood or a regular board. If the bark is removed, it is best to cover the product with stain, varnish or paint.
A hanger made from a pallet will fit perfectly into a bright modern interior. For its manufacture, it is recommended to choose a pallet that meets EUR or EPAL standards. First, you need to clean the workpiece from dirt and treat it with a grinder: there should be no dangerous defects on the surface. Then you should saw off the excess parts of the pallet, leaving only the frame. The structure can be painted or varnished. Lastly, you need to fix the hooks for caps, scarves and other things, after which the product can be hung on the wall.
Even the remains of pallets can serve as an original decoration for the hallway: just use your imagination.
The photo shows sanded pieces of wood, painted in different colors and fastened together on a wooden base.
A lightweight and inexpensive clothes rack can be assembled from ordinary plastic pipes. If you adhere to a certain manufacturing technology, the design will be strong and durable. For manufacturing you will need pipes with a diameter of 20-25 mm, right angle bends, T-shaped connectors, plugs, caps and glue. If desired, the product can be painted with spray paint with a metallic effect. This stand will look great in a country house or garden.
The photo shows an easy-to-assemble stand made of white PVC pipes.
The undeniable advantages of using floor hangers
A fundamental point: the purpose of the hanger and its location. DIY designs for outerwear can be wall-mounted or floor-mounted. The main difference is mobility: floor-standing ones can be equipped with wheels and moved around the apartment if necessary. Wall-mounted ones are stationary, but they take up almost no space and do not take away the useful space of the hallway floor. Another option is embedded systems.
It is the free space and footage of the hallway that determine the choice. A floor clothes hanger will take up space on which you can place a full-fledged wardrobe. Therefore, this option is more likely for modern layouts, where wide corridors provide for the location of all storage systems. There will also be a place for a mobile floor hanger.
Floor designs have become popular thanks to modern, spacious hallway layouts. Today, many people choose this interesting option.
- A wall hanger is as compact as possible and isolates things from external influences. Thanks to good ventilation, clothes dry quickly and are well ventilated. The hangers are located at a comfortable height.
- If the length of the rod reaches one and a half meters, then an additional storage system will not be needed. Such dimensions will accommodate all the seasonal clothes of a large family and free up space in the closet for dresses and suits. After all, it is best to store any clothes on hangers.
- A floor hanger, as well as a stationary wall hanger, will be an excellent addition to a shoe rack. Storage space for shoes will make practical use of the hallway space. This standard solution remains relevant and is very ergonomic.
- When designing the structure, a small gap between hanging clothes and the wall is taken into account. This solution allows the fabrics to maintain their appearance.
- A floor hanger equipped with wheels can change its location and leave the hallway if necessary.
Description of the transformer hanger
This design will not only help solve the problem of storing things, but will also become a stylish decoration for the room. It differs not only in appearance, but also in the presence of filling with various elements:
- sections for storing accessories;
- shoe stands;
- brackets for outerwear;
- hanger bar;
- number of shelves;
- the standard height of retractable upper shelves for hangers can vary from 75 to 140 cm;
- Some models are equipped with a stylish and comfortable case.
An ideal solution for compact and high-quality storage of clothes on hangers.
The main advantage of the design is the base on wheels, which makes it easy to move it to other rooms without requiring outside help.
This hanger is an ideal solution for a small apartment or office, where it is sometimes difficult to allocate a separate room for storing clothes and various items. It takes up very little space, yet allows you to very effectively solve the problem of convenient placement of things. Universal wardrobe models on wheels are manufactured taking into account all the requirements of quality and safe operation.
Does this idea make sense?
Before you learn how to make a clothes hanger with your own hands, you need to figure out whether such a “game” is worth the candle. A master who has not yet engaged in such creativity may have quite a lot of concerns. In fact, this method has enough advantages, which is better to be sure of before making a decision.
- Making almost any item with your own hands guarantees minimal costs, because the work, as a rule, does not require any complex tools or equipment, and materials are cheap. In some cases, everything that is needed to create a hanger is already on hand. This means that this option completely eliminates the “painful parting” with money.
- Large space for activity is another advantage. As a material, you can use wood, various objects: either already unnecessary, or those that the owners are ready to sacrifice.
Simple tools do not require highly qualified craftsmen; all that is required is attentiveness, accuracy, and precision in fitting parts. The biggest advantage of doing it yourself is the uniqueness of the item made, its originality, which all guests will certainly appreciate.
Features of placing hangers in the interior
First of all, the hanger should fit perfectly into the interior of the room and match its style. For modern trends, especially when decorating hallways or rooms for children and teenagers, non-standard designs of wall and floor models are very often used. Eg:
- wall hanger made from a school of fish;
- imitating wood (wall or floor);
- hanger in the shape of a cactus (also of two types);
- bicycle design;
- exotic birds or animals with elements of artistic forging.
A floor clothes hanger in the shape of a tree is the optimal solution for storing things.
Wall-mounted options are simply ideal for very small spaces. More spacious rooms allow the use of floor models and even luggage carts - they are in perfect harmony with the classics.
Transformer hangers are very diverse and versatile, which allows them to be used in almost all interior design styles. The mobility of these models allows you to change the situation in a matter of minutes. They are especially convenient when guests are expected: they can be quickly moved to another room.
The most popular are models made of chrome-plated metal tube.
Forged furniture is a symbol of wealth and sophistication; it subtly emphasizes the uniqueness and status of the owners of the apartment. Such models are not only beautiful, but also highly durable and durable. Such products never go out of fashion.
Wood will add warmth, comfort, charm and uniqueness to any interior. Wooden floor hangers are made from solid birch and alder. They come in several color options and are protected with polyurethane varnish. Such products are very strong, durable and can withstand considerable loads. The variety of models allows them to be used not only in apartments, but also in bars, restaurants, conference rooms and banquet halls.
Small folding wooden floor structures can be used only when necessary, they are convenient to store in a pantry or closet, and are almost invisible.
A stylish and convenient hanger will help keep your home or office tidy and will become a worthy decoration and addition to the interior. Having seen a high-quality hanger by the owner himself, guests will appreciate his talent and creativity. The cost of finished products can reach decent amounts, and homemade furniture will allow you to spend money on more important purchases.
Wooden hangers will fit perfectly into the interior of any room.
How to choose the perfect hanger
Before the question of how to make a clothes hanger with your own hands, you need to ask yourself another one - how to choose the right model? The answer cannot be unambiguous: many factors will have to be considered.
Hanger size and width
Based on the dimensions of the room and the specific location, the hanger size and width are determined and calculated. It should not be very bulky and fit perfectly into the space.
All materials must be durable and safe. When making a structure, the maximum load should be taken into account: the minimum will be for plastic ones, and the maximum for metal ones.
If executed correctly, it can become the “highlight” of your room.
Before starting work, it is necessary to take measurements of the part of the room where you plan to install the hanger. Then, based on the dimensions, you should draw up a drawing of the future structure indicating the dimensions of all parts. This will help you correctly determine the amount of materials needed and accurately cut them into parts.
How to make (forge) with your own hands: preparation, equipment, manufacturing, painting; video
The production process of forged hangers consists of several stages :
- sketch development;
- manufacturing the required number of parts or purchasing ready-made elements;
Reference. You can purchase ready-made parts for making hangers from specialists. Manufacturers offer a wide range of products of this type. Using the elements, products of various styles and designs are created.
- assembly;
- forging painting;
- installation.
The reviews presented below will allow you to study the production process visually.
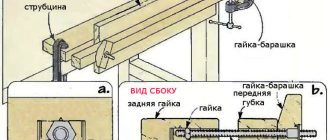
Forged wall coat hanger, decorated with monograms, houndstooth pattern and texture, DIY hot and cold forging. Part 1
This two-part review is dedicated to making a forged wall-mounted clothes hanger.
When producing the product, the master uses 12 mm strip and rod.
On the blanks, the performer marks with chalk where the textured surface will be.
The bottom strip, on which the hooks are located, as well as the side parts with monograms, are made from a textured strip. Volutes are created from a rod.
The texture is applied using a homemade stamp; the parts are first heated in a forge.
The shape of the ends of the workpieces: a crow's foot on the strip and a curl on the rod - is given with the help of a hammer and an anvil.
After punching the texture, the pattern is marked along the edges with stripes to highlight the boundaries; this is done with a cutting wheel.
On a snail machine, rods with texture are twisted into curls. The procedure is carried out without heating, since there is a possibility of metal breaking in the places of cuts.
Forged wall coat hanger, decorated with monograms, houndstooth pattern and texture, DIY hot and cold forging. Part 2
Volutes are also made from rods, the tips of which are offset so that they do not interfere with the fit.
Hooks are made from 6 mm rods.
All elements are prepared, the master begins assembly.
At the very beginning, a corner (bracket, side part) is assembled, to which monograms are then welded. The second bracket is assembled in a similar way.
The hanger shelf is made of rods with a diameter of 8 mm. The elements are grabbed to the side parts.
The volute pattern and the bar on which the coat hooks are located are attached to the product.
The master performs the final welding and cleans the seams.
Holes are drilled in the legs for attaching the hanger to the wall.
General operating principle
Creating a structure of varying complexity consists of several stages:
- Selection of scheme and method of implementation.
- Purchase of materials and tools.
- Cutting pipes in the required quantity according to dimensions.
- Assembly of individual frame parts using soldering or fittings.
- Creation of a complete structure.
- Checking the result for strength.
You can choose the assembly diagram at your discretion. There are a huge number of them. The choice depends on the skills and desires of the master. After this, you need to buy materials and tools. And here the question may arise about which plastic pipes are best to take.
As such, there is no difference. Especially when it comes to small pieces of furniture. Polypropylene is more expensive than polyvinyl chloride. Therefore, if the appearance of PVC and the way it is assembled are suitable, it is better to use it.
Polypropylene is much stronger, but also more expensive. Homemade products made from polypropylene pipes can withstand serious pressure. This is due to the fact that these products have thick walls.
Artistic and cold forging
Two technologies for working with metal allow you to create forged hangers with different designs. Home craftsmen are used to produce both cold and hot forging products. The choice of method should be based on the skills and knowledge available to the performer, as well as the availability of equipment and tools.
Hangers made using cold forging technology have a patterned design. But to implement such a project you will not need to spend a significant amount of time.
Items created using the hot forging technique are distinguished by high artistry and exclusive design. To implement such projects, the contractor must have experience, theoretical and practical knowledge.
Reference. You can acquire skills by mastering forging operations. Basic knowledge allows us to produce products that are simple in design and components. Learning blacksmithing in an educational institution, independently, or in master classes will require financial costs and considerable time. However, such options provide the acquisition of broad (professional) skills that allow you to create original designs.
Useful tips
In the process of assembling a structure from PVC pipes, to obtain the desired result, it is worth following some recommendations from experts:
- Instead of expensive special glue for joining plastic products, you can use inexpensive glue for fixing plastic products.
- In order not to lose sight of any detail and to follow a clear assembly algorithm, you need to use a pre-drawn diagram of the future hanger.
- It is recommended to connect structural parts for storing things with an adhesive composition outdoors, using gloves and a mask.
- To give the product the desired shape, polypropylene pipes can be bent by applying heat - using a hair dryer, electric stove, or boiling water.
- You can add more stability to the hanger using sand; it is poured inside the pipes.
Materials and tools
Almost anything can be used as a material to create hangers. Wood - in the form of planks, slats, branches; also plywood and chipboard. Fittings, rope, horns (any), pipes (even plastic) will do - it all depends on your imagination.
Self-tapping screws, bolts and screws are used as fasteners. The set of tools is the simplest:
- jigsaw;
- electric drill;
- screwdriver;
- screwdriver;
- hammer;
- roulette;
- level;
- hacksaw for metal.
Naturally, if you work with wood, then a hacksaw for metal will not be needed, and if only metal is present, then a jigsaw is of no use.
Photo ideas for homemade hangers from scrap materials
Sources
- https://mebel-expert.info/mebel-svoimi-rukami/veshalka-v-koridor-dlya-odezhdy-svoimi-rukami
- https://pilka-nn.ru/remont/napolnaya-veshalka-svoimi-rukami-iz-dereva.html
- https://dom-i-remont.info/posts/samodelki/kak-sdelat-veshalku-dlya-odezhdy-svoimi-rukami-idei-i-prostye-varianty/
- https://sc-stroy.ru/drugoe/veshalka-iz-polipropilenovyh-trub.html
- https://leaba.ru/communications/vesalka-iz-trub-pvh-posagovyj-instruktaz-po-izgotovleniu-svoimi-rukami.html
- https://MobileLords.ru/podelki/veshalka-iz-trub-pvh.html
- https://septik27.ru/vesalka-iz-trub-pvh-posagovyj-instruktaz-po-izgotovleniu-svoimi-rukami/
- https://sdelatrykami.ru/veshalka-svoimi-rukami/
- https://dnevnikmastera.ru/veshalka-svoimi-rukami
- https://vdome.club/materialy/svoimi-rukami/veshalka-iz-trub-pvh-svoimi-rukami-chertezhi-i-foto.html
[collapse]
Destination options
The convenience of hangers lies in the fact that you can place on them almost any items that should always be at hand:
- outerwear in the hallway;
- everyday wardrobe items;
- accessories;
- kitchen utensils;
- towels in the bathroom and much more.
At the same time, a wide selection of materials and designs makes it possible to create a unique original model.
A self-made hanger will be inexpensive, fit perfectly with the interior, and be an exclusive handmade item.
Decoration
The finished hanger can be further refined. It can be glissal, artistic painting, craquelure or decoupage. Before coating, you need to clean the surface of the hanger. Then it is primed with a roller or paint brush in order to fill all microcracks and other flaws in the material.
You may be interested in: How to care for bees for a novice beekeeperGrowing strawberries correctlyPopular greenhouses: popular rating
Glizal is a type of paint. It can form texture under certain conditions. Glizal is diluted with water before use, following its instructions, then applied to the workpiece. This type of paint hardens in about half an hour, so you work with this type of paint quickly. The pattern is created with a sponge, and craquelure is used to artistically age the surface.
Decoupage is used for intricate patterns or to create an antique effect. For this method you will need:
- drawn blank;
- penknife;
- scissors.
Cut out a “pattern” from paper with a pattern and place it on the surface. The reverse side of the applique is covered with glue and leveled on the surface, making sure that no bubbles form. Then the finished piece of furniture is varnished.
Artists can paint an item with acrylic. Finally, the painting is also treated with varnish or craquelure.
Make a key hanger
In order to create an elegant key hanger from a wooden block, you will need:
- The block itself – its dimensions can reach approximately 2.5x5x14 cm. These parameters are ideal for placing four keys. Accordingly, if you want to create a more spacious hanger, you need to choose a larger block.
- Fastening elements for shelves in the amount of 2 pcs. Dimensions should be consistent with the parameters of the bar
- Thick lace
- Small rings with releases
- Pendants, keychains
- Ruler, pencil
- Wire cutters and pliers
- Drill, grinder, saw
IMPORTANT: A great solution would be to purchase a Dremel 8050 Micro multi-tool.
Here's what's useful for making a key hanger.
You need to make a hanger like this:
- To begin with, the block is polished. In this case, a rough disk is used first, and then a medium and smooth one.
- Next, use a pencil to mark the locations for the fasteners.
- Using an engraving cutter, it is necessary to make indentations of approximately 3 mm.
- Where there will be an opening in the elements, it is worth making another 3 mm recess.
- Now the hangers need to be attached to the block and secured with screws.
- This was all the back of the future hanger. Now you need to cut four parallel lines on the opposite front side .
IMPORTANT: Their depth should be approximately a centimeter.
Scheme for creating a key hanger
- Now you can attach the block to the wall.
- You need to attach small rings to the keys at the rate of “one ring per key.”
- Next, you need to attach a piece of lace to each ring, the opposite end of which will be attached to the keychain.
Scheme for attaching keys to keychains for a hanger
- All that remains is to thread the laces into the recesses on the block. The keychain in this case will act as a latch.
The end result is such a cute key hanger.
Make a belt hanger
You can make a similar hanger from plywood with a thickness of approximately 3 to 6 mm . Oriented strand board 50 cm long and 30 cm wide is also suitable
The procedure is as follows:
- It is advisable to draw a grid on the material , each of the squares of which will have an average size of 50 mm. With the help of such a mesh it will be much easier to transfer the stencil.
IMPORTANT: The hook must be located above the center of gravity of the hanger.
Cells on a blank for a hanger
- Now you can mark the contours of the hanger with all the holes. By the way, on such a device it is quite convenient to place not only belts, but also, for example, scarves - it is worth providing round holes for them.
This is what the contours for a hanger for belts and scarves look like
- Next you need to cut out the internal holes. The diameter must be at least 5-10 mm, otherwise it will be difficult to insert the jigsaw.
Such holes need to be drilled in the blank for the hanger.
- Now all that remains is to work out the holes with a jigsaw.
Neatly cut holes for hangers
- And then you can do the external contours.
- It is worth remembering to thoroughly polish the product both outside and inside. As for sanding from the inside, it is most convenient to use a cloth-based tape. Its optimal width is from 8 to 15 mm.
IMPORTANT: There should be no burrs or roughness left!
- It is also necessary to varnish the future hanger. After applying and drying each layer of varnish, it is advisable to sand the product again , as burrs may form. When after the next layer of varnish there are no burrs, the work can be considered complete.
The result is a hanger for belts, scarves and even ties.
Antique metal and wood towel rack for the bathroom
To make such a hanger you need:
- Ready-made metal ring - you can purchase it at a craft store. Or you can make such a ring yourself from thick wire
- Wooden beads – preferably a large diameter of about 20 mm
- Dye and container for diluting it, spoon
IMPORTANT: It is preferable that the container is made of plastic.
- A piece of leather
- Screw
- Paper towels
- Glue, ruler, scissors
- Latex gloves
Here's what you need to make a hanger for your bathroom.
The procedure is as follows:
The first thing you need to do is work with the ring. If you bought a whole piece, you will have to separate it using wire cutters.
This is how you need to prepare metal rings for a hanger
- Now you need to string the beads onto the metal base. They are strung until there is no more free space.
Stringing beads onto a metal base for a hanger
- Next, it is recommended to cover the work surface with paper towels or, if they are unavailable, newspapers.
- Now you can mix water and dye in a plastic container. By the way, you can choose a shade to create the effect of old wood.
IMPORTANT: The dye should be mixed thoroughly until completely dissolved.
- First, you should test the resulting shade on one extra bead. If the resulting color turns out to be too dark, you should correct it by adding water, and if it’s too light, add paint.
- Now you can immerse the ring in the container.
Painting a hanger ring This is what a hanger ring can look like
- It is recommended that when removing the workpiece from the container, hold the first one over the table for a little while - the paint needs to drain off. It’s even better to let the workpiece dry on a paper towel.
The blank for the hanger is dried on paper towels
- to rinse the beads under running water after this
- Again, you need to give them time to dry.
- Now you can start fastening. at the desired height .
- Then you need to cut 2 strips of 10 cm from the leather .
- must be made at each edge of the strips .
IMPORTANT: You should retreat at least a centimeter from the edges.
Leather strips for hangers
- Now we need to connect everything. A ring is threaded through the holes of the strips, and the strip, in turn, is attached to the screw. The result is a design similar to the one in the picture. In this case, it is advisable to connect the strip with the screw with glue, otherwise it may fall.
This is how a bathroom hanger is made from wooden beads and a metal base
PVC pipes for hangers
PVC pipes are available in the arsenal of every owner. Their scraps can be used as the main material to create a homemade hanger. A durable movable frame is made from pipes, on which an entire wardrobe can be placed.
If you wish, you can find a master class on hangers made by yourself, video lessons and practical advice from experienced craftsmen.
From perforated sheet
For work they take:
- Metal sheet with holes of the required size;
- Special hooks for holes, fastenings (dowels, screws, profiles);
- Screwdriver;
- Tape measure and a simple pencil;
- Metal scissors (jigsaw, multi-cutter);
- Threads for floss, wool or jute (threads will be needed for “embroidery” on perforated fabric).
Process of creation:
- If the sheet is large, then it is necessary to cut the sheet of the required size using an electric jigsaw with a metal attachment, a grinder or metal scissors.
- If desired, threads can be used to create “embroidery” in the form of an inscription or design at the top of the product. The hooks will be located just below.
- Next, you need to attach the panel to the wall. This is done using a puncher, dowels and self-tapping screws (or screws), if the perforation is large enough in diameter, so that you can then simply hang it on top of slightly unscrewed screws.
- First, the sheet is applied to the wall and the drilling points are marked with a pencil. Or they do it in another way. First, they construct a frame from metal profiles or wooden slats, screw the frame to the wall and then hang a perforated metal sheet on it. Ready-made sheets with side fastenings and corresponding profiles for them are available for sale.
- The profile is attached to the wall, and then the structure itself is put on using special fasteners. If the wall is made of plasterboard or wooden panels, then the screen can be secured with self-tapping screws through the holes in the metal panel.
- In the same way, install individual single or double hooks made of metal or plastic through the perforations. Heavy things cannot be hung on such fasteners.
The next step is to attach special hooks for perforation. The hanger is ready for use!
Unfortunately, you cannot hang heavy clothes on such a structure (or the hooks must be mounted deeper into the wall). A hanger made of perforated sheet is suitable for storing light accessories: scarves, scarves, belts, summer clothes and keys.
Wood construction
Natural material, when properly processed, allows you to make very beautiful and practical designs. Even beginner craftsmen can make wooden hangers with their own hands. I will analyze the most popular and accessible types.
Simple option
A simple piece of furniture can be made in 10 minutes. As a material I use 4 wooden sticks or cuttings for shovels. The recommended length is 1.8 m, diameter is 2-4 cm. I paint the upper parts of the parts with acrylic enamel, the lower parts with aerosol paint. To create a clear transition between raw materials, I use masking tape.
After the supports have dried, I tie them together using rope (wire, leather tape). The design with widely spaced legs resembles a wigwam. The structure must be stable on the floor, otherwise it will not support the weight of the clothes.
Source kallibry.ru
Tree
A simple single model can be easily assembled from scrap materials. As a stand, I recommend using a floor piece from a Christmas tree or drilling a hole in a thick beam. The stand can be made from a small and polished tree trunk, the branches of which act as holders. The elements are glued or screwed in, the surface is coated with varnish (stain).
Source dizajninfo.ru
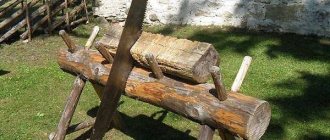
Stand on wheels
A do-it-yourself mobile hanger is made from wooden beams. I use a shovel handle as a crossbar. I assemble the base in the shape of the letter “H”, connecting the parts with screws. To prevent the wood from bursting, I advise you to drill holes in advance.
I install vertical structures with their ends down. I control the parameters of the stand with jibs using a regular square. I mount the horizontal stick with self-tapping screws. To attach the wheels, I place the structure on its side. Movable furniture parts with holes for fasteners are suitable.
Source samodelino.ru
I carefully clean the surface of a homemade wooden hanger from burrs with sandpaper. Treated wood can be coated with colorless varnish or enamel. Models tinted with stain and special wax look luxurious. I recommend insulating children's furniture with bright tape.
Source samodelino.ru
The design looks harmonious near one of the walls of the room. To move the structure, just push the piece of furniture a little with your palm. I place clothes on hangers along the crossbar. The space below can be arranged for small things by screwing on a shelf board or a narrow drawer.
Source lyvi.ru
For a suit
If you understand how to make a hanger with your own hands from wood, then it’s easy to create a multi-tiered structure. As a stand, I recommend taking a block with a cross-section of 100*150 mm, the length of which is up to 70 cm. The part must withstand the weight of the clothing and structure.
The base consists of 2 elements of different heights (1.3 and 1 m), the role of which is played by beams or shovel handles. I carefully clean the components from burrs. Use a sanding machine to gently round the corners.
I drill four holes in the stand, the size of which matches the diameter of the base. I screw in the supporting parts or carefully hammer them into the holes with a soft hammer. To ensure reliability, it is better to lubricate the edges with wood glue. After drying, I install rubber pieces to improve bottom stability.
Source fenster.ua
I drill holes for intermediate crossbars 10 cm from the base. On top of the tall structure I install a hanger without a hook-holder, and on the low structure I install a straight barbell. At the bottom, above the stand, you can place a shelf for shoes. I cover the assembled device with stain or paint it with colorless varnish.
A homemade wooden suit hanger, due to its compactness, will not take up much space in the room. The design fits perfectly into the interior of the home and is practically invisible in the design of the office. Due to the peculiarity of its structure, the device is convenient for both an adult’s clothes and a schoolchild’s uniform.
Source mebel-online.ru
Selection principles
When purchasing a finished forged product in a store, you need to consider a number of factors:
- number of hooks, capacity;
- the presence of shelves, bedside tables;
- strength, structural stability;
- availability of free space.
If 1-3 people live in a house, there is no point in buying a massive metal structure.
Hanger with one leg (Photo: Instagram / antik_stil_vintage)
Advantages and disadvantages
Advantages of forged floor hangers:
- There is no need to ruin the finish by drilling holes in the walls to attach hooks.
- The product can be moved.
- Attractive view.
- The strength, durability, and wear resistance of forged parts are higher than that of other materials.
- Clothes do not rot in the closet and dry out faster from moisture.
- There is no need to carry out additional work; you can use the product immediately after purchase.
Flaws:
- To install the hanger you need a sufficient amount of free space.
- If the load is unevenly distributed (one side is loaded more than the others), the stand may fall.
- High price for forged products.
Metal surfaces and welding seams must be coated with an anti-corrosion compound.
Manufacturers and cost
The most popular domestic manufacturers:
- Stalivan;
- "Damian-M";
- "Metaldecor";
- Decoriko.
The average price of a forged floor hanger is 15,000 rubles.
Children's hanger rack (Photo: Instagram / vigvam_fantasy)