It is very difficult to imagine a modern set of repair and construction equipment without a hammer drill. Its main function is to perforate holes in building materials such as brick, concrete and stone. This power tool is almost always used in difficult conditions with heavy dust and heavy loads. Therefore, sometimes even the highest quality models fail, not to mention cheap Chinese counterfeits. If your hammer drill suddenly breaks down, don’t be upset, because in most cases you can fix the problem yourself.
Figure 1. Diagram of the hammer drill.
Design and principle of operation of a hammer drill
To understand how to fix a rotary hammer if it breaks, you need to know its structure and operating principle. This tool can work in 3 directions at once:
- drill various holes in concrete and brick like a drill;
- make grooves in soft plaster like a jackhammer;
- screw in the screws like a screwdriver.
Different models of rotary hammers may differ in some design features and additional functions. However, despite all the differences, such products have the same components and systems that allow rotary hammers to perform their main function. Such nodes include (Fig. 1):
- Electrical engine;
- gearbox;
- cartridge;
- impact mechanism.
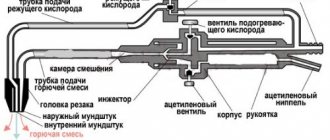
Figure 2. Diagram of the pneumatic impact mechanism.
There are also additional components that simplify the operation of the hammer drill. These include: an anti-vibration system, a mechanism for fixing the tool in a certain position, a device for switching various operating modes, a system for limiting the drilling depth, etc.
One of the main elements of a rotary hammer is the impact mechanism, which can be electromagnetic or pneumatic. In the first case, the operation of the impact mechanism is controlled by 2 electromagnetic coils, which create reciprocating movements of the core, and the core transmits these impacts to the end part of the tool. In the second case, the operation of the mechanism is ensured by the movement of the piston in the cylinder. It is this type of impact mechanism that is most widespread.
The design of the pneumatic impact mechanism is shown in Fig. 2, where: 1 – pumping bearing, 2 – piston, 3 – ram, 4 – hammer, 5 – gear. When the tool is turned on, the torque from the electric motor is transmitted to the swing bearing, which, converting the rotational motion into oscillatory motion, transmits it to the piston. Due to the pressure difference between the ram and the piston, the first begins to move, putting the displacer into operation. The displacer strikes the working element installed in the cartridge. This principle is used to convert electrical energy into shock energy.
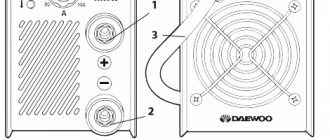
Mechanical malfunctions of the Bosch rotary hammer
When mechanical malfunctions occur in the operation of the tool, an extraneous unpleasant sound appears, sparking intensifies in the collector area, a burning smell appears, the tool heats up excessively, its power drops depending on the duration of operation and the impact on the material.
We will look at all the faults in the diagram of the Bosch 2-26 rotary hammer. Other models, such as Bosch 2-20, 2-24, differ in the design of the intermediate shaft and the installation of various bearings.
The hammer drill stops hammering, but drills
The hammer drill does not hammer under load or in idle mode for the following reasons:
- the rubber rings of the striker, striker, and piston are worn out;
- the rolling bearing race has collapsed;
- the cylinder and the firing pin of the percussion mechanism were destroyed;
- cut off the splines of the clutch mounted on the intermediate shaft;
The hammer drill has stopped drilling, but is chiseling
The main reasons why a rotary hammer hammers but does not drill are:
- the force of the conical spring pressing the clutch has weakened;
- the locking roller does not fix the large barrel shaft gear;
- does not hold the tool locking mechanism in the barrel;
- The hammer drill does not chisel or drill.
The main reasons why a hammer drill does not chisel or drill are:
- sheared teeth on the small rotor gear or on the large intermediate shaft gear;
- The rotary hammer electric motor does not work;
- there is no power to the hammer drill motor.
Now let's talk about everything in order
Let's consider options in which the hammer drill does not hammer, but drills
Wear of rubber rings on the striker, striker, piston.
This reason appears gradually as the rubber rings wear out. At first the blow weakens, then disappears altogether.
The malfunction is eliminated by replacing the indicated rubber rings with new ones.
For any repair of rotary hammers or their components, all rubber products must be replaced.
Repair kit for rubber sealing rings for a Bosch 2-26 rotary hammer
The rolling bearing race has fallen apart (drunk bearing)
If the drunk bearing pos. 830 is destroyed, the rotational movement of the intermediate shaft cannot be converted into the translational movement of the cylinder in the impact mechanism.
Eliminated by completely replacing the rolling bearing.
Friction bearing
The cylinder, firing pin, and firing pin of the firing mechanism were destroyed
There are cases when the striker in the cylinder, pos. 26, gets stuck, which leads to destruction of the cylinder and the impossibility of creating air pressure in the barrel of the striker mechanism. And the second reason: destruction or breakage of the striker pos. 28, leading to distortion of the part and the impossibility of transmitting the shock impulse. Breakdowns are eliminated by completely replacing failed parts.
The main causes of hammer drill breakdowns
The main difference between a rotary hammer and many other construction power tools is that it works in very dusty conditions. Its engine is cooled by a fan. The cooling air contains many dust particles, which, penetrating inside the tool, rub against the armature and stator, which leads to their rapid wear. To extend the service life of these elements, it is necessary to periodically clean them from dust.
Figure 3. Stator diagram.
Another common tool breakdown is related to the mechanism for switching operating modes (rotation, strike, rotation with strike). Therefore, if your hammer drill does not turn on, for example, the rotation mode, then you should disassemble the tool and visually check the switching mechanism.
Quite often, hammer drill breakdowns are associated with the chuck, because it is subjected to heavy loads during operation. You can protect your equipment from such damage by periodically cleaning the cartridge from dust and dirt using a rag soaked in gasoline.
Daily care and storage
In order for the tool to serve the master properly for many years, during operation it is recommended:
run the device “idle” before starting work
If the hammer drill shows signs of breakdown, work is stopped and diagnostics begin. After completing the work, take care of the cleanliness of the rotary hammer - it is important to remember that electrical appliances “do not like” water; cleaning is carried out with a vacuum cleaner and rags. If the hammer drill is working in the cold or has been moved indoors from outside, do not start it right away. Allow the components to “warm up” and the lubricant to thaw. Carry the hammer drill in a special box or suitcase (usually included) to avoid dust and construction debris.
Thus, if you follow objective precautions and operating rules for the hammer drill, it will last a long time and without breakdowns. If trouble does happen, the suggested advice from the experts will help determine the essence of the problem and promptly fix the breakdown.
Do-it-yourself disassembly of a rotary hammer
Eliminating almost any malfunction in a rotary hammer requires disassembling it . Therefore, it is very important to know how to do it correctly. The sequence of disassembling the hammer drill is as follows:
- remove the rubber tip, the ring spring, and the casing of the drill fixation coupling;
- the fixing ball is removed;
- the switch handle is dismantled, for which it is necessary to turn the operating mode switch to the extreme position, and then press the locking button located on it;
- the rear trim on the handle is dismantled, the engine brushes are removed;
- unscrew 4 screws from the drill side and remove the tool body;
- The rotor of the electric motor is removed, 2 screws are unscrewed, with which the stator is fixed, after which the stator is dismantled (Fig. 3).
After replacing the damaged element, assembly is performed in the reverse order.
Disassembly algorithm
Do not forget that repair of a rotary hammer is only possible in de-energized mode! Due to the similarity in the internal composition of the main part of the hammer drills, the tool disassembly scheme is approximately the same. If no external faults are observed, you should start disassembling the device from the cartridge.
Next, the following parts are removed sequentially:
- rubber boot;
- retaining ring (using a screwdriver);
- plastic boot;
- washer;
- plate;
- spring;
- small metal ball.
When the last four parts wear out, the barrel cannot stay in the cartridge and begins to fall out. To fix this, you need to replace the broken part, and clean and lubricate the remaining parts.
The next part in the parsing algorithm is the body . The first thing to do is remove the switch. To do this, it must be transferred to the “Strike” state, indicated by a drawn hammer. Then, hold the button on this mechanism and turn it until it clicks.
To complete removal, take a screwdriver and use it to pry up the switch and remove it. In order to get to the electrical fault, it is worth removing the plastic housing.
This is not difficult; it is usually held on with screws around the perimeter. If there is a problem in the gearbox, it must be dismantled and damaged bearings replaced.
Do-it-yourself hammer drill repair
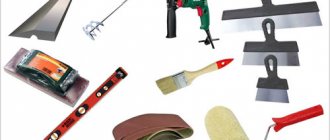
Main components of a hammer drill.
To repair a rotary hammer, you may need the following tools and materials:
If you more or less understand the design of a hammer drill, then this will allow you to quickly find a breakdown and fix it with minimal financial investment. Typically, repairing this tool comes down to replacing a failed part:
- anchors;
- starter;
- brushes;
- bearings;
- power cable;
- switch.
It should be noted that it is much easier to repair a household hammer drill than a professional one. But breakdowns of more serious equipment can be quite complex, so it is better to entrust their elimination to specialists.
Sometimes it happens that when you turn on the hammer drill, the electric motor does not start. Usually the cause of such a breakdown is damage to the power cord. Often it bends at the point of its entry into the body of the instrument.
To eliminate this malfunction, you should disassemble the hammer drill and ring the 2 cable cores with a tester. If a break is detected in any place, the power cord must be replaced with a new one. It is recommended not to make twists, since there is a high probability that the cable in this place will break again after a while.
If during operation the motor does not develop full speed or a crackling sound and a burning smell is heard during operation, this may be due to wear on the brushes. In this case, the brushes should be replaced. To do this, you need to disassemble the hammer drill, remove the worn brushes, and install new ones in their place. Another reason for severe sparking of the brushes may be a breakdown of the stator or rotor winding. In this case, the failed parts should also be replaced.
Diagram of the impact mechanism, its malfunctions and repairs
The impact mechanisms of rotary hammers differ in their design, depending on which family the devices belong to. Therefore, the repair of these mechanisms will take place according to different principles.
Barrel perforators
Rotary hammers with a vertical engine usually have an impact unit based on a crank mechanism (CSM). Below is a diagram of this type of impact mechanism.
The following photo shows a section of the device, where you can see the location of the crankshaft.
The impact mechanism of a unit with a vertical motor may have the following malfunctions. The connecting rod mechanism has a separate bearing that is mounted on the cam of the wheel with an eccentric, but sometimes it can be located at the base of the connecting rod. In some models of rotary hammers, a plain bearing (instead of a rolling bearing) may be installed at this location, which requires constant lubrication. If it is not there, or it is already old, then this unit will wear out. During repairs, you will have to completely replace the connecting rod and eccentric barrel.
Another common problem is the firing pin breaking. This malfunction can be calculated if you notice that there is no longer any impact on your hammer drill. To get to the firing pin, you will need to completely disassemble the barrel of the device. It is done as follows.
- Disconnect the barrel from the hammer body, remove the cartridge (see description above). Tap the barrel on the table so that the piston falls out. Take a rubber mallet and knock the barrel out of the housing.
- Remove the retaining ring holding the bearing.
- Remove the bearing itself and lightly tap the table to remove the balls.
- After removing the 3 balls, you can pull out the raster sleeve.
- Also, as in the previous case, remove the balls located on the bushing, just do not confuse them with those that were removed earlier (these balls are smaller in diameter). After removing the balls, you need to insert a screwdriver into the sleeve and push out the firing pin.
In this case, the firing pin is intact. But if it is broken, then replace it with a new one. You should also pay attention to the rubber seals and seals in the barrel body. If they are worn out, they must be replaced.
Pistol type hammer drills
The design of the impact mechanism in a pistol-type unit is slightly different from the same-purpose mechanism installed in a barrel-type unit.
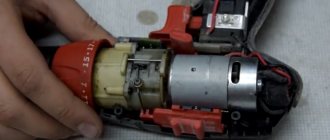
Its main difference is that the piston is driven not by a connecting rod, but by a swinging (“drunk”) bearing. Therefore, the most common breakdown of this unit is the wear of a “drunk” bearing that needs to be replaced.
The next photo shows a destroyed “drunk” bearing, which is the reason why the hammer drill stopped hammering.
The swing bearing is removed using a flat screwdriver, which you need to pick up the bracket and remove it. After this, the bearing is easily separated from the gearbox housing.
When replacing a collapsed bearing, you should thoroughly rinse the gearbox, since it is in its housing that fragments of the broken part may remain.
After cleaning and installing a new bearing, apply a thick layer of lubricant to this block.
Also, the reason that the device does not hit can be a broken firing pin. To get it out, you need to remove the retaining ring that is visible in the hole.
Take a small screwdriver, pick up the ring with it, and move it to the right (towards the gear).
Do the same steps on the other side of the part. Next, insert a screwdriver into the hole in the part and push through the removed internal parts of the mechanism.
After this action, you can easily get the locking ring and the housing in which the broken striker is located.
If you disassemble this case, you will see the “culprit” of the malfunction, due to which the hammer drill does not hammer.
When assembling the impact mechanism, be sure to generously apply lubricant to all parts.
How to extend the life of a hammer drill?
The service life of this tool largely depends on the correctness and timeliness of its maintenance, proper preparation for work, as well as on compliance with all storage and operation rules.
Before turning on the hammer drill, you need to check the reliability of fastening of all housing elements, the insulation of the plug and the power cable.
When operating the equipment, you should pay attention to extraneous noise, burning smell and strong vibrations. If they appear, you should immediately carry out maintenance, identify and eliminate the malfunction.
Continuous operation of the hammer drill should not exceed 15 minutes, after which a break should be taken for at least 5 minutes. Before replacing the working element (drill, drill, chisel), be sure to lubricate the tail. It is allowed to change the operating modes of the hammer drill using the appropriate switch only after the electric motor has completely stopped.
Compliance with all recommendations for using a rotary hammer will protect it from failure, and you from headaches.
There are several most common hammer drill malfunctions that the owner can fix on his own if desired. We are talking about a tool that has already expired its warranty period. If the warranty is still valid, the hammer drill must be taken to a warranty workshop. Please note that you can buy spare parts for rotary hammers on the website https://toolparts.com.ua, look at the range and prices right now by clicking on the link.
How to write off a battery: timing, malfunctions, reasons, standards, instructions
Failure of the support roller. In the process of operations on various materials, the saw blade is considered the main working element of the jigsaw, performing its useful functions. This element is attached to the support roller of the tool, which bears the maximum load during operation.
We inspect the power cable and internal wiring for burnouts, breaks and reliability of the contact connection.
During maintenance or DIY repairs of a Bosch drill, you may notice wear on some parts. Of course, they need timely replacement. Many craftsmen warn that it is necessary to use only original components.
Basic tool malfunctions
- The hammer drill does not turn on when you press the “Start” button. As a rule, this is an open circuit or the contact of the start button has come loose. To make sure of this, you should “ring” the circuit using a multimeter. The procedure is carried out when disconnected from the power supply.
- If the circuit and button are OK, the problem may be with the motor. You need to open the rotary hammer housing and check the engine for obvious damage, a burning smell or jammed rotor.
- Brush wear is the next breakdown on the list that can occur with a power tool. When using a rotary hammer for a long time, the brushes become shortened and cease to exert the required pressure on the commutator. You can buy brushes at the store and replace them yourself.
- Damage to the stator or armature is a serious malfunction. The breakdown requires rewinding, and this work can only be performed by a specialist.
- Noise and vibration increased. There may be several reasons: the bearings are worn out, the gears are skewed, or there is play on them. You can fix this problem yourself.
- The hammer drill requires constant lubrication. If you work without it, very soon the sealing rings will fail, and then it’s not far from the striker. Neglecting lubrication will result in the hammer having to be thrown away.
- The hammer can break if the user presses too hard on the hammer. This is due to the fact that the pressure forcibly accelerates the striker, which is forced to push the drill. Therefore, putting excessive pressure on the power tool is not advisable.
Electric drill - remember the design of the tool
An electric drill is a type of tool that is designed for drilling different types of materials, including concrete and reinforced concrete. Only for this you will need to use a tool with an impact drilling function or an impact drill. You can find out how the tool works if you take it apart. A brief description of the design of Soviet and foreign-made electric drills is described below.
It should be noted that the design of modern drills of domestic and foreign production differs from the design of Soviet tools. Only these are minor differences, which consist in the absence of reverse on an electric drill, as well as impact drilling. So, structurally, an electric drill consists of two main parts - electrical and mechanical. The mechanical part is based on the following structural elements:
- Gearbox - a set of gears, due to which the speed decreases and the torque from the electric motor shaft increases
- The cartridge is an executive body that is designed to secure working attachments
- Bearings are supporting mechanisms for shafts and axles that ensure their rotation.
- Impact mechanism - in electric impact drills this device is part of the gearbox
The electrical component of any corded electric drill consists of the following elements:
- A commutator type motor consisting of a stator (fixed part), rotor or armature (moving part) and a collector (copper plates or lamellas through which current is supplied to the armature winding)
- Graphite or carbon brushes are a transmission device through which current is transmitted to the rotor winding. Brushes are consumables, and when they spark, this indicates their wear.
- Start button - depending on the model of the electric drill, the switches can be regular or with a built-in speed controller
- Reverse button - Soviet drills do not have such devices. This is a polarity reversal mechanism through which the direction of rotation of the tool chuck changes. Installed separately or integrated into the start button
- A ferrite ring is an element (filter) through which noise in the network is smoothed out
- A capacitor is a filter element that prevents interference from entering the network
- Power cord - the link between the electrical outlet and the tool
The photo above shows the design of the drill with the main components. Sooner or later, it becomes necessary to repair the drill due to the failure of its individual components and mechanisms. To do this, you first need to inspect the tool, identify the cause of the malfunction, and eliminate it. More details about what types of drill breakdowns there are, how to identify and fix them, are described in the material.
This is interesting!
Old Soviet drills do not have a reverse mechanism or an electronic speed controller. Instead of an electronic regulator, a mechanical one is used, consisting of gears of different diameters and numbers of teeth. This method of adjustment is more reliable, since reducing the speed does not affect the power. However, this method of speed control is expensive, as it requires the additional use of a pair of gears. If one pair of gears wears out, you can continue to use the tool. Below are photos showing the design of the mechanical speed controller of an old Soviet drill.
How to prevent breakdown
As you know, nothing is eternal. Therefore, even the best quality hammer drill will eventually fail. But if the tool is handled incorrectly, failure will occur much earlier than with proper operation and careful storage.
To extend the life of electrical equipment, the following recommendations must be followed:
- Do not allow the engine to overheat.
- Work carefully.
- You cannot work continuously; the unit requires rest.
- It is necessary to carry out maintenance on time.
- Do not store the tool in a damp or dusty place.
- After each use, wipe off dust with a soft cloth.
Preventive measures
After we have examined the main causes of hammer drill malfunction, as well as methods for repairing breakdowns, we can highlight several points on how to extend the life of your impact tool.
- In case of frequent repair work, the hammer drill should be cleaned at least once a month.
- Do not forget to lubricate the device parts regularly.
- To prevent malfunctions, you should choose a high-quality hammer drill. Cheap devices are only suitable for use a couple of times a year.
- To prevent the mechanism from overheating and the brushes from wearing out, it is worth taking breaks from work. For example, after using it for 20-30 minutes, give yourself and the hammer drill a rest for 10 minutes.
- And lastly, after you've finished working, don't leave the hammer drill dirty. Be sure to clean it after each use and put it in a special drawer.
By following these little tips, you can extend the life of your hammer drill, which will save you time on repairing it and money on buying a new tool.
Don't be afraid to disassemble it; it may have stopped working due to a small problem that you can solve yourself.
To learn how to repair a rotary hammer with your own hands, see the following video.
A hammer drill is a complex device consisting of electrical and mechanical components. Constant use of this unit can lead to various breakdowns and malfunctions, especially if preventive maintenance is not carried out. To extend the service life of the tool, as well as to prevent unexpected breakdowns, you should periodically disassemble the hammer drill and carry out diagnostics. If it happens that the hammer drill refuses to function, then you should not rush to purchase a new unit, even if your tool is already ten years old. It can be taken to a repair shop, but the cost of the services will be quite high. This article will tell you how to repair a rotary hammer yourself.
How to choose equipment
When choosing, a potential buyer should take into account the intensity of use of the hammer drill. If you purchase a tool for regular work, you should pay attention to professional models that have more power (15 J) and a durable body.
It is not advisable to buy a weak hammer drill - its performance is the same as that of a conventional drill. It is impossible to carry out a full repair with such equipment. In addition, low-power power tools break down very quickly.
Spindle rotation speed for rotary hammers is not as important as for drills, so it is not necessary to pay attention to it. To work with large nozzles, 500 rpm is sufficient. But the frequency of impacts for a hammer drill is very important, since the quality and speed of drilling depends on it.
The hammer drill can have 1, 2 or 3 modes:
- drilling;
- impact drilling;
- drilling + impact crushing.
A hammer drill with 1 mode is not much different from a conventional drill.
A hammer drill is rightfully one of the most important tools for an installer and repair specialist. The ability to make holes in solid walls is extremely important. And, most importantly, there is almost nothing to do with this except a hammer drill. In this regard, the inoperability of this tool can almost completely paralyze all work.
Sample equipment decommissioning certificate
Equipment write-off act is a document that is drawn up by several persons and confirms the fact that the equipment has been written off.
All organizations are faced with the need to write off old equipment. Computers, office equipment and other property must be disposed of according to a write-off report. Correct write-off requires an expert opinion on the condition of the equipment, which contains an assessment confirming the impossibility of further use. A specially created commission or an invited expert organization draws up a technical inspection report, on the basis of which it is possible to write off fixed assets from the balance sheet and dispose of them.
Property tax has to be paid for equipment that has not been written off but is out of order or obsolete. You can write off fixed assets gradually - through depreciation, but there is a shorter way - drawing up an equipment write-off act. It is recommended to write off material assets that:
- cannot be used because they have become unusable;
- do not exist based on inventory results;
- damaged when repair is impossible or economically unfeasible.
Every year, the head of the organization must issue an order appointing a commission to write off fixed assets. The chairman of such a commission is, as a rule, a deputy director, and the members of the commission are the chief accountant, economists and engineers.
Reasons for decommissioning equipment
In most cases, fixed assets are subject to write-off in the following cases:
— The property has fallen into disrepair.
— It is impossible or economically infeasible to restore the object.
— Equipment does not exist as a single object.
All three circumstances must be present, otherwise the write-off will be illegal.
For example, you cannot write off a computer on the grounds that its performance is not sufficient to run a program. The hardware remains suitable for lower performance programs such as word processing or email. The write-off of the printer will be considered unreasonable if the commission does not include a technical specialist who can confirm that the fixed asset cannot be repaired. It will also not be legal to write off equipment without a decision on its disposal.
If the organization does not have a technical service that can competently confirm the impossibility of restoring equipment, you should contact third-party specialists. The list of activities of the invited organization must include an examination of the technical condition of equipment, a documented level of qualifications of specialists for conducting diagnostics of the relevant fixed assets.
An agreement is concluded with the selected organization with the wording “Diagnostics of equipment to estimate repair costs.” If the certificate of completion of work issued by the invited organization contains a conclusion about the malfunction and impossibility of restoring the equipment, the organization that owns the fixed assets will receive sufficient grounds for write-off.
To make an informed decision about the feasibility of restoring equipment, you should:
— compare the cost of repairs with the price of new equipment;
— assess the consequences taking into account the duration of the repair;
— compare the warranty period of new and repaired equipment.
When making a decision to dispose of equipment, an appropriate act must be drawn up with photographic materials documenting the disassembled (destroyed) object.
A hammer drill is not something you can skimp on
Every repairman or installer knows that the most important thing in a tool is quality and reliability. Well, in such an irreplaceable example as a hammer drill, these parameters are even more important. Often, trying to save money, we purchase goods of dubious quality, and we notice that after a short time the hammer drill begins to hit weakly, or even stops functioning altogether. This disrupts all the work and can lead to losses that will cover the amount saved on purchasing a hammer drill.
However, nothing lasts forever, and sometimes even the highest quality original products of this kind from the world's best manufacturers can fail. So, even owners of high-end models cannot be sure that they will be able to avoid repairs in the foreseeable future.
The main reasons for breakdowns of rotary hammers
As a rule, a hammer drill is a universal device that can also work as a drill. Usually on such instruments there are switches between rotation with combat, rotation and just combat. And if your Makita rotary hammer spins but does not hit, then it is likely that the whole issue is a broken switch.
Dust is one of the most serious enemies of a hammer drill. During the destruction of the wall, a huge amount of dust is released into the air, entering the cartridge and even the fan, wearing out the stator and armature. In this regard, it is recommended to periodically clean the hammer drill from exposure to dust, for which you can use compressed air. And the more actively you work with a hammer drill, the more often you need to do such cleanings.
Other mechanical breakdowns and their elimination
In addition to breakdowns associated with the impact mechanism, other mechanical breakdowns may also occur in the hammer drill.
Mode switch
There are times when the unit mode switch fails. Basically, this occurs due to dust clogging of this unit. To repair the switch, you will need to disconnect it from the body (see how to do this above) and clean it from dirt. If you find any damage to the plastic parts of the switch, it will have to be replaced.
Helical gears
The reason that the device stopped working normally, namely, stopped drilling and chiseling, may lie in worn-out teeth on the rotor shaft.
If this happens, the teeth on the intermediate helical gear will also be worn.
This problem occurs when the tool is jammed or the clutch is malfunctioning. The breakdown is eliminated by replacing the intermediate gear and engine rotor.
The drill does not stay in the chuck
The reason that the hammer drill does not hold the drill lies in the breakage of the chuck and the wear of its constituent parts:
- deformation of the balls occurred;
- the restrictor ring is worn out;
- The retaining spring gave way.
You will need to disassemble the cartridge and replace problematic parts.
Drill stuck in hammer drill
The reasons that the drill is stuck in the chuck of the device may be the following.
- Before installing the equipment, you did not apply lubricant to its shank. You will need to move the sealing rubber of the cartridge and inject WD-40 into the place where the tool fits.
- Dust got under the balls. Perform the same operation as in the paragraph above.
- If you used a regular drill inserted into an adapter in a hammer drill, then also treat it with WD-40, wait a couple of minutes, and, lightly tapping the clamp surface with a hammer, loosen the equipment in different directions. Typically, after these steps, the clamping jaws open and allow the drill to be removed.
- The tool shank came loose. You will need to first add WD-40 and try to remove the drill. If nothing works, then you need to disassemble the cartridge and knock out the equipment. You can also use tips on how to remove a tool stuck in the device from this video.
Which hammer drills should not be repaired?
Cheap. And this is obvious. After all, taking such a product to a specialist will often cost more than buying a new one. Its disassembly and repair with replacement of parts can significantly exceed the cost of the product itself. And since such breakdowns with cheap hammer drills happen very, very often, a considerable amount of money can be spent on constant repairs and the purchase of new devices. And this is another reason why it is better to buy quality tools.
But, as we said, the last one can also break. Therefore, if your original hammer drill from a well-known manufacturer begins to act up, this may be a consequence of both long-term use and your negligence in terms of care. In this case, self-repair can only cause harm, and it is better to seek help from professional craftsmen.
Repairing a rotary hammer yourself - instructions
It is worth noting that different models may have their own technical features, so there is no single manual for non-professionals. In addition, if you are not confident in your abilities, then it is better to turn to the experts.
For DIY repairs, the process is usually as follows:
- Removing the shift lever and rubber cap;
- The dismountable cartridge is dismantled, the brushes are removed;
- By removing the screws, you can open the case and gain access to the internal parts;
- The failed part is located and replaced;
- Lubrication is provided in the right places. It is recommended not to use a CV joint;
- The hammer drill is assembled.