General
Seam welding is one of the resistance welding methods. Two pieces of metal are joined together and pressed tightly between two welding roller electrodes. After this, voltage is applied to the electrodes from the pulse unit, and the material to be welded is rolled between the welding rollers. The welding process can be continuous, if welding with a continuous seam is required, or periodic to form an intermittent seam. The operating cycle, consisting of voltage pulses and pauses between them, can be selected by the operator. There is also a smooth adjustment of the welding roller rotation speed and welding current. The machine has a cooling system and a pneumatic roller compression system.
The FN-1B/2B seam welding machine is an improved model of the welding machine based on the FN-1A/2A model.
In Model FN-1B/2B,
some technical solutions have been improved and improvements have been introduced.
This model has the following features
: 1. A pneumatic cylinder creates pressure from the welding roller on the metal being welded. The simplified structure of the mechanism solves the problem of pressure changes caused by the friction of the welding roller, and also effectively stabilizes the oscillatory movements resulting from the operation of the machine. 2. The welding current control device has smooth and precise adjustment due to the use of powerful controlled silicon thyristors and a current control system. 3. Electronic speed control of the driving welding roller motor using integrated circuits allows you to set the welding speed in the range of 0~3.2 m/min. 4. The automatic control system for the welding process allows you to set all the necessary welding parameters and, further: the welding process is performed automatically, and the operator does not need to do anything other than press the foot pedal and load and unload workpieces.
Application
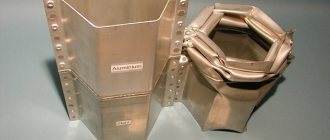
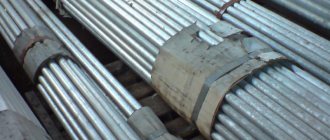
Examples of roller welding
It is advisable to use step welding in cases where overheating of the outer surface of the part is especially dangerous, for example, when welding clad duralumin and in other cases.
Figure c shows welding with a continuous flow of current. It is used relatively rarely - for joining thin (up to 1 mm) sheets of low-carbon steel.
The parameters of the roller welding mode are current strength, pressure, welding speed, pulse and pause duration, and the width of the working surface of the rollers. The diameter of the rollers has some influence.
- The current strength is 1.5-2 times greater than with spot welding.
- This is explained by the fact that in order to avoid overheating of the surface of the sheets, the welding mode of each elementary point must be quite rigid
- An increase in current is also required in connection with shunting, which reaches a significant value in the immediate vicinity of adjacent points. Pressure is taken in approximately the same ratio.
The welding speed and the total pulse and pause time are in the following relationship:
roller welding
where Vw is the welding speed in m/min;
a — dot pitch in mm:
tsectn — pulse and pause duration in seconds.
The pitch of the points depends on the thickness and type of metal. For low-carbon and low-alloy steels, the pitch is 2.8-3.2 times the thickness of the thinner part, for stainless steel - 2.4-2.8, and for light and non-ferrous metals and alloys 2.0-2.4.
Example of welding electrodes for welding
Roller welding machine
Specifications
| Model | FN-35-1B/2B | FN-50-1B/2B | FN-75-1B/2B | FN-100-1B/2B | FN-125-1B/2B | FN-160-1B/2B |
| Rated power, kW | 35 | 50 | 75 | 100 | 125 | 160 |
| Loading duration, % | 50 | 50 | 50 | 50 | 50 | 50 |
| Supply voltage, V | 380 | 380 | 380 | 380 | 380 | 380 |
| Welding thickness, mm | 1+1 | 1.5+1.5 | 2+2 | 2.5+2.5 | 3+3 | 3.5+3.5 |
| Welding speed, m/min | 0.8~3.2 | 0.8~3.2 | 0.8~3.2 | 0.8~3.2 | 0.8~3.2 | 0.8~3.2 |
| Water consumption, l/h | 300 | 300 | 400 | 600 | 800 | 800 |
Structure of Seam Welding Machine
Seam welding machines in this series consist of: a housing, a pneumatic system, a motor speed control unit, a ventilation system, an electrical control system and a continuous water cooling system. Below is a detailed description of each part of the machine: 1. Body: the main part of the welding machine, a combination of welding angle steel and sheet iron. 2. Pneumatic system: includes an air purification system, solenoid valve, fittings, and pneumatic hoses. 3. Motor speed control system: includes a gearbox, a DC motor and a control unit. 4. The ventilation system consists of: a cylinder, a guide tube, etc. 5. The electrical control system includes a block of thyristor switches and an automatic current regulator. 6. The water cooling system consists of: a water supply device, a flexible secondary water cooling tube, a cooling pipe electrode clamp, and a water level measurement sensor.
Installation and use
1. Secure the welding machine to a level concrete floor using anchor or embedded bolts. 2. Connect the machine to a power source of 380V, 50-60Hz, corresponding to the power consumption of the welding machine. The welding machine must not come into contact with the surface on which it stands, the grounding resistance must be less than 4 ohms, and the insulation resistance must be at least 2.5 megohms. 3. Turn on the compressed air supply, the external air compressor should maintain the air pressure between 0.2~0.5MPa as set. 4. Further actions: 1) When the power is turned on, the light indicator turns on. 2) Turn on the motor controller, set the speed of the welding roller to select a suitable welding speed. 3) While pressing the foot pedal, check the functions of the machine. Set the required seam welding parameters on the control panel.
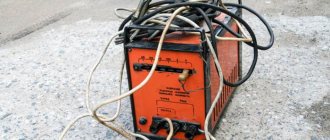
Production of welding equipment: instructions.
According to experts, a three-phase step-down transformer should be chosen as the basis of the equipment.
The secondary windings are removed from the coil, the primary wires and core are left in their original form, the middle wire is wrapped in the same material with 8-10 turns at the output.
To independently produce welding equipment, you need a 25 m cable, a copper pipe 10-12 mm in diameter, a metal disc and a grinder.
It is necessary to ensure that both coils located at the edges are filled by carefully winding the secondary winding using a multi-core three-phase power cable. The flexible wire winds without the need to disassemble the equipment.
The parameters of the wires in the cable are 6-8 mm in diameter. One of them should be thinner, but with good insulation and resistant to current power. For the production of the device 25 m of cable. If necessary, it can be replaced with wires with a smaller cross-section.
It is more efficient to do this work together: one person will do the pulling of the wire, the second will do the laying of the turns. To make a terminal, you need a copper pipe 30-40 mm long and 10-12 mm in diameter.
One part of it is separated, which forms a plate in which a hole up to 10 mm in diameter is made; pre-stripped wires are inserted into the other part. Experts advise crimping the wires with a hammer.
Contact will improve if several notches are made on the outside of the pipe.
New fasteners with M10 threads replace the existing screws and nuts at the top of the transformer, to which the terminals from the secondary winding are then attached.
It is necessary to make 11 holes (no more than 6 mm in diameter) in the textolite board for screws with nuts and washers; and firmly attach it to the surface of the transformer. These components will provide the output of the primary winding.
The electric holder is made from ¾ pipe 25 cm in length. It is necessary to make recesses in the corners, and weld a small piece of metal wire to the holder.
A hole is made on the reverse side and a piece of cable is connected, as with the secondary winding. Then you need to insulate the pipe with a rubber hose.
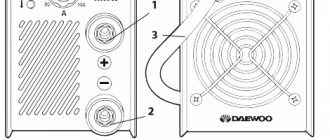
Operating the Control Panel
According to the needs of our customers, the automatic welding mode is divided into two types: general continuous welding and periodic pulsating welding. 1. Counter: counts welding seams. 2. Clear counter: Press the button to reset the counter to zero. 3. “Release Yes\No”: when switched to the “no” column, press the foot pedal, all parts of the machine will work in automatic mode. 4. Power on: Turn on the main switch of the control box to prepare to operate the machine. 5. Pre-pressure time: refers to the pre-pressure time between each welding cycle and blowing, this time should be longer than the time required for the pneumatic cylinder to move from top to bottom. 6. Adjusting the seam welding current: clockwise - increase the current power, counterclockwise - decrease. 7. Motor rotation speed: clockwise - the motor speed increases, counterclockwise - decreases. 8. Pause: Increases the electrode charge time before welding, acting as a break in the intermittent welding process. The greater the volume of work, the longer the interruptions in machine operation. 9. Welding: During welding, power is supplied in pulse mode. The larger the volume of work, the longer the operating time of the machine. 10. Non-working time is the time between the last operation of the machine and the present switching on. Usually does not affect the quality of welding. 11. Look at the welding setup in the picture below.
In Fig. Figure 1 shows the parameters of the actual volume and duration of one welding cycle. Since an intermittent weld is used, the longer the machine runs and the higher the current, the higher the productivity. If the cycle time is long enough, the weld spots are deep and infrequent. Of course, the rotation speed of the welding roller is also important.
Note when using seam welding machine
1. The water must be turned on before the welding machine starts working. Every moving part of the machine, including the waste box, must be kept lubricated at all times. The material being processed must be cleaned before welding to prevent damage to the electrodes and welding rollers. 2. If the temperature of the room where the machine is installed is below zero Celsius, it is necessary to remove water from the cooling system pipeline after finishing the machine to avoid pipe rupture when water freezes. 3. The welding machine must be checked after every power off. The operator must wear canvas gloves and a thick apron to avoid scalding. 4. The seam welding machine should not be placed in a damp room, due to the possibility of the power supply becoming damp. The insulation resistance between the supply circuit and the outer casing must be at least 2.5 MOhm, and only in this case the machine can be turned on and used. 5. The location of the welding machine must be clean and free of caustic and flammable substances, corrosive gases and any products of chemical decomposition of compounds, as this may cause serious damage to the insulating system of the welding machine. 6. The welding machine must operate in strict accordance with the rated load capacity, overloading the machine is not allowed.
How to get a sealed seam
Seam tightness is ensured by creating a chain of partially overlapping resistance welding points. The weld spot after the pulse passed through the roller electrodes has the shape of an oval.
If you correctly combine the feed rate of the workpieces and the frequency of welding pulses, the ovals will overlap with their side parts, forming a continuous and sealed suture material.
If you find an error, please select a piece of text and press Ctrl+Enter.
Welding machine maintenance
| Maintenance of machine parts | Explanation of maintenance | What to do | How often should it be done |
| A full range of | Wipe off dust from the case | Wipe off the dust | daily |
| Lubrication of pneumatics and moving parts of the machine | Fill the lubricator with oil | If necessary | |
| Cleaning up spilled liquid and dust | Remove splashed liquid using a bucket and dust using a compressor | monthly | |
| Transformer | In the prescribed manner, check the hose connected to the pipeline; if there is no water, add | Check back as often as possible. If there is a water leak, fix the problem in time. | daily |
| Condition of connection of bolts, secondary winding and tension belts | Tighten the loosened bolts tightly | every season | |
| Dirt that gets onto the transformer must be removed in time | Remove dirt | monthly | |
| Welding electrode | Keep the surface of the material being processed clean | Wash and wipe the surface | daily |
| There should be no metal objects on the work surface | Wipe or reposition the electrode | daily | |
| Cooling system | The machine cannot be used without coolant | First turn on the water, only then the welding machine itself | as stated in the instructions |
| Make sure the cooling system is not clogged | Clean the system from clogs and deposits in a timely manner | every season | |
| The water temperature should not be too high | Ensure that the inlet water temperature does not exceed 30oC and the final water temperature does not exceed 50oC | daily inspection | |
| Prevent the machine from freezing so that the pipes do not burst from frozen liquid | Use a compressor to remove water from the cooling system daily. | mainly in winter |
Note:
there is no need to frequently add oil to the lubrication box. When the oil level is below o, add a mixture of castor oil and graphite oil in a 2:1 ratio.
Roller welding of stainless steel – Machine tools, welding, metalworking
Roller welding, diagram
Roller welding is such a complicated type of spot welding, when the points are so closely, overlapping, close together that a strip of continuous connection is formed. Unlike other types of this welding, it is used for the manufacture of various kinds of thin-walled products that require:
Roller welding progress
Stainless steel welding technology
Stainless steel, like other materials, has a unique, characteristic set of characteristics, on which the method and technique of its processing will depend. The topic of this article is stainless steel welding technology.
Why is a separate stainless steel welding technology needed?
Stainless steel
(corrosion-resistant steels and simply “stainless steel”) - alloy steel that is not subject to corrosion in the atmosphere and aggressive environments.
Stainless steel can be austenitic, ferritic and martensitic, each characterized by its own microstructure with a predominant crystalline phase.
- For austenitic
stainless steels, the main phase is austenite. Such alloys contain chromium and nickel (less commonly, manganese and nitrogen). The most common stainless steel in this class is 304 steel (or T304). It contains 18–20% chromium and 8–10% nickel. Thanks to this composition, this type of stainless steel has no magnetic properties, is resistant to corrosion, durable and ductile. All these qualities allow the use of 304 steel in many industries. - Ferritic steels.
Their main phase is ferrite. This class of stainless steel contains iron and chromium. The most common is 430 steel, which contains 17% chromium. Ferritic steels are not as ductile compared to austenitic ones, they are not hardened during heat treatment and are most often used in aggressive environments. - Martensitic steels.
The microstructure of martensite was first discovered by the German microscopist Adolf Martens in 1890. These are low carbon steels, the most notable example being 410 steel (12% chromium and 0.12% carbon). Stainless steels with this structure are characterized by hardness, brittleness and fairly low rigidity. They have found application in mildly aggressive environments (manufacturing cutlery and cutting tools).
Why is it necessary to use special technology for welding stainless steel? The answer to this question is quite simple - these metals are highly alloyed and difficult to weld. When these steels are in a molten state, they behave differently than other types.
The weld pool turns out to be too liquid, so it is very difficult to “assemble” a normal bead. It is uneven due to the metal spreading too quickly over the surface, the edges do not have time to set.
All this leads to the formation of many defects, to minimize which stainless steel welding technology provides additional protection.
This technology is more complex than welding conventional carbon steel. These steels have different properties, so welding “stainless steel” is more difficult and requires preheating.
Stainless steel has the following features compared to regular steel:
- low melting point;
- low thermal conductivity coefficient;
- high coefficient of thermal expansion.
Steels containing up to 20% carbon rarely require preheating. The technology for welding stainless steels (carbon over 0.20%) requires preheating. If the thickness of the metal being processed exceeds 30 mm, then it must be heated at a temperature of 150 ° C (in rare cases, stronger heating is necessary).
What determines how effective stainless steel welding technology is?
Different grades of stainless steel have different weldability, which is influenced by many factors:
- These metals, compared to low-carbon steel, are less thermally conductive (the difference is from 50 to 100% for different grades). Therefore, it is necessary to provide for this in stainless steel welding technology, otherwise the metal can be burned through due to the increased concentration of high temperatures at the seam. To prevent such consequences, it is necessary to perform welding work with a current mode reduced by 17–20%.
- Stainless steel has a fairly high electrical resistance, and therefore the electrode can become very hot (this is the reason for their rapid failure). Welding technology for this type of metal requires the use of chromium-nickel electrodes.
- This type of steel has a considerable coefficient of linear expansion. Therefore, the technology for welding fairly thick products requires maintaining a certain gap, which allows us to obtain the necessary shrinkage of the seam. If you neglect this rule, cracks may form.
- The welding technology of austenitic chromium-nickel stainless steel must not be violated, as this may cause it to lose its anti-corrosion properties. This is explained by the formation of iron and chromium carbides. To get rid of this phenomenon, they usually use rapid cooling of the weld with cold water, which will significantly reduce the likelihood of loss of corrosion resistance.
- Stainless steel welding technology requires the use of special welding equipment, the choice of which is presented in a wide range. If you get the right tool, you can do this even at home.
Problems and their solutions
| Nature of the problem | Possible reasons | Solutions |
| Controller indicator light does not work | 1. The board or light bulb is faulty. | Check, replace |
| 2. The controller fuse has blown. | Check, replace | |
| 3. The switch is broken. | Check, replace | |
| The switch does not work when the pedal is pressed | 1. The pedal is broken. | Check, repair, replace |
| 2. The switch is broken. | Check, replace | |
| 3. Wiring diagram is broken. | Check, replace | |
| Welding roller does not rotate | 1. The motor is damaged. | Check, replace |
| 2. The fuse has blown. | Check, replace | |
| 3. The controller is damaged. | Check, replace | |
| 4. The cleaning unit is broken. | Check, repair, replace | |
| 5. Speed set too low. | Check, adjust | |
| Increased sparking of electrodes during welding | 1. The pressure in the cylinder is too low or too high. | Tune |
| 2.The distance between the electrodes is too large or too small. | Tune | |
| 3.Pre-clamping time is too short. | Tune | |
| 4. Inappropriate welding mode selected. | Tune | |
| 5. Dirty welding material. | Clean | |
| When pressing the pedal the cycle does not start | 1. The microcircuit is broken. | Check, replace |
| 2. The main transformer is damaged. | Check, replace | |
| 3. The control panel is broken. | Check, replace | |
| Welding is not tight enough | 1. Inappropriate welding mode selected. | Tune |
| 2. Poor contact of the welding roller, the roller is dirty. | Check, wipe | |
| After pressing the pedal, the motor does not stop rotating | 1. The cylinder is damaged. | Check, replace |
| 2. The valve is broken. | Check, replace | |
| 3. The control panel is broken. | Check, replace |
Advantages and disadvantages
Roller contact welding is often used in conveyor production. It is widely used due to a number of advantages over other methods of overlapping metals:
- good performance, the welding machine produces several tens of meters of seams in an hour;
- guaranteed high quality connections;
- welding takes place without surfacing materials: consumable electrodes, filler wire;
- the metal is arced through between the electrodes, the melt does not oxidize at this moment, the contact zone does not need to be protected with flux or a cloud of neutral gas;
- high work culture, no need for standard welding equipment.
The disadvantages are considered to be low technology:
- You cannot weld sheets of different alloys;
- there are restrictions on the thickness of the workpiece up to 3 mm;
- Expensive equipment is purchased only for large volumes of welding work.
Scheme
Scheme No. 1
Scheme No. 2
Scheme No. 3
Scheme No. 4