Causes of the defect does not clamp the bit
Based on the experience of our service engineers, we can identify the following reasons:
- Untimely prevention and cleaning of the device
- Lack of protection against power outages
- Replacing Consumable Accessories
- Not carefully studying the user manual or ignoring the manufacturer's advice.
- Not careful use
Bring your equipment to our service centers or call the technicians to your home and we will repair it and provide a guarantee. Afterwards, the faulty device will work at 100 percent (full). Addresses of Umedia services in all districts of St. Petersburg.
Where can I get it repaired in St. Petersburg?
Location: In the shopping center Trading yard Archimedes, 1st floor, room 7A. Nearest addresses - Metro: Politekhnicheskaya, Ploshchad Muzhestva; Avenues: Sciences, Civil Invictus, Northern; Streets: Vernost, Butlerova, Gzhatskaya, Favorskogo, Karpinskogo. .
Metro station:
Academic
—> Working hours:
from 10.30 to 20.00
Location: On the 2nd floor in the Morskoy shopping center. Nearest addresses - Metro: Vasileostrovskaya, Primorskaya; Avenues: Morskaya Embankment, Vasileostrovsky; Streets: Korablestroiteley, Nalichnaya, Uralskaya. .
Metro station:
Primorskaya
—> Working hours:
from 10.00 to 20.00 (7 days a week)
Location: Entrance from the parking lot. 6 steps up. Nearest addresses - Metro: Kupchino, Zvezdnaya; Avenues: Vitebsky, Slavy, Danube; Addresses: Sofia, Bukharestskaya, Malaya Balkanskaya, Oleko Dundicha, Budapestskaya, Kupchinskaya. .
Metro station:
Kupchino
—> Working hours:
Weekdays: from 10:00 to 20:00; Sat, Sun: from 10:00 to 18:00
Location: In shopping center Paktor (Bada Bum). 5 minutes from Ozerki metro station. Siqueiros, Yesenina, Vyborg highway, Thorez Avenue. .
Metro station:
Ozerki
—> Working hours:
Mon-Fri: from 10:00 to 20:00, Sat-Sun: from 10:00 to 19:00
Location: On the ground floor, section 015. Nearest addresses - Avenues: Bogatyrsky, Ispytatelei, Sizova, Streets: Tupolevskaya, Gakkelevskaya, Baikonurskaya, Staroderevenskaya. .
Metro station:
Pionerskaya
—> Working hours:
from 11:00 to 21:00 (Sat-Sun until 19:00)
Location: Entrance from Saperny Lane. Nearest addresses - Avenues: Liteiny, Suvorovsky, Nevsky, Ligovsky; Streets: Zhukovsky, Nekrasova, Vosstaniya, Radishcheva, Mayakovsky. .
Metro station:
Chernyshevskaya
—> Working hours:
Weekdays: from 10:00 to 20:00; Saturday: 10:00 – 19:00; Sun: 11:00 – 18:00
Location: On the 2nd floor of the Yugo-Zapad shopping center near Media Markt. Nearest addresses: Metro Kirovsky Zavod, Avtovo; Leninsky Avenue, Stachek; street Marshal Kazakov, Marshal Zakharov, Valor. .
Metro station:
Kirov plant
—> Working hours:
from 10.00 to 20.00 (7 days a week)
Location: On the 2nd floor in the Rzhevka shopping center, room No. 2-07b. Nearest addresses - Avenues: Irinovsky, Kosygina, Industrialny, Nastavnikov; Streets: Communes, Progressives, Enthusiasts, Shockers. .
Metro station:
Bolsheviks
—> Working hours:
from 11.00 to 20.00 (7 days a week)
Location: How to get there? Magnit store, checkout area, Umedia Serivis sign. Nearest addresses - Metro: Ploschad Muzhestva, Vyborgskaya, Chernaya Rechka; Avenues: Lesnoy, 1st Murinsky, Polyustrovsky, Bolshoi Sampsonievsky; Streets: Kantemirovskaya, Kharchenko, Litovskaya, Vyborgskaya. .
Metro station:
Lesnaya
—> Working hours:
from 10:00 to 20:00 (7 days a week)
Location: Entrance to the ground floor, near Magnit. Nearest addresses - Avenues: Severny, Prosveshcheniya, Lunacharsky; Streets: Kirishskaya, Toksovskaya, Luzhskaya, Ushinskogo, Kirishskaya. .
Metro station:
Civil Prospect
—> Working hours:
from 10.00 to 20.00 (7 days a week)
Location: on the 2nd floor. Neighbors FIX-PRICE. Nearest addresses - Metro: Bukharestskaya, Mezhdunarodnaya; Avenues: Slavy, Vitebsk; Addresses: Sofia, Salova, Bela Kuna, Fucik, Budapest, Paris, Turku. .
Metro station:
International
—> Working hours:
from 10.00 to 20.00
Location: Two end entrances to the Magnit Cosmetic Store. Nearest addresses - Avenues: Novgorodsky, Vitebsky, Moskovsky Streets: Shkolnaya, Pushkinskaya, Okulovskaya.
Metro station:
Shushary
—> Working hours:
Mon-Fri: from 10.00 to 20.00; Sat: from 11.00 to 19.00; Sun: closed
Location: In the Cosmos shopping center, 2nd floor. Nearest addresses - Avenues: Kolomyazhsky, Bogatyrsky, Ispytatelei, Korolev; Streets: Parashutnaya, Gakkelevskaya, Staroderevenskaya, Planernaya, Sharova, Dolgoozernaya. .
Metro station:
Komendantsky Avenue
—> Working hours:
from 10:00 to 20:00 (7 days a week)
Location: Second floor of the Pyaterochka store. Nearest addresses - Avenues: Levashovsky, Chkalovsky, Petrovsky, Dobrolyubova, Kamennoostrovsky; Streets: Zhdanovskaya, Bolshaya Pushkinskaya, Bolshaya Zelenina, Lenina. .
Metro station:
Chkalovskaya
—> Working hours:
Mon-Fri from 10:00 to 20:00, Sat-Sun from 11:00 to 19:00
Location: On the 1st floor in the Plovdiv shopping center, near the cash register area. Nearest addresses - Metro: Park Pobedy, Mezhdunarodnaya, Moskovskaya; Avenues: Vitebsky, Cosmonauts; Streets: Tipanova, Titova, Baseinaya. .
Metro station:
Moscow
—> Working hours:
from 10.00 to 20.00 (7 days a week)
Location: Front entrance from Valor. Nearest addresses - Avenues: Leninsky, Kuznetsova, Geroev, Peterhofskoe highway; Streets: Valor, Marshal Kazakov, Marshal Zakharov, .
Metro station:
Leninsky Prospekt
—> Working hours:
Mon-Fri: from 10.00 to 20.00; Sat: from 11.00 to 18.00; Sun: closed
Location: On the 2nd floor of the Termin shopping center. Nearest addresses - Metro: Dybenko, Bolshevikov; Avenues: Dalnevostochny, Podvoisky, Iskrovsky, Tovarishchesky; Streets: Dybenko, Antonova Ovseenko, Oktyabrskaya embankment, Podvoisky. .
Metro station:
Dybenko
—> Working hours:
from 10.00 to 20.00 (7 days a week)
strawberry
The garden strawberry (or simply strawberry Fragaria ? ananassa) is a widely grown hybrid species of the genus Fragaria (collectively known as the strawberries)
A banana is an edible fruit, botanically a berry, produced by several kinds of large herbaceous flowering plants in the genus Musa.
The apple tree (Malus domestica) is a deciduous tree in the rose family best known for its sweet, pomaceous fruit, the apple. It is cultivated worldwide as a fruit tree, and is the most widely grown species in the genus Malus.
The orange (specifically, the sweet orange) is the fruit of the citrus species Citrus ? sinensis in the family Rutaceae.
Source: remont3.ru
How to remove and repair a screwdriver chuck with your own hands
Today, many people use a tool such as a screwdriver, so it is not surprising that there is a high demand for them. Very often the device breaks down, and the buyer rushes to a repair shop, paying money for repairs. You don’t always want to do this, of course, so in our article we will help you become more familiar with the design of a screwdriver. You can deal with some problems on your own.
We will look at various cases of screwdriver breakdowns, namely: we will deal with the most common breakdowns of such an important part of the tool as the chuck.
Screwdriver chuck: description, function
The cartridge is a metal cylinder with a cavity inside, equipped with a ring and a control sleeve. It is fixed to the shaft. With its help, the drill or grinding attachment is securely fixed in it for further work. The fixation of the working part of the tool (drill) is ensured by the thread. The drill is tightened in two ways. The first method is to tighten it with a special wrench; in the second method, the drill is tightened when the chuck is rotated in the direction opposite to the axis of rotation of the drill.
How to disassemble a screwdriver chuck
Despite the fact that today there are many models of screwdrivers on the market, they have the same general approach to removing such an element as a cartridge. Now we will briefly describe it.
In order to unscrew it, you need to remove the screw securing it to the shaft. It is located inside the cartridge; the screw should be rotated clockwise. After you have unscrewed the screw, you should jerk the cartridge in the opposite direction.
Attention! If you try to unscrew it manually, you must set the drill to second speed if it is two-speed. When purchasing a tool, it is advisable to lubricate the screw with machine oil. In some cases, when this element does not want to give in, then you should put the tool on first speed, hold it in your palm, and turn the reverse to the left. The cartridge should come off the thread easily.
How to replace a screwdriver chuck
It will not be easy for an untrained user to replace it, since without the help of a special tool you will not be able to do it with your bare hands. There are two ways in which it can be removed, and we will consider them further in our article. In order to change it, you should pay attention to the actions that we described in the article above. Dismantling is performed with the following tools:
- A hex key is usually a 10mm L-shaped metal rod. Its short part should be fixed in the chuck, the long part should be rested against something, for example, a table. We turn the cartridge, and then remove it by turning the key.
We looked at the dismantling method using a key. The method to remove the element manually is described above.
Care and storage
- regularly disassemble and clean the internal elements of the screwdriver from carbon deposits, dust and dirt;
- If unstable operation occurs, carry out diagnostics. Check the wear of the brushes so that you do not have to change the motor armature;
- Do not leave the instrument in areas with high humidity or under the sun. The same goes for the battery;
- Do not keep the battery near keys, coins or other short metal objects. In case of accidental contact with the poles, the battery will short circuit. As a result, a fire may occur;
- At the end of the working day, take a clean rag and wipe the instrument. The cloth can be slightly moistened with water without using detergents;
- The screwdriver should be stored in a dry environment with positive temperatures. Use a case or other packaging to prevent the instrument from becoming covered in dust.
Operate a screwdriver, observing safety precautions and the rules described in the instructions.
Choose the right equipment. And then the tool will serve you for a long time. How to insert a drill
into
a drill
and hammer drill
- 1 Varieties
- 5 How to insert a drill
- 3 What to do if the drill gets stuck
- 4 Videos
There are often problems that arise when working with a rotary hammer or another drill. Basically, the problem may lie in the inability to work correctly with drills. First, let's look at some differences between the cartridges and the drills.
DIY screwdriver chuck repair
This is a moving element of the tool, which consists of many rubbing parts. During operation, it is subject to wear resulting from the action of friction forces, impact forces and other factors. The chuck's runout and excessive play can frighten an inexperienced craftsman. In some cases, it is not always possible to allocate the time or finances to contact a repair shop. Therefore, we will look at how you can do it yourself when repairing various tool malfunctions.
Repairing a screwdriver with your own hands when the chuck is loose
A small play within 1 mm usually does not create visible problems during operation. If the value is larger, you should pay attention to the condition of the gearbox. So, the procedure is as follows:
- Unscrew the bolts securing the top cover of the tool. Let's take it off.
- Unscrew the electric motor from the gearbox. We inspect the fastenings.
- Let's disassemble the gearbox. Often the cause of failure is a malfunction of the bushing located inside. It is possible to remove the bushing using the steps described at the beginning of the article (see how to remove the cartridge manually). The bushing is easily pressed out by hand.
- We are replacing the bushing. Then we assemble everything in the following sequence: bushing, shaft, bushing bearings, retaining ring. Lubricate the rubbing parts.
- After this, we assemble the gearbox in reverse order. We attach it to the electric motor.
- Assembling the screwdriver body.
Repairing a screwdriver with your own hands when the chuck runs out
The main culprit for this problem is the screwdriver gearbox. To make sure of this, you need to remove it by dismantling it in the above manner. This particular breakdown may indicate several problems in the gearbox, which we will indicate below. The reason may be:
- violation of the gearbox shaft geometry;
- production of gears;
- malfunction of the shaft support bearing;
- wear of the pins securing the satellites of the planetary gear.
The above parts are produced only in factories, so you won’t be able to make them yourself. All you have to do is purchase them and replace the broken ones.
Screwdriver chuck thread
Structurally, this movable element is fixed in the tool body in three ways:
- Fastening using Morse taper.
- Carving.
- Securing the set screw.
Fastening using a Morse cone has been known for a long time and consists of the following. The shaft has the shape of a cone, repeating the contours of the surface inside the cartridge - the same cone. By combining them in a certain way, a reliable connection is obtained.
Connecting the shaft to the chuck using a threaded connection consists of having a thread at the end of the shaft onto which a chuck with the same thread can be freely screwed.
The fixing screw is most often used as an additional fastener. Its head has notches for a Phillips screwdriver, as well as a left-hand thread. You can see this screw by unscrewing the cams that cover it.
To find out what kind of mount your tool has, you need to carefully inspect the body of the tool. Each type of fastening has its own designation. For example, this: 1–6 B 10 will mean that the cartridge is secured using a Morse taper of size B10, and nozzles with a shank diameter of 1 to 6 mm can be used for it. If you have the following entry: 1.0–11 M 12 x 1.25, you will know that you should use nozzles with shanks from 1 to 11 mm; the metric thread has a cross-section of 12 x 1.5 mm. Foreign manufacturers use indicators in inches, for example, 1.0–11 ½ – 20 UNF.
In this article, we examined the main problems that arise during the operation of the tool, and paid attention to such a critical component in the design of a screwdriver as the chuck. At the same time, we figured out how it is attached to the design of the screwdriver, gave some tips on how to repair it yourself, and also tried to outline ways to solve repair problems.
Source: pro-instrument.com
Video: How to Insert a Drill Bit into a Bosch Drill
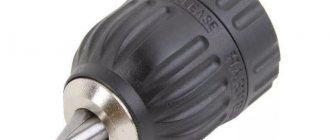
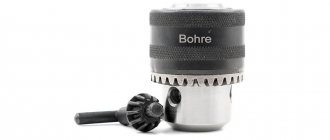
Pulling out and installing drill bits is much easier and faster when using a quick release chuck. In it, the sleeve is rotated manually. To limit cam force, they are often equipped with locking elements.
Before inserting the planter, first make sure the planter is in working order and disconnect it from the power source. Only then can you start training.
Types of Eyeless Cartridges
Installation of working tools on a hammer drill
As stated above, the hammer should be checked before installing the drill bit. To perform such a test, the perforation mode is set for non-combat drilling. If you hear and feel that the motor runs smoothly and without shock when you press the start button on the device, this means that the hammer can be used for its intended purpose after drilling or drilling.
To attach a straight shank drill bit to a hammer drill, use a jaw adapter
Before inserting a drill into a hammer drill, the shank of the working tool must be treated with a special lubricant that will protect it from corrosion. The procedure for installing drill bits in a drill is as follows.
- The hammer drill is installed on the back of the floor or other hard surface.
- The moving part of the clamping device is retracted.
- The tool is inserted into the punch until it stops. In this case, the drill bit or insertion bit should be held vertically. If you do not comply with this requirement, you may experience breakage or even breakage of the tool, which can also cause the drill bit to malfunction.
Press until it clicks, then pull the drill out if it doesn't work. Everything is fine
Due to the fact that the chucks on modern hammer drills have a fairly simple operating principle, questions about how to get a drill from a hammer drill, as a rule, do not arise.
After removing a used tool from a hammer drill to replace it with another, it is recommended to immediately clean the shank of grease and construction dust. The drill bit you are going to insert should also be cleaned and pre-lubricated. The tool replaced in this way will not damage the impact mechanism and will last much longer.
Lubrication extends the life of both drill bit and bit
With a hammer drill, you can not only get a drilled structural element, but also perform processing using a special chisel. You can also set the device's mixer as an operating element.
Home workers also often have questions about how to insert a drill into a screwdriver or how to replace the cartridge on an impact drill. The first question is easy to solve, since the design of the screwdriver uses chucks of the same design as for drills and rotary hammers. But the question of how to correctly replace a cartridge with a hammer drill must be approached with skill: carrying out such a procedure without certain knowledge and skills is not easy.
Some tips for using drilling tools
To avoid the risk of injury to your health from flying tools or concrete chips, drilling operations must be carried out with all precautions. To ensure this safety, you should use safety glasses, gloves, earplugs or earplugs
Naturally, all work must be carried out in special clothing, which should not contain hanging elements that could be wound around the drill.
To prevent the power tool used for drilling from overheating, it should be rested regularly.
It is very important to insert the drill correctly (this must be done until the tool stops)
Two ways to compress a thin cartridge if the jaws extend just short of the shank
If a drill bit gets stuck in the wall while drilling, it should be removed without removing the tool from its surface. To do this, remove the drill bit from the hammer drill and insert another one with which you want to start breaking the wall around the drilled hole in it.
If the drill bit cannot be removed from the drill or hammer drill, it should be clamped in a vice and then pressed down with a hammer using a wooden spacer to press the jaws of the clamping mechanism. This can be helped by oil, a few drops of which are poured into the key cartridge.
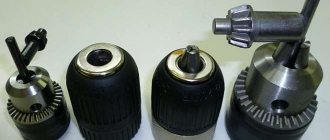
The role of the chuck in reliable fastening of the drill
Clamping drill chucks for household drills are available in three modifications:
The body of the key jaw chuck is made in the form of a hollow hardened cylindrical sleeve (collet), on the outer surface of which a rotating adjusting collar is installed. On one side the cylinder is mounted on the drive shaft of the drill, and on the other side there are cams (petals) for attaching cutting tools (drills, taps, reamers, etc.). When the adjusting ring rotates, the steel cams move along guides using special threads. If they come close to each other, the drill is clamped. If they diverge from each other, the tool is released. The approaching and moving away of the cams depends on the direction of rotation of the holder. Reliable fixation of the drill is ensured by tightening the chuck holder with great force. To do this, use a special key or a quick-clamping - on quick-release chucks - clutch.
The key helps to firmly clamp the drill and easily unscrew the adjusting collar. Drills of various diameters with a cylindrical shank are fixed in jaw chucks. Most often, household electric drill chucks are designed for drills with a diameter of 0.8 to 10 mm or 1.5 to 13 mm.
Why and when do you need to change?
The clamping device must ensure drilling of holes with acceptable accuracy. But over time, the seats on the shaft and cams wear out, and the cartridge begins to beat. That is, the working area of the drill begins to move from side to side when rotating, and the hole is drilled with deviations both in location and in diameter. Wear on the cams does not allow the drills to be securely fastened, and they stop under load. There is only one way out - replace the worn cartridge with a new one.
Causes and types of malfunction
Incorrect operation of the fastening mechanism, when the screwdriver does not clamp the bit well, may be caused by wear of one or more of its elements. On the outside of the cams there are teeth that engage the rotary gear and, when twisted, move up along a conical guide, clamping the drill shank. When grinding teeth on the cams or gear, the clamping force becomes insufficient to hold the bit securely.
There is an option when the cams, although they do not converge completely, can provide the required amount of pressure up to a certain diameter. Then a temporary solution is possible. Wire is wound onto the shank of the bit (the best material is copper), increasing the diameter and thus tightly tightening the improvised structure. These are extreme measures that allow you to realize the capabilities of the tool only in case of extreme necessity.
How to replace the chuck in a drill with your own hands?
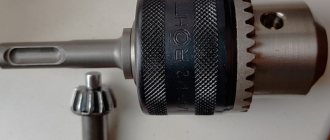
To attach the chuck to the drive shaft of the drill, a threaded connection or Morse taper is used. A visual inspection of an electric drill will not always help indicate how to secure the drill chuck. This can be indicated by the marking on the cartridge: it is stamped on its surface.
Replacing the conical type of part
The standard size of the Morse cone (according to GOST 9953–82) consists of 9 values: from B7 to B45. The larger the number after the letter B, the larger the diameter of the cone.
Thus, having found the marking “B” on the surface of the cartridge, we can conclude that this is a device with a conical mounting base. With this method of attachment, the cartridge can be easily removed. It is enough to use a drift and a plumber's hammer.
Video: how to remove a chuck with a cone from an electric drill?
Replacing the reversible threaded chuck
To secure the drill clamp to an electric household drill using a threaded joint, two types of threads are used:
- inch (for foreign models);
- metric (from Russian manufacturers).
The following marking is applied to the surface of the threaded clamping chuck body: 1.5–13 1/2 – 20UNF or 1.5–13 M12x1.25.
The reversible threaded cartridge for fixation has a screw with a left-hand thread. You need to know this nuance when removing a broken cartridge. In order to get to the screw head, it is necessary to recess the cams into the collet completely. As soon as the head of the screw is visible, use a hardened Phillips screwdriver to unscrew it to the right clockwise. Then hold the hex key in your fists and hit it sharply in a counterclockwise direction. After the cartridge is torn from its place, it can be easily unscrewed.
Video: how to remove a chuck from a reverse drill or screwdriver?
On other models there are other options for mounting the cartridge on the thread. In some cases, the cartridge is twisted entirely from the threaded end of the shaft. In other cases, the screw can be fixed with a special thin key using a narrow groove. The main difficulty is to move the cartridge from its place when unscrewing. Sometimes this is very difficult to do. In any case, to remove the cartridge you need: a mechanic's tool, the necessary skill and patience.
How to change a drill bit in a drill - we can do it ourselves!
It is not always possible to remove a drill from the chuck in the usual way - as a result of heavy load or improper fixation, it can jam the chuck. How to get a drill out of a drill without damaging the fastener and the tool itself? First of all, try to cool the cartridge thoroughly. Sometimes this is enough for the cams to release the drill a little and you can pull it out.
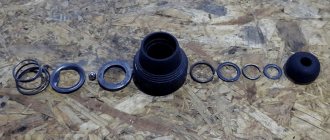
Disassembling a drill chuck with a quick-release nut
To clean the jaws and lubricate the moving parts and threads of the cartridge, it must be disassembled. Disassembly is necessary to repair and replace failed parts. Here is a short list and sequence of operations for disassembling the jaw chuck:
- The removed cartridge with the conical part up, lined with wooden spacers, is clamped by the coupling in a vice.
- Use a gas wrench to carefully unscrew the notched nut.
- The bearing is pulled out. The puck comes out.
- The cartridge is removed from the vice.
- The adjusting sleeve is twisted from the base by hand. If it does not give in (jammed), then the cartridge turns over and is again compressed by the clutch in a vice. A little machine oil is poured onto the threaded part of the coupling and base. Then, using a gas wrench, the base is skillfully unscrewed from the coupling.
- If there is a retaining ring or nut at the bottom, they are removed.
- The cams are pulled out of the guide rings and removed from the base cone.
- All parts of the drill chuck are carefully inspected. If worn, deformed or broken parts are identified, they are rejected and replaced.
- The jaw chuck is assembled in the reverse order. At the same time, all moving parts are lubricated with a special grease. It is best to use the lubricant recommended by the manufacturer.
The procedure for disassembling cartridges of other models may be different. It depends on the type of chuck, its design and the manufacturer of the drill. To disassemble the drill chuck yourself, you need to fulfill three conditions:
- have the necessary set of tools available;
- have plumbing skills;
- to be a person with a stable, balanced psyche.
Repair methods
Experts recommend, regardless of the reason why the screwdriver jams, what to do first: introduce universal lubricant such as WD-40 into the internal cavity of the chuck, including the surface of the jaws. After 10-15 minutes, use a rubber hammer (or a regular one, through a gasket) to tap the cartridge and jaws with moderate force.
If the bit is jammed in the chuck of a Bosch, Texas, Praktika, etc. screwdriver, then (after lubrication) the use of two adjustable wrenches effectively solves the problem. One clamps the base of the cartridge, the other carefully rotates its upper part. To avoid damage to the surface and the unit itself, soft but dense pads such as leather should be used.
If your efforts lead to nothing, workshop specialists will be able to restore the functionality of the tool with minimal financial costs and extremely quickly.
Possible problems with the chuck when operating a drill: causes, descriptions and ways to solve them
To avoid problems with a drill, you need to be able to operate it correctly. A drill is a universal tool; it can be used to drill wood and metal, plastic and tile, stone and glass, concrete and brick. In everyday life, a rotary impact drill of medium power is usually used. It is equipped with a chuck of the SDS system, which was invented by BOSH. The SDS chuck is not particularly accurate, but is ideal for drilling concrete, stone, and brick. That is, those building materials where drilling is necessary with impact.
For more precise drilling of metal and wood parts, it has a special adapter for attaching a jaw key chuck or a keyless chuck. A drill cannot be used for milling work. The drill chuck is not designed for side loads and will quickly fail. Of great importance is:
- correct choice of drill;
- correct sharpening of the cutting part of the drill;
- mandatory marking of the center of the holes using a core.
You need to skillfully select the desired speed, feed, operating mode depending on the workpiece material. All these factors directly affect the reliable operation of the drill chuck.
The part falls off
Does the cartridge fly off? This problem occurs quite often even on new drills with a cone-shaped jaw chuck when drilling a deep hole. You need to lift the drill to free it from the chips, and at this moment the chuck flies off the cone. The situation can be corrected by increasing the tension in the cone joint. To do this, the cartridge is heated in oil or oven to a temperature of 110 degrees and placed on a cold drill mandrel.
Clamping jaws jammed
Drill work always takes place in dirty conditions. This is dust, dirt, shavings, sawdust and other small debris. If this debris gets inside the chuck, it can cause the threaded connections, particularly the jaws, to jam. There is only one way out here. Requires disassembly of the cartridge, cleaning and rinsing of moving parts. Before assembly, all moving parts are lubricated with lithol. Especially a lot of waste is poured into the chuck when drilling ceiling surfaces. Here you can think about protecting the cartridge with half a small rubber ball.
Chuck runout can be caused by various reasons. For example, the Morse seat cone is worn out. This can be checked using paint. An even layer is applied to the cone and the cartridge is inserted. Then the mark he left on the cone is removed and studied. Another reason could be uneven wear on the cams. In this case, they need to be changed. But more often they replace a broken cartridge with a new clamping device.
In the right hands, a household drill can work wonders. With its help, holes are drilled in durable and soft materials. The chuck is an important component of a drilling machine. It is this that ensures the reliability of drill fastening and drilling accuracy. Therefore, it is very important for a home craftsman to be able to independently carry out minor repairs and replacement of this part of the device.
Source: 100uslug.com
Device and purpose
A screwdriver is used for various construction and repair work, but its main function is to quickly screw in and tighten fasteners: self-tapping screws, screws, bolts, screws.
It helps to cope with a large volume of tasks in significantly less time than using a screwdriver.
Budget screwdrivers of low and medium power are used in the assembly, installation and dismantling of furniture, equipment, construction of frame structures (partitions, walls, suspended ceilings) and other objects. A powerful tool with an impact mechanism copes with drilling holes.
In addition to the standard operations listed in the instructions for the screwdriver, it can also be used for other tasks. Use a mixer attachment to mix thin solutions. Using a special adapter, the device is connected to an ice auger to quickly make holes.
The body of most screwdrivers is made of plastic, which reduces the overall weight of the tool. Inside the case are located:
- engine. Depending on the type of device, it can be electric or pneumatic. The former operate from a network or battery, the latter from a compressed air tank or compressor.
- Gearbox. A gear mechanism that transmits rotational motion from the motor to the spindle.
- Clutch-regulator. Connected to the gearbox, it is used to adjust the screwing depth and torque.
- Start capacitor. He starts the engine.
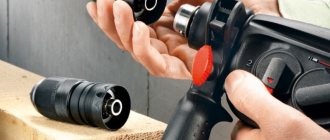
- Chuck. Bits, drills, and socket heads are inserted into it. The most common are quick-clamping three- or four-jaw ones.
- Power source (battery) and/or power cord.
The body houses a control panel with a power button and a speed switch. To operate in unscrewing mode, reverse is used. Additionally, the screwdriver can have a backlight and a fuse.