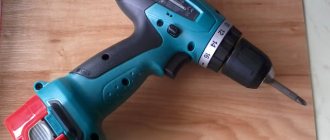
The lightweight version of the drill, which has been improved to work with bolts and screws, has been breaking sales records in the markets of the former Soviet Union for twenty years. Each type of tool has its own weaknesses associated with the method of implementing design solutions. The service life of units and spare parts depends on the quality of assembly, materials used and the manufacturer’s quality control system. The electric motor for a Makita screwdriver lasts much longer than motors from unknown Chinese companies.
All cordless drill malfunctions can be divided into 4 categories:
- electronic malfunctions and breaks in the electrical circuit;
- mechanical failures;
- problems with the battery and charger;
- failure of housing elements.
Why the drill does not work: main faults
Significant design differences between different drill models are the presence or absence of reverse, speed control and impact mode. Otherwise, the tool of any brand consists of the same components. Regardless of whether the Interskol, Bosch, Metabo or DeWALT drill does not work, the sources of problems will be the same, only the characteristics and parameters of the spare parts will become variables.
If the drill does not turn on at all, the main reasons for this are electrical:
- a break in the power cord, which can be easily detected with a multimeter;
- violation of contact between the cable cores and the start button terminals;
- failure of the electric motor: interturn breakdown of the armature or stator windings, their breakage, breakdown to the housing. A multimeter will help diagnose these defects, but it is impossible to eliminate them independently at home;
- when the drill turns on every once in a while or works intermittently (with a working power cable), there is a high probability of wear on the brushes, replacing which is not particularly difficult;
- heating or melting of the housing causes excessive load on the engine;
- One of the common causes of breakdown is the drill button does not work as a result of wear of the working layer of the rheostat, failure of the speed controller or reverse.
In situations where a Hitachi, DWT, Makita, etc. drill stops turning on even though the electrical part is working, defects should be looked for in the mechanical components. Most often this is:
- damage to the gears of the gearbox, accompanied by a characteristic grinding noise;
- wear of the clamping jaws of the chuck, as a result of which the reliability of fixing the drill or other tool is impaired;
- jamming or excessive play in the support bearings, which requires their complete replacement.
To prevent troubleshooting and troubleshooting on your own from taking too much effort and time, contact the “Successful Equipment Service” service center. High-quality, fast and inexpensive - the company’s main principles when repairing drills and many other types of hand tools!
Source: service.udt.ru
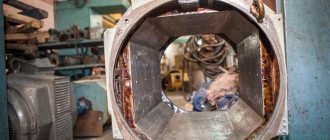
Checking the functionality of the electric motor
The last thing in line to check is the electric motor as the most complex element of the electrical part. If no damage is found to the contact and starting mechanisms, and there is no doubt about the reliability of soldering and the integrity of the supply wires, then the electric motor is checked.
Diagram of a charger for a screwdriver.
Disassembling the engine begins with removing the armature from the stator. A visual inspection of the contact part of the commutator and winding is carried out. Mechanical damage or electrical short circuit and breakdown of wire insulation are noticeable by a change in color and the presence of soot. Anchor repairs are not carried out independently. It is either trusted to professionals or replaced with a new one. If no visual damage is detected, then an ohmmeter is used to check the operability of all windings separately.
The condition of the stator windings is checked in the same way. Repairing it involves rewinding the winding; here you will have to use the services of a workshop.
Typical malfunctions of cordless screwdrivers
1. The appearance of cartridge runout . If you encounter such a malfunction, it means that for some reason your gearbox spindle is bent or its bearing has become unusable. A ball-type device or a bronze bushing can be used as a bearing in different models of screwdrivers. In any of the above cases, you will have to change the entire screwdriver gearbox.
2. Whistling or creaking when the electric motor is running . In this case, the screwdriver motor works, but makes uncharacteristic sounds. The cause of this malfunction may be the separation of one of the motor magnets from the housing and its sticking to the rotor body. Also, the appearance of extraneous sound can cause clogging of the rotor bearing. If the design of the screwdriver allows you to disassemble the engine, then the fallen magnet can be returned to its place (if it was not damaged) and secured with suitable glue. The problem with a whistling journal bearing can be solved by lubricating it on both sides with a liquid spray lubricant, such as WD-40. It also doesn’t hurt to thoroughly lubricate the rotor shaft itself. It should be noted that rapid clogging of the bearings and the subsequent appearance of whistling sounds during rotation indicates that they are already seriously worn out. The correct thing to do would be not to wait for a more serious breakdown to occur, but to replace the entire electric motor assembly.
3. The screwdriver continues to rotate after releasing the start button . In a working screwdriver, after releasing the start button, the braking device should be activated, stopping the rotation of the gearbox. The cause of the problem is a failed thyristor of the control circuit. You can, of course, select a semiconductor device that is suitable for its parameters, but it would be wiser to replace the entire switching unit.
4. The button for switching the direction of rotation (reverse) does not work . Almost all models of screwdrivers use a microswitch, which is mounted in the device’s switching unit, to change the direction of rotation of the chuck. Failure of the switch will require replacement of the entire screwdriver switching unit.
5. Slipping of the clutch-regulator of the gearbox . The speed of rotation of the screwdriver chuck is regulated using a special coupling, which can be represented in the form of a toothed washer. Over time, the clutch teeth wear out and it begins to slip. Outwardly, it looks like the screwdriver cannot tighten the fastening elements with the required force.
6. The screwdriver does not turn on . There may be several reasons:
- Failure of the switching unit. The problem can be treated by replacing the unit with a working one.
- Broken contact wires. Replace faulty wires and solder broken contacts.
- Electric motor combustion. The burnt out motor is replaced with a new unit.
- Critical wear of graphite brushes. Carbon brushes are a consumable item (in models with a dismountable motor), a spare set of which must be supplied with the screwdriver.
- Discharge or failure of the battery. The battery should be charged or replaced with a new one.
7. Replacing a failed cartridge . There is a left-hand threaded locking screw inside the chuck. Before unscrewing the screw, it is recommended to spray the threads with liquid spray lubricant and lightly tap the head with a screwdriver. After removing the screw, clamp the L-shaped hex key in the chuck, secure the screwdriver body and, turning the key counterclockwise, unscrew the chuck from the axle. Before you start unscrewing the chuck, you should set the screwdriver to drilling mode at first speed.
Brush wear
To diagnose this failure, you need to unscrew the bolts on the outside of the case. Remove one half of the plastic casing. Remove the reverse switch. Remove and check the gearbox. Use pliers to bend the latches of the rear engine cover and remove the brushes. The wear of these spare parts will be visible to the naked eye. Use a soldering iron to melt the contacts. Then dismantle everything that remains of the old brushes. Use a thin screwdriver to bend the holders. Install a set of new brushes and assemble the tool.
Screwdriver repair: main tool malfunctions
A screwdriver belongs to the category of tools that are often used not only in construction and repair work, but also in everyday life. Over time, any mechanism tends to break down, which happens with screwdrivers. If such a thing happens, then there is no need to rush to throw away the tool, since you can repair the screwdriver yourself. From this article you will learn how to repair a screwdriver without the help of specialists.
How to repair
Having found the cause of the problem, you need to know exactly how to solve the problem. The following information will be enough to understand how to repair a screwdriver with your own hands.
Charging block
The charging unit breaks due to constant misalignment of the wire. A break occurs. It is necessary to solder the wires and restore the insulation.
Battery
Typically, screwdrivers use nickel-cadmium batteries, which need to be charged only after they are completely discharged. They cannot be recharged as their service life will be reduced.
Solution to the problem (does not always work): completely discharge, preferably charge with a low current. This operation must be performed approximately 5 times to get rid of the so-called memory effect (incorrect charge).
Battery and screwdriver
Problems with the button
Very often the contacts on this assembly oxidize and need to be cleaned.
Disassembly process:
- Remove the red push mechanism using a rotating motion.
- Remove the cover by pushing out the latches with a small knife.
- Using a soldering iron, detach the two metal pieces on the side.
- Remove the cover.
- Holding the spring, remove the mechanism from the housing.
Worn or oxidized components must be wiped with cotton wool soaked in alcohol. If the dirt cannot be removed, you need to rub it with a knife.
Electric motor
This is the most expensive part of the instrument. Problems usually start due to brush wear. They cannot be repaired, so they must be replaced. The armature is changed if a break in the winding is detected.
Replacing brushes
To get to the unit, you will have to disassemble the engine by pulling out the “antennae” located on the end part.
Next, adhere to the following scheme:
- Use a hammer to hit the shaft to knock the rotor out of the housing.
- The lid can now be easily removed.
- Next you need to remove the remaining parts.
If the commutators are black, it means they are dirty with brush residue. This causes loss of power and sparking. The collector should be wiped with cotton wool soaked in alcohol and the grooves should be cleaned with a small needle.
The brushes themselves cannot be restored, so you need to purchase new ones and install them.
Gearbox
If extraneous sounds are heard in the gearbox, then the gears of the mechanism are to blame. It is necessary to disassemble the gearbox and, in those places where the teeth have worn out, install a small bolt, which is ground down to the required size. The places where you need to place the bolt must be carefully marked.
You need to drill holes in the marked parts to place the bolts there. Once they are in place, you need to put more lubricant into the gearbox.
Keyless chuck
Disassembling the keyless chuck:
- Place a piece of wood under it and hit the protruding part in the center with a hammer.
- Place the bolt in the jaws and hit it with a hammer.
- Remove the internal part of the device from the housing.
Now you can see the nut with two halves. In most cases, it is this that causes all the problems. Most likely the thread there has worn out. If a similar unit is not available, you will have to buy the entire cartridge. It costs around 300 rubles (as of 2021).
Cartridge
Screwdriver and its design features
You should start repairing a screwdriver yourself by becoming familiar with its design. The main element of a screwdriver is an electric motor. Screwdrivers come in both corded and cordless types. The use of a corded screwdriver is used less frequently, due to such a disadvantage as the need to connect the tool to a 220V network. Battery-type tools are more popular, as they allow you to carry out not only repair work at home, but also outside it.
The main components of a cordless screwdriver are:
- Frame. Typically, all screwdrivers are made of durable plastic.
- Start button. It is designed in such a way that the number of revolutions of the cartridge depends on the force of pressing it.
- Electric motor. Battery-powered tools use single-phase commutator-type and DC motors. The motor consists of a rotor, a stator in the form of magnets, and a brush assembly.
- Gearbox.
- Force regulator.
- Reverse switch.
- Battery. As a rule, it is removable and is often supplied with the product in duplicate.
- Cartridge. As a rule, quick-release chucks are used.
Some models are additionally equipped with LED backlights, as well as battery charging indicators. Returning to the problems with the screwdriver, it should be noted that any of the above elements can cause the tool to malfunction. What is needed for repairs? The first step is to find the cause of the breakdown, and then make the appropriate decision to eliminate it. The tool can be divided into two parts: electrical and mechanical. Initially, you need to find out what the problem is with the screwdriver not working: mechanical or electrical. This won’t be difficult to do, so let’s look at the breakdowns in more detail.
Mechanical faults
Mechanical malfunctions of screwdrivers can be identified by such a sign as the audibility of the operation of the electric motor. When you press the start button, you can hear signs of the electric motor running, but the tool chuck does not rotate or characteristic sounds of a malfunction are heard when rotating.
Repair of power control and reverse mechanisms
A situation arises when the tool turns on normally, but the rotation is not adjusted when the push-button switch is pressed differently. In this case, the cause of the damage must be found in the engine rotation control mechanism. The main causes of such damage can be failure of a push-button switch, breakdown of a transistor, or destruction of the armature brushes.
The functionality of the contact system of the start button is checked using a tester. It cannot be repaired and should be replaced.
The integrity of the transistor located on the control panel is checked by inspection (by color change) or by measuring the voltage and current of the input and output signals.
Then you should check the integrity of all soldering and the condition of all elements in the speed controller circuit diagram.
Malfunctions in the motor rotation reversal mechanism can occur due to damage to the lever mechanism or destruction of the armature brushes. The performance of the contact system of the mechanism is assessed with an ohmmeter with different fixations of the flag.
Mechanical breakdowns
Mechanical breakdowns of the instrument are often indicated by extraneous sounds that appear during operation. Inspecting a squeaking or grinding screwdriver may reveal damaged bearings or bushings that should be replaced.
- Jamming of the rotating mechanism often indicates failure of gearbox parts - deformation of the shaft, damage to the pin for attaching the satellite, wear of gear teeth.
- Chuck runout, among other reasons, can be caused by significant wear of the bearings or deformation of the gearbox shaft.
All listed parts cannot be restored and must be replaced.
If it is impossible to tighten the cartridge well, you should inspect the couplings - when their teeth wear out, “slippage” is observed. Clutches with worn teeth must also be replaced.
History of the device
A screwdriver is a power tool. Its main purpose, as the name suggests, is to tighten or unscrew a fastener. After the electric drill was invented in 1868, the development of power tools became widespread. Founding companies DeWalt, Bosch, Black & Decker, Makita and Hitachi developed the industry by creating new devices.
The introduction of the Phillips head screw in 1934 created a demand for electric tools to tighten them. It was especially in demand in mechanical engineering. The first device of this kind was called a wrench. With the advent of batteries, the device gained mobility, and the name screwdriver came into use. Its mass production began in the early 80s .
Modern devices are constantly improving, but to a greater extent this relates to the method of autonomy and control. The design of the device remains unchanged.
Types of cartridges
Very often, home craftsmen are faced with such a difficulty as jamming of elements, and few people know how to change the chuck on a screwdriver in the correct way. First, it’s worth understanding the main types.
Sometimes self-clamping devices are installed on units, but these varieties are more popular.
chuck for cordless screwdrivers is further divided into several classifications.
- Double coupling. This type has to be tightened with both hands, because one of the couplings must be supported, and the other must be turned using a special key.
- Single coupling. In this case, you will need to perform all the same actions as in the first option, but everything can be done with only one hand. This was achieved due to the fact that the design has a special lock that automatically jams the shaft when the equipment is removed. The bit fits onto this design somewhat easier and more convenient.
The quick-clamping model is distinguished by the fact that during operation it is not necessary to use any additional tools. For example, there is no need to use a key.
The cartridges are made of two materials:
Thanks to the plastic construction, manufacturers have significantly reduced the weight of the unit. But it cannot be said that such material is reliable. It will not be able to withstand large shock loads and does not have high stability, unlike a metal screwdriver.
A quick-release mechanism made of plastic and metal is used to perform both professional and household tasks.
Metal units are more reliable, they have high strength, and therefore are able to withstand large shock loads. This is especially important for those devices that have a shock function.
Electrical problems with the screwdriver
Electrical problems include the inability to start the tool, spontaneous starting of the engine, and interruptions in the power supply. Sometimes reverse or speed control does not work when the force applied to the start button changes.
Replacing the battery bank of a screwdriver
Battery life is limited to 3-6 years. Improper use will shorten the battery life. Determining whether the battery is to blame for the fact that the screwdriver engine does not start is simple - it can be placed in another device or replaced with a second one. You can also:
- Fully charge until the green charging indicator starts to light up. Depending on the container, the process takes up to a couple of hours.
- Measure the voltage difference across the battery terminals using a voltmeter or multimeter.
In the latter case, the measuring device is switched to operating mode with a direct current voltage (DCV) in the range of 10-20 V. The batteries produce from 9 to 18 V, the voltage is indicated in the technical documentation and on the device body.
Battery working
If the value is zero or close to it, the battery is completely discharged or faulty. Suddenly it remains like this after charging - the battery has failed.
Battery manufacturers do not recommend repairing them yourself. Whoever decides must:
- Disassemble the battery case by removing all screws.
- Visually inspect the contacts for damage and oxides.
- Check the voltage of each can or keg after the battery is fully charged. If one or more output less than 1 V, they will have to be replaced.
Voltage drop
- Disconnect the damaged element using a soldering iron.
- Purchase a similar one, taking into account the rating, filling, or remove it from a second power source, if available.
- Solder the barrel in place of the old one.
- Assemble the battery.
- Charge and test it afterwards.
Screwdriver battery banks
Important! Barrels rated below 0.9 V should not be taken from an old battery due to the low voltage.
Problems with the screwdriver charger
If the battery does not charge, do not rush to disassemble it. The charger (charger) may be faulty. For check:
- It is connected to a 220 V network.
- On the tester, a nominal value of 20 V or 200 V is selected if a 24 V battery is used.
- The voltage at the charger terminals is replaced.
If it is lower than the value specified in the passport data or on the device body, the elements of the charging unit have failed.
- Its body can be disassembled by unscrewing the fasteners.
- A visual inspection of attached components is carried out to look for places where contacts are oxidized, burnt, or swollen capacitors.
Capacitor needs replacement
- The circuit elements are called by the tester.
Very high resistance indicates an open circuit.
Broken chain
Very low is a sign of a short circuit.
Diode breakdown
- Faulty elements are replaced with similar ones, and the body is assembled.
- The device is being tested.
In standby mode, the green light flashes, the charging mode lights up red, and after replenishing the battery capacity, the green light turns on.
The charger is functioning properly
How to repair a screwdriver start button
The button should be disassembled if:
- after pressing it, the electric motor does not start;
- the engine starts abruptly - soft start does not work;
- to start the electric motor you need to press the button harder than before;
- the engine starts spontaneously.
For diagnostics:
- The battery is disconnected from the screwdriver.
- The contacts going to the battery are shorted out.
- Multimeter probes in voltage measurement mode are connected to the button output. If the circuit is working properly, zeros will be displayed on the screen; if there is a break, the numbers will tend to infinity.
- Next, the button is disassembled - using a screwdriver you need to pry off the latches.
Sometimes a transistor fails; a multimeter with a diode continuity function is suitable for testing it. Oxides on the contacts are removed with an eraser or fine sandpaper, torn wires are soldered, bent contacts are straightened with tweezers, debris and dust are removed. If possible, the elements are purged with compressed air.
Exploded view of the button
On a note! When disassembling a screwdriver, it is important not to lose the terminals and spring, remember the order of installation of parts: which components are placed where, which elements go into which grooves, connect all the terminals.
Screwdriver motor
The electric motor is placed in a cylindrical housing. If everything has been checked and repaired, but the engine does not start, you should look for the cause of the breakdown. The engine is disconnected from the gearbox and start button. Afterwards, the resistance of the armature winding is measured with a multimeter: the probes are applied to the opposite contacts - the plates. And so on in a circle, the values are recorded.
Measuring the resistance of opposite contacts
If they are the same - the error does not exceed a couple of percent - the engine is serviceable. High resistance indicates an open circuit, low resistance indicates a short circuit.
To check the insulation, the multimeter is switched to the 200 Ohm resistance measurement mode, one probe is applied to the armature plate, as before, and the second to the commutator body. The resistance between the body and each armature lamella is measured.
Finding the location of the insulation breakdown
One indicates that everything is in order, zero or other numbers indicate an insulation breakdown. The anchor can be handed over to specialists for rewinding or a new one can be purchased. Each case has a number of advantages and disadvantages.
It is important that the plates are even; sometimes they wear out at the pores indicated below if the brushes are smaller than the size of the commutator. Peripheral protrusions can be removed with fine sandpaper of at least 800 grit.
Anchor development
Everything is done slowly and very carefully so as not to catch too much.
To repair a screwdriver yourself, you need a minimum set of tools and lubricant for mechanical components. The latter may have to be replaced completely or partially; sometimes worn parts are restored, for example, crowns. It is important to have a little understanding of mechanics, electrical, and be able to use a multimeter. Parts like pins or gears are cheaper to find at a repair shop than to buy the entire assembly.
Disassembling a screwdriver
Disassembling the tool is not difficult, since it has a relatively simple and understandable design. First you need to remove the battery, then unscrew all the screws. The case opens carefully so as not to damage anything when opening.
An open screwdriver can be photographed to know how and where the parts were located. Then all the parts are carefully removed, you need to inspect each of them and arrange them in the order in which they were removed.