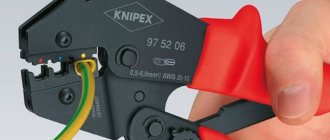
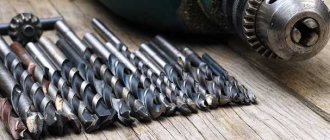
Electrical wiring is a necessity, without which there will be no light and not a single electrical appliance will work. During installation or repair work, craftsmen use crimping for electrical cable lugs, which ensures a high level of safety and reliability of the wire connections. Read and understand what it is and why it is needed. We will tell you about lugs for electrical wires, types of crimping and the nuances of connecting cables with a special tool.
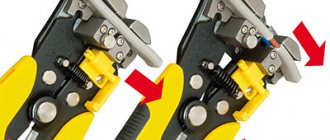
Ferrules and special tools for crimping electrical wires Source asset.conrad.com
General information about using tips and sleeves
If the connection of the electrical wires is not tight, then the contact point will heat up. The result could be a fire. In addition, a loose connection will not provide the required throughput. This will lead to unstable operation of the power grid and, possibly, failure of electrical equipment.
When crimping wires is performed, the listed troubles can be avoided. The process itself involves crimping electrical cables using special lugs.
Usually craftsmen do the work with crimpers. They provide high-quality connections with the required density. A special tool for electrical wires is also called crimpers. With their help, the connection is crimped using mechanical action, which allows:
- carry out installation and repair work as quickly as possible;
- create, in most cases, a permanent connection that can withstand significant breaking loads;
- ensure a continuous flow of electrical current in a particular circuit even under difficult operating conditions.
The crimper speeds up installation and creates a reliable permanent connection Source kabeltut.ru
The advantages of the method of connecting electrical wires by crimping have influenced the use of the method by almost all professional electricians. In addition, manufacturers of electrical products offer various tips that facilitate installation and repair work.
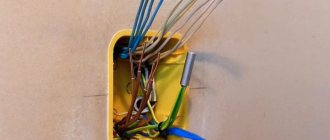
The use of lugs is not difficult for any professional electrician. A stripped electrical cable is inserted into the empty cavity of these elements of the electrical network. Then the sleeve is compressed. The result is a wire with a lug that is connected to another electrical circuit component.
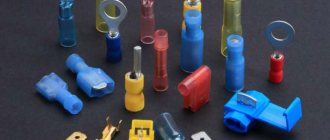
On a note! Special ferrules are available in a wide range in all specialized stores, as well as tools for crimping them. It is recommended to use the sleeves even when performing one-time work of small volume. Their low price will not significantly affect the allocated budget. At the same time, the use of tips allows you to make the highest quality connection.
One of the lug options Source german-instrument.ru
Crimping of wires with lugs is usually carried out when connecting multi-core cables. In this case, the number of cores matters in contrast to their cross-section. Crimping is used even for crimping very thin wires when there is no need to create significant effort.
However, such work cannot be done without a special tool. Therefore, most homeowners turn to specialized companies for help, which employ experienced personnel who always have all the necessary consumables and devices for crimping available.
Important! Crimping wire lugs is the so-called cold welding. The process is performed without exposure to high temperatures. It is carried out only by mechanical action. The result is fast and reliable switching.
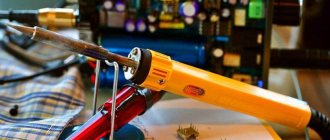
Crimping the metal tip of an electrical wire with a special tool Source 6.allegroimg.com
Due to the strong impact on the junction of the wire with the tip of its metal, it tightly compresses the current-carrying core. That is why it receives a permanent contact. However, during crimping, the maximum possible effort is not applied. There are limits that must not be exceeded. Otherwise, the integrity of the current-carrying conductors will be damaged. Professionals know this well. Therefore, their help is indispensable in most cases.
One of the options for connecting stranded wires is soldering. However, this option is not the easiest way. You need a minimum of skill in this type of work. Only an experienced person can make a quality solder connection.
Without removing the overall braiding and insulation from each core, it will not be possible to ensure contact. This work takes time to complete. An additional tool is also needed. However, not every person in the street will be able to cope with it. Some people don't even have any idea how it's done.
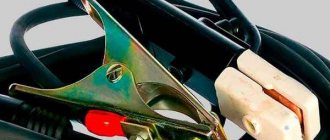
Craftsmen will always come to the rescue when you need to professionally crimp electrical wires Source ad-cd.net
Wire crimping significantly speeds up and simplifies the installation process. This method allows you to quickly make the necessary connection and efficiently solve the problem. The method is used by most professional electricians, who have seen its advantages in practice.
To ensure a high-quality connection, suitable sleeves and tips are selected at the beginning of work. Their compression is performed according to the same principle.
Different materials are used to make connecting elements. The production of such parts is carried out taking into account the characteristics of currents. Only a professional who understands the markings of these products and knows well how they differ can select the appropriate sleeve or tip for a specific type of work.
Thus, the sleeve is used to connect electrical wires to each other. In this case, the cables can have the same or different cross-sections. The tip is used for a convenient and high-quality connection of an electrical wire, for example, with terminals.
Tips of different sizes Source mti.by
Such products are small in size. This feature creates another problem when choosing sleeves and tips. The fact is that products that are too small do not have space for full marking. It may be partial or completely absent. Therefore, there is a high probability that a non-professional will make a mistake by choosing the wrong elements for a particular electrical circuit. In this case, crimping the tips or sleeves will not provide the required level of safety and reliability of the connections.
At the same time, on large-sized products there is enough space to apply full markings. However, they are more expensive both because of their size and the presence of special designations. After all, marking forces manufacturers to increase costs for the production of electrical products.
Important! Marked and unmarked tips or sleeves from a responsible manufacturer do not differ in quality. It is always high for electrical products of well-known brands.
Sleeve tips from well-known manufacturers are always of high quality Source elnow.ru
At the same time, a consultant in a store will not always help you choose a suitable product. Many sellers are not qualified specialists in the field of electrical products. Therefore, it is recommended to purchase it from specialized companies simultaneously with ordering services for the installation of an electrical network.
An important point is also the force with which crimping of cable lugs and sleeves is carried out. Its values are not indicated when labeling products. This is another reason why you need to turn to professionals. After all, they know very well that the tightening force of products depends on their type, of which there are quite a lot.
Thus, popular electrical products include:
- NKI – ring type tips;
- RPI-P, RSHI-P and so on - flat-shaped connectors;
- NVI – fork-type tips;
- OV – piercing couplers;
- NSHKI – round pin lugs.
To carry out high-quality crimping of wires with lugs, you need to use a tool that indicates the appropriate dimensions for making a specific connection. In this case, the jaws of the special device must match the shape of the sleeve.
Press jaws, on the matrix of which the wire sections are indicated Source onlinetrade.ru
Important! The force created by the tool depends on the diameter of the hole between the compressed jaws. This means that the cross-section of the tip or sleeve affects the magnitude of the force.
The well-thought-out design of the special device allows you not to exert much effort during the work if the dimensions of the crimping part fit the hole in the tool.
On a note! The required force is not indicated when marking, because the connection of electrical cable products is carried out by professional electricians.
Crimping of tips and sleeves is carried out with a tool that allows you to clamp standard products. These are universal devices. The technology for their use is not complicated. The use of such a tool allows you to crimp various tips, connectors, sleeves during repair or installation of any electrical networks.
When crimping cable products, additional lubricant is used. Most manufacturers apply it to the inner surface of tips and sleeves. Therefore, they try to choose just such products in order to reduce costs and work time.
It is better to use sleeves with lubricant inside Source 1.allegroimg.com
Important! Tips and sleeves are disposable products. It is not removed after installation. Therefore, it can never be used anywhere else, creating a reliable and secure connection. At the same time, the products allow you to quickly restore an electrical circuit, carry out high-quality repairs, initial installation of wiring and ensure its performance for many years.
See also: Catalog of companies that specialize in electrical work of any complexity
How to crimp wire lugs without tools
From the point of view of construction technology, crimping wires without the appropriate tool is prohibited, the only exception being rough installation to check the work performed. However, for any household work with low-current consumers, work without a crimping tool is allowed.
There are several methods for ending cords without tools:
- soldering using refractory high-temperature solders;
- “non-standard” crimping using cores, hammers, and notching the tip
Soldering tip
For soldering, you, of course, do not need serious and expensive press pliers/crimpers, but the following “household” repair tools should be present in your arsenal:
- Soldering iron (from 80 W)/blowtorch/gas burner.
- Soldering kit (fluxes/rosin, various types of solders).
- Heat shrink tubing and/or electrical tape.
- Basic knowledge and skills of working with a soldering iron.
The algorithm of actions is as follows:
- if you have a soldering iron/blowtorch, heat it up to operating temperature, if you don’t have one, turn on the burner on the kitchen stove;
- While the tool is heating up, we perform operations to remove the insulation from our cord (remove with a margin of 0.3–0.5 cm), making sure not to damage the cores;
- we put the thermal insulating braid on the cord and move it to a safe distance until we need it;
- degrease the cleaned area;
- degrease the tip;
- apply flux to the inside of the tip;
- Pre-cut the solder into small pieces so that it covers the inside of the tip by about half to a third;
- apply flux with a soldering iron to the stripped part of the cord, tin it (if there is no soldering iron, then skip this step);
- carefully, holding the tip with pliers so that the solder particles do not fall out of it, place it on the kitchen tile (if you don’t have a soldering iron) or heat it with a soldering iron/lamp/burner for several minutes until the solder inside becomes plastic and liquid;
- as soon as the solder is ready, quickly and carefully take the cord by the insulation and install it into the tip, while continuing to heat the tip, holding it with pliers, if there is an empty space between the tip and the solder does not come out, then add solder to these places until it will not begin to “crawl out”;
- then turn off the soldering iron/burner and give it a few minutes for the solder to completely harden;
- After hardening, we wrap 2-3 layers of electrical tape around the connection between the cable and the tip, move the thermal braiding, securing it at the edges with electrical tape.
Crimping using a core/hammer
This method has many disadvantages, the main one being insufficient pressure, which can lead to heating of such a connection. However, it is often practiced, especially in cases where the connection will not work with high-current devices.
This method requires a minimum of tools:
- Hammer.
- Kern (optional, but recommended).
- A small file for metal.
- Vise (optional, but recommended).
- Conductive paste (highly desirable).
- Insulation tape and/or heat shrink.
To finish with these tools, we do this:
- remove the insulation from the cord (margin 0.3–0.5 cm);
- make sure that the wires are not damaged;
- straighten all the wire strands, twist them slightly (half a turn, no more!);
- take the tip and make a small cut with a file (about 1/5 of the entire length of the tip) on the wire side;
- put on the heat shrink, move it 10–20 centimeters so that it does not interfere; degrease the cord;
- evenly apply conductive paste;
- we clamp the tip in a vice or place it so that it can be comfortably held with one hand;
- after which we completely install the wire into the tip;
- we take a core and a hammer and begin to strike the central part of the tip, which should be “compressed” (if there is no core, then you can use the thin part of the hammer);
- make 4–5 fixation points;
- turn the tip over and repeat the operation;
- check the connection for strength;
- We put heat shrink on the connection, heat it;
- ready, the connection is pressed!
Varieties and markings of elements
A clear example of an incorrect connection of electrical cables is an electrical panel in which the wiring insulation is melted after twisting the conductive wires. Crimping the wires prevents heating of the contact point even when the load current increases. Therefore, the likelihood of a fire is significantly reduced. If the cable is connected well to the connected device, then the transition resistance decreases.
Tips and sleeves are a professional alternative to twists, bolted and screw connections. They completely remove or minimize transition resistance as much as possible. Such electrical products are intended mainly for multi-core cables.
Sleeves are a reliable alternative to other methods of connecting wires Source chint.ru
Copper wire crimps are made from seamless tubes made from the same alloy. At the same time, a popular tip is a product that is flattened on one side. In this part it also has a hole that allows for a screw connection.
The lugs are manufactured without a protective coating for electrical wiring of different cross-sections. Holes for screw fasteners are also created of different diameters. This allows you to select the right product for a specific connection. Tinned electrolytic tips are also produced. This type of product is manufactured with various mounting holes.
The abbreviation TM is used to mark uncoated tips. After the letters, manufacturers indicate the cross-section of the suitable electrical wire and the diameter of the hole for the screw fastening. In this case, coated tips are designated by the abbreviation TML. After these letters, similar parameters are indicated as for uncoated products.
Coated TML tips Source satu.kz
Manufacturers also produce tips that have a control window in their design. The products are made of copper. The existing window allows you to control the ongoing crimping. To mark such tips, the abbreviation TML(o) is used. These products differ in the possibility of their installation on cable products using soldering and using solder. This installation option eliminates the occurrence of transient resistance.
There are also aluminum-copper elements. They are used when it is necessary to connect a copper wire to an aluminum cable. In this design, manufacturers produce tips with a flattened end and cylindrical sleeves.
Aluminum-copper terminal elements Source satu.kz
Pin connecting elements are also in demand. This type of lug is used to connect to small electrical appliances. In particular, they are used when installing circuit breakers. Pin lugs are an ideal option to ensure good contact when connecting to devices with small clamp mounts. To mark these connecting products, manufacturers use the abbreviation NShP.
Why do you need crimping and crimping wires?
Is it even possible to do without sleeves and crimping? What's wrong with simply attaching wires to machines and other devices?
With a simple clamp, the bundle of wire fluffs up and is crushed to the sides. Some individual conductors may even be damaged. Such conductors, destroyed and separated from the main bundle, no longer take part in contact and the passage of current load through themselves.
All this leads to the fact that the remaining cores are not enough and the connection points heat up. In addition, the bare copper from which the wire strands are made remains accessible to moisture and oxygen. And this leads to its darkening and oxidation. By crimping the conductor once with a tip or sleeve, you will save yourself from all these problems in the future.
Features of the tool for crimping electrical wires
Crimping of wire lugs is carried out with a special tool. It is selected for the specific type of product being clamped. After all, it can not only be flat, but also have the shape:
- cylinder;
- forks;
- loops;
- knife,
- plug.
Tips are available in different shapes Source elektroznatok.ru
When choosing a tool, the crimping range is also taken into account. This is a parameter that shows the largest and smallest cross-section of the electrical cable. If a wire with a diameter of 0.25-16 mm is crimped, then crimping is done using hand pliers. Such a tool is used, for example, during the installation of low-current, telephone, and computer lines.
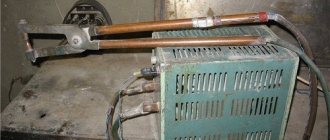
Hydraulic pliers are used when connecting substations when large-diameter cables are laid. Their cross-sectional area usually exceeds 16 mm². If a large amount of work is being done, professional electricians use electric pliers. They can operate in semi-automatic or fully automatic mode.
Hydraulic powerful press jaws Source avtomag96.ru
How to work with crimping pliers - important nuances
The process of crimping wires is intuitive - a sleeve or tip is put on the wire(s), a pliers matrix is attached to it, the handles of the tool are closed and the contact is ready. In practice, most often the “first pancake”, or even several, turn out “lumpy”, and almost in the literal sense - the connections may be far from ideal. There have also been cases when contact in a seemingly well-crimped wire deteriorated over time.
If the shape of the terminals is not maintained
In the first case, the culprit is the settings for the compression force of the matrix parts, which can be different both for individual wires and for the tips themselves. Because of this, professionals prefer to have at least two tools so as not to have to reconfigure the spring to work with different wires or sleeves.
The quality of work is also influenced by the material from which the sleeves are made and their thickness. Crimping for dense terminals is always much easier and they subsequently hold their shape better than those made of soft materials.
The correct orientation of tips with a “U”-shaped cross-section is a requirement that lies on the surface, but is often ignored, and the misalignment of parts in any mechanism does not always fall within the zone of permissible error.
Twisting stranded cores before crimping
For every experienced electrician who started with twisting and soldering wires, this movement is most likely already a reflex, but when crimping for stranded lugs is performed, then you need to get rid of it. The validity of this statement can be verified by a simple experiment - take a pair of single-core single-wire wires, arrange them crosswise and squeeze them with pliers.
In some cases, both wires are deformed, and sometimes only one, but in this case it will be almost completely broken and begin to dangle on a thin isthmus. Of course, the conductivity of this vein will decrease significantly. If the wires do not twist, then when crimping the tip they will be located parallel to each other and when deformed they will simply fill all the voids without squeezing each other.
Color marking of sleeves and dies
Some manufacturers mark different sizes of sleeves with separate colors and the same marks are applied to the plier matrices. We must remember that a unified system for this has not yet been developed, so if you purchase cartridges based only on color, you may end up with consumables that are not entirely suitable.
Video description
The use of crimping pliers and strippers is described and shown in this video:
On a note! A wide range of tools allows you to purchase a suitable crimp for wires in accordance with their diameter, the lugs used, and the planned amount of work.
Although the most common are press pliers, the operating principle of which is similar to the functioning of pliers, electricians also use a diaphragm tool in their work. Its special feature is the ability to perform crimping on 4 or even 6 sides. The exact number of such surfaces is influenced by the type of diaphragm that is installed in the jaws.
The full-circle tool sleeve increases the reliability of the connection. Crimping of cable lugs is performed with maximum density. In addition, there is no need for the tool to change the bushing because the tool is able to automatically adjust to its thickness.
Diaphragm tool Source ls-market.ru
However, there is a drawback to diaphragm clamps. Using such a tool, crimping is performed exclusively on the end of one cable. The reason for this is the presence of a closed head located on the other side of the hole into which the tip is inserted. Therefore, such a tool is not used to crimp 2 electrical cables. In other words, it is not used instead of twisting.
Other connection methods, their advantages and disadvantages
The most common method after crimping wires is soldering. It still occupies a leading position in electronics because it has high mechanical strength. Among the disadvantages, it is worth noting that in a humid environment and places with large temperature differences, this connection method is not suitable.
Another well-known method is twisting. The main advantage of the method lies in its implementation - a minimal set of tools is required. When connected, the conductors remain intact. To twist the wires, you only need to clear small sections of them from the insulating layer. Dismantling the connection should also not raise any questions. The only difficulty that may arise at the work stage is the small contact area, as well as the low reliability of the connection.
The wire crimp connector combines the advantages of all methods.
Scope of use of crimpers for terminating electrical wires
The area of application of the tool is influenced by its design and shape. The variety of models produced by manufacturers allows specialized companies to perform any task.
Pliers for terminating stranded wires and thin-walled lugs
This tool is used for crimping electrical cables of small thickness. Their cross-sectional area can even be 0.25 mm². Such wires are connected to pin-type ferrules.
On a note! IEK makes one of the highest quality multi-strand wire termination tools available.
Thanks to the crimping of electrical wires using high-quality bushings, numerous wires do not spread out at the end of the cable. This allows you to conveniently and quickly connect it to the terminals of various devices.
Pliers for fine tips and stranded electrical wires Source bts-instrument.com
Press pliers for wires with multiple cores and thick-walled ferrules
This tool is larger in size compared to the pliers described above. Each model is made with a matrix for tips of specific sizes. For example, the KVT company produces the PK-16 crimper, which has 5 working zones. After using the pliers, a special mark is imprinted on the sleeve.
The name of the press jaws may contain the letter “U”. It means that the crimper design has a ratcheting mechanism, which is located in the handle of the tool.
Crimping solid wires
Many people often wonder whether it is possible to crimp solid wires? Yes, of course, it is not prohibited to do this, you just need to use the appropriate tool for this. Ordinary crimpers are no longer suitable here, since they are designed for less force required when compressing a monocore. You will have to purchase specially designed press pliers PK-16u or PK-35u for this.
This is a universal tool and can also be used for crimping stranded wires.
In order for the compression on the monocore to be high-quality and there is no play inside the sleeve, the basic rule here is to choose a sleeve or tip one size smaller than the cross-section of the wire being pressed. These pliers are also convenient for pressing several conductors simultaneously in one sleeve. This is done, for example, when making connections in junction boxes.
Video description
The following video will help you get acquainted with the options for crimping and crimping electrical wires:
Large cross section electrical cable pliers
If the electrical wire has a large cross-section, then use a hydraulic crimper to wrap the cable. This type of tool began to be used earlier than press pliers with a working principle similar to pliers.
The cross-section of the electrical wire on which the tip can be crimped depends on the size of the hydraulic device. This type of tool is used when laying power lines. This device is used when installing electrical panels.
To compress the matrix of a hydraulic tool, a lot of force is applied to its lever. Slow removal of the stem occurs when the valve is opened slightly. This process is performed faster when it is fully opened. When the dies are fully compressed, then the tool is locked. However, even in this position they do not create excessive pressure, which will cause the mechanism to fail.
Hydraulic crimper option Source cheboksary.optinstrument.rf
Matrices for a hydraulic tool are selected according to its dimensions. Typically, a set of such a crimper includes several of them. Only the lower element is subject to change, since the upper part is capable of automatically occupying its original position, because it is a magnetized part.
In the hydraulic version, the crimp for wire lugs can have a double-sided sleeve in its design. It is used when dismantling an electrical panel and then installing it in another location. After all, when performing such work, it is often necessary to extend electrical cables. Moreover, their cross-section often exceeds 16 mm².
Why can't you twist the wires?
The wires inside the bushing are crimped under very high pressure, so that they can even change their original circular shape if they lie parallel to each other. From a circle they turn into a hexagon, and this increases the area of their contact surface with each other.
And when you twist them, during crimping, in those places where the veins intersect, they can be pressed against each other.
Video description
The master talks about the features of using hydraulic press tongs in this video:
Tool for sequential crimping of cable products
This type of crimper allows you to prevent air from entering the inner cavity of the sleeve during crimping. This nuance is very important when connecting an aluminum cable to a copper wire. The absence of air reduces the likelihood of oxidation at the point of contact between two metals.
Computer wire crimping pliers
Twisted pair cable is used to connect a computer to the Internet. Special crimpers are used for the LAN cable. This type of tool belongs to a separate group of press jaws. Their design has a special matrix, which differs in shape. It is this that allows the installation of RJ 45 type plugs. It is also used during the installation of telephone networks.
This type of crimper does not crimp. The tool displaces contacts that cut through the insulation protection on each thin twisted pair conductor.
Professional crimping of computer wire Source stroy-okey.ru
Pliers, pliers, round nose pliers, pliers and wire cutters
Main types of ticks
Crimping pliers are divided into two types. The most common type is a design that works like pliers. That is, the sleeve is compressed on both sides. Other pliers are diaphragm crimpers. Crimping pliers.
Pliers
The tip is crimped in the same way as pliers grip a part. The working surface of the dies has cutouts into which the tip shank is threaded. This design is suitable for those fastenings that do not require special reliability.
To increase crimping force, hydraulic ferrule crimping tools were invented. Thanks to this improvement, the pliers became more efficient. The design uses cylinders with pistons filled with oil, which creates a large pressure of the matrices on the tip sleeve.
Pliers with removable dies
Some crimpers are equipped with several types of removable matrices. The versatility of the tool eliminates the need for pliers for each conductor cross-sectional size.
Diaphragm pliers
The originality of the design of diaphragm crimpers lies in the comprehensive coverage of the tip shank. The principle of operation is similar to the movement of the aperture blades of photographic lenses. The only drawback of such devices is the impossibility of inserting pliers into the connection of the two ends of the wires.
The diaphragm tool is used as a press for pin or flat metal tips. The all-round clamp is much more effective than the plier type for covering the end switches of wire products.
Design features of adjustable pliers
Since adjustable pliers are the most versatile tool, it is worth getting to know their design features in more detail. Based on the type of mechanism used, adjustable pliers are divided into two categories of tools.
The adjustable mechanism can consist of an axis fixed to the movable jaw of the tool and a groove on a stationary clamping element, which is a series of aligned circles. On the axis, so that it can be moved along the groove and thereby adjust the degree of opening of the jaws, a sector is specially cut out. This adjustable mechanism works as follows: the axis for moving along the groove is rotated so that its bevel is parallel to the side of the cutout. Having positioned the axis in this way, the adjustable pliers are set to the required amount of jaw opening.
Pliers with grooves on the fixed part.
More common are adjustable pliers, the jaw opening mechanism of which is made according to the so-called American system. On the fixed jaw of such pliers there is a number of circular grooves along which the “tide”, made on the movable handle of the tool, moves.
Pliers with circular grooves.
To adjust the degree of opening of the pliers, you must perform the following steps:
- Remove the “tide” from its engagement with the side walls of the grooves.
- Place the mite lips as far apart as possible from each other.
- Place the tool handles in the required position and bring them together again.
Adjustable pliers equipped with a mechanism of the second type are considered more reliable and easier to use.
Many experts, when comparing adjustable plumbing pliers with conventional adjustable wrenches, emphasize that the former are easier to use and the required degree of opening of their working jaws is carried out more quickly. As a rule, adjustable pliers, equipped with adjustable mechanisms of both the first and second types, have about seven fixed positions of the clamping jaws.
Pliers
Pliers are a type of pliers that have a flat working surface. Often it is equipped with small notches. They are designed to grip and hold relatively small parts. For ease of working with parts, two such tools are sometimes used at once. They can have various shapes of working surfaces, which is why they got their name: long-nose pliers, duck-billed pliers, narrow-nose pliers. Often, pliers are equipped with cutting edges designed for cutting wire.
Combination pliers are also called pliers. Such tools include pliers equipped with a cutting edge for cutting nails and wire, and serrated grooves designed to hold tubes, nuts and other cylindrical parts.
Round nose pliers
The difference between round-nose pliers and pliers is the circular cross-section of the jaws, which taper towards the end (cone-shaped jaws). Round nose pliers are designed for curly bending of wire; the conical shape of the jaws makes it possible to make bends with different radii; they are an important tool for jewelers. Round nose pliers can have jaws of different sizes, both in length and thickness, and there are models that have jaws of different shapes in one tool, and there are round nose pliers with curved jaws.
Briefly about the main thing
A crimper is a tool for crimping wires with lugs and sleeves, which simplify further installation of the electrical network. Press pliers, similar to pliers, are often used. These are manual crimpers equipped with dies for crimping tips of different shapes and sizes.
Manufacturers also produce diaphragm tools, characterized by the presence of a sleeve that allows crimping from 4 or 6 sides. There are hydraulic pliers also for crimping computer wires, thick-walled and thin-walled ferrules, and sequential crimping.
The sleeves are made of copper, aluminum and in a combined version. Tips are available in different sizes and shapes depending on the location of use. During the connection, the end of the wire is stripped, inserted together with the sleeve into the pliers and crimped.
What is the joining process?
The use of terminals allows you to create reliable contact.
Before starting work, you need to purchase couplings suitable for the diameter of the wire. This figure should be exactly 2 times the diameter together with the insulating layer.
There are two types of couplings - simple and with complicated insulation. The former have a single layer of plastic, the latter are equipped with a layer of heat shrink on the surface and inside with a layer of glue and sealant.
It is worth taking a responsible approach to the choice of tool – press jaws. The best option is a modification equipped with a ratchet for fixation, which greatly simplifies the process of working with bare and insulated conductors.
Work begins by cutting the wire with wire cutters. Next, it is important to clear them of insulation to a length equal to 0.5 times the length of the sleeve. If several wires are connected on one side, first twist them. Next, the sleeve is put on and carefully healed with pliers. If heat shrink was included in the kit, put it on before crimping.
One side of the pliers is equipped with an oval sponge, and the other with the same sponges, only larger sizes. The smaller side is intended for clamping the wire insulation in the sleeve, and the second is for fixing the metal coupling.
The process of crimping wires using press pliers and lugs
To make a reliable connection, the pliers crimp the sleeve first on one side and then on the other. Next, heat shrink is installed and processed by fire from one side to the other. If the wires are connected on one side, heat shrink is applied in advance.
Crimper for pin bushings
The pin lug crimp consists of a series of indentations and tabs, each of a different size. Each hole is used to clamp bushings of a different size.
Each hole has a number that determines what cable section the hole is intended for. For example, this crimp can clamp wires with a cross section from 0.5 mm to 16 mm square.
Twisting wires before crimping
Now about twisting the wires. Some people do this every time because once it's done, it's easier to push the wires into the end pin (tube).
Of course you can do this, the effect is ultimately identical.
But when twisting wires, it is a mistake to screw them in one at a time and then try to twist them together. Cables with this twist have a larger cross-section and may not fit into the grommet hole.
What does the tip marking mean: full explanation
Each type and type of product has its own alphanumeric marking, without knowing which it is impossible for a home craftsman to explain in the store what he needs. Let's look at popular markings:
- TML is a tin-plated tip, to work with which you need a special tool - a crimper. Looks like NSP. The only difference is that NShP is copper;
- TA – the same tip, but made of aluminum;
- SIP is a self-supporting tip that has its own insulation along the tube and an annular mounting plate;
- NSHVI - common in household use, sleeve pin;
- NKB - used in industry as geophysical cable;
- RFI-M is already a flag tip;
- IEK – copper fork;
- TMD – double blind connectors;
- NKI - isolated ring.
Aluminum products are regulated by GOST-9581-80, copper - GOST-7368-80.
Products for crimping are made of copper, aluminum or bimetal
Preparation for crimping
To crimp using a cable lug, you need to prepare the wire. See the table below for how to do this.
| Photo | Action |
| Measure the depth of the shank, add 5 mm and make a mark on the cable | |
| Clean the conductors from the insulating layer, check that the edge is smooth | |
| Degrease the wire and put a tip on it, the wires should fit tightly inside the shank |
Procedure for crimping cable lugs and sleeves
For crimping thick-walled tips and sleeves, it is best to use a hydraulic press. The press set initially includes universal dies for any tips and wires.
Under no circumstances use a tool not intended for crimping (hammer, chisel, etc.). A contact pressed in this way will not last long, especially if it constantly experiences heavy loads.
The next question that arises for an ignorant user is: how many times should I press the tip with a press? Once, twice or three times?
This depends on 2 parameters - the length of the tip and the width of the matrix.
In the operating instructions for the press that comes with the tool, there is a sign indicating the required number of crimps. Please note that this table is intended for tips and sleeves made in accordance with GOST.
Insert the tip into the press so that the matrix cross-section markings (35-50-70, etc.) are imprinted on the front side of the tip, and not on the side or bottom.
- do the first crimp test closer to the blade (where the bolt is inserted);
- Perform the following crimps in order, moving from the blade to the tail of the tip.
The same rules apply for connecting sleeves.
This must be done in this sequence, because with each press the tip tends to lengthen (sometimes up to ten percent!).
And if you start pressing from the end (not from the blade), during the last crimp, there is a high probability that you will have a void at the end of the sleeve. And you will not achieve the contact that was necessary. First of all, this applies to all aluminum products. For copper this is not yet so critical.
Crimping a twisted pair cable without a tool (crimper)
If you have everything you need, you can start making the cable. I will try to show everything as detailed and step by step as possible.
1
2(photo above)
3
4
Insert the wires until they stop. They should go all the way in and rest against the front wall of the connector.
5 (maybe you have something different)
The contacts must be pressed in firmly. So that they pierce the cable. The contact itself should not just align with the connector body, but be slightly recessed into the body. The task is not the easiest. When I crimped the cable with a screwdriver, it was difficult to insert into the LAN port of the router (but it was already working), after which I further tightened the contacts with a screwdriver.
After I crimped each pin, I also snapped the cable clamp into place. It is simply pressed inward and the outer insulation is pressed down.
All is ready. We do the same on the other side of the cable. I got it like this:
As you can see, the contacts themselves were slightly damaged by the screwdriver. When crimping with a crimper there is no such damage.
I tested the cable by connecting my laptop to the router. The Internet appeared on the laptop, which means that everything worked out and is working. I managed to make a network cable the first time. Even without a special tool, using a regular knife and screwdriver. I hope everything worked out just as well for you.
What to do if the network cable does not work?
It may be like that. But I wouldn’t rush to blame everything on the cable right away. It is possible that the problem is with the router, computer, or other device you are connecting. Need to check.
- Connect another device using the manufactured cable. If possible, check the devices by connecting them with a different cable. To make sure that the problem is in the network cable that we just crimped.
- Be sure to carefully check the sequence of wires in the connector according to the diagram.
- If you mix up the sequence of wires, then bite off the connector and redo it.
- If everything is according to the diagram, then take a screwdriver and press the contacts on the connector. It is quite possible that there is no contact.
24
Sergey
Useful and interesting
Options for crimping bushings
You can use wires with other cross-sections of lugs. You don't always have all types of bushing terminals on hand. For example, to clamp one 1.5 mm² wire, you can use a 2 x 0.75 ferrule. Of course it's not professional because the tip insulation doesn't fit perfectly, but in most cases it gets the job done just fine.
When it is necessary to clamp, for example, three wires, it is worth using one terminal with a correspondingly large cross-section. The single lug has a round insulation shape which will be better for three conductors than square insulation. For example, we want to connect three wires with cross sections: 2.5 mm2 – 2 pcs. and 1.5 mm2 – 1 pc. It's worth trying to use one terminal for 6mm2 wires. It should fit perfectly.
Connection of current-carrying conductors from 16 to 240 mm/sq.
The principle of crimping such cores is almost the same as described above. The exception is the use of a more powerful tool and a two-way connection type.
Before crimping, you again need to prepare the cores. To do this, you need to remove 3.5-6.5 centimeters of insulation.
Before crimping, you need to prepare the wires. Then you need to round off their ends:
- stranded wires are rounded off with pliers;
- single-wire - with a special tool, which is usually sold in a crimping kit.
Before crimping, copper wires are treated with technical petroleum jelly, and aluminum wires, respectively, with quartz-vaseline paste. Typically, the sleeves are lubricated from the inside at the factory. There is no need to be afraid that the lubricant will increase the resistance - if the technology is followed, it will be forced out of the contact area into the voids.
The cores are inserted into the sleeve from both sides. It is important that the joint occurs right in the middle of the sleeve. With local indentation, the degree of deformation is checked with a special probe or caliper at the place where the pits form. If the compression is continuous, then the cross-sectional dimensions must be checked according to the table.
Preparatory work with the cable
Strip the insulation from the cable cores to the required length. What is this length?
It should be equal to the depth of the tip, plus 5mm margin.
A reserve is required because the tip will be stretched and deformed during crimping (especially aluminum). Try to make the cut of the insulation even, strictly at an angle of 90 degrees to the axis of the cable itself.
If the cable cores are triangular in shape, they must be ground off with a rounding file. Otherwise, you will never achieve this density during crimping:
After removing the insulation, the bare core must be cleaned and degreased. To do this, use special contact pastes.
Crimper for crimping tips: design specifics, application
The operating principle of crimpers for crimping wire lugs is the same as that of double-jaw pliers. The difference is that the latter clamp the sleeve, and the crimper clamps the plugs. More precisely, crimping is not performed in its standard sense, but the contacts are shifted, which leads to tight pressing. This tool is designed to work with twisted pair cables.
Cable connection always begins with stripping the insulation from the ends of the wires
Before performing crimping with a crimper, be sure to evenly trim the untwisted conductors. If this is not done, a uniform position in the connector will not be achieved, and this will affect the quality of the crimp. You can do this with regular wire cutters, but this does not always give the desired result.
Many models of pliers for crimping Internet cables are equipped with special cutters. They are blades that close tightly when you press the handles of the tool.
Important! Before cutting, the straightened wires must be placed in the sequence required for connection (based on color).
There are many types of crimpers. The operating principle of all models is the same, but there are differences in connector standards. The body of the cable crimping pliers must contain symbols indicating the purpose of the tool. For example, RJ 45 is designated as 8P. This indicates the standard and maximum number of pairs. RJ 11 – 6P, the maximum number of pairs does not exceed 6.
A typical crimping crimper has comfortable plastic handles and a steel body and jaws.
Crimping pliers for crimping RJ 45 wire lugs
RJ45 connectors are one of the most used in the field of computer networking. RJ stands for Registered Jack, a standardized network interface. The body of this device is much larger than RJ 11. The latter cannot be used for computer connections; it is used when laying telephone cables. The internal contents and operating principle of these two types of connectors are almost identical.
Crimping pliers for RJ45 cable lugs are selected in accordance with the markings. As for the general requirements, you should pay attention to the following indicators:
- Weight. A small one most likely indicates the use of insufficiently strong materials for manufacturing, so you should not count on a long service life. Excessively heavy ones will contribute to rapid hand fatigue.
- The shape of the handles. It should be ergonomic and easy to grip.
- Presence of defects. Traces of dents and other mechanical damage may be a consequence of improper assembly. It is worth paying attention to the contact lines of the blades and jaws: even minor deviations will affect the quality of the crimp.
Among the most popular models of manual press jaws for twisted pairs is the Hanlong HT-500. The tool is designed for both RJ45 connectors and RJ11 and RJ12 options. The crimper is equipped with blades for cutting and stripping. The price of the product is 1250-15000 rubles. The model should be classified as professional.
Crimping pliers for RJ45 cable lugs are selected in accordance with the markings
Inexpensive pliers 5bites LY-T568R are quite in demand. They are also designed for three types of connectors and have blades. The products are lighter, weight – 340 g, less durable (according to user reviews on social networks). They can be purchased for 450-500 rubles.
Other types of crimping tools
Crimping tools from different manufacturers have their own shape, but when it comes to the most convenient option, let's note the automatic crimper.
Such a device does not require searching for the hole that best fits a given tip. There is one hole and during clamping it automatically adjusts to the inserted end of the coupling and the clamps.
On various websites and online stores, this type of crimping machine is called universal, but the range of conductor cross-sections it supports is usually limited, for example from a cross-section of 0.25 to 6 mm2 or from 6 to 16 mm2. More versatile, in terms of the range of wire cross-sections, are hand crimpers like the one shown above.