Welding is the most common method of joining metals at the moment. Now there are a lot of welding technologies, each of which has both advantages and disadvantages. But ultimately, the selection of technology depends on the type of metal, its characteristics, the expected welding speed and its quality.
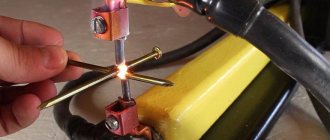
One of the technologies that combines high speed and quality of work, with the relative simplicity of the process, is resistance spot welding. It is used both in everyday life and in large industries. Resistance spot welding has proven itself well when welding thin sheet metal, for example, a car body. The whole secret lies in technology. To form a weld point, special welding pliers for resistance welding are used, which not only compress the parts, but at the same time heat them up using a short electrical pulse.
This creates a strong weld. In this article we will tell you how to make welding pliers at home to reduce the cost of welding and save on purchasing factory pliers.
general information
Welding pliers can be hand-held or suspended. Let's talk in more detail about the types of pliers, since this is important for assembling them yourself.
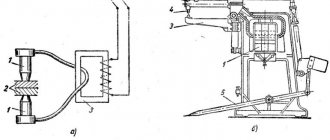
You can see manual resistance welding pliers in the picture below. As you can see, the design of hand pliers is extremely simple, and in many ways similar to any other hand tools (with the same pliers or tongs), which use a lever opening/closing system. The main difference between manual resistance welding pliers is the additional use of a transformer. The transformer is connected to one of the pliers handles and generates the welding current necessary to form the seam.
The essence of the operation of resistance spot welding pliers is that the transformer generates welding current, which is then supplied through the pliers handle to the welding electrodes. The pliers manually clamp the metal workpieces, then a current is passed through the electrodes and a weld point is formed under the action of the compression force. The speed of welding with manual tongs directly depends on the welder himself, since the entire process is performed manually.
There are also hanging welding guns for spot welding. They are used in production or in the manufacture of professional resistance welding machines. Such pliers are built into the welding machine and work according to a different scheme. They still compress both parts, but this process is not done manually. It is for this reason that hanging pliers are much more productive than hand pliers. However, hanging mites are not collected at home. This is impractical and their use requires special equipment.
Therefore, below we will tell you how to assemble manual pliers for contact welding with your own hands.
Types of equipment
All welding guns work on the same principle: when current is applied, the electrodes are compressed. They differ in the form of fastening and the method of creating a force load. They come in two types:
- manual (they are light in weight);
- suspended (clamping arms are fixed on brackets or permanently placed on tables so that the contacts are suspended, the welder freely holds the parts to be welded in his hands).
Hand welding guns
Hanging welding gun
To create a large compressive force, suspended industrial pliers are equipped with a pneumatic pusher. If necessary, you can make hanging hand pliers; to do this, they are placed in a vertical plane. The lower handle is clamped in a vice, the upper one remains free. This design makes the work of the welder easier.
It is easier to squeeze welding clamping pliers by resting your whole body on the clamping lever.
Homemade pliers
DIY spot welding pliers are a great way to save money while still getting a working tool. Homemade pliers for contact and spot welding are easy to make and use. They can cope with all types of metals and will be useful to any country craftsman or private craftsman. The cost of homemade pliers is extremely low, so you can save a lot of money. Watch the video below for details on how to assemble your homemade pliers.
If you need a quick guide, read on. Start by making the basic pliers structure. To do this, you can use available materials. We recommend taking metal no more than 5 mm thick and cutting it into strips 20 mm wide. Choose the length of the strips based on your preferences. You can also use thick metal rods. On both strips or rods, bend the ends so that they take on the shape of tongs.
Join the pieces crosswise and drill a hole. It is necessary for connecting two metal blanks and their further opening/closing. Don't forget about the dielectric gasket. It needs to be installed between two blanks. Then at the end of one workpiece you need to make a hole for attaching copper wires using a bolt. A hole is drilled on another workpiece for attaching the welding cable and fixing the terminal.
Wrap the handles of the pliers with electrical tape or put on a rubber hose if you used a metal rod when making the device. This will make the pliers safer and easier to use. This is sufficient for manual use by weight. But if you want to use the pliers permanently, then weld a thick spring between the two handles.
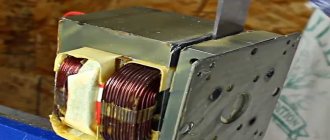
As for supplying current to the clamps, any transformer with a secondary rewound winding will do for these purposes. You can lay the welding cable in three turns on the core. If you want higher power resistance welding, connect two transformers and use them to generate current.
There are only drawings of hanging pliers on the Internet, so you will have to think through the design of your homemade device yourself. But this will not be difficult since numerous videos detail how to make hand pliers.
Process technology
To heat the parts to the required temperature, a short-term pulse of high-power electric current is applied to them. As a rule, the pulse lasts from 0.01 to 0.1 seconds (the time is selected based on the characteristics of the metal from which the parts are made).
When pulsed, the metal melts and a common liquid core forms between the parts; until it hardens, the welded surfaces must be held under pressure. Due to this, as it cools, the molten core crystallizes. A drawing illustrating the welding process is shown below.
Spot welding process illustration
Designations:
- A – electrodes;
- B – parts to be welded;
- C – welding core.
Pressure on the parts is necessary so that, when pulsed, a sealing belt is formed along the perimeter of the molten metal core, preventing the melt from flowing outside the zone where welding occurs.
To provide better conditions for crystallization of the melt, the pressure on the parts is gradually removed. If it is necessary to “forge” the welding site in order to eliminate inhomogeneities inside the seam, increase the pressure (do this at the final stage).
Please note that to ensure a reliable connection, as well as the quality of the seam, it is first necessary to treat the surfaces of the parts in the places where welding will take place. This is done to remove oxide film or corrosion.
When it is necessary to ensure reliable connection of parts with a thickness of 1 to 1.5 mm, capacitor welding is used. The principle of its operation is as follows:
- the capacitor block is charged with a small electric current;
- the capacitors are discharged through the parts being connected (the pulse strength is sufficient to ensure the required welding mode).
This type of welding is used in those areas of industry where it is necessary to connect miniature and subminiature components (radio engineering, electronics, etc.).
Speaking about spot welding technology, it should be noted that it can be used to connect dissimilar metals together.
general information
Spot welding clamps come in hand-held and overhead versions. You need to dwell on the types of this tool for a couple of minutes to understand the nuances of their manual assembly.
Manual welding guns have a simple design. Just like all other hand tools (pliers, pliers, forceps), their system is based on a lever that regulates the opening and closing of the pliers.
The main nuance of welding pliers is the ability to use a transformer system. A transformer is connected to one handle of the pliers, which transmits current to the tool in order to create the connection.
Through one of the handles, the transformer mechanism transmits the generated welding current to the electrode rods. This is the main work of the clamping mechanisms. You press metal parts with pliers with your hands, and current flows through them.
Electrical force and compressive force create the welding point (hence spot welding). The process is not mechanized, it is performed from start to finish by the hands of the welder, so only he decides how quickly the elements will be welded.
Suspended clamps for resistance welding are rarely used in everyday life. But they can often be found in factories and among professional craftsmen who use highly specialized equipment for point technology.
These pliers are built into the device itself, and their operating principle is different. Yes, they are designed to squeeze parts together, but not by hand. Therefore, the productivity of work with hanging pliers is higher than with manual ones.
There is no point in assembling such houses, since, most likely, you do not have the equipment with which to use them.
Therefore, further we will talk about assembling hand pliers for the spot welding method.
Safety precautions
To ensure their own safety, the worker must know and comply with the safety instructions for spot welding:
- To prevent electric shock, ground the unit;
- Before starting work, be sure to check its serviceability;
- use personal protective equipment for hands, eyes and body;
- exclude high voltage supply to the device controls
- use only wires of the specified cross-section in the device;
- carry out work in a room with well-equipped ventilation or use special masks to protect the respiratory system.
- locks and toggle switches (buttons) for turning on or off must be in working order, clearly visible and easily accessible;
- During work, the area of the clamping mechanisms must be covered with a shield.
Compliance with these safety measures will ensure the health of the employee and others and will allow the required amount of work to be completed accurately and on time.
Manufacturing
You'll spend less time in stores by making your own spot welding pliers. At the same time, you spend much less, and the money saved can be “used” on high-quality materials for welding.
Making and using handheld resistance welding pliers is easy. But at the same time they are suitable for any type of metal. Both a person repairing his car in a garage and a field work specialist will find a place for them. Their cost pleases thrifty people.
The first stage of making a homemade instrument is creating the base. Materials that everyone has at hand are suitable for it. It can be any steel or alloy, the thickness of which is no more than five millimeters.
Make several strips of twenty mm wide from a sheet of material. Their length can be different, it depends on your wishes. Wide metal rods are also suitable for the base. Give the ends of the blanks the shape of tongs.
Place the pieces obliquely relative to each other and join them together. Make a hole in the center that will be the point for adjusting the opening and closing of the pliers. Place a dielectric spacer between the plates at the hole location.
You also need to drill a hole at the end of one rod/plate so that you can attach the copper wire to the bolts. The opposite workpiece is also drilled. The hole in it is needed to attach the device cable and fix the terminal.
Insulate the metal of the spot welding pliers with electrical tape along with a rubber pad (this could be a piece of hose) after connecting and drilling the desired components.
These materials will protect you when working with electricity, and will make them more comfortable to hold in your hands. This design will be enough to support the welding clamps, but to secure them you will need to add a spring between the handles.
The current is supplied to the terminal also taking into account the rules. Its best source will be a transformer mechanism with a secondary superimposed winding. You can wrap the cable around the core three times.
To increase the power of spot welding, combine a pair of transformers that generate current.
Schemes for creating hand pliers are not easy to find, so try to think through their design yourself. To help, you can take video lessons on creating non-hanging pliers or advice from familiar craftsmen.
Read also: How to make a boat from foam plastic
Welding methods
There are several methods for spot welding:
Spot - welding of elements occurs in one or many places. It is used in instrument making, the automotive industry, and the construction of sea, river and aircraft vessels.
Provides welding of steel sheets up to twenty millimeters thick.
Relief method - structural elements are welded in one or several prepared places. The difference between this method and the previous one is due to the shape of the fastened elements at the welding site.
Seam method - the welded elements are fastened with a series of welding seams. A seam can consist of individual weld pixels or overlapping ones. Used for the manufacture of various tanks requiring a high degree of tightness.
How to assemble a simple welding machine at home: drawings of inverter models and step-by-step assembly instructionsDo-it-yourself welding table - step-by-step instructions for manufacturing and assembly (65 photos)
What types of welding machines are there: types, principles of operation and classification of devices
Docking - elements are welded along the adjacent contact area under high temperature. They are used in laying pipelines and making anchor chains for ships.
Design and principle of operation
Any welding gun consists of five main elements:
- a power supply that provides the required power (a transformer copes with this task),
- starting device,
- two conductors connecting the power supply to the ends of the clamping device (pieces of cable with a large cross-section),
- two rigid conductors through which the charge flows to the point of contact (they act as levers of the clamping device),
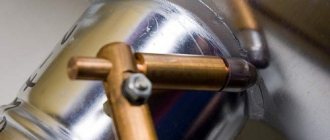
- two dense electrodes that can withstand compressive loads and create an electric arc that heats the metal.
Welding pliers Essentially, the design of the clamps is simple. These are the same pliers, the handles of which have wires connected to them, and electrodes are installed in place of the clamping plates. For power supply, powerful transformers are used, powered from a three-phase 380 V network. They are equipped with a solid copper disk of the secondary winding. The required idle potential difference is from two to five volts. The current strength of resistance welding, depending on the type of units, varies from 2 to 15 kA.
In order to weld metal tightly, you need a powerful arc. From it, at the junction of two overlapping sheets, a 2-3 mm fused point with a common crystalline structure is formed. For tight contact, the handles are compressed with the necessary force, which is why hand pliers are made with long handles.
Hanging model
This type of equipment is used in large repair centers and industrial enterprises with mass production that perform a large number of similar operations.
The most advanced models are equipped with a balanced suspension with a gyroscope, which stabilizes the position of the device in space. The housing houses a powerful transformer current source and an automated control unit that controls the current strength, clamping force and pulse duration.
A productive pneumatic system ensures quick supply of electrodes to the workpiece, clamping with a given force and rapid removal. The pneumatic system is powered from a general workshop compressed air line or from a separate compressor.
The convenient handle allows you to accurately point the device at the welding site and, by pressing a button, give a command for an impulse.
Homemade welding pliers for contact (spot) welding with your own hands
Thanks to welding equipment, you can perform numerous jobs. The designs of units for joining metals are also varied. One of the small devices is a welding gun. They come in several varieties. Thanks to such simple equipment, you can quickly create spot seams. In addition to store-bought versions, there are also home-made analogues. How they work and what you need to consider to create them yourself is described below.
Design and principle of operation
Resistance welding pliers have a simple device:
- current source (transformer),
- a structural grip that allows you to bring current-carrying ends on both sides of the product,
- electrodes,
- cable,
- launch control mechanism.
To create a welded joint, you need a device with a lower V value and an increased A. Transformers with a reinforced secondary winding are often used. The voltage from it is transmitted to the contacts, which are the copper electrodes. The latter are located at the ends of the pliers or brackets, allowing a part of the product to be inserted between them.
When the sides are aligned, the electrodes are compressed by hand or a pressing device (pneumatics). At the same moment, a current with a large ampere value is supplied, which leads to local heating of the area to a molten state and mixing of the molecular mass into a single whole. After hardening, a general structural molecular lattice and a strong connection in the form of a point are formed. The operation of the device is similar to a spotter, but with a two-way approach to the product. The diameter of the point depends on the current strength, the holding time of the electrodes, and their width.
Equipment advantages
Welding pliers are popular in small workshops and large enterprises due to a number of positive features:
- convenience of applying spot sutures on similar structures,
- speed of manipulations,
- the cost-effectiveness of the method due to the lack of consumables,
- light weight portable devices,
- Several welding points installed close to each other make it possible to replace a narrow continuous seam according to the strength of the connection.
Read also: Wi-Fi signal jammer: review of factory and homemade jammers
Resistance welding pliers are actively used for creating equipment casings, making cages, containers and communication paths for ventilation, and for installing small frame products.
Types of equipment
Spot welding pliers are divided into two types: manual and suspended. Both have the same operating principle, but differ in application possibilities. Hand pliers look like large pliers with copper teeth on the ends. Cables from the transformer are connected to the opposite ends of the moving sides. The pliers can be applied to the product from different sides, depending on the length of the reach, and produce welded spot connections in all spatial positions.
The design is lightweight. The tongs themselves can weigh a kilogram or more, and together with the current source up to 12 kg. This allows them to be freely transported around the workshop and to neighboring workshops. To operate, you only need to connect to the power supply.
Hanging models are mounted on brackets or tables. The tongs themselves are carried beyond the edge of the surface so that nothing interferes with bringing products to them for welding. Due to the absence of load on the welder’s hands, it is possible to make the structure heavier with an additional mechanism for squeezing the electrodes. Pneumatic pushers are often used. When working with such equipment, the welder’s hands remain free and he can easily hold and rotate the product being welded.
Important nuances when creating with your own hands
To make homemade pliers for resistance welding, you need to know a number of key factors that allow you to correctly select the parameters and other features of the equipment. Here are the most important ones:
- Current strength. The ability to work with different thicknesses of metal directly depends on the power of the welding unit. The transformer is responsible for generating the required voltage. The maximum value of 3500 A will allow you to weld plates and metal rods up to 1 mm thick on each side. A current of more than 6000 A allows you to make strong point connections on materials whose total thickness is 4 mm.
- Electrodes fly out. This word refers to the distance between the ends of the copper rods and the common axis of the pliers. The size of the inserted parts and the installation location of the weld point depend on this value. The smaller the overhang, the closer to the edge of the product resistance welding will be performed.
- Electrode material. They are made from copper with various impurities. Among them: beryllium, cadmium, chromium and others. The density of the material and the frequency of sharpening the electrode depend on this.
- Weight of ticks. The long sides of the tongs, which make it possible to create a decent extension of the electrodes, are fraught with the weight of the structure. Therefore, it is worth thinking about future frequent work and creating spot welding pliers with your own hands with optimal weight and reach that can handle the upcoming work. Designs that are too heavy will overload your hands, and fixing them on a table will limit the range of use and maneuverability.
Other important parameters of welding tongs that are worth thinking about when making your own are: the ability to move the electrodes, power from 16 to 75 kW, short circuit current, type of compression drive, diameter of the electrode holder, cooling of the electrodes. Of course, for rare household use, some of these functions and values are not required, but for professional use they will be very useful.
Manufacturing process
You can start your journey to creating homemade pliers by making the design of the pliers themselves. You can use any available materials. For example, from a strip of metal 2-3 mm thick and 20 mm wide, you can bend two stepped parts. The same shape can be created from a thick metal rod. A hole is drilled for the axle. It is important to install a thick dielectric between the two parts so that the contact does not close in the wrong place.
At the ends of one edge, holes are drilled for bolting copper electrodes. It is important to install these elements opposite each other. To compensate for the thickness of the dielectric spacer, you may have to bend the plates inward. The cable is attached to the opposite edge. To do this, holes are drilled and terminals are fixed.
To increase the safety of the product and ease of use, you can put a rubber hose on top of the handles or wrap them with several layers of electrical tape. If the device is planned to be used permanently, then a powerful spring is installed between the handles, and an additional lever-handle is screwed onto the edge of the end with the electrode to apply pressure.
A transformer with a rewound secondary winding is suitable as a current source. The last one can be a welding cable laid in three turns on the core. If you connect two transformers in parallel, you can double the power of the device. For manual pliers, it is enough to install a general power button on the body. On a suspended model, it is practical to place such a trigger mechanism on the clamping handle.
Contact welding pliers are very easy to make and use. They are widely used and will be useful in the country house and in a private workshop.
Popular posts
- DIY Easter egg for Easter 2022 - 5 best crafts Cheburashka fishing weights How to make a car out of cardboard with your own hands The procedure for making a chair with your own hands, taking into account the features of the model How to build a stable for horses Papercraft for beginners, paper modeling, three-dimensional sculptures and simple figures from paper for children How to make a bouquet in a box with your own hands: step-by-step instructions Drip irrigation in a greenhouse and in the garden with your own hands
Features of choice
Before you decide to buy a tool for resistance welding, you need to know the criteria for choosing a quality unit:
- Operating voltage and current strength. All devices are designed for a specific voltage - 220 V or 380 V.
- Electrode extension is the distance between the electrodes and the unit body. The larger it is, the further from the edge you can weld parts.
- Electrode clamp type. Terminal or threaded.
- Weight of the welding unit.
- Performance.
In addition, it is worth paying attention to the energy consumption of the structure and possible additional properties that do not always add benefits.
Having decided on the specified parameters, as well as having carefully studied the desired modification of the device, you can safely make a purchase.
It has been established that it is more effective to use hand pliers when working with thin sheet metal, and mechanized ones when working with thick sheets.
