Today you can often see electric vehicles on local roads. At the same time, we are not talking about cars, which include, for example, Tesla or other similar models, but exclusively about full-fledged modern two or three-wheeled vehicles that can provide significant assistance in the field of movement on city streets and off-road conditions in particular.
The most popular form of transport today is the electric scooter.
Homemade electric scooter
Electric scooter: buy or assemble it yourself?
We recommend that you read our previous material on a similar topic.
I would like to emphasize that it makes sense to assemble a serious mechanism on your own only if a person has really found a way to improve, improve factory designs, and do something extraordinary with specific practical goals. For example, as in the case of Thai engineer Joseph Memmel, who integrated a monocrystalline solar battery with a power of 180 Watts and a voltage of 24 Volts into his homemade electric scooter. This scooter is capable of traveling about 40 km at a speed of up to 30 km/h.
In other cases, when there is no innovative practical solution, it is better to buy a ready-made electric scooter: it is always a well-thought-out design with guaranteed reliable connections, mechanics and automation.
Why doesn't the electric scooter work?
Despite the fact that an electric scooter is a fairly durable and hardy vehicle, from time to time some elements fail. The reasons may include wear and tear of parts during regular use of the scooter, or improper operation. We will look at what breakdowns most often occur when using an electric scooter.
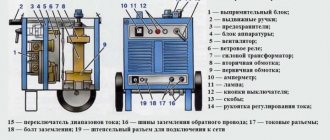
Controller malfunction
The key element of the electric scooter system is the controller. It connects the operation of such components as the battery, gas handle, brake sensor, and wheel motor. When the controller fails, the operation of the electric scooter stops completely.
The controller is equipped with a reliable protection system against overheating and damage. When the system overheats, the controller blocks the operation of the electric scooter. In this case, you should wait about 20 minutes for the system to cool down to the optimal temperature. After this, the electric scooter will begin to function again. Therefore, if the controller burns out, then most likely it is the user's fault.
How to assemble an electric scooter with your own hands
So, you have decided: “make your own electric scooter.” The main thing that is important to decide on is the selection of a battery and an electric motor. The capabilities of the scooter, its mileage and speed limit depend on which set of components you choose.
- Batteries (batteries): lead - cheap, but heavy in weight; lithium and lithium phosphate are more expensive, but more durable and lighter.
- The battery is optimally placed under the frame, along with the alarm and controller. It makes sense to leave a compartment under the seat for luggage.
- Assembling the scooter involves welding work. If you are not ready to do them yourself, then the cost of assembling a homemade scooter will not be more profitable than buying a ready-made factory-assembled model.
- An electric motor will allow you to save on refueling your scooter and make your vehicle environmentally friendly.
What is needed to assemble an electric scooter?
If you decide to assemble an electric scooter with your own hands, the most important thing is the selection of the engine and battery, since this vehicle runs on electric power.
The choice of one or another engine with a battery directly affects the maximum speed and mileage:
- If you take lead batteries, you can save a lot, but they are heavy and this must be taken into account.
- A more expensive alternative is lithium phosphate batteries, which are lighter.
- It is best to place the battery under the frame, where in addition to it the controller and alarm will be located. You need to leave at least some space under the seat for luggage.
- It is necessary to understand that assembling an electric scooter with your own hands necessarily involves welding work. If the necessary equipment, tools and skills are not available, then such an undertaking can be much more expensive than a finished electric model.
- But in any case, in the long run it will pay off due to the electric motor, which is much cheaper to refuel.
Set of ready-made components
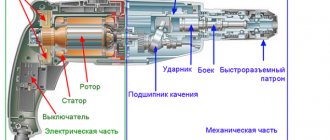
It is very important to install the electric motor correctly. This is one of the most important points during scooter assembly. It is very important to minimize the sound it will make (it's not the roar of a Ford Mustang). This can be done due to the absence of a commutator and brushes. Often it is placed on the rear wheel, the rotation of which occurs thanks to an electrical circuit that supplies a push to the front one.
It is necessary to look for the necessary components for your electric scooter as responsibly as possible. You can buy an electric motor and battery along with the necessary connectors separately, or you can take the path of least resistance and buy a ready-made kit. Despite the fact that this one will cost more, you can immediately buy a set with a controller and a motor wheel, a charger and a set of hydraulic brakes.
Advantages and disadvantages
For many years now, some European countries have been actively fighting for the environment, so they have banned gasoline scooters. Electric analogues certainly have some advantages in this case:
- Much more modern design.
- The efficiency is much higher.
- There is no need for frequent repairs of the power unit.
- Easy to find spare parts.
- There is virtually no noise when driving.
- Easier to charge.
But they are not without drawbacks in terms of driving range on a single charge. However, for trips around the city this is the best option.
Will such a homemade product be safe?
From the point of view of risks to life - absolutely safe, from the point of view of the wallet - not everything is so simple, because if you don’t understand basic electrics at the level of plus to plus, and minus to minus, then you can burn not only the controller boards, but also the electric motor
The best thing that can happen if assembled incorrectly is that the homemade electric scooter simply won’t move. If you can’t wait to make such a vehicle yourself, it’s better to enlist the help of smart friends who can digest the frame and connect the system correctly.
How to make an electric scooter: step by step solution
As a rule, assembling an electric motorcycle yourself involves having some kind of basic kit that you convert and improve. Therefore, the first step is to choose the model of scooter that you will remodel.
- Decide which electric motor will satisfy you. Estimate the required power and base your choice on this indicator.
- Select your battery based on type, capacity and voltage. Choose the right controller.
- First, attach the components to the frame and suspension (engine, battery, controller), then connect them together.
- Charge the batteries from the mains, check the quality of the connection and readiness for use.
Scooter assembly and welding work
To assemble your electric scooter, you cannot do without welding.
Among the features are:
- They often use a profile pipe with dimensions of 20x20x2 mm as a frame for their scooter;
- an engine mount is a must-have for your scooter;
- for the purpose of installing the control system, irf3205 transistors are used;
- if necessary, carrying out turning work.
Important: do not forget to install a chain tensioner on your electric scooter, without which it will be impossible to start.
How to make a homemade moped from a bicycle?
7 minutes Author: Sergey Morskoy 274
A moped, like a bicycle, is a very convenient vehicle. Moreover, it drives faster than its older brother, thanks to its built-in drive. The ability to move quickly without much effort – isn’t this the dream of every cyclist? It’s quite possible to bring it to life - equip your bike with a gasoline engine or an electric motor.
An assembled moped from a bicycle is a fairly common occurrence in rural areas or regional towns. It is there that they like to put innovative ideas into practice, in particular, to make nimble and economical transport out of an ordinary old bike. Have you noticed a similar interest in yourself? Then it's time to get down to business!
Main parts of a moped
First, let's look at the main parts of this technique. In other words, let's take our future scooter apart, so to speak, and find out its main elements so that making a moped is easy.
Main moped components
It is clear that without a good engine you cannot go far on a scooter. In this case, it is usually installed on the D-6 power unit. Recently, chainsaws have also become very popular, from which a homemade moped is made. In the video instructions you can see in detail how to do this. Chainsaws will be discussed in more detail below.
Homemade moped: manufacturing features and video instructions
Nowadays, many people have begun to engage in constructive creativity. Fortunately, there is time for this, materials and video instructions that can be easily found. If a homemade bicycle is interesting to some part of our society, then there is nothing to say about a homemade scooter or tricycle, which are easy to make. In city conditions, this is a very useful type of transport, which can be maneuvered quite successfully. You can buy a scooter or a tricycle, but making them yourself means turning all your ideas into reality, a unique opportunity to save money, and much more. You can always make it using a high-quality video guide.
Option 1: how to quickly assemble a moped with a gasoline engine
Before you start creating a new moped from a bicycle, you need:
- bike;
- gasoline engine and gas tank;
- battery;
- pulleys or gears;
- transmission belt or chain;
- drive cable;
- fastening clamps.
Recommended power – 2 l. s., and the engine volume should not exceed 50 cubic meters. see. A weaker engine will not allow you to move the bike; you will have to pedal for a while. An engine of sufficient power can be taken from an old moped. Other options are with a chainsaw or lawn mower.
The working unit of the engine, gas tank and battery are securely fastened to the frame using fastening clamps. Convenient location:
- on the top pipe there is a battery;
- the junction of the lower front and seat tubes is the engine;
- Next to the engine is a gasoline tank.
At the next stage, you need to make pulleys - special transmission units through which the engine force will be transmitted to the rear wheel. The source material for the pulleys can be small wheels with external barriers, the size of a CD. Mandatory conditions are the strength of the material and reliable fastening.
Do-it-yourself installation of pulleys on a bicycle:
- The front gear wheel is attached to the motor shaft.
- A second pulley is attached to the hub of the rear wheel of the bicycle.
- A belt is placed on the pulleys. The tension force is approximately the same as that of a chain. The belt must hold firmly to the wheels; this determines how accurately the engine will transmit force to the wheel.
If a chain drive is used instead of a belt drive, then gears are installed on the motor and wheel instead of pulleys.
So, the transmission is ready, now let's move on to connecting the engine:
- The working motor housing is connected to the battery.
- Assemble the “ignition” mechanism: a regular brake lever is attached to the steering wheel, then it is connected to the engine body through a cable.
- Set the tension so that the engine starts freely through the handle.
DIY electric bike scooter (photo+video)
In 1914, Henry Ford and Thomas Edison tried to create an electric car. And, apparently, they made a couple of experimental samples that could travel up to 160 km on one charge. But the workshop burned down, and Ford returned to the internal combustion engine. And now, almost a hundred years have passed...
The idea of an electric bicycle or scooter has been in my mind for a long time (I don’t know what is more in the device: a bicycle or a scooter, so we will call it that). But how to implement this idea? Of course, you can buy any of those produced by industry, but over the past 5-6 years they have not even thought of getting cheaper.
A more or less decent bike or scooter with electric drive costs from 27,000 rubles, and the ones I like generally cost about 40 thousand.
Against the background of a fairly good used scooter worth 17,000 rubles. The price of the electric bike seems inadequate. I kept hoping that bikes would start to get cheaper. But one year passed, then another, and prices still did not become acceptable.
And suddenly the issue began to resolve itself. In the last days of the New Year holidays, a friend called me and said that he would come to me and bring me an electric mini-moped that was not fully assembled. In the afternoon, a friend showed up with a bunch of components and an unfinished device like an “electric stool.” There is one more piece of furniture in my room.
The story of the “stool” turned out to be interesting. Six months earlier, a friend also had the desire to have an electric moped. But those who were ready to buy did not - it was expensive. On avito.ru he came across an advertisement for the sale of an unfinished moped and some other electrical accessories. When buying, a friend saw a not very attractive picture: the frame was rusty in places, but the engine was on it.
All this had to be brought to fruition by investing money. The seller, who wanted to empty the garage as soon as possible, immediately agreed to sell everything in bulk for only 4,500 rubles. So a friend became the owner of three DIY kits.
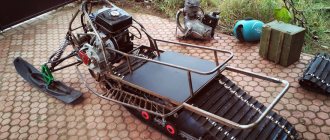
Reference by topic: Do-it-yourself tracked all-terrain vehicle
Before coming to me, he managed to find the missing components in different parts of Moscow and paint the frame. All that remained was to screw on the footpegs, install the disc brake and connect the regulator.
In the first modification, it was planned to install a ski (skateboard) instead of the front wheel. In one day, the two of us (this is a big word, I only held a screwdriver and sometimes handed over the tool) managed to screw on the footpegs, install the ski, disc brake and cut out a protective casing for the batteries.
Work continued on the next day off. Dmitry brought three batteries from a computer uninterruptible power supply with a capacity of 12 Ah. They fit very comfortably underfoot. They are secured in the casing with foam plugs.
The second approach to creating a moped was done over the weekend, all that was left was to simply connect the regulator and test the homemade product.
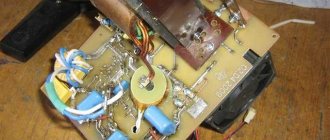
But no matter how hard we tried, the electric bike’s engine would not start. We tried combinations of two different regulators and different throttle handles. To no avail! The problem was resolved only by mid-March, when a friend bought a new Chinese regulator unit.
It turned out to be more powerful and was equipped with a throttle handle. When purchasing, the seller gave full advice on how to connect it correctly.
And, lo and behold, Dmitry connected the regulator in 10 minutes, it worked perfectly even with the old gas handle. I just felt sorry for the old regulator - apparently, our experiments led to us burning it.
Connecting the new regulator is shown in photos 1 and 2.
Reference by topic: Do-it-yourself homemade snowmobile scooter
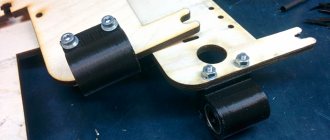
The disc brake from a children's ATV looks solid (photo 3). To attach it, it was enough to make one 06 mm hole in the frame and place the brake disc on a cylindrical key.
They did not put on the upper casing - the regulator, temporarily taped to the front, was in the way (photo 4). The rims are 4 inches in size - from a children's ATV; the tubes and tires are from a go-kart. Two running boards for an electric moped scooter were made from one running board of an off-road vehicle.
The first trip took place at the end of March, but there was a snowstorm and the asphalt was covered with snow. The first test drive showed that the mini-snowmobile lacked either engine power or grip on the snow. When equipped with a ski, he could not even ride on a path made of trampled snow... The rear wheel sank or skidded.
After replacing the ski with a wheel, the moped ran briskly through the snow. And the ski was not useful (photo 5).
The speed is low, but the power is felt (photo 6). I drove around the yard a couple of times. The feeling is pleasant. If the moped started to skid, then I put my leg out as an additional ski (photo 7).
The second trip “to the field” took place in mid-April, when the snow melted a little and the paths dried out. The regulator was moved under the electric motor, and all equipment was covered with a protective casing.
The wheels were replaced with narrow tires with a summer tread pattern (photo 8).
It is convenient to transport the “miracle of technology” in the back seat of a car (photo 9).
The second test race took place at a nearby stadium. The well-loaded electric bike ran great on the asphalt path.
Reference by topic: DIY snowmobile
Even without visible effort, he overcame small obstacles.
An attempt to drive through the mud that remained after the snow showed that there was not enough power for such movement.
I made a couple of laps around the stadium, but I didn’t speed up too much, since I was driving on a pedestrian path. It was good to ride through the spring puddles! Passersby looked at me strangely.
“Wild people, they’ve never seen an electric train,” I thought. And when I arrived, I realized that a significant part of the splashes from under the drive wheel had settled on my back.
The only thing our electric scooter was missing was a rear fender (photo 10).
Test drives can be viewed online:
Electric Scooter Bicycle Features:
Motor - commutator, 250-350 W Regulator - commutator 36 V, 500 W Battery - 36 V, 12 Ah (three batteries connected in series) Maximum speed with a load of 80 kg - 20 km/h (forecast)
Weight - 30 kg
The regulator was purchased here - motorboard.ru, and the disc brake and rims from a children's ATV here - mike-motors.ru
PS That's what I don't understand. Half of China's population has been riding electric bicycles for at least ten years.
And in Moscow, I have the feeling that there are fewer electric bicycles (scooters, scooters) than, say, Cayenne or I wonder why? "Maybachov".
©Author famous on the Internet master Y. CHUDOTWORKER, Moscow
Below are other entries on the topic “How to do it yourself - for a homeowner!”
- Do-it-yourself scooter trailer cart How to make a comfortable cart for…
- DIY LED night light How to make your own night light...
- How to put skis on a stroller with your own hands Do-it-yourself stroller on skis In winter...
- DIY zipper bracelet (PHOTO + STEP-BY-STEP DESCRIPTION) HOW TO MAKE A BRACELET FROM REGULAR…
- Stable folding trestles for the workshop with your own hands - photo and drawing Folding trestles for the workshop with your own...
- DIY ceramic tile lamp (photo+diagram) DIY ceramic tile night light…
- DIY chair made from cans Chair made from cans for the terrace I saw…
Option 2: assembling a moped with a gas engine
This is an advanced method, and the result is more reminiscent of a real moped. To make it, we need:
- gasoline engine;
- moped parts: wheels, shock absorbers, exhaust pipe, brakes;
- proven bike frame;
- tools.
Since here we are going to get a real moped, the frame must have increased strength and weight. Also, mopeds have a slightly different frame design, which may require some modifications.
Wheels from a moped are put on the frame. It will be necessary to change the fork design, since the width of the wheels will be wider than the distance between the dropouts. If possible, install shock absorbers on the fork.
Carefully overhaul the moped power unit and replace all faulty parts. The propulsion system will require a separate space; for this, a welded metal platform at the bottom of the frame would be a good option. The engine and fuel tank are secured to the site using metal fasteners. It is better to place the battery closer to the steering wheel. An exhaust pipe is connected to the bottom of the engine. The pipe must be firmly secured to the frame so that it does not dangle while driving.
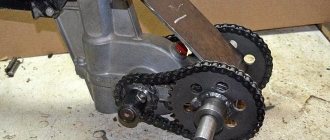
Transmission. Next, you will need to make the engine torque transmission system:
- Remove the pedals and chainring from the bicycle frame.
- Install sprockets on the rear wheel of the moped and the engine shaft. A star on a wheel with a larger diameter.
- Place the rear wheel on the frame.
- Connect the stars using a chain.
Motor connection. The clutch and throttle valve are connected to the ignition lever via drive cables. The tension is selected so that the engine can immediately start and start spinning the wheel.