To restore order and free up space occupied by accumulated things, a metal rack is assembled. You can buy a ready-made design or make it yourself. If the weight of the objects is small, an aluminum corner is used as the material. To store preparations for the winter in city apartments, racks made of steel corners are installed on the balcony. To accommodate a large number of heavy objects, make a rack from pipes in a garage, shed, or cellar.
Advantages and disadvantages of metal shelving
The advantages of metal structures include:
- Reliability and durability. The shelves can support significant weight without damage.
- Easy to care for.
- Wear resistance. Even with intensive use, metal pipe racks retain their characteristics and appearance unchanged.
- Full compliance with fire safety requirements.
- Storage of items made of any material.
- The metal frame is resistant to moisture and temperature changes.
Disadvantages include:
- It is more difficult to make a rack from a metal profile than from wood;
- the price of metal structures is higher.
What materials are garage shelving made from?
The service life of the structure depends on this condition. Wood and metal are commonly used. Let's look at what material you can use to make tool shelves in your garage with your own hands.
The material used to make the shelving depends on where and how you are going to place it.
- Metal. It is durable, strong and can withstand any load. But with excessive humidity, it quickly begins to deteriorate without preliminary anti-corrosion treatment. It is very easy to care for such a structure; you just need to wipe off dust and treat it with stainless steel;
- Wood. It is better to make them hanging shelves. Not suitable for heavy structures. It is best to opt for oak, pine or birch. It is better to secure the boards using iron corners. In a dark and damp room this is not the best option, since after some time the wood begins to rot;
- Plastic. Perfect for storing light weight items. For example, in the form of containers or boxes. Plastic is lightweight, which allows the structure to move freely. But this material has a significant drawback - its fragility. With little physical impact it breaks easily;
- Combination of several materials. Usually it is metal and wood. This is the best option, since together you can get the highest quality and durable design.
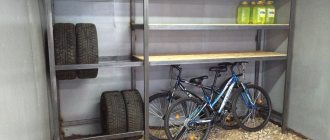
If you are planning to build a large rack to store heavy items (such as tires), then it would be optimal to use a steel structure.
In addition, you can use improvised items: plastic containers, flower pots, and so on.
If necessary, you can buy ready-made shelves or make them yourself.
If you properly process the wood, these shelves will last in the garage for quite a long time, and you won’t have to complain about them.
Types of shelving
When choosing a metal storage system option, the complexity of manufacturing and operating conditions are taken into account:
- Modular structures are assembled from perforated profiles of different sizes. They are reliable, and the height of the shelves can be easily changed if necessary. However, the price is steep.
- Aluminum frames are attractive in appearance; their low weight allows you to quickly move the collapsible rack to another place. The disadvantages are the high price and deformation from impacts.
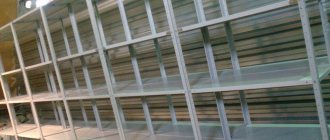
- Shelves of any size and configuration can be made from profile pipes. The shelves can withstand a lot of weight. For manufacturing you will need a welding machine and skills in working with metal.
- In terms of price and labor costs, frames made from metal corners are similar to the previous option, but are inferior in strength and aesthetics.
- The CD profile for fastening drywall is good because welding and expensive tools are not required to assemble the frame. Sold in building materials stores at affordable prices.
Principles and possibilities of arranging a car garage
The main purpose of a garage is to store a car. This means that first of all, the car owner must eliminate possible attacks on the property stored inside, that is, ensure the safety of the latter. An equally important issue is the correct climate regime in the garage space - the condition of the car should in no case depend on the vagaries of the weather or the appetites of harmful microorganisms such as fungus or mold. Another principle of organizing the situation in the garage - ergonomics - says that everything under the roof of the structure should always stand, lie or hang in its place, without interfering with the passage, travel, cleaning or car care process. With all this, it is imperative that the premises be clean and orderly, which are the key not only to the health of the car owner, but also to his safety when visiting the garage and performing all kinds of business or repair operations.
In accordance with these principles, at the first stage of arranging a garage you will need:
- Install a reliable locking system on gates and windows, if any.
- Insulate the structure of the structure or organize high-quality heating of the interior during the cold season.
- Carry out interior decoration with reliable, durable and easy to clean materials.
After completing the finishing work, you can begin the final stage of arrangement - organizing the interior of the garage. To do this, you need to draw up a detailed plan of the premises and determine what and how exactly will be stored in it, in addition to the car.
Garage plan for a car with estimated dimensions
As a rule, the wall farthest from the entrance to the garage is allocated for racks and shelves. If the dimensions of the room allow, it is advantageous to equip the side walls with shelves
If there is a lack of free space in the garage, special attention should be paid to the space under the ceiling, as well as above the car itself. Shelves equipped on the upper level will allow you to relieve the lower part of the room by storing things that need to be used from time to time.
Wooden shelves on a metal frame under the garage ceiling
The configuration and dimensions of the racking system depend on the size of the garage and the needs of its owner. The materials from which the shelves will be made must be strong enough to support the weight of the items being stored. For example, tiers can be made of thick plywood or boards, and the frame can be made of metal pipes or corners, but other options are also possible.
Wooden shelving system for a garage
The method of assembling and installing the rack system depends on the material used to decorate the garage, as well as the design features of the structure itself. In many cases, shelves are hung on the walls, and racks are installed directly on the floor. However, shelves can also be hung from the ceiling, while to increase the stability of a separate rack, its frame is often equipped with fastenings for walls, floors and ceilings.
Open Hanging Garage Shelving System
Connection by welding or bolting
Metal structures assembled with bolts are easier to make than welded racks, but their rigidity is low, since there are backlashes at the joints. To increase stability, the frame is attached to the wall with plates with holes screwed to the posts. They are nailed down with crutches or dowels. They are attached to a wall made of foam or cinder blocks with anchor bolts. The prefabricated option is chosen if rearrangement is expected in the near future or there is no possibility of welding. Perforated angle frames are assembled without bolts. The horizontal crossbars have hooks that are inserted into the grooves of the posts. However, such a connection also suffers from backlash. Therefore, when installing high racks, the structure is welded.
Types and purpose
Professionals recommend carefully considering all the details for making shelves and racks with your own hands, this also applies to the type of construction.
Most products are needed to store tools or parts of various sizes.
At the same time, there are several types of classification, the first of which talks about the design features:
Open. Necessary for quick access to a certain thing. The open type of shelves is divided into wall-mounted and hanging. Wooden or metal bases are hung on the wall using corners, the fastening of which can be dismantled or permanent. Special anchors must first be installed on the wall to hold the entire structure.
It is recommended to divide into cells for certain types of tools or small parts. For example, it is possible to sort different types of screws.
Common materials used are wood or metal. In rare cases, the structure can be made of plastic. However, based on practice, the ideal option would be to implement a combined type design.
The following assembly options are suitable for making your own:
Removable or mobile. The shelves form a rack with wheels on the lower tier. The mobile base will ensure optimal load distribution.
- Permanent. The shelving system is designed for specific areas that need to be pre-allocated. To do this, you should initially create drawings that involve dividing the garage into several parts. The standard option includes one-time assembly and fastening of the integral structure with brackets.
- Collapsible products. They are convenient because they can be expanded and easily dismantled in case of replacement or renovation of the premises. The height and number of shelves can be adjusted, and it is also possible to rearrange the shelves to a new location.
- Attic shelf. Hanging shelves are made of a corner and a metal profile, which serves as a base. The entire structure is usually attached to the ceiling or beams, thereby saving space in the garage compartment. For fastening, you will need to install special hooks; they need to be driven in or welded to the ceiling beams. This way they can be easily disconnected if necessary.
- Rotating products. These structures are not intended for storing large items. Their main advantage is saving time in searching for suitable parts. For example, self-tapping screws or nuts.
When choosing a product, you should start from the parameters of the room. It is also necessary to remember that the more, the better, the more spacious and convenient.
Requirements for racks
To ensure that the metal rack is safe to use, the installation is guided by the requirements of GOST 16140-77:
- distance between racks 0.9 - 2.9 m;
- rack width 0.45 - 1.35 m;
- the curvature of the posts and crossbars should not be more than 3 mm per 1 m or 0.1% of the length;
- permissible deviation of the racks from the vertical is 1 mm per 1 m without load, and under the influence of weight 4 mm, but not more than 6 mm in length;
- sharp corners and edges must be smoothed;
- if the load does not exceed 60 kg, the shelf does not need an additional bar (stiffening rib), for 90 kg one crossbar is installed in the middle, for 120 kg - two;
- Cracks, lack of penetration, sagging, slag inclusions larger than 1 mm in size, and undercuts deeper than 0.5 mm are not allowed on welded seams.
Assembly of metal and wooden structures
Planning to make a wooden or metal rack or shelves with your own hands is half the battle. You will need to realize your plans, build your dream, and translate it into wood or metal.
The assembly of homemade products is often not given due attention, being carried out in a hurry, so “home” designs, for all their advantages, look unattractive, worse than factory ones. Before installation, the iron frame is finally adjusted, sharp edges are sanded, and preparations are made for future painting. Suitable installation methods include welding, bolting - anything that will provide the required rigidity.
It is easier to work with wood - it is fastened with nails, self-tapping screws of the required length, and corners. It is better to drill holes, keeping in mind the tendency of the material to chip and split. For wood, a prerequisite is treatment with compounds that prevent rotting and fire. The chosen assembly method must guarantee:
- relative ease of implementation;
- reliability, structural rigidity.
Taking into account these nuances, building a rack is not as difficult as it seems at first. If, of course, you plan correctly and provide for as many little things as possible that may affect the progress of work in the future.
How to assemble a rack from an aluminum profile with your own hands
Assembling a rack with your own hands from a profile can be done even by a person taking up this task for the first time. It is easier to work with than wood.
The main advantage of the modular design is the ease of assembly from a ready-made kit
Materials and tools
To calculate how much material is needed, first sketch out a sketch indicating the dimensions and number of shelves. Profile dimensions are selected depending on the expected load. To connect the parts, you will need self-tapping screws with press washers, since their fastening is more reliable. It is better to take pointed ones, since drill ones make large holes, so the strength is reduced. Shelves are made from boards 2 - 3 cm thick, 10 mm or more plywood, OSB sheets no thinner than 12 mm.
To work you need to stock up on tools:
- Tape measure, pencil or felt-tip pen, square for checking angles.
- Metal scissors for cutting profiles.
- Screwdriver. If you screw in each screw manually with a screwdriver, it will take several days to assemble the frame.
- A wood hacksaw for cutting shelves. The process will speed up if you have a circular saw or jigsaw.
Build process
When the materials and tools are prepared, begin assembly:
- On the profile, mark the length of the racks, crossbars, and crossbars along the width of the shelves. To prevent the rack from turning out crooked due to errors with the dimensions of the workpieces, you need to re-check the correctness of the markings.
- On the side walls of the profile, cuts are made to the base and bent at this point. The workpiece is cut along the fold line.
- Longitudinal cuts are made on the crossbars to a depth equal to the width of the profile of the vertical supports. Internal bends, if any, are cut off.
- The crossbars are inserted into one another to form a rectangular cross-section. The cut ends are bent 90⁰. You need two of these parts for each shelf. They are installed on both sides of the frame.
- The assembly of the sidewalls, so that there are no distortions, is carried out on a flat surface, possibly on the floor. Cross members are inserted between a pair of vertical supports. After checking the corners, each bend is screwed with 1 - 2 self-tapping screws.
- After both sidewalls are ready, the rack is assembled from the profile. First install the lower crossbars, then the upper ones. If no distortions are found during inspection, the rest are fixed. It is more convenient to screw in the screws by placing the frame on its side. Having secured the parts on one side, it is turned over to the other.
- On profile racks with wide shelves, additional supports are installed from below in the middle of the lower crossbar. After determining the height, bends are made on them and screwed with self-tapping screws.
- After measuring, the shelves are cut. To increase the rigidity of the frame, cutouts are made in the corners so that they extend onto the side crossbars. To fasten wood, it is better to use self-tapping screws with fine threads.
Hanging shelf with studs for garage
Hanging shelf with studs for garage
If you want to save useful space in the room, you can make a hanging shelf with your own hands and attach it to the ceiling.
Materials required for the manufacture of the structure
- Material for flooring the bottom of the shelf. You can use plywood, fiberboard sheets (the thickness of the material should be more than 2 cm).
- Large anchors (4 pcs.).
- Hex nuts - couplings for couplers (4 pcs.).
- Regular nuts (12 pcs.).
- Hairpins (4 pcs.).
- Large diameter flat washers (8 pcs.).
- Grover washers (4 pcs.).
Tools for work
- Drill with a drill bit for wood. The diameter of the drill must match the diameter of the stud.
- A hammer drill for drilling holes in the ceiling for mounting anchors. The drill should be slightly smaller than the diameter of the anchor.
- Wrenches, their markings must match the size of the nuts used.
- Jigsaw.
- Screwdriver.
- Bubble level.
Work order
Hanging shelves
Step 1. To begin, cut out a shelf of the required width and length from a sheet of plywood or fiberboard.
Hanging shelves
Step 2. To enhance the strength of the material, you can attach a metal profile equipped with internal stiffeners to the ends of the slab.
Shelf manufacturing process
Step 3. Holes for the pins are marked along the edges of the shelf. It is worth knowing that it is advisable to drill 5-7 cm from the edges of the slab. If the holes are located too close to the ends, the material may crumble under the weight of the items placed on the shelf.
Step 4. After the holes are drilled, you need to attach the shelf to the ceiling and use a pencil to transfer the location of the holes to the ceiling. This way the structure will be positioned without distortion and you won’t have to worry about the studs becoming deformed.
Holes for anchors are drilled in the ceiling and dust is removed from them. The anchors are driven into the concrete all the way and the nuts are tightened.
Anchor bolt
Driven anchor
Long metal studs connect to anchors placed on the ceiling. The connection is secured using coupling nuts. It is also advisable to secure the connection with an additional regular nut, which is screwed onto the thread of the stud.
Anchor attachment
Anchor fastening.png
Attaching an anchor to the ceiling
Step 5. After the studs are firmly fixed to the ceiling, the period of installing the shelf begins. A nut is screwed onto the stud, then a washer. After this, a shelf is strung on the ends of the studs.
The pin is secured
The shelf is fixed using a Grover washer and a control nut. The washers protect the shelf holes from breaking under loads. The bushing serves as protection against loosening of the fastening nut. You can use two nuts for safety and greater structural strength. The final adjustment of fastening fittings is carried out according to the level.
Hanging a shelf
Hanging a shelf
Fastening the ring nut under the shelf
This hanging shelf will significantly save space in the garage. The only drawback is the mobility of the structure. You can eliminate it using a special metal corner. One edge of the corner is attached to the wall, the second - to the base of the shelf. This way the entire suspended structure is fixed. Also, a metal corner will strengthen the shelf, which will affect its durability.
How to make a metal rack from a profile pipe with your own hands
Depending on the capabilities, the profile pipe frame is assembled with bolts or welded. An alternative option made from metal corners will be cheaper, since their price is lower. To simplify installation, make a combined rack with your own hands. Instead of a pipe for the side posts, use a metal corner.
You can make racks of any size and configuration from profile pipes
Preparatory work
To determine the dimensions of a rack made from a profile pipe, you need to measure the location of its installation. When installed along the entire length of the wall, its sides should not reach the corners by 10 - 15 cm. A metal structure for a garage where there is little space is made up to the ceiling. Due to this, you can reduce the length and width without sacrificing capacity. The height and depth of the shelves depend on the size of the items being placed. Having decided on the parameters, drawings are drawn up indicating the general dimensions, dimensions and cross-section of the parts. Even a simple sketch will help you avoid mistakes when cutting workpieces and installation, as well as accurately calculate the amount of materials.
Corner shelf
Metal corner is a reliable material suitable for constructing structures that can withstand significant weight loads. You can use it to make a rigid hanging frame for storing wheels. Moreover, the metal must be painted or coated with an anti-corrosion primer. The rules for storing wheels require that they be installed in a vertical position, and they can be placed at any height, even under the ceiling.
If you are planning a multi-tiered corner shelf, leave the bottom part for the heaviest items
A corner shelf can be made in the form of a stable multi-tiered structure, on which it is convenient to store heavy and large items. To do this, first of all, they determine what exactly will be located here. The most bulky and heaviest things are usually placed on the bottom shelf, so the distance from it to the next upper horizontal surface should be significant.
Design + drawing
A corner shelf is a simple design consisting of several elements:
- vertical racks;
- horizontal frame crossbars;
- steel or wooden sheets laid on them.
The design process consists of several stages:
- decide what will be on the shelves;
- find the optimal distance between them;
- choose the number of shelves;
- are determined with other geometric design parameters: the width and depth of the horizontal panels, the height of the racks.
Required tools and materials
To make shelves you will need the following materials:
- metal corner 20x20x3 mm;
- sheet metal 1.5-2 mm thick (can be replaced with plywood or OSB 9-12 mm thick);
- anchor bolts No. 8;
- bolts M6x30 DIN 933;
- metal studs with external thread M6x40;
- M6 washers;
- M6 nuts.
The listed fastening elements (studs, bolts, nuts and washers) are necessary if a prefabricated metal frame is being installed. The structure can be made in another way - connecting its elements to each other using welding.
To complete the work you will need the following tools:
- drill and metal drills;
- spanners;
- roulette;
- bubble level;
- marker or simple pencil;
- grinder with a disc for metal.
Manufacturing instructions
Step 1. Using a grinder, cut the metal corner into sections equal to the height of the vertical posts. For a standard design, 4 supports will be required.
Step 2. Markings are made on the wall in the selected location: mark the location of two vertical supports, spaced from each other at a distance equal to the length of the shelves.
Step 3. Prepare pieces of metal corner for constructing frames of horizontal shelves.
Step 4. The shelves themselves are cut out of sheet metal or OSB/plywood. If the frame dimensions are 30x1200 or 60x1200 mm, fabrics of 288x1188 or 588x1188 mm are prepared, respectively.
Step 5. The frames are assembled using the chosen method: by welding or using bolts with nuts and washers.
Step 6. In accordance with the design, install the upper and lower shelves using welding or bolted connections.
Step 7. Place the structure against the wall in accordance with the previously made markings.
Step 8. Attach the vertical posts to the wall using M8 anchor bolts.
Step 9. Install the frames of the intermediate shelves.
Helpful tips and layout ideas
The functionality of a metal rack will improve if you implement the recommendations of knowledgeable people:
- to increase the number of shelves for storing jars with blanks, they are made 30 cm high;
- in order not to be distracted from work by searching for what you need in garages and workshops, workbenches are built into the storage system;
- metal rack on wheels with a stand for tools, convenient to roll out for repairs on the street;
- to increase the usable area of the greenhouse, racks are installed, on the shelves of which boxes with soil are placed;
- space for wheels and bulky items can be left under the bottom shelf, raising it 60 - 70 cm from the floor;
- If you make a drawer with compartments for hardware on one of the shelves, they will always be at hand.
Example of rack layout 1
Example of rack layout 2
A self-made metal rack is not only cheaper than a factory one, but also more convenient to use. It is collected taking into account the characteristics of the room, the number and size of objects. The assembly of a metal structure with the required parameters can be performed even without a welding machine.
Layout, diagrams, drawings, ideas
In the garage you need not only a rack, but also a workbench and a stand for hand tools - all kinds of keys and other small things, of which there are a lot and it is difficult to come up with a specific convenient storage place.
The workbench can be made in the center of the rack. This is convenient - everything you need will be at hand, you won’t have to constantly go to the shelves.
Garage shelving with workbench is convenient
The workbench can be part of the system, or you can make two separate modules, between which you can install the required table. If you don’t like this arrangement, you can change the configuration - at least put it at an angle.
As for the tool stand. There is a factory option - a perforated sheet of metal with holders hung on it. The idea is very good except for the price.
Comfortable))
As usual, there are also several homemade projects (what would a garage be without them) on the same topic. The ideas are simple to implement, maybe not so elegant, but convenient:
- On boards, chipboard sheets, plywood, place nails under each tool. To avoid confusion about where to hang something, trace the instrument in place and paint it with some color.
Everything is in order and in its place
- For heavier equipment - large keys, etc. You can use a mesh onto which you weld hooks from wire. Nail the mesh to the wall.
Option for heavier and bulkier tools
- Make a bar with holes cut in it into which tools are lowered.
This tool stand is very easy to make with your own hands.
And if desired, all this can be put on wheels - to make the tool stand mobile. This is the case if during the warm season you prefer to work with the machine outside.
You can easily roll back to where you want
Well, for inspiration... so that all the tools are in place))
Full order))
Metal or wood?
When deciding on the material from which you plan to order or make a rack yourself, you should pay attention to the positive, negative characteristics and the feasibility of using a product made from a particular material.
First of all, there are several important factors to consider:
- what type of rack will be used, where they will be located;
- total load on the product (what exactly will be stored: dimensions, weight, quantity);
- temperature indicators, percentage of humidity and other characteristics of the room.
Why is it so important to consider all of the above? Take wooden shelves for example. Despite the fact that a well-dried board is practically not affected by temperature changes, it is very sensitive to high humidity, which can lead to many negative processes: fungus, deformation, mold. To neutralize such consequences, the future wooden product should be treated with special antiseptics (substances that kill biological pests). Do not forget also that wood is highly susceptible to the influence of chemicals and has a high degree of combustion.
Unlike a wooden one, a metal garage rack:
- resistant to chemical substances;
- with low weight it can withstand heavy loads. The weight that one shelf can support is 120 kg, and with appropriate reinforcement, up to 300 kg;
- it is not afraid of even sharp fluctuations in temperature and changes in humidity (provided it is painted with a polymer dye);
- does not require special knowledge and is quickly assembled even by a non-professional.
Original options for shelving structures
Anyone who believes that a rack is a rough frame with shelves is deeply mistaken. Indeed, for the basement and garage you don’t have to imagine too much. Strength, durability and functionality are the main slogans for these premises.
For the home interior, on the contrary, I want to do something special and non-trivial. Therefore, home-made masters spare no time and effort to capture our imagination. A couple of oak boards and a few glass bottles are all that is needed to create an original design.
Despite its simplicity, the strength of such a rack is quite high. You can store not only books on it, but also use it to display your wine collection.
Anyone who has dealt with high shelf structures knows that without a good ladder it is impossible to reach their upper tier. Why not use shelves as steps - a resourceful person thought and created such an original system.
The classic frame shelving rests on the floor, and to install the rope shelving you only need two hooks in the wall. Of course, it won’t be possible to store heavy cans of preserved food on it, but it is perfect for books, photographs and souvenirs.
You can make a rack with your own hands so that others will appreciate your creative nature using steel water pipes and fittings. This design looks perfect in an industrial-style interior. In addition, it is quite appropriate in an ordinary apartment.
Pay attention to the original way of mounting the shelves. They are mounted on racks according to the principle of a children's “pyramid”, tier by tier.
This rack does not have rear support posts. The high rigidity of a steel pipe reinforced with tees makes it possible to eliminate them. This design can be placed anywhere: in an apartment, on the veranda, in the attic or cellar.
If your house has a staircase leading to the second floor, then the free space under it can be adapted for shelving. It will turn out functional and beautiful, as in photo No. 5.
Read also: Tool for measuring internal and external threads
Having studied the original homemade options, we will consider the sequence of design and assembly of wooden and metal shelving.
Main technical characteristics of shelves for racks
The main components of any rack are: racks, crossbars, shelves, and, if necessary, transverse ties. Tightenings allow you to strengthen the product and are two metal strips that are welded or screwed to the racks.
For the most convenient use of a metal garage rack, during design and installation you must adhere to a number of rules:
- shelves for any type of structure must withstand a certain load and not be deformed;
- the design should be as functional and compact as possible;
- The overall dimensions of the shelves can vary: width - 1.5 - 2 meters, height - 20 - 100 centimeters, depth - 20 - 20 centimeters.
In addition to choosing the main design, you can also play with the type of shelves themselves, the main ones being:
- open. Can be vertical (for wheels), horizontal. When installing such shelves, all your things will be in the public domain;
- closed. Help prevent the loss of things;
- removable. They make it possible to vary the overall dimensions (length and height) of the structure;
- separated. A distinctive feature of a storage system with such shelves is that the shelves are conventionally divided into cells, allowing you to organize and systematize things.
Read also: How to determine the thermal conductivity of a material
Schemes for placing shelves in the garage
One of the stages on which, if not everything, then a lot depends, is the arrangement of shelving, the choice of a place for arranging shelves. It will depend on this whether additional elements in the garage will bring freedom from the “trash” accumulated in the corners and on the garage floor or will add problems with free movement, parking of a car or motorcycle.
An old, proven method is to draw a floor plan on paper, taking into account the opening of the gate leaves and possible movements of people. Most often, without compromising the free space, the far wall located opposite the entrance is used for storage. And already in this section of the garage they allow their imagination and sense of beauty to unfold.
When planning the placement of shelves vertically, do not forget that the step should ensure ease of use and not be too frequent or overly stretched.
If there is not enough space, it is permissible to hang shelves around the entire perimeter, but you must remember that any accidentally dropped can or bolt will “land” on the car body or may lead to injury to people in the room.
Manufacturing technology
For convenience, we divide the manufacturing process into several stages:
- Drawing up a drawing;
- Preparation of materials;
- Frame assembly;
- Finishing.
Next, we will look at the work process step by step from start to finish.
Drawing up a drawing
Before assembling a metal rack, you need to decide on its design and basic parameters. To do this, first of all, consider the dimensions of the structure. To be on the safe side, go to the garage and measure the area where you want to install the furniture.
In addition, decide on the height of the future product. In a garage, especially if it is small, it is advisable to make a storage system right up to the ceiling. Due to this, you can reduce its size, i.e. length and depth, without sacrificing capacity.
When parameters such as length, depth and height are known, decide on the distance between the shelves. To do this, think about what items you are going to store.
For example, the height of the wheel storage compartment should be several centimeters greater than the outer diameter of the wheel, i.e. the distance between the shelves should be approximately 65-70 cm. Make the remaining compartments smaller so that more shelves can fit.
As for the design, we will make the most practical option - a wall frame. It has two rows of racks, so it is not attached to the wall and, if necessary, can be moved from place to place.
All racks are connected to each other by longitudinal and transverse crossbars. These same crossbars are also the basis for the shelves. Accordingly, the distance between the shelves depends on their position.
That, in fact, is the whole structure. Therefore, as we have already said, DIY metal shelving is quite simple to make.
Advice! When you have decided on all the main parameters, be sure to “sketch” a drawing on paper, even by hand, and indicate on it the dimensions of all parts in millimeters. Thanks to him, you will not go wrong when making blanks and assembling the frame.
Materials
The frame of the structure will be made from profiled pipes 20x20 mm. The wall thickness must be at least 2 mm so that the structure has sufficient load-bearing capacity.
As for the shelves, they can be made from any boards, slats, plywood, OSB, reinforcement rods or any other materials that you have at hand.
Note! Instead of a profiled pipe, you can use a corner, the price of which is slightly lower. However, a product made from a pipe looks neater.
It must be said that the assembly of the frame can be done in two ways:
- By welding - in this case, to connect the parts except a welding machine and consumables for it, you will not need anything;
- Bolted method - this assembly option is suitable for those who do not have a welding machine. Its principle is based on the use of special fasteners (brackets) for perforated pipes, which are tightened with bolts.
If you are going to assemble the frame using the second method, count on the drawing how many and what connections the structure has, and purchase the appropriate fasteners.
Among other things, we will need paint and varnish material to immediately paint the frame and shelves. If this is not done, the structure in the garage will quickly become corroded and begin to rot.
Frame assembly
So, we’ve sorted out the preparatory stages, now let’s look at how to make metal racks with your own hands.
The sequential action is as follows:
Advice! Before assembling the metal rack, prepare a workbench or large table on which you can secure the parts with clamps. This will greatly simplify the workflow.
Advice! To avoid making mortgages, you can use a corner to make jumpers.
We can say that we have already made a metal rack with our own hands. All that remains are the small touches - painting and making shelves.
Making a product design
Experienced car enthusiasts recommend using one of the garage walls for shelving. You choose the height and length of the product yourself, but as a rule, shelves are made from the floor to the ceiling. At the bottom, the height of the shelves is greater than the rest, since this is where the largest items are stored. You can make the upper shelves at a minimum height; small items are often stored there.
Please note that a gap of about 30 - 50 centimeters must be left from the bottom shelf to the floor. This will allow you to clean under the shelves properly. In addition, leave a distance from the side walls to the rack posts of about 10-20 centimeters, this will make it easier for you to carry out installation.
Drawings and options
Many shelving drawings are available on the Internet. But in order to choose the right one, you need to decide on the future use of the structure. For storing tools and spare parts in the garage, a rack measuring 500 x 2000 mm with four shelves of 450 mm each is suitable. But for a cellar with conservation, you can make more shelves - every 300 mm. Warehouse structures require an individual approach, taking into account the size of the stored boxes.
The most common shelving options are:
- design 500 x 1800 mm with four shelves;
- rack 600 x 2000 mm with three shelves;
- combined models measuring 500 x 1800 mm with a high shelf at the bottom of 700 mm and three shelves for small parts of 350 mm each.
If the items for which the rack is designed will constantly change in size, then there are universal designs where the distance between the shelves is adjusted. To do this, several holes are drilled in the main racks at the level of future shelves. Only the main frame (cube) is welded, and all internal elements are bolted. This way you can add or remove the number of shelves, as well as change the distance between them. This is especially convenient to do if the main racks are from a corner. Holes are drilled in them and the shelves, and for fixation two bolts are used on each side.
If you need a long rack, it is recommended not to make it on the entire wall, but to leave small gaps of 100 mm from the side walls to make it more convenient to install the metal structure in place. There are no strict size restrictions on the depth of the shelves, but it is worth considering the convenience of retrieving items. For example, if the depth is 1000 mm, then not everyone has enough arm length to reach the part under the wall. But if the structure stands in the middle of the workshop, and there is access from both sides, then you can make shelves 1500 mm deep.
The height of the racks is made individually. It all depends on the materials available and future use. But in any case, it is not necessary to make the height up to the ceiling, because the upper part can also serve as a shelf, on which only a small threshold (150 mm) is provided so that the objects located there have somewhere to rest, if they are located vertically.
There are combined models of shelving, where there is a high shelf for large items (engine, wheel) and small parts. The reinforcement under the shelves depends on the future weight of the load. If these are heavy car parts, then it is worth welding an additional jumper under the middle of the shelf. Based on this, the number of main racks is determined. Excessively large spans will lead to sagging and deformation. But if the design is made for small parts, then the outer racks are quite enough.