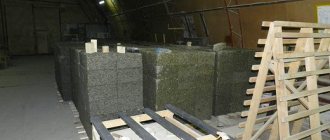
To restore order and free up space occupied by accumulated things, a metal rack is assembled. You can buy a ready-made design or make it yourself. If the weight of the objects is small, an aluminum corner is used as the material. To store preparations for the winter in city apartments, racks made of steel corners are installed on the balcony. To accommodate a large number of heavy objects, make a rack from pipes in a garage, shed, or cellar.
Advantages and disadvantages of metal shelving
The advantages of metal structures include:
- Reliability and durability. The shelves can support significant weight without damage.
- Easy to care for.
- Wear resistance. Even with intensive use, metal pipe racks retain their characteristics and appearance unchanged.
- Full compliance with fire safety requirements.
- Storage of items made of any material.
- The metal frame is resistant to moisture and temperature changes.
Disadvantages include:
- It is more difficult to make a rack from a metal profile than from wood;
- the price of metal structures is higher.
Types of shelving
When choosing a metal storage system option, the complexity of manufacturing and operating conditions are taken into account:
- Modular structures are assembled from perforated profiles of different sizes. They are reliable, and the height of the shelves can be easily changed if necessary. However, the price is steep.
- Aluminum frames are attractive in appearance; their low weight allows you to quickly move the collapsible rack to another place. The disadvantages are the high price and deformation from impacts.
- Shelves of any size and configuration can be made from profile pipes. The shelves can withstand a lot of weight. For manufacturing you will need a welding machine and skills in working with metal.
- In terms of price and labor costs, frames made from metal corners are similar to the previous option, but are inferior in strength and aesthetics.
- The CD profile for fastening drywall is good because welding and expensive tools are not required to assemble the frame. Sold in building materials stores at affordable prices.
For safe operation - accurate calculation
Thank you for choosing the Factory of commercial equipment for Standes stores.
We want the equipment purchased from us to serve you for a long time, ensure the safety of goods and be safe. Therefore, before placing an order, please accurately calculate the overall dimensions of the retail shelving, taking into account the maximum permissible load. And although we are absolutely confident in the strength and safety of our equipment, we advise you to carry out calculations with a small margin. This will allow you to avoid unpleasant surprises if, for example, promotional items in packaging of greater weight for the same price are placed on the rack or conveyor belt of the checkout box. The equipment we produce will serve you for a long time and reliably, this is guaranteed by the professionalism of our employees, high quality materials and adherence to manufacturing technology. Call us and our consultants will help you perform the calculations.
Connection by welding or bolting
Metal structures assembled with bolts are easier to make than welded racks, but their rigidity is low, since there are backlashes at the joints. To increase stability, the frame is attached to the wall with plates with holes screwed to the posts. They are nailed down with crutches or dowels. They are attached to a wall made of foam or cinder blocks with anchor bolts. The prefabricated option is chosen if rearrangement is expected in the near future or there is no possibility of welding. Perforated angle frames are assembled without bolts. The horizontal crossbars have hooks that are inserted into the grooves of the posts. However, such a connection also suffers from backlash. Therefore, when installing high racks, the structure is welded.
Features of installing shelving at an angle
The corner type of rack is perfect for installation in small spaces. For example, it is suitable for a loggia for pots with indoor plants or narrow cellars for arranging jars of pickles.
The collection principle is similar to stationary racks, only a few points differ:
- In the place where the corner shelf is attached, you need to install additional reinforcing metal corners, firmly securing them.
- Fix the corner shelves to the racks using corners.
- Connect the structure with thrust bearings.
- Push the vertically placed rack into a corner and evaluate the correctness of the assembled structure.
Requirements for racks
To ensure that the metal rack is safe to use, the installation is guided by the requirements of GOST 16140-77:
- distance between racks 0.9 - 2.9 m;
- rack width 0.45 - 1.35 m;
- the curvature of the posts and crossbars should not be more than 3 mm per 1 m or 0.1% of the length;
- permissible deviation of the racks from the vertical is 1 mm per 1 m without load, and under the influence of weight 4 mm, but not more than 6 mm in length;
- sharp corners and edges must be smoothed;
- if the load does not exceed 60 kg, the shelf does not need an additional bar (stiffening rib), for 90 kg one crossbar is installed in the middle, for 120 kg - two;
- Cracks, lack of penetration, sagging, slag inclusions larger than 1 mm in size, and undercuts deeper than 0.5 mm are not allowed on welded seams.
Design Features
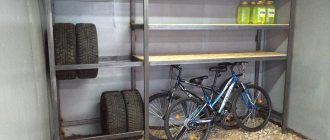
A shelving unit is a type of multi-tiered shelf that has its own vertical supports. Different materials can be used for their manufacture, but most users prefer a metal profile. It has the highest mechanical properties, is able to withstand enormous loads, and works equally well in any conditions.
The main advantage of the rack is the ability to use the volume of premises with maximum rationality. As a rule, they are made to the full height of the room so that all available space can be used.
If the parameters of the rack are correctly selected, the owner gets not only the opportunity to neatly fold and store things or other items, but also take them at any time without having to dig through a pile of various utensils.
Using a profile for making shelving is one of the most rational and reasonable solutions. An alternative would be to make it from wooden blocks, but they are less durable and cannot work in conditions of high humidity. If steel parts rust, then wood rots and quickly turns into dust.
How to assemble a rack from an aluminum profile with your own hands
Assembling a rack with your own hands from a profile can be done even by a person taking up this task for the first time. It is easier to work with than wood.
The main advantage of the modular design is the ease of assembly from a ready-made kit
Materials and tools
To calculate how much material is needed, first sketch out a sketch indicating the dimensions and number of shelves. Profile dimensions are selected depending on the expected load. To connect the parts, you will need self-tapping screws with press washers, since their fastening is more reliable. It is better to take pointed ones, since drill ones make large holes, so the strength is reduced. Shelves are made from boards 2 - 3 cm thick, 10 mm or more plywood, OSB sheets no thinner than 12 mm.
To work you need to stock up on tools:
- Tape measure, pencil or felt-tip pen, square for checking angles.
- Metal scissors for cutting profiles.
- Screwdriver. If you screw in each screw manually with a screwdriver, it will take several days to assemble the frame.
- A wood hacksaw for cutting shelves. The process will speed up if you have a circular saw or jigsaw.
Build process
When the materials and tools are prepared, begin assembly:
- On the profile, mark the length of the racks, crossbars, and crossbars along the width of the shelves. To prevent the rack from turning out crooked due to errors with the dimensions of the workpieces, you need to re-check the correctness of the markings.
- On the side walls of the profile, cuts are made to the base and bent at this point. The workpiece is cut along the fold line.
- Longitudinal cuts are made on the crossbars to a depth equal to the width of the profile of the vertical supports. Internal bends, if any, are cut off.
- The crossbars are inserted into one another to form a rectangular cross-section. The cut ends are bent 90⁰. You need two of these parts for each shelf. They are installed on both sides of the frame.
- The assembly of the sidewalls, so that there are no distortions, is carried out on a flat surface, possibly on the floor. Cross members are inserted between a pair of vertical supports. After checking the corners, each bend is screwed with 1 - 2 self-tapping screws.
- After both sidewalls are ready, the rack is assembled from the profile. First install the lower crossbars, then the upper ones. If no distortions are found during inspection, the rest are fixed. It is more convenient to screw in the screws by placing the frame on its side. Having secured the parts on one side, it is turned over to the other.
- On profile racks with wide shelves, additional supports are installed from below in the middle of the lower crossbar. After determining the height, bends are made on them and screwed with self-tapping screws.
- After measuring, the shelves are cut. To increase the rigidity of the frame, cutouts are made in the corners so that they extend onto the side crossbars. To fasten wood, it is better to use self-tapping screws with fine threads.
What materials and tools will be needed to make a rack?
To store fairly heavy items, racks are made from steel equal or unequal angle 40x40, 45x45, 50x50, 30x50 mm with a wall thickness of 3-5 mm. Typically, hot-rolled corner steel is used for these purposes, which is primed and painted to increase corrosion resistance. For this purpose, it is convenient to use “2 in 1” primer enamels, which serve as both a primer and a finishing coat. If for the manufacture of a structure you use a corner that has been used and has become covered with rust, then it is better to purchase “3 in 1” metal paint. It functions as a converter of rust, soil and decorative enamel.
For flooring, plywood, OSB, chipboard, and less often sheet metal are used. To store large items, the covering of the shelves is made of bars located with gaps; for storing small items and installing cans of preserves - from plywood, fiberboard, chipboard, OSB, boards. Metal flooring is made in cases where it is planned to store heavy objects. A big disadvantage of wood is its low resistance to aggressive biofactors. The tree quickly rots, becomes moldy, and is damaged by insects. To extend its service life, the wooden covering is treated with antiseptic compounds. To increase resistance to fire - fire retardants.
To create a welded rack you will need a welding machine. Welding inverters are the most popular now. For welding ferrous metal up to 10 mm thick, machines can be used that provide a welding current of 160-180 A. The diameter of the electrodes is 3-4 mm.
- angle grinder (angle grinder, “grinder”) with a cutting wheel designed for metal work - cutting workpieces to size;
- cleaning wheel - for processing welds;
- drill or screwdriver, self-tapping screws with a drill-shaped end, washers with rubber gaskets for securing the shelf covering;
- electrodes;
- building level;
- a wood saw or electric jigsaw for cutting boards or plywood to size;
- measuring instruments;
- primer and enamel.
To carry out procurement and assembly work, you will need personal protective equipment - gloves and goggles.
How to make a metal rack from a profile pipe with your own hands
Depending on the capabilities, the profile pipe frame is assembled with bolts or welded. An alternative option made from metal corners will be cheaper, since their price is lower. To simplify installation, make a combined rack with your own hands. Instead of a pipe for the side posts, use a metal corner.
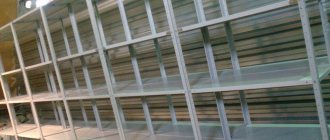
You can make racks of any size and configuration from profile pipes
Preparatory work
To determine the dimensions of a rack made from a profile pipe, you need to measure the location of its installation. When installed along the entire length of the wall, its sides should not reach the corners by 10 - 15 cm. A metal structure for a garage where there is little space is made up to the ceiling. Due to this, you can reduce the length and width without sacrificing capacity. The height and depth of the shelves depend on the size of the items being placed. Having decided on the parameters, drawings are drawn up indicating the general dimensions, dimensions and cross-section of the parts. Even a simple sketch will help you avoid mistakes when cutting workpieces and installation, as well as accurately calculate the amount of materials.
Base manufacturing technology
The second stage of work is preparing the foundation. Let's move on to its lower part. A thick board will be useful, equal in width and length to the dimensions of the rack. To add the necessary strength in this place, you can also nail cross bars.
The base consists of vertical and transverse slats.
We move on to the side walls if their presence is suggested by the design. If your budget is limited, you can replace wooden boards with plywood of an acceptable thickness. Its width should correspond to the lower base. The height must be according to the developed drawing.
Having prepared the sides, you need to use a pencil or chalk to mark the place where the shelves are attached. Their height can be different, depending on the objects that need to be placed in a given structure. Experts advise making the distance between shelves about 20 and 40 cm. You can use these two indicators to compactly place each item and make it universal.
The distance between shelves may vary. Another step is preparing the back wall. Some craftsmen do not use this part; the texture of the wall surface suits them. But if the design requires this shelving part, then it can also be made from thick plywood.
Helpful tips and layout ideas
The functionality of a metal rack will improve if you implement the recommendations of knowledgeable people:
- to increase the number of shelves for storing jars with blanks, they are made 30 cm high;
- in order not to be distracted from work by searching for what you need in garages and workshops, workbenches are built into the storage system;
- metal rack on wheels with a stand for tools, convenient to roll out for repairs on the street;
- to increase the usable area of the greenhouse, racks are installed, on the shelves of which boxes with soil are placed;
- space for wheels and bulky items can be left under the bottom shelf, raising it 60 - 70 cm from the floor;
- If you make a drawer with compartments for hardware on one of the shelves, they will always be at hand.
Example of rack layout 1
Example of rack layout 2
A self-made metal rack is not only cheaper than a factory one, but also more convenient to use. It is collected taking into account the characteristics of the room, the number and size of objects. The assembly of a metal structure with the required parameters can be performed even without a welding machine.
Assembly safety rules
First of all, before starting assembly, you need to familiarize yourself with the safety rules. The installation process must be approached with extreme caution. Let's look at the basic recommendations for safe assembly of metal shelving:
- Get personal protective equipment (helmet, gloves, hard shoes).
- The place where the assembly will take place must be spacious, without the presence of third-party objects.
- Good lighting is necessary.
- Use only serviceable tools that are free of any defects.
- The location for installing the future structure must be level.
- Each subsequent tier is installed after the previous one is completely installed.
- There should be no rush during installation.
- You should begin installation only in a sober state.
- Assembly should take place in a place protected from children.
- When installing the rack, the assembled structure should not be unstable; it is recommended to place additional support under the base or secure the rack to the wall with additional pins.
Subscribe to our Social networks